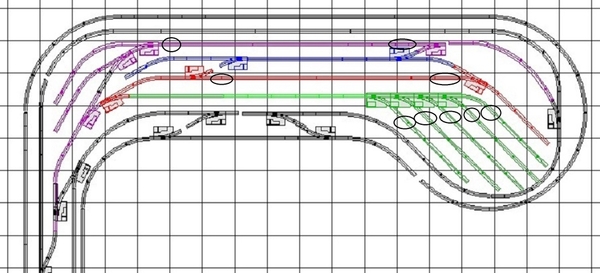
Great suggestions guys. I'm going to try to work on these this weekend. One point that's not included in my design (that Dave has built off and enhanced) is that there's a beam along the wall that I had to curve around. One of those in-field adjustments I tend to do without showing on the drawing. But, Chuck's point is spot on in that I could widen the yard a bit more and bring Dave's enhancements closer to fruition.
OK, now I owe you both a Christmas present! That's beautiful!
Wasn't sure it would actually fit, but I thought so and Dave proved it. You enjoying your yard a little better is all I need for Christmas.
Chuck
Now you can actually move several cars at once, so fewer trips through the switches. I think it's a pretty nice design (collective effort) given the track selections, space, etc. You have both arrival and departure tracks, a yard where a switcher can be breaking down while another builds up with 2 or more trains running. Chuck's suggestion really paid off.
Now, if you really want to get fancy, you can have 2 reversing switches.
Attachments
Wow, that's terrific! Just added to my to-do list for this Saturday and Sunday.
Just don’t forget you can place the switch further down if you want. Good luck!
@DoubleDAZ and @PRR1950 - Quick note to let you both know I'm making steady, but slow progress on the layout design above. All worth added efforts as I think the entire layout will be exponentially better and more fun.
Had some unfortunate supply shortages. Needed one more LH switch (and the dealer shipped me a RH switch which caused further delays....grrr) and quite a few more uncoupling tracks. The last uncoupling tracks arrive via Fedex today. Good problems to have for a good layout, but shipping is slow these days. My LHS unfortunately closed last year due to the death of the owner. Not a lot of shops around Cleveland carrying O27 tubular track these days. I also ran out of 3R Plastics rubber road ties but found them on Amazon.
I'm already looking to make two adjustments and wondered if you've got any ideas.
1. Would love to replace the O27 switch that allows engines to escape from the red to blue with an O42 switch.
2. Would also like to find a way to have engines scape from the purple track to the blue without using the mainline.
With any luck, I'll have the as-designed yard's track road-bedded, tied, and fastened down by tonight's Browns vs. Giants kick-off.
Then let the wiring begin. No ballasting until I've run it for a while.
Scott, thanks for the update, sorry about the supply problems.
As far as the switches go, the ones between the red/blue lines in my file and the photo are all O-42. There are 7 O-27 switches on the layout; 4 in the yard, 1 in the bottom reverse loop and 2 in the elevated section that is not shown.
As far as the purple to blue escape, the only way I can see is shifting the red and green lines down and everything above that up to make room to add an O-42 crossover. I don’t know if there is enough room in the space to move the outer main up. The yard switches would all have to be moved to the right a bit too, but I didn’t do that.
Attachments
Well Dave beat me to it with some good info. Here were my ideas.
Wow, tough questions:
1. Would love to replace the O27 switch that allows engines to escape from the red to blue with an O42 switch.
Maybe, but because the curve part of an O42 is wider than an O27, you might have to push the red-to-blue switch farther down the red track to allow the "curve back" to meet the blue track. But doing that would shorten the tail track for engine escape. A better alternative might be to move the left-most red-blue crossover as far left as possible and put another (opposite) red-blue crossover at the other end of the straight track (just before both red and blue tracks follow the curve). This actually lengthens the engine escape, but a major drawback to that idea is that it shortens the existing double-ended red-blue siding.
2. Would also like to find a way to have engines scape from the purple track to the blue without using the mainline.
The only way to do this requires another set of switches to connect purple to blue. Unfortunately, the distance between the two seems to narrow for the switches you are using to work. However, some brands of manually operated switches might work to achieve that goal, but switching track types comes with its own attendant problems.
Lastly, I just looked at your plan from a "reach" perspective. I hope you can walk all the way around your plan with ease for maintenance issues; otherwise, it's sure a long reach across that yard.
Chuck
Thanks guys. @DoubleDAZ, you're right, your last design had converted the escape switch from O27 to O42. I just hadn't made that change yet in reality. What I probably should've said around that area is that I'd like a long spur after the switch (to the right) for the engine. Right now, on my layout, it's about 23". I've got a couple engines that will push that limit or beyond, so they won't be able to pull up and then back through the switch from red to blue. Also aren't those 27" curves coming off that escape switch? I think most of my engines, even those rated for 31" will deal with a 27" curve like that, but there are a couple that concern me.
Regardless, you both gave me some more to chew on. The entry into the yard on the left plus the green and purple are laid, road-bedded, tied, and fastened. Looks great. Moving onto the blue and red, but **** if those additional uncoupling tracks haven't arrived yet. Set for "end of day" according to Fedex, so maybe I'll be laying track while watching the Browns v. Giants tonight.
SIRT,
I'm sorry, but I just don't understand your comment & pictures. Are you talking about a manual uncoupling tool?
Chuck
@DoubleDAZ and @PRR1950 - got the rest of my supplies right before Christmas and squeezed in time to get the yard finished. I did everything EXCEPT (1) the two switches that would give me reversing loops and (2) the switches from the purple to the blue. I might do one or both of those down the road.
I'm not operational yet; in fact, I decided to buy some backdrops from a local supplier and that will take an extra weekend or two (which is a month at my glacial pace) as I've got a bunch of wall prep to do. Figure better to do that now while the only thing in my way is unwired track.
Wanted to confirm with both of you where I located coupling/uncoupling tracks. I drew circles where I put them using Dave's rendering (since I don't still haven't bought RRTrack 5). I couldn't come up with a reason to have uncoupling tracks on the blue track where engines and cabooses will be stored. Make sense?
Attachments
Scott, it all looks good to me. I’ve been trying to find reasons to add one to the beginning of the green yard lead, but I haven’t come up with any. I don’t know that much about yards though.
Agreed. I saw the green yard lead as a means for the switcher to get to/from the storage spurs with a car or two.
If I had extra uncoupling tracks, I'd consider putting a 3rd in the middle of the red and purple tracks where trains will be getting assembled and disassembled. I've got the 5-6 of the 1019 tracks that are for both uncoupling and unloading, but their controllers take up a lot of real estate, and I'm trying to keep my control panel as small as possible. Just toggles for the switches and push buttons for the uncoupling tracks.
Scott,
If you plan to "park" anything on the blue tail track, you will need an uncoupler there, just after the switch into the tail. Otherwise, I agree with you and Dave.
Chuck
Chuck, the blue track is just a runaround for an engine coming off the red and purple tracks. It has some engine/caboose storage in the left end. I assume the engines don’t need an uncoupling track.
How are you going to leave a caboose on the left end?
Chuck, my engines uncouple using the DCS remote, so they can drop off without an uncoupling track. However, there will be a problem is 2 or more cabooses get connected to each other.
I'd put them at both ends of the all the colored tracks as you never know when you may want to use them as temporary storage when you are breaking up a large train to sort or making up a long train to depart. I've learned the hard way to never assume you will have an engine or tender with an automatic coupler at that end of a stretch of track - you may very well find yourself in the middle of a consist. Now if you are never going to be running that long of a train then disregard.
-Greg
@PRR1950 and @DoubleDAZ
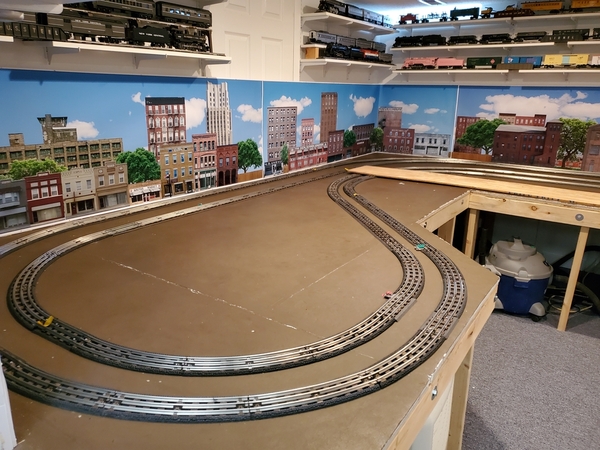
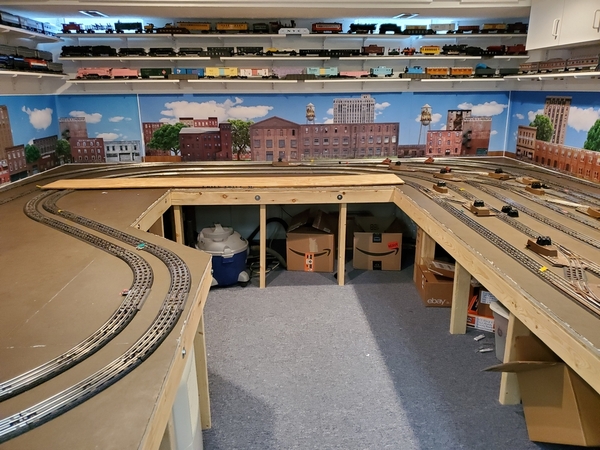
Finally got track laid and backdrops, originally not part of the plan, done. Start wiring and power this weekend.

Attachments
Looks real good; like the backdrops! Cautionary note: some of your curves are real close to table edge so consider putting some kind of barrier at each "close spot" to prevent equipment free-fall to floor in case of accidental or intentional (impish) derailments. Some put up wire (or strong thread) fences, some put up plexi-glass. Just make sure it is anchored strong enough to hold your heaviest engine.
Chuck
That really looks nice! I agree with Chuck about the potential for mishaps at the edges, but it’s easy enough to add protection.
Spot on Chuck and Dave about the barriers. That's in the plans as part of the "final assembly operation." For now, since I'm still climbing on top on the layout, I left them off. There's a fellow forum member here, not hugely active, but he has a TREMENDOUS layout. I don't call him out for fear of potentially alerting criminals to what he owns, but his belongs in OGR's magazine, it's that good. He used some clear plexiglass and I'm going to try that. Might adjust the track, too, for more space. Don't want mishaps!
I hit post too soon. I want to those both of you again for the help, guidance, and expertise on the yard. I'm SO happy with how it turned out. Not operational yet, but I can see where it's going and I like it a lot.
I hope you know you could tack on a piece of 1x to extend the edge a bit rather than move a bunch of track.
Great job, and I too admire the use and placement of the back drops. Are those from AngiesTracksideFlats ?
@chris a posted:Great job, and I too admire the use and placement of the back drops. Are those from AngiesTracksideFlats ?
Thanks! Got them from here. https://www.tracksideflats.com/


