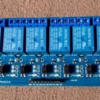
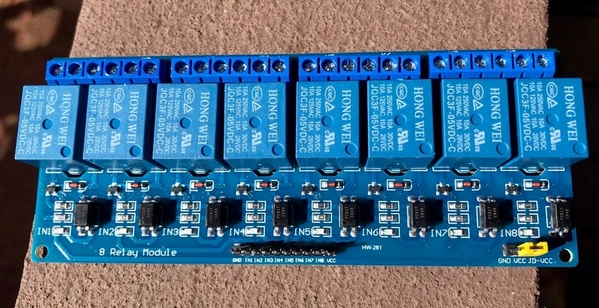
I recall a topic back 2-3 years ago where wiring these guys (like below) was discussed. I tried searching for it and came up dry. On ebay they come in 1, 2, 4, 6, and 8 relay versions. I bought a couple of the 8 relay versions back then, but they came with zero documentation. I found a document online that had a fair bit of info, the most useful of which is right at the end called Pin Wiring.

8 Way Relay Module-2

I tested one of them out the other day to see if I could make sense of it. Once I found out how it actually worked I edited the pin wiring section. Copy attached for anyone who can make use of it. But I have a question. The two methods of wiring seem to be 1) direct to the coil from the inputs, or 2) indirectly through the built in opto's, so the inputs are isolated from the coils. In both cases however it seems you need to ground the input to activate the relay. I could not find a way to trigger the relay with a positive input. Has anyone found a way to do this??

Rod

Attachments

Images (1)
  • 8 Way Relay Module-2
Files (1)
Last edited by Rod Stewart
Original Post

Replies sorted oldest to newest

@Rod Stewart posted:

.... In both cases however it seems you need to ground the input to activate the relay. I could not find a way to trigger the relay with a positive input. Has anyone found a way to do this??

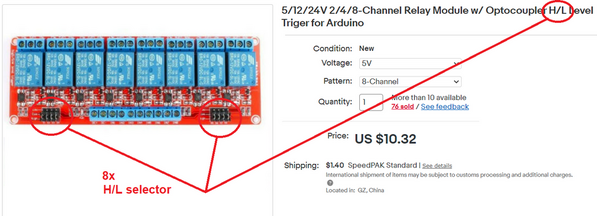
Yes. Buy a relay module that allows you to select either Hi or Lo level triggering.

8ch trigger polarity h or l

In example above, there are 8x 3-pin headers where you can select Hi or Lo level input triggering on a per-channel basis.  In eBay or wherever, add the search term "H/L" or "Hi/Lo" or similar.  They are widely available.

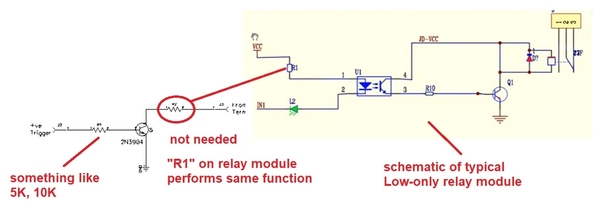
But if you are "stubbornly" determined to make your Lo-only module work with a Hi level trigger, you could add a garden-variety 10-cent NPN transistor and a 5-cent resistor on each input for which you want to invert the trigger polarity.  If not obvious I can draw this up.

Attachments

Images (1)
  • 8ch trigger polarity h or l
@stan2004 posted:

Yes. Buy a relay module that allows you to select either Hi or Lo level triggering.

8ch trigger polarity h or l

In example above, there are 8x 3-pin headers where you can select Hi or Lo level input triggering on a per-channel basis.  In eBay or wherever, add the search term "H/L" or "Hi/Lo" or similar.  They are widely available.

But if you are "stubbornly" determined to make your Lo-only module work with a Hi level trigger, you could add a garden-variety 10-cent NPN transistor and a 5-cent resistor on each input for which you want to invert the trigger polarity.  If not obvious I can draw this up.

Got it Stan thanks. Later I picked up a couple that are Hi-Lo selectable. Much more versatile.

So if I did want to "stubbornly" use them with a +ve trigger; you mean a circuit something like this?

Pos to Neg Relay Trigger

NOTE: J3 should show "From INx relay Terminal"

On the other hand a -ve input trigger should lend itself nicely to use with an insulated outside rail type trigger?

Rod

Attachments

Images (1)
  • Pos to Neg Relay Trigger
Files (1)

Rod: I have some of the blue low-level input modules that I bought prior to the ones with the option to choose either high- or low-level input triggering. With an Arduino, you simply use either:

digitalWrite(RELAY_PIN, LOW);

or:

digitalWrite(RELAY_PIN, HIGH);

That's all there is to it.

Leo, this would be great for someone who knows something about Arduino programming! That leaves me out.

Rod

@Rod Stewart posted:

...

So if I did want to "stubbornly" use them with a +ve trigger; you mean a circuit something like this?


invert

Even simpler.  You only need to add an external resistor and NPN transistor (2N3904).  The input circuit on the relay module has a suitable current-limiting resistor already.  The yellow-region copied from the video that Leo identified.

That is, as you apparently saw yourself you can apply "ground" to the relay module input and turns on without shorting or drawing undue current.  So you don't need the 2nd resistor to protect the 2N3904 from drawing too much current when it turns on.

@Rod Stewart posted:

...On the other hand a -ve input trigger should lend itself nicely to use with an insulated outside rail type trigger?

Yes...but a qualified-yes.

This would assume that your DC power supply for the relay module shares a common ground connection with the track AC power.

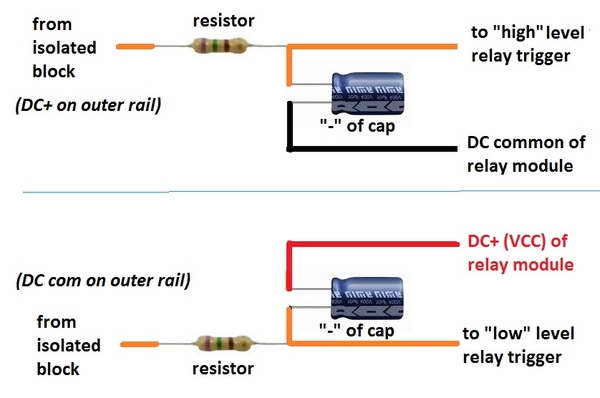
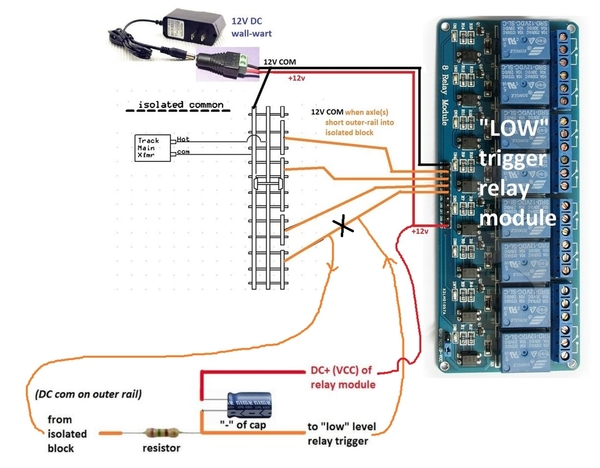
Additionally, for insulated-outside-rail triggering of relays, I recommend adding a 5-cent resistor and 10-cent capacitor to demote relay chatter when a consist enters or exits the triggering zone.  These relays are very quick so intermittent triggering from dirty track or wheels can cause signal-light flickering if, for example, the relay is driving a red or green signal light.  I know I've posted about this "phenomenon" in previous OGR threads and can find it if needed, but I found this diagram,,,

isolated rail rc filter

And if comfortable tinkering at the component level like this, you can add a 10-cent transistor to hold the trigger for many seconds of delay in response to a momentary trigger - sort of like the "delay" setting on a Lionel 153IR or MTH ITAD occupancy sensor.  Again, if there's interest I can dig up the OGR thread(s) on how to modify the bare-bones relay modules to add these train-useful modifications.

Attachments

Images (3)
  • invert
  • invert
  • isolated rail rc filter

OK. Let's start with the "simple" case of simple Resistor-Capacitor filter to smooth any intermittent wheel contact that can cause relay chatter and flickering signal lights.  This photo adapted from this 5-year old OGR thread:

RC filter

The R-C filter is inserted into the trigger path on any relay channel that you want to demote chatter from dirty wheels-track.   And here's the video from the above thread showing the improvement from 10 cents of parts!


How does it work? 

fast charge slow discharge rc filter

The idea is the capacitor quickly charges when an axle straddles the insulated-rail trigger section.  Using back-of-envelope calculations, the charging rate/time is the so-called R-C product which in this case is 20 Ohms x 47 uFarads = 0.001 seconds or 1 millisecond.  Yeah, you'll just have to take my word for it that when you multiply Ohms and Farads you end up with Seconds.   So if that doesn't make your head explode, we forge ahead.

So as soon as the axle hits the trigger, the capacitor charges up very quickly...in a matter of a few milliseconds.  And the relay then triggers as soon as the capacitor charges up too.  But if the insulated-rail trigger is lost for whatever reason, the capacitor maintains the trigger to the relay module input until it discharges.  How fast does it discharge?  Now the R of the R-C product changes to the optocoupler resistor which is typically around 2000 Ohms for these relay modules.  So the R-C product is 100 times longer or around 0.1 seconds.  This length of time is sufficient to smooth over transient drop-outs of the insulated-rail trigger.

----

The more "complex" case is if you want to keep the relay triggered for a long time (many seconds) after the insulated-rail trigger vanishes.  IIRC the Lionel 153IR and MTH ITADs have adjustable time delays of 10 seconds or more before the relay turns off after a trigger. So if a longer delay is needed you can indeed fuss with the Capacitor value.  It's just that as you crank up the value to 1000's of uF to achieve Seconds of delay, the capacitor can become physically large and disproportionately expensive for what it's doing.  That's where you toss in a 10-cent transistor and use the miracle of current-gain to multiply the effect of the capacitor.  A typical transistor might have a current-gain of, say, 100.  This can make a 47uF capacitor "look like" a 4700uF capacitor. I'm pretty sure I've posted on OGR about this latter method too,,,but let's start with the "simple" case and listen for the crickets chirping. 

Attachments

Images (2)
  • RC filter
  • fast charge slow discharge rc filter

Ok Stan, I'll "chirp" in here! Very impressive and straight ahead stuff. Love it. Back in another lifetime I recall being dissappointed with the insulated rail technique due to that exact problem of relay chatter and dropout. No amount of track and wheel cleaning seemed to work. I didn't know enough at the time to realize that a simple capacitor could help solve the issue.

I have no idea how I missed your earlier threads on these ideas. I must have been on another planet that year I guess! Fast forward; I plan to maybe whip up a Diptrace circuit to capture it all and maybe do some boards up to make the hookup slick and easy. Maybe that will actually allow an opportunity to use the relay boards aquired a few years ago haha. And I bet there are others amongst us who would also benefit.

If you could indulge us a little further with the particulars for the "delay" circuit please, that would be a home run!

Rod

@Rod Stewart posted:

...

Back in another lifetime I recall being dissappointed with the insulated rail technique due to that exact problem of relay chatter and dropout. No amount of track and wheel cleaning seemed to work. I didn't know enough at the time to realize that a simple capacitor could help solve the issue.

What changed is the widespread availability of insanely inexpensive relay modules as per topic ($1 per relay, assembled, screw-terminals, no soldering, etc.).  These modules have transistor buffers on the input trigger so you only need maybe 1 mA of current to trip the relay.  In other words, with the "Arduino" relay modules you are not directly drive the relay coil which may have a resistance of, say, 100 Ohms.  So referring to my previous notes about how you are "only" driving maybe a 2000 Ohms resistor with the buffered relay modules, that's a factor of 20 difference.  This means that for the same chatter/dropout delay you would need a capacitor that is 20 times larger.  So that 47uF capacitor becomes a 1000uF capacitor...at some point there is something inelegant about using a sledge hammer to swat a fly.  But to each his own.

@Rod Stewart posted:

...

I have no idea how I missed your earlier threads on these ideas. I must have been on another planet that year I guess! Fast forward; I plan to maybe whip up a Diptrace circuit to capture it all and maybe do some boards up to make the hookup slick and easy. Maybe that will actually allow an opportunity to use the relay boards aquired a few years ago haha. And I bet there are others amongst us who would also benefit.

If you could indulge us a little further with the particulars for the "delay" circuit please, that would be a home run!


OK. I found this 7 year old OGR thread which even has a video showing how the addition of a 5 cent transistor can multiply the effective delay of a timing-capacitor with an "Arduino" type relay module.  I'm reposting the video below as it exactly illustrates the method under discussion. There's more discussion on the linked thread but it is long and wanders on and off topic.

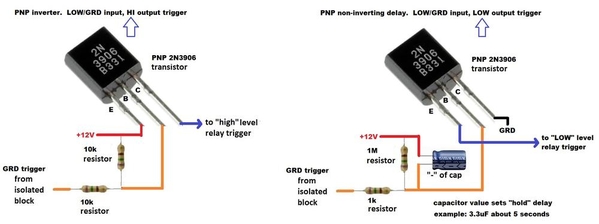
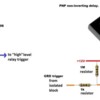
I see though that the circuit in the thread does not directly address the application of an insulated-rail "ground" trigger driving a LO-only relay module.  I may have posted something on that specific configuration but if I can't dig that one up I can put something together.   I found this 5 year old OGR thread which should apply.  The diagram from that post is copied below.  The right circuit albeit shown for 12V DC is the one.  The OP from that thread confirmed it also works at 5V DC which is apparently what you have.  Note that this uses the PNP companion to the NPN 2N3904.

PNP%20r%20and%20rc%20input%20to%20relay%20module

Attachments

Images (1)
  • PNP%20r%20and%20rc%20input%20to%20relay%20module
Videos (1)
ogr capacitor delay ebay relay module
Last edited by stan2004

OK Stan, back with you after a hiatus of several days while we were travelling.

@stan2004 posted:

PNP%20r%20and%20rc%20input%20to%20relay%20module

So the Lo input shown on the right seems easy enough to incorporate. Since it would be nice to make the delay variable say from about 5-20 seconds, can we make the 1M resistor variable to accomplish that (as opposed to a variable cap)? If the above values would be maybe 5 seconds delay, how about adding a 1M pot in series with the 1M fixed resistor? I realize that some breadboard work will be needed here to settle on appropriate values, whether 5V or 12V. And it just so happens I have a bucket load of 2N3906 pnp's lying around, so no worries there. (I think an S8550 is also interchangeable for the 2N3906.) Am I on the right track here?

Rod

Yes, on right track.

Lo to Lo cheap delay for arduino relay module

As you noted some experimentation is required when trying to make a more "universal" design...to support both 5V and 12V operation, to allow a reasonable range of adjustment, and so on.  I believe the majority of applications only need the simple R-C filter to eliminate relay chatter.  So perhaps a wire jumper or something like that could bypass the need to install all parts. 

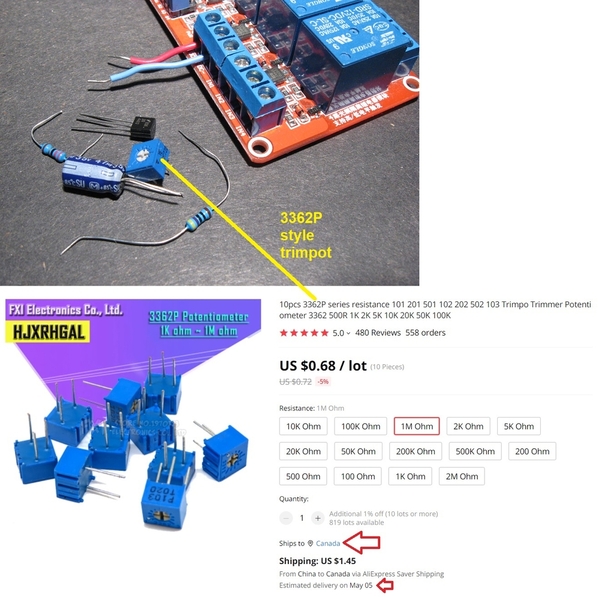
If you do design a PCB, I throw my vote for a 3362P style trimpot.  These are compact and are relatively "sealed" compared to some of the cheaper "open" trimpots.  I recall multiple instances where the open style trimpot used for Delay adjustment in the Lionel 153IR became grimy and failed even being in the trackside enclosure.  The 3362P is widely available, is on 0.1" grid, and not that expensive - example from AliExpress.com shown above - about 20 cents each shipped in a month to Canada.

Attachments

Images (1)
  • Lo to Lo cheap delay for arduino relay module
@stan2004 posted:

Yes, on right track.

As you noted some experimentation is required when trying to make a more "universal" design...to support both 5V and 12V operation, to allow a reasonable range of adjustment, and so on.  I believe the majority of applications only need the simple R-C filter to eliminate relay chatter.  So perhaps a wire jumper or something like that could bypass the need to install all parts.

If you do design a PCB, I throw my vote for a 3362P style trimpot.  These are compact and are relatively "sealed" compared to some of the cheaper "open" trimpots.  I recall multiple instances where the open style trimpot used for Delay adjustment in the Lionel 153IR became grimy and failed even being in the trackside enclosure.  The 3362P is widely available, is on 0.1" grid, and not that expensive - example from AliExpress.com shown above - about 20 cents each shipped in a month to Canada.

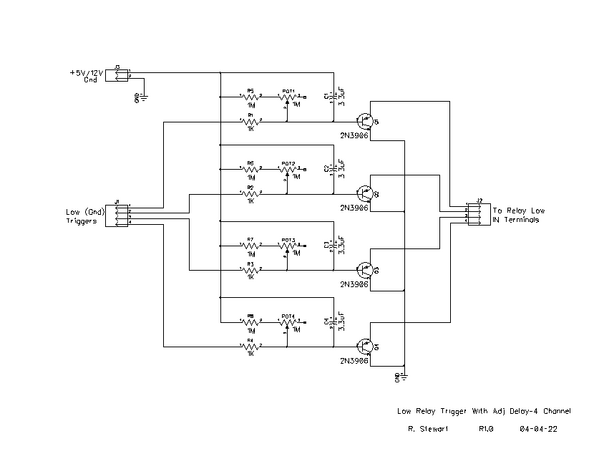
Great thanks Stan. Here is my first cut schematic of a 4 channel board. I figured 4 channel is a convenient size since this would do any size relay board up to 4, then use two boards for a 6 or 8 channel relay module. Obviously you would only need to install components for the number of channels you are using. Duh!

Low Relay Trigger with Delay-4 Channel

For now I am using your suggested part values, to be confirmed with some breadboard work. That's the next step. There may be some differences for whether the relay modules are 5V or 12V. I have a couple of each so that will get checked.

Thanks for the 3362P suggestion; those are already my go-to standard trim pots for board work, and I have loads on hand, though nothing bigger than 1 meg. Might have to order some bigger if needed. We shall see. Next step will be a prelim board layout if the above circuitry looks right?

Rod

Attachments

Images (1)
  • Low Relay Trigger with Delay-4 Channel

So I did more testing of both 5V and 12V relay boards, and settled on some values that work about right. They are different depending on the voltage of the relay boards, per below. Note that I figure most of the time it would make sense to use the same power source for this board as will be used for the relay board, since they will likely be located close together.
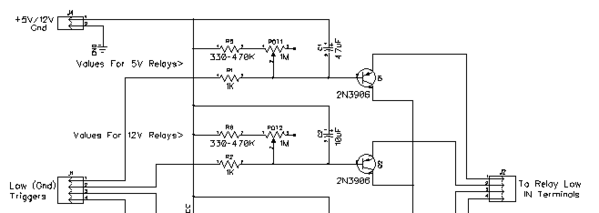
Values Revised

R1 and POT1 stay as they were at 1K and 1M respectively. R5 can be 330-470K; not critical. C1 can be 47uF for the 5V case, and 10uF for the 12V case. These values give delays in a range of about 5 to 12-15 seconds, which seems about right.

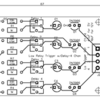
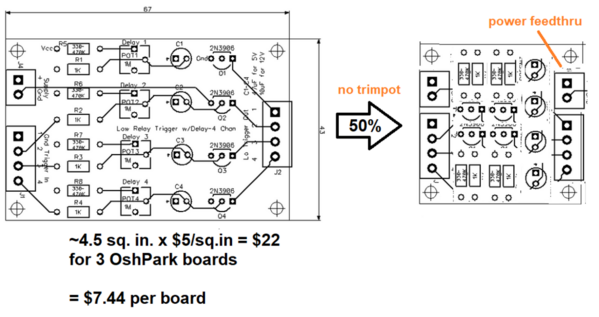
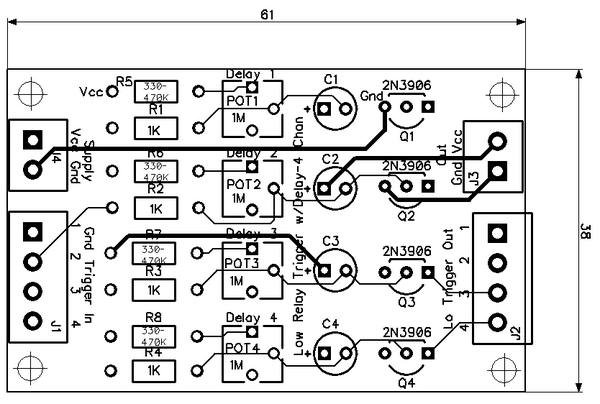
Here is a prelim board layout. Size is 67 x 43mm and its all cheap easy to solder through-hole parts. You could save some space by using SMT parts, but since this will likely be mounted under the layout there is no real need. The headers are sized for 3.5mm pitch screw terminals (ie KF-350 style) to make connections easy. The only somewhat pricey parts are the pots; though Stan attached an AliExpress source above which is very reasonable.
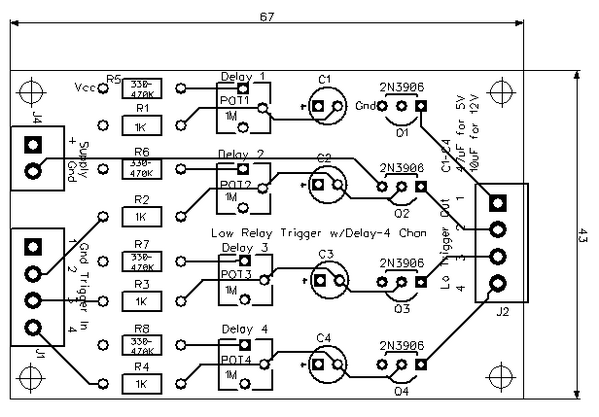
Board Layout R1.0

The whole purpose behind this board is to have a convenient easy to hook up spot in which to mount the anti-chatter filter parts necessary when using isolated outside rail relay triggering, for up to 4 separate channels. The adjustable release delay (after the train has left the block, similar to a 153IR) is a bonus that prevents re-triggering and allows a train to move a realistic distance away before the crossing gates, signals, whatever are released. The board is designed to use grounded inputs from the trigger rails, and to use the Low input of any of the commonly available offshore multi-relay boards. All I have done here is take Stan2004's excellent ideas and roll them into an inexpensive easy to build board. The next step will be to order a few boards and try them out!

To be clear my testing was done with this 5V version of the early "blue" boards (Lo only inputs):
8 Way Relay Module-2

and the 12V version of the later "red" boards (both Hi and Lo inputs) like this one that Stan posted.8ch%20trigger%20polarity%20h%20or%20l
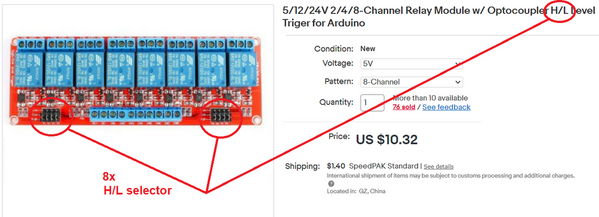
Each 5V relay draws about 70 ma when triggered, and each 12V relay about 50 ma. The trigger board itself draws a miniscule 10 ma or so, it's wiring can be very light.

Rod

Attachments

Images (4)
  • Values Revised
  • Board Layout R1.0
  • 8 Way Relay Module-2
  • 8ch%20trigger%20polarity%20h%20or%20l
Last edited by Rod Stewart
@stan2004 posted:

As you noted some experimentation is required when trying to make a more "universal" design...to support both 5V and 12V operation, to allow a reasonable range of adjustment, and so on.  I believe the majority of applications only need the simple R-C filter to eliminate relay chatter.  So perhaps a wire jumper or something like that could bypass the need to install all parts.


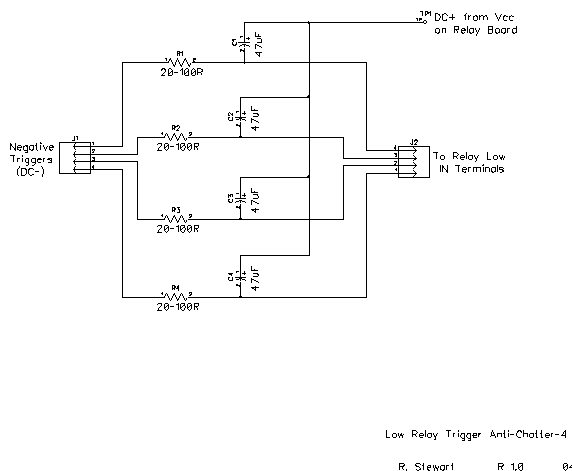
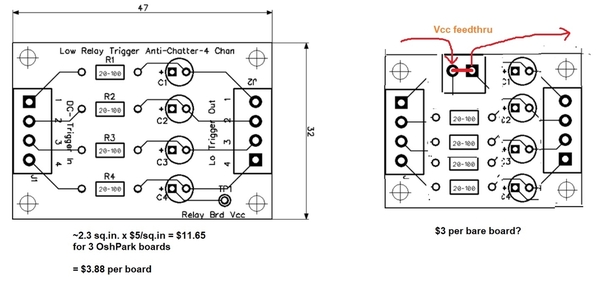
Stan to address your comment above (which I agree with) I whipped up the following RC Anti-Chatter board based on your notes earlier. Again it is a 4 channel design just because. I did some breadboard testing and it works exactly as you say. The triggering delay is not noticeable, and when the trigger is released the relay stays triggered for perhaps 1/3 to 1/2 second. Surely enough time to allay most chattering. I used the suggested 47uF cap and a 100R resistor.

Low Relay Trigger Anti-Chatter-4 Channel

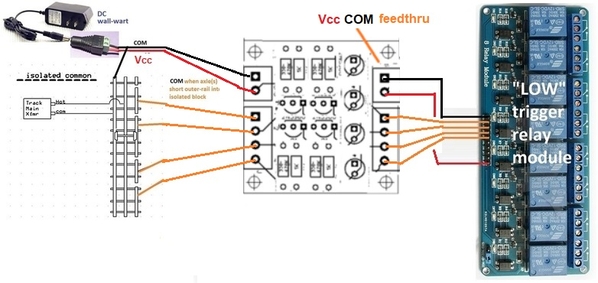
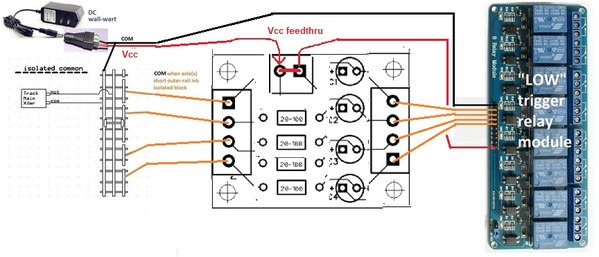
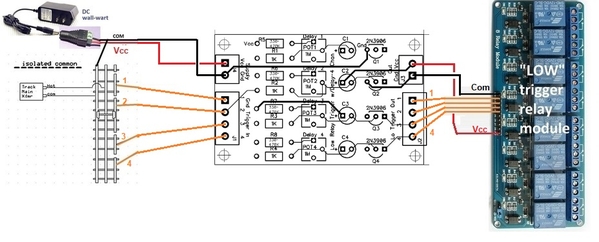
To be clear this is intended to be wired in exactly like this drawing which you posted a few days ago, except you can cover 4 channels with one board.

RC filter

Besides the inputs and outputs all that is needed is one connection to the Vcc of the multi relay board as you show, which would likely be located close at hand in most cases.

This is drawn up for a DC- input trigger level, useful for virtually all of the offshore Arduino type relay boards. This should cover most cases. But in the case where someone is using DC+ signal from the isolated rail (with Hi board inputs), all you would need to do is install the caps C1-C4 backwards. Then connect the - side of the caps (shown as "DC+ from Vcc on Relay Board") to the Gnd terminal of the relay board instead. Hope that makes sense.

Here is the prelim board layout; pretty simple.

Low Relay Trigger Anti-Chatter-4 Channel

Rod

Attachments

Images (3)
  • Low Relay Trigger Anti-Chatter-4 Channel
  • RC filter
  • Low Relay Trigger Anti-Chatter-4 Channel
@Rod Stewart posted:


...

Here is a prelim board layout. Size is 67 x 43mm and its all cheap easy to solder through-hole parts. You could save some space by using SMT parts, but since this will likely be mounted under the layout there is no real need. The headers are sized for 3.5mm pitch screw terminals (ie KF-350 style) to make connections easy. The only somewhat pricey parts are the pots;...


OK - so in the spirit of a discussion forum - here's what I'm trying to get my arms around.

Board%20Layout%20R1.0

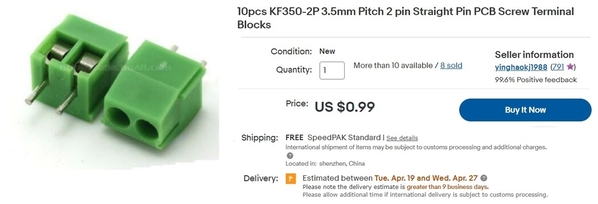
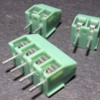
I figure the parts costs is maybe $2 per board...KF350 connectors are widely available of course.

kf350 screw terminal connector 2 pin for 10 cents

And like most edge connectors, the KF350 are designed to mate together so you can make a 4-pin out of two 2-pins...thus only needing to buy/stock the 2-pin version in this application.

2 plus 2 equals 4

So like my pet peeve of paying more for shipping than parts...here's a similar situation where you pay more for the bare PCB than the parts!   I realize OshPark pricing is not the cheapest but they are pretty dog-gone convenient and I can't imagine a typical OGR operator needing more than 3 boards (each having 4 channels of course)!

So to that end, I was pondering the idea of dropping the trimpot.  As your experiments show, there is a capacitor value selection based on relay voltage (5V or 12V)...so the board is really not "that" universal.  The point being by removing the trimpot, I think the board could easily be cut in half real-estate wise.  And since, in my opinion anyway, most guys set the time delay one-and-done, it's not that restrictive to do this delay setting by judiciously inserting the right capacitor (or fixed resistor) once upon installation.

I was also thinking about the actual hookup and think adding a feedthru 2-pin connector to send the power wires to the other side of the board could tidy the wiring to the relay module.

delay configuration

Again, just my 2 cents!

Attachments

Images (4)
  • Board%20Layout%20R1.0
  • kf350 screw terminal connector 2 pin for 10 cents
  • delay configuration
  • 2 plus 2 equals 4
Last edited by stan2004

rc only filter

Allow me to play the broken record, and easy for me to say since you're doing all the work , the parts cost is less than a buck...yet the OshPark bare board price is almost $4.  Yikes!  So being the cheapskate, I figure the ratio of parts cost to bare board cost could be reduced without having to resort to surface-mount.  And again, I suggest adding 2-pin KF350 to feedthru and access Vcc.

rc filter configuration

Attachments

Images (2)
  • rc only filter
  • rc filter configuration
Last edited by stan2004

Well you certainly can't please everyone with one design, and this clearly attests to that, haha! Board layout is always a compromise between having enough space for comfortable assembly, and minimizing the footprint, ie board cost. Unless I only need say 3 boards, I only use OSHPark for smaller boards, and then only in small quantities. Mostly for boards like these triggers, I go to an offshore boardhouse and typically order lots of 10, 20, or more, and accept that it will take the best part of a month to get them. It does not matter to me if I wind up with half the boards "spare"; it's still usually way cheaper in the long run. I'd rather have spare boards on hand than have to do a partial re-order because I ran out. But that's just me, to each their own.

Having said that, there is always ways to tweak a prelim layout, and that usually happens on a 2nd or 3rd (or more) review before ordering. So I am happy to take another look and tighten things up. I happen to agree with grj that having adjustable pots on the board is well worth the extra real estate required, if for no other reason than if you are not happy with the delay timing, adjusting a pot is a whole bunch easier than changing components! And I always like to have adequate board space for component identification and other helpful silkscreen markings. Nevertheless I am going to have another look and see if something creative can be done.

Stan2004, I really like your suggestion of having the DC+/Gnd (and Vcc) feed-thru's right on the board. That should often make the layout wiring a little easier, and for the sake of a couple of KF350 terminals it's a great addition. I'll add those on the next rev.

Thanks for the input guys; the beat goes on!

Rod

Where are the adjustment pots, on the other side?

There's actually 2 separate boards. The board above is the fairly simple anti-chatter board, with no delay. This was the simple case suggested by Stan2004. The other board has a delay circuit built in and transistors to trigger the relay boards. It's the more complex case that was discussed earlier above. Both have a purpose depending on the application. Stan suggested that a majority of users would only need the simple anti-chatter fix for isolated rail triggering, and he's probably right.

I have revised the delay board as well, and will post what I think will work shortly.

Rod

It seems I also saw the image in question earlier today but it is now saying "image not found".  There was a message from OGR that they are changing host server TODAY (Thursday) and that images that were recently loaded might take a day or so to be viewable.

@Rod Stewart posted:

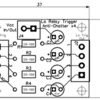
Well here is the revised anti-chatter board; really small now. The Vcc feed-thru is also included. Cost should be under 3 bucks a board from OSH Park. Lets hear any comments and opinions about this revision please.

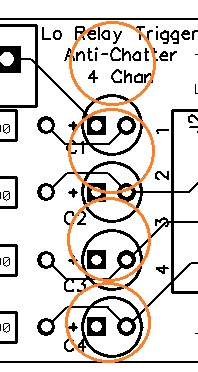
It appears C1-C4 caps are 4mm diameter?  I suggest spreading them vertically using a, say, 6mm diameter footprint...no change in overall board size but may interfere with your silkscreen labeling up top.  In any case, while 4mm caps are readily available, allowing 6mm caps gives more options such as using large value caps for those wanting some delay, but not wanting to go with the buffered transistor version.

caps

Attachments

Images (1)
  • caps
Last edited by stan2004
@stan2004 posted:

It appears C1-C4 caps are 4mm diameter?  I suggest spreading them vertically using a, say, 6mm diameter footprint...no change in overall board size but may interfere with your silkscreen labeling up top.  In any case, while 4mm caps are readily available, allowing 6mm caps gives more options such as using large value caps for those wanting some delay, but not wanting to go with the buffered transistor version.


Stan, good catch. Those cap patterns are actually 2.54/5. So you could use any cap up to about 7mm diam with .1" lead spacing easily. I did space them out a little more per your suggestion like below. This gives a bit more room for the caps; you could likely use up to 100uF maybe bigger. If the relays still chatter you need the board with built in delay; not this one!

Anti chatter

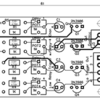
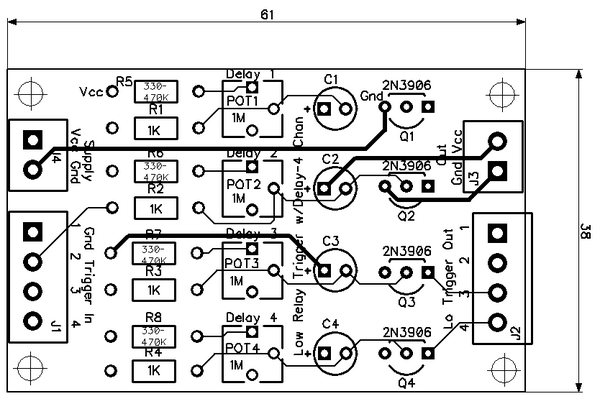
Speaking of the delay board here it is again for anyone who can't view it in the earlier post. Yah it's had a couple more tweaks too.

With delay

You may notice the Vcc and Gnd feed thru traces are beefed up to handle up to 1 amp of current for the relay coils on the relay board. An 8 relay board at 70 ma per coil will pull close to 600ma with all relays triggered, however unlikely that may be.

Here is a 3D view of the delay board just for conversation.

3D View Low Trig with Delay

I think we are pretty much there. BTW, the connectors above render as pin types, but the reality is you would want to use KF350 style 3.5mm pitch screw terminal connectors as discussed earlier.

Rod

Attachments

Images (3)
  • Anti chatter
  • With delay
  • 3D View Low Trig with Delay
Last edited by Rod Stewart

Another thing I've done for a couple of projects is allow multiple lead spacing for a cap.  If you leave clearance on one side of the component, you can just extend a second pad off to that side with a hole, say for .1" and .2" spacing caps.

Cool idea John. I did something a bit similar a while back on this simple rectifier board. It allows use of any cap from about 220uF up to 4700uF, maybe higher, depending on what you need to do.

Board Layout Snip

Rod

Attachments

Images (1)
  • Board Layout Snip

Add Reply

Post

OGR Publishing, Inc., 1310 Eastside Centre Ct, Suite 6, Mountain Home, AR 72653
800-980-OGRR (6477)
www.ogaugerr.com

×
×
×
×
Link copied to your clipboard.
×
×