
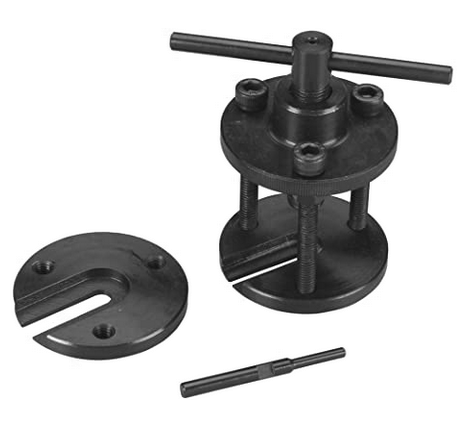
Does anyone have a way of getting the worm gear off of an old motor ? I've tried heat and the small gear Removeal and al, that did was bend both ends of the tool, I've gotten a new motor to work and got the flywheel switched over and all that works fine but without the correct gear on it none of the rest does much good, I have someone trying to make one on a 3D printer so we will see how that works but I wanted to see if anyone has a sure fire way of getting the worm gears off the shafts,

Thanks

Original Post

Replies sorted oldest to newest

Not for the feint of heart... I used 1/8"  flat bar stock about 2 inches wide and 12 inches long.  I put about a 1 inch or so slit in the middle of the bar stock at one end with my grinder (very thin metal cutting disc).  Placed motor in a vice, heated the gear up... slid the bar stock slit over the shaft behind the gear and whacked the bar stock with a hammer... off she came.

This was a Timko conversion of an NW-J... it could not pull your hat off and got hot as Hades ...I converted it back to Pulmor.

Last edited by Dennis-LaRock

Are you trying to save the old motor?

If you can say 'no', I'd cut the motor shaft between the motor and worm.  You'll have a lot more choices of tool/technique with just the worm gear and a piece of shaft at hand.

BTW, I'm assuming you've verified that there's no evidence of solder or CA twixt worm and shaft?  ...In which case you might check with the folks at Northwest ShortLine (NWSL) and see what they have for replacement possibilities.

Just a couple of thoughts...

Have a blessed Easter Day!

KD

Last edited by dkdkrd

They are tough to remove.  You will have a hard time even with a Timko puller.  As John said, the pin usually bends.  The press on the end closest to the motor is much tighter than at the end.

I have had success using rollers from an old roller bearing for the pin.   

I would be curious to see what other people are using.

Wow, I wish I could say I'm surprised, I guess I was hoping someone had a secret for success  on these and like most of the other folks have said all the pieces bent while trying to us them, even tried using a shaft out of an old motor thinking it was just as strong as what I was trying to punch out but no dice it bent as well.

I do have a former employee who is seriously into RC 4x4 and dirt racing vehicles and after seeing how those things get abused and how these guys rebuild them by printing their own parts he is printing a few gears for me to see which one may work, so if that pans out I will definitely share with everyone, I will post weather it works or not.

Thank you all for your thoughts and inputs and Hope you all have a Great Easter

They are tough to remove.  You will have a hard time even with a Timko puller.  As John said, the pin usually bends.  The press on the end closest to the motor is much tighter than at the end.

I have had success using rollers from an old roller bearing for the pin.   

I would be curious to see what other people are using.

I use dowel pins. This is actually my flywheel puller. My gear puller has smaller jaws but uses the same set of bolts.


image


Pete

Attachments

Images (1)
  • image
Last edited by Norton

GRJ...Do you still have your bent pin?  If there is a fairly straight portion for about 1/8-1/4" of the small diameter portion of the pin below the neck, you could cut off the rest of the bent length, grind the end square.  On a situation such as this worm gear pressed to the motor shaft, my guess is that if you can get the worm gear to just 'break free' of its press fit...move it about 1/8" or so...you'd be home free substituting some other drive pin tool, such as...

drive pin tool set

...to finish the job.  There are many options less expensive than Starrett, too (I've been successful using a finishing nail to finish driving a gear from a shaft once the gear has started to move). 

My own experience sez that getting a press fit to just break free of its current position is more than half the battle for removal.

Just a thought.   

KD

Last edited by dkdkrd

Well, the pin is stepped, and it's bent right at the step, so that might not work.  In any case, I'll eventually get a new pin, hopefully from tool steel that will resist the forces necessary to do this job.

I haven’t forgotten about making pins for y’all, ....I’ll get it done,....I just get distracted easily,..........oooh look!..a locomotive!...gotta run!!...😁

Pat

I'm not following.  I have removed worm gears from Lionel and MTH motors.  Although I suspect there might be a slight taper to the shaft, I have never seen a step.  The worm gets pressed on, so I have to believe they can be pressed off.  Of course, if the worm is put on from the other end before they assemble the motor, that's another story.

Last edited by gunrunnerjohn

I'm curious...  The idea of heating the worm gear to facilitate removal is intriguing.  But only the gear, not the shaft, too.

I was thinking of the technique that the 1:1 pros use to attach a steel tire to the locomotive driver wheel casting.  They actually set a fire on the rim to heat it up, then force it home on the wheel.  When it cools down, it's there, period!

So, what if you used a cotton cord...wick material, perhaps...soaked in oil (used in old lamps), wrapped it onto the worm gear thread (motor held vertically, worm gear up) and lit the cord.  Once it burns out, quickly move to the wheel puller.

Think it would help/work?  Anyone tried it before?

Seems like other traditional heating techniques might not heat the worm gear evenly and simultaneously  throughout its circumference, or heat the shaft at the same time thereby defeating the purpose.

Just a thought...

KD

Last edited by dkdkrd
@dkdkrd posted:

I'm curious...  The idea of heating the worm gear to facilitate removal is intriguing.  But only the gear, not the shaft, too.

I was thinking of the technique that the 1:1 pros use to attach a steel tire to the locomotive driver wheel casting.  They actually set a fire on the rim to heat it up, then force it home on the wheel.  When it cools down, it's there, period!

So, what if you used a cotton cord...wick material, perhaps...soaked in oil (used in old lamps), wrapped it onto the worm gear thread (motor held vertically, worm gear up) and lit the cord.  Once it burns out, quickly move to the wheel puller.

Think it would help/work?  Anyone tried it before?

Seems like other traditional heating techniques might not heat the worm gear evenly and simultaneously  throughout its circumference, or heat the shaft at the same time thereby defeating the purpose.

Just a thought...

KD

When I pull the gears and flywheels off those stubborn RS385’s, I set it up in my Great Planes puller, then apply a little heat from a small butane torch, then push off the gear,.....still chance to wreck the gear,....the flywheels that are made of brass heat soak really nicely and walk off fairly quickly,....the gear takes time and patience,.....when I re-install, all the parts get re-bored for a snug slip fit and a set screw, this way, I can optimize gear and flywheel depths for the best operations,....

Pat

I am soaking up all these ideas and thoughts, I just ordered  a Great plans puller and wondering if using a piece of old shaft from a bad motor would work ? And  as  the one statement above said that once you start heating the gear the shaft is also expanding as well, I have used a heat gun as well as a propane torch to give a little heat, I thought about trying to drill out the shaft but guessing the shaft is a bit to hard to drill out without drilling out the sides of the gear.

You do need a lot of heat. Small torch or as I do use a resistence soldering unit. Both are capable of getting the gear red hot if required. At that temperature the Great Planes pins or other hardened steel will work. It helps if after you apply pressure to the point where the pins feels like its going to bend is give the puller a sharp rap. That can set up a vibration to help break the gear free.

The real problem arises when you really want to save the motor. Getting the gear hot enough to free it usually damages the motor beyond repair. Catch 22.


Pete

I have no experience removing removing gears on model motors. I work as a mechanic. Things don’t always come apart like the book says. Especially in the northeast where road salt is used and everything turns to rust in a few years time. The torch becomes your go to tool to get things apart in one piece without breaking bolts off. After you apply heat. You don’t have a lot of working time before it cools off. The use of heat gets defeated quickly if you don’t move fast. One thing I do a lot. Is apply a lot of heat quickly to what you want to expand. Say a nut. When it’s good and hot quickly douse it with cold water till it stops smoking. This will keep it in an expanded state.  In the case of the model motor. A cup of water nearby and just put in the gear portion till it quickly cools.  What once would never come off without breaking despite what the spray penetrant cans say. Most times will come off like it was put together yesterday.

Not sure if it would work for this. But if you have the torch out anyways it’s worth a shot. Now putting it on the new motor. I’m used to dealing with threads mostly not pressed fit components. You may have to put the gear in a freezer overnight if it now fits loosely or apply Loctite. Today changing out a caliper I used the above method. The brake  caliper had to be heated to loosen the nut. After the caliper was spun off I had to heat the line nut to free it up on the steel tube. Some heat and a dunk in a cup of water and it freed up. The alternative without heat would have been a rounded tube nut or a kinked line. Turning a small job into a big one.

When metal is heated it expands. If you cool it quickly it supposedly stays somewhat slightly expanded. Freeing itself somewhat from the threads. John, I can’t really explain it. Learned it years ago from an older mechanic. It works well for what I do at work. Beats drilling out broken bolts. The heat alone usually works. The thing is you have very little working time. Especially if after heating you have to hammer a socket on what once was a hex. The quick cooling with water just gives you more working time. If you have to heat say 4 bolts. You can heat them one at a time. Douse with water and just keep the lit torch in your hand. Have a cup of coffee then go back and remove them. Rather than keep firing it up doing one at a time. I remember a show years ago from Vegas on the History Channel that restored antiques and they used this method at times.

Pete, I watch a guy on You Tube a lot from your neck of the woods. South Main Auto. Everything he works on is rusty and I can relate to what he’s doing. Does a lot of chassis and wheel bearing work  Nothing comes apart easily. Reminds me of the plow trucks I used to work on. Can’t remember what he was working on but he used that same method once. It does help to spritz it with some PB Blaster or something similar after it cools.

I’ve been turning wrenches for 37 years, and I’ve never heard of this “shock”process either,...I deal with rusty fused together fasteners 5 days a week.....just like heating up the gear on a Mubachi, my trick is to heat up the surrounding area the fastener is in, not the fastener itself,.....if the hole is expanded, the fastener will come out,.....If I’ve got a caliper that rusted up with gangly rust it’s going in the garbage ,......not knocking the shock therapy, but I can’t see it, ....metal has a memory, it wants to go back to its original size,....unless it’s been sheered, or stretched ,......maybe that therapy helps to break up the rust, I don’t know, but I can’t see it aiding in gear removal,.....best method I’ve found is as Pete said, heat, pressure, a rap on the forcing stud, push, heat & repeat,...once the gear gets to movin, don’t stop,...😁.....I’d love to see a video of how those gears and flywheels get installed at the factory, that would tell the tale,...no??....

Pat

Last edited by harmonyards

I am soaking up all these ideas and thoughts, I just ordered  a Great plans puller and wondering if using a piece of old shaft from a bad motor would work ? And  as  the one statement above said that once you start heating the gear the shaft is also expanding as well, I have used a heat gun as well as a propane torch to give a little heat, I thought about trying to drill out the shaft but guessing the shaft is a bit to hard to drill out without drilling out the sides of the gear.

The shafts are a wee bit harder than the gear,....however, it’s not as hard as say a drill bit. Trying to use a hunk of motor shaft as a pusher, and it will just cave in and bend,...it’s hard, but not as hard as you think,.....( I’ve tried it) .....also, attempting to drill out the shaft is also very difficult, not impossible, but difficult,....if the drill bit walks even the slightest bit, the gear will be wrecked,.....I have had some motor shafts so stubborn, I’ve had to cut off the shaft from the motor, and heat and beat out the remaining hunk of shaft,....but I have punches that small,......like I mentioned above, those gears are on there and they mean business,.....that gear has to be on the ragged edge of red hot to move,.....too hot and the gear begins to deform as the puller is trying to do its job,......gotta find that happy medium of heat and pressure from the puller to begin the pushing process,......

Pat

@ConrailFan posted:

So please excuse my ignorance, but why would you want to remove a worm gear off a shaft? Although I run trains, (models not the real ones) I seldom get this deep into the inner workings of the models and this sounds interesting, but I'm still puzzled as to why one would want to do that. Thanks

No worries, ....I’ll explain,....the worm gears are directly attached to the motor shaft itself, and sometimes the motors fail, draw too much amperage or have way too much “cog” and don’t operate smoothly at low speeds,....in some cases, the complete motor assemblies are not available or are made out of unobtanium,.....however, in the case of the Mubachi RS385 and others, motors are available readily from certain places, but have no gears or flywheels on them, so they need to be harvested from the original motor,.....

Pat

Just some more food for thought on the “shock therapy “

I have done it to remove the old bearing housing off of a custbuster disc it works but I think why it works is that the main thing on your way is the rust in my case the housing was made to fit inside of its case but it had sand and rust holding it in. After heated and dropped in water the water will naturally try to go in every crevice it can find only to suddenly reach its boiling temperature turn into a gas and force its way out bringing with it the rust and sand this freeing the housing.

that being said though a good thought I don’t think it’ll work on this situation

I have posted this before - we ran MTH Diesels on the 2-rail portion of the San Diego MRR Museum.  I suppose my postings drift into the past.

We got three years out of the worm gears.  That's the proper name for the bronze axle gear.  Every third worm gear replacement required a new worm as well.  MTH was very nice about supplying replacement gears.  One unit needed axle bearings after about 15 years of continuous daily museum running, and they turned out to be Piper Cub aileron bushings, cut to length.

To remove an MTH worm ( again, proper nomenclature) I have two steel bars, machined almost exactly like gunrunner's puller.  They get bolted solidly, the motor is suspended from them in a steel tube with a cushion in the bottom to catch the motor.

Then the worm is heated with a torch - hot, but not discolored, and definitely not red.  The motor shaft is tapped with a tiny drift pin and a hammer; the motor drops onto the cushion, and a new worm is inserted with shaft Loctite.  Never damaged a motor.  In fact, those motors were indestructible - I don't remember replacing any.

I had to move a pinion on a new lionel replacement motor. The bottom of pinion had to sit in bearing in bottom of truck. Had to move about .160.I tried old slot car puller nope. So I made one basically a 'fork'. Used two 3/8 plates with 5/16 fine thread bolts. Made fork just big enough for pinion to fit. Wish I had a milling machine,used drill press and grinder. I used finishing nails,all I had,for inside pinion,bent them, about 6 finally got it moved. I practiced on old mth motor. Seems old motor pinion moved way easier than new motor. Heating and cooling cycles!?? I need to get a harden shaft to really work better than nails.

I use the Great Planes Gear Puller, it's pretty robust, but it didn't survive the cut, and I bent the pin.  Still trying to get a replacement pin, hopefully from stronger material.

John,

Break the cage on a roller bearing and use the rollers.  They are very hard and will not bend.

I made a plate similar to that bottom plate but I couldn't harden it and it ended up bending.

Dave, I'd have to find roller bearings that have a step in them as the pin does in the foreground.  I think that's unlikely to be easy to find.

John, I bought one of those and played around with it to see what the best possible scenario might be.  I took your stepped pin and turned it around and pressed against a pin from a roller bearing.  The gear came right off.  I don’t know how it even worked for you the other way.  The step is too large on the OD and not long enough.  

The press is towards the bottom 1/8” of the gear.  This will allow you to insert a pin that is too big.  The pin always gets stuck at the end.

I did taper the end of my pin by inserting it in a drill and honing it down at the end. (I know you don’t have machine tools)

Anyway, I hope this helps you and the OP.  This is a nice little puller!

B62F1B95-C2F2-4D1E-805A-D7445FCD227B2545E4F1-1C2C-4F89-946C-203B981B3175

Attachments

Images (2)
  • B62F1B95-C2F2-4D1E-805A-D7445FCD227B
  • 2545E4F1-1C2C-4F89-946C-203B981B3175
Last edited by David Minarik

Pat,

The bearing was an INA for a Harley transmission countershaft in the case.


David,

The pin punches might be a great source!  Thanks for the tip.


John,

I will send you one

You just gave me a thought, ......Borg Warner & Tremec T5 transmissions are loaded with similar needle bearings,..and they’re in plastic cages, so really easy to harvest,....AND I have boat loads of them since I rebuild them on a weekly basis,...I’ll check it out tomorrow while I’m at work,....I might have a lifetime supply for all of us,....thanks David!..

Pat

@JET posted:

"We got three years out of the worm gears.  That's the proper name for the bronze axle gear. "

The worm gear is always attached to the motor or driving shaft. The driven gear or axle gear is called the "worm wheel."

https://www.pic-design.com/pro...orms-and-worm-wheels

Respectfully, worm gear and worm wheel are synonyms. 

https://gearsolutions.com/depa...20is%20the%20throat.

The "worm" or "worm screw" is on the motor shaft.

https://en.wikipedia.org/wiki/Worm_drive

I would say for for the majority of our trains lubing the gearbox is fairly easy. MTH and Williams diesels require a single screw removal to drop a truck. newer Lionel diesels with Liondrive just require a 90 degree twist of the truck. Most steam engines have a screw to remove to allow greasing the gearbox. Just a matter of keeping track either by run time or years to do this maintenance. It helps if the manufacturers use the best materials and design in the first place.

Pete

I’ve been following this thread with interest. Not because I have any plans to remove a worm gear from a motor shaft but, more as a reminder to myself that work like this is way beyond my skill set.

Thank God there are people like Pat, Dave and GRJ (to name a few) who really know what they are doing!

I’m also thankful for my own anal retentive side that convinced me years ago to maintain a maintenance log on all of my locomotives and see they are serviced at least every 2-3 years based on run time. Hopefully that “ounce of prevention” keeps my engines out of the shop for the “pound of cure” represented by new motors with original worm gears.

Curt

Last edited by juniata guy

Since I asked the question and started this post and am very gratefull for all the responces that have been posted, it is a wealth of  information

Anyways I thought I would  share that I bought I  think 6 motors that were taken out of  MTH trains and they all have worn gears on them and another 4 that are still installed in diesel frames, that have the motors and the trucks  attached but no boards, so if anyone is in dire need of a motor with a worm gear already on it , let me know and I'll see if I can't help you out.

GRJ

Well, I see a lot of them, especially the tinplate O and Std Gauge stuff, and the brass "worm gear" is all chewed up and dry.  You'd have to disassemble those every 20-25 hours and grease the gear to keep it lubricated, I suspect very few people actually do that.

Well i suspect if you tried marine grease which is very sticky and tacky and will stay in contact with the mess gears, maybe that would last much longer, i know it is a excellent wheel bearing grease ! IMHO

Alan

https://www.walmart.com/ip/Sup...-14-oz-Tube/16928008

Last edited by Alan Mancus

Add Reply

Post

OGR Publishing, Inc., 1310 Eastside Centre Ct, Suite 6, Mountain Home, AR 72653
800-980-OGRR (6477)
www.ogaugerr.com

×
×
×
×
Link copied to your clipboard.
×
×