
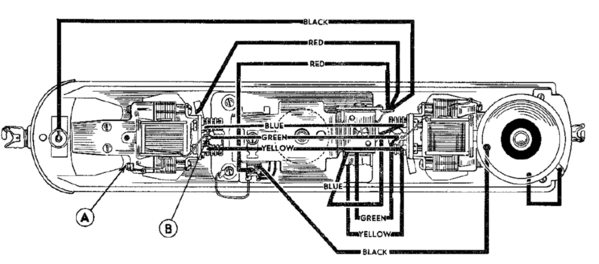
Can anyone provide information about where to physically attach the AC commander from ERR in a Lionel Sante Fe F3   #2343 (1950's) -- has 2 motors.   I have taken everything out except the 2 motors.

Appreciate any help and pictures if possible.  The electrical part seems straight forward but the actual placement of the AC commander (and then the railrsounds) eludes me.   Thank you. 


Original Post

Replies sorted oldest to newest

I added an AC Commander to a 2343 F3 earlier this year. I don't have any pictures of the installation but what I did was make a mount out of sheet aluminum for the AC Commander. Basically cut a piece of sheet aluminum to cover the fuel tank area. In the front make it long enough so it goes over the holes where the horn battery bracket mounted, drill holes in the aluminum sheet and secure it using the factory horn bracket screws. In the rear have the sheet overhang the rear of the fuel tank, bend the corner up around the E-unit bracket in the chassis, and use the old E-unit screw to secure it. 

I did not add Railsounds, as I have a Railsounds 2.5 B unit to run behind the locomotive. I can pop the shell off in the next day ot two if you want to see the bracket I made to mount the AC Commander. 

20181021_115735

Attachments

Images (1)
  • 20181021_115735

As a safety factor. After I mount the commander board to the metal engine frame, I glue a piece of styrene to the frame under the commander board so if the screw that is holding the board to the metal frame comes loose. So the end of the board's bottom metal pins will not contact the metal frame of the engine and short out the board. But DO NOT have the styrene between the board metal heat sink and the metal engine frame.

20190205_125733[0)

I also use styrene between all the boards that I use the ERR two sided tape to attach to the frame. Note the styrene on the right of the board will be the location of the railsound board that will be attached with two sided tape.  

Attachments

Images (1)
  • 20190205_125733(0)

All of the locos in these pics have a stamped steel frame.  The 2343 has a thick die-cast frame, that's a different animal.  Especially if the original poster is intending to do a cut-out for a speaker.  Maybe better off starting with an LTI-era frame that already has the cut-out for sound.  @Lou1985  I would like to see a pic of what you did.  Also, how many speed steps?  How does it run?

Last edited by Ted S

Ted, the speaker can go in the tank, you won't be using the battery any more.  You'll just have to cover the top of the tank hole with a platform, 1/16" Styrene is a good choice.

The real question is if there's room between the horizontal motors for the electronics.  Obviously, the battery box, horn relay, E-Unit, and horn will all be gone for the upgrade.

Interesting that both of the A-A units are powered, must have sucked a lot of power!

Attachments

Images (2)
  • mceclip0
  • mceclip1

Here it is. I don't remember what gauge aluminum sheet I used but it was thick enough to support the AC Commander, but thin enough to cut with tin snips. Since I have a Railsounds 2.5 B unit to run behind the 2343 I didn't use the battery hole in the frame for a speaker (but you could, and mount the speaker below the plate the hold the AC Commander). Instead I used the hole to house the program/run switch. 

As far as how it runs, well it runs great. In 100 speed step mode it will pull a Railsounds 2.5 B unit, another dummy B unit, a dummy A unit, and 6 15 inch aluminum passenger cars at 15-20 scale mph around a 072 loop without stalling. It'll go even slower, down to 10  scale mph or so, on straight sections. 

20190716_23422620190716_23424520190716_234551

Attachments

Images (3)
  • 20190716_234245
  • 20190716_234226
  • 20190716_234551

If you only have a single A-Unit, I'd use the tank for the speaker, and you can stick the RS Commander to the roof of the shell.  I'd obviously also remove the battery cover and screw from the tank!

The aluminum plate would be a simple idea that makes it easy to attach the AC Commander.  If you also cover the whole tank cavity, it makes a passable speaker baffle, double duty.

I think a way to make even more room for the speaker in the tank (if you are not worried about returning the locomotive to stock) is to grind the "lip" around the battery compartment flush with the bottom of the fuel tank on the inside of the fuel tank. Another option could be to raise the plate up higher, as there is vertical clearance in the shell. With the plate set up as on my 2343 there is not enough room for the speaker ERR includes in their kit to fit in the fuel tank. The battery compartment "lip" gets in the way.

gunrunnerjohn posted:

I didn't have one to look at, but you're doubtless right about the battery compartment fit. 

The molded in battery holder is just too tall. Ideally the best thing is to use a motor tool to cut it flush with the inside bottom of the fuel tank. Then it's a perfect place to mount a speaker.

I think a Postwar F3 frame in this case is better than the MPC or LTI frame, simply because of the battery hole which can be used as a speaker mount. The MPC and LTI F3s lack this hole, so one would have to get a little creative. 

Mikado 4501 posted:

This is a pretty in depth topic with a lot of different great ideas to take note of. I'm in the process of purchasing an Kenner-Parker era F-3 that could benefit greatly from this same kind of treatment.

I converted my childhood LTI Santa Fe freight ABBA F3s to AC Commander from a mechanical E-unit. The great thing is the inside of the bottom of the fuel tank is flat, since there is not battery holder. The ERR board installed with no drilling using one of the screw holes in the bottom of the fuel tank. There was even a spot for the Program/Run switch behind the front motor (originally there for the horn on/off switch if the frame was forca dummy A unit). 

I didn't add Railsounds to the A unit as I already had the Railsounds 2 B unit for the set. I ended up adding a LCRX to the B unit to make it TMCC controlled. Even though it was originally conventional the board and sound chip were TMCC compatible. So it now has TMCC control of revs as well as brake and coupler release sounds.

If you'd like I can post pictures of the upgrade. 

20180906_212811

Attachments

Images (1)
  • 20180906_212811

Add Reply

Post

OGR Publishing, Inc., 1310 Eastside Centre Ct, Suite 6, Mountain Home, AR 72653
800-980-OGRR (6477)
www.ogaugerr.com

×
×
×
×
Link copied to your clipboard.
×
×