
Is there a way, or any need, to attach the benchwork to the walls for an around the room layout?  I plan on topping it with 1/2" plywood.

I didn't see any stringers over 48" long, what's recommended for a 60" space?

Can the legs be cut down?  About midway in the length of my upstairs room (old house) there appears to be a 1" rise in the floor, to keep the top of the layout flat I'd need to cut 1' off 2-3 legs.  I don't think I'll know what the height is until I actually get to it.

I've emailed Mianne but haven't heard back yet, I guess they're getting set for York.

Here's the latest rendition of my proposed layout:

2017 PLAN F

The 45 degree corners make it more pleasing than a sharp 90 degree.

Attachments

Images (1)
  • 2017 PLAN F
Original Post

Replies sorted oldest to newest

Bob Delbridge posted:

Bob;

I have a 14' x 16' around the room layout (with an attached 10'x30" freight yard) which uses Mianne benchwork and I think it is a fabulous product - saved me a ton of time and effort getting my layout started, especially since I am no carpenter. 

Is there a way, or any need, to attach the benchwork to the walls for an around the room layout?  I plan on topping it with 1/2" plywood. 

My layout is freestanding, but has one length resting against a wall. The benchwork, when assembled, is  very stable, even before attaching the plywood top. If, for some reason, you still wish to attach the benchwork to the wall, I see no reason you could not do so using some L brackets or long screws running through the legs.

I didn't see any stringers over 48" long, what's recommended for a 60" space?

If I remember correctly, Tim indicated that he can do custom lengths, just think in increments of 6". That being said, I think that 60" may allow sagging in the section. Two 30" segments may be a better bet.

Can the legs be cut down?  About midway in the length of my upstairs room (old house) there appears to be a 1" rise in the floor, to keep the top of the layout flat I'd need to cut 1' off 2-3 legs.  I don't think I'll know what the height is until I actually get to it.

The bottoms of the legs all have levelers to adjust the height, so cutting off the bottoms would be a bit problematic, and the tops are where the stringers attach, so that is impossible. Again, if I remember correctly, Tim stated that he can do custom height legs.

I've emailed Mianne but haven't heard back yet, I guess they're getting set for York.

Mianne definitely has a setup at every York, so you are probably correct that they are pretty busy right now!!!

Here's the latest rendition of my proposed layout:

2017 PLAN F

The 45 degree corners make it more pleasing than a sharp 90 degree.

I know Mianne can do 45 degree corners - I have one in my yard addition. I opted for 90 degree corners for most of the layout since that gives me some room for buildings.

Good luck with your project... I look forward to seeing your progress.

Paul


Bob Delbridge posted:

Is there a way, or any need, to attach the benchwork to the walls for an around the room layout?  I plan on topping it with 1/2" plywood.

I didn't see any stringers over 48" long, what's recommended for a 60" space?

Can the legs be cut down?  About midway in the length of my upstairs room (old house) there appears to be a 1" rise in the floor, to keep the top of the layout flat I'd need to cut 1' off 2-3 legs.  I don't think I'll know what the height is until I actually get to it.

I've emailed Mianne but haven't heard back yet, I guess they're getting set for York.

The 45 degree corners make it more pleasing than a sharp 90 degree.

"Need" is a relative term. The modular layouts you see at shows are similar to around the room layouts and they are perfectly fine standing alone in the showroom space given them. Anchoring to the wall makes they sturdier and accidental bumps will not knock things off the rails. Anchoring also does away with the need for legs along the wall side. In your case, it appears that the width of the room is going to be slightly larger that the width of whatever Mianne comes up with. Remember though that their designs are based on 6" increments, so if your room is 13' 9" wide, there will be a 3" difference that will need to be considered. If you want to anchor things to the wall, you will probably have to add shims to the I-beams in various locations to match the actually width of the room and run the anchors through the I-beams at those locations. Remember too that all Mianne measurements are from the center of one leg to center of the next. That means that a 48" rail is NOT 48". It's 48" from the center of one leg through the rail to the center of the other leg. That also means that when you add your 1/2" plywood decking, it won't cover the outside part of the legs. Note too that the top part of the legs are rounded, so you have to consider the exposed part of the leg lower down and any shim needs to be thick enough to account for that. Of course, you could run the anchors through the legs, but then they'd have to be positioned over studs. The 2nd image shows an around the room layout that I don't think is anchored.

Capture

As far as the 48" stringers go, you'd have to add a leg and use a 48/12 or 30/30 combination. That's something Mianne will figure out. I don't recommend trying to figure out what to order on your own because there are things you probably won't think about and they will.

Obviously, the legs can be cut down, but then you'd have to deal with the leveling hardware, assuming you include that in your order. I believe the levelers can be adjusted up to 2", so I'm not sure you'd have a problem if all you need is an inch or so. Another thing to talk to Them about.

I suggest you call, multiple times if necessary given that York is coming up. I got a response to my first email when I tried contacting them around the time for York, but it took awhile, and subsequent emails went unanswered. I ended up having to change my plans, so I didn't follow up, but I was pretty disappointed by the lack of response. Still, if I hadn't been forced to change plans, I would have followed up. If I build the 2nd layout I want, I will still consider them. They are expensive, but if you compare prices of comparable materials, the expense is not that different considering the time saved for assembly not to mention the lack of a mess.


Attachments

Images (1)
  • Capture

Thanks folks!!!

Does anyone paint this?  It almost looks too good to paint.

If the 1/2" plywood top is larger than the frame, say a 24" frame with a 30" plywood top (or 30" frame and 36" plywood top) would that be stable?  A 3" overhang at the back walls and 3" on the front wouldn't be a big concern for me as far as looks or function.

If you find there's pieces you don't use, will they take them back?

How do you fasten the plywood top to the benchwork?

Bob Delbridge posted:

Thanks folks!!!

Does anyone paint this?  It almost looks too good to paint.

If the 1/2" plywood top is larger than the frame, say a 24" frame with a 30" plywood top (or 30" frame and 36" plywood top) would that be stable?  A 3" overhang at the back walls and 3" on the front wouldn't be a big concern for me as far as looks or function.

If you find there's pieces you don't use, will they take them back?

How do you fasten the plywood top to the benchwork?

Not an engineer, but I think that the slight overhang would not effect the stability. If you plan on walking or crawling on top, I'd be careful on the overhanging edges.

Don't know about painting, but there was a thread a couple of years ago from a gentleman who moved with his layout and the new location was in the living space of the new home, so he stained the benchwork to match the room - looked quite good. I left mine natural, but it resides in a crappy basement!!!

The benchwork comes with small plastic fasteners which you attach flush to the tops of the legs, then screw up into the plywood. I had several 48" stringers and the plywood didn't lay snugly on top, so I bought some optional metal L-brackets from Mianne which clamp onto the top of the I-beam stringers and into the plywood. They both work well.

Thanks Paul!  I've used some metal "L-shaped" brackets to hold down plywood before, so i think I know what you're talking about.

Sounds like all I need to do is contact Mianne and get the ball rolling

Do they close down during York?  I would hope/think not.  I'll give them a call tomorrow.

I figure i can start on the end of the room that doesn't currently have any benchwork in it and when it comes time I can tear down what I have in the 12x12 section to extend the new stuff.  I'm not one to take my time so I doubt the old layout will stay up long.

Bob Delbridge posted:

If the 1/2" plywood top is larger than the frame, say a 24" frame with a 30" plywood top (or 30" frame and 36" plywood top) would that be stable?  A 3" overhang at the back walls and 3" on the front wouldn't be a big concern for me as far as looks or function.

I wouldn't think stability would be an issue, it'd be no different than a 24x24 frame made with 1x4s and covered with a 30" wide piece of plywood, though you might want to add extra fasteners. Like Paul said, the overhang shouldn't be an issue unless you climb on it and put all your weight on that 3" edge. When I was considering Mianne for one of my designs, I had planned a 1" overhang in the back along the wall and a 5" overhang along the front because I wanted the legs set back from the edge.

Dave makes a good point about the center to center Mianne uses for the dimensions. It's the center of the cross pieces/legs to the same centers on the opposite side. The actual size of say a 4'x8' table will be about 3/4" to 7/8" or so more on each side. The 4'x8' table would actually be 4' 1-1/2" (to 1-3/4") x 8' 1-1/2" (to 1-3/4"). I didn't think to mention that earlier in the other thread. 

I think the others have covered about everything pretty well. Just let Tim figure out the parts needed to fit your space. They put it together for strength and stability and supply you with very detailed plans. They also include all hardware including the hardware to fasten the top down with. All you need to get is the plywood. As others say it will be plenty strong as a self standing unit with the 1/2" plywood installed. 

There was one forum member that stained his Mianne benchwork and it really looked nice! He built shelves for trains between the legs too and it really looked nice. I believe it was in his family room or maybe even living room and looked like nice furniture. If I can remember the thread I will post a link. There were some great pictures in the thread.

Bob:

I used Mianne Benchwork for my current layout in CA and my prior layout in PA using essentially all of the same parts re-configured to fit the new space. I did need to trim down the legs 4" which I did on my miter saw and then re-installed the levelers which worked quite well.

Nothing is attached to the walls and the train table is very strong and stable.

I submitted an article to OGR which I expect to be published in the February issue with more details about my experience building a layout in the living space that I also refer to as "three dimensional art in motion with sound"©

Good luck with your project!

IMG_6994

When I installed the 1/2 inch plywood top, I brought the plywood out to the edges of the legs and trimmed the plywood edge with 3/4 inch moulding:

IMG_6989IMG_6990

On the side of the table that does not show in the room, I built a section I call the "power distribution center", shelves for transformers and a convenient ledge for my Legacy controller to sit.

IMG_6996IMG_6997IMG_6998

Attachments

Images (6)
  • IMG_6994
  • IMG_6989
  • IMG_6990
  • IMG_6996
  • IMG_6997
  • IMG_6998

Stangtrain,

Your layout looks great!  I see how you extended the plywood and put moulding on, and it really gives a finished look!  The shelves both front and back look great and are very functional.

This is my first comment on this topic, but I have joined in on other discussions about Mianne.  I will be starting a new layout in a finished room late this fall, I hope!  Thank you everyone for your input!!  I hope to visit the Mianne booth at York this week.

Yes, Dave is correct about the added cross braces for shelving on my Mianne. I talked to Tim about that before ordering and he added holes in the legs for the extra cross braces. That is why it's good to talk things over with Tim before ordering.

Also it was StangTrain above that had the beautifully stained Mianne with the train shelves added. He posted the pictures I was going to look for today. Thanks StangTrain, really does look nice! 

WOW!!!  Nice job on the layout and your neighbors must hate it when you run trains cause the whole area must suffer a "Brown Out" with their lighting

That's a lot of power you got there.

I called Mianne earlier and the machine said they'd be closed all this week, but I may call back and leave a message letting them know to contact me and that I've email them a plan (or 2).

I too am extremely pleased with my Mianne benchwork.  Tim did a great job adapting a published track plan to fit my space, and that was a free service!  I concur with the others who have said the benchwork doesn't need to be fastened to the walls.  My layout is a 20' x 18' folded dogbone with walk-in access, and it doesn't move at all even when I climb on it to work on scenery.  Regarding custom heights, I wanted a slightly lower height than the standard 40", and Tim accommodated me at no extra charge.  (From viewing the Mianne website, I gather that heights greater than 40" incur additional charges.)

I had built the benchwork for my previous two layouts from scratch, but at this point in my life it was either buy Mianne or not build this, my third and probably final layout.  If I had it to do all over, I would go with Mianne again.  The time savings that came from the screwdriver assembly was huge.  From the day I received the 7 cartons until I had laid all my track and had trains running as you see them below was less than 2 weeks.  (The truss bridge later replaced a plywood filler section.)

Tim didn't see all of my emails early on, so if you email twice with no response, call.  Once I had made that first phone call, our communications were clear sailing.

I've posted early images of my current layout in another thread, but it seemed pertinent to include one of them here:

IMG_2895

Stangtrain, I like what you did with the moulding on the table edges!  I'll probably go with something similar.

Attachments

Images (1)
  • IMG_2895

It's been said several times ... but I'll chime in, too.  Mianne Benchwork is free-standing and - IMO - is better not to be attached to the walls.  In fact, that's one of the reasons (among many) that I bought Mianne so that there would be no layout noise sent to the walls.

Mianne is great.  Very happy to be a buyer.


Last edited by rthomps
RETINPA posted:

I too am extremely pleased with my Mianne benchwork.  Tim did a great job adapting a published track plan to fit my space, and that was a free service!  I concur with the others who have said the benchwork doesn't need to be fastened to the walls.  My layout is a 20' x 18' folded dogbone with walk-in access, and it doesn't move at all even when I climb on it to work on scenery.  Regarding custom heights, I wanted a slightly lower height than the standard 40", and Tim accommodated me at no extra charge.  (From viewing the Mianne website, I gather that heights greater than 40" incur additional charges.)

I had built the benchwork for my previous two layouts from scratch, but at this point in my life it was either buy Mianne or not build this, my third and probably final layout.  If I had it to do all over, I would go with Mianne again.  The time savings that came from the screwdriver assembly was huge.  From the day I received the 7 cartons until I had laid all my track and had trains running as you see them below was less than 2 weeks.  (The truss bridge later replaced a plywood filler section.)

Tim didn't see all of my emails early on, so if you email twice with no response, call.  Once I had made that first phone call, our communications were clear sailing.

I've posted early images of my current layout in another thread, but it seemed pertinent to include one of them here:

IMG_2895

Stangtrain, I like what you did with the moulding on the table edges!  I'll probably go with something similar.

Joel,

I didn't see an email in your profile. This track plan looks very familiar. Would you share the source? Offline if you prefer, my email is in my profile.

Thanks,

Carl

Seeing these layouts makes me eager to get going on mine! 

Nothing is so easy as the job you imagine someone else doing.
 ()
John, sounds like you have to many other projects working, all work and no play makes GUNRUNNERJOHN a very dull boy.
I know when I first retired I had trouble getting out of the work mode. I understand though the work we love is not work.
Ray
 

RE: Mianne.

Thought I’d mention this because it’s York week. When I bought my bench work from Mianne at York (this was several year ago) they waived the shipping fees. This was their policy at the time (buy at York and shipping is free). That’s not an insignificant savings when you consider the cost to ship heavy bench work.

Another satisfied Mianne customer.

Last edited by johnstrains

Another benefit of bringing the plywood out to the edge of the legs is to provide a lip to attach (from underneath) controller switches for interactive accessories as well as switch track control - I attached my DZ 1002 controllers in this fashion as well near all switch track locations. While my trains are Legacy controlled (using SC-2s for switch tracks) it's nice to have the push button handy as well.

IMG_7006IMG_7007IMG_7003

Attachments

Images (3)
  • IMG_7006
  • IMG_7007
  • IMG_7003

Plywood overhang is a good idea. Also something I sort of regret not doing, but didn't think of it at the time. Maybe I can change a few things during my expansion one of these days.

Mark Boyce posted:

Joel,

Your's looks great too!!  I like seeing your turn-back curves and the angles involved, because that is what is on my plan.  Even though I have a fairly local Forum member who I am going to team up with helping on each other's layouts, I don't really feel up to figuring out and building my benchwork from scratch again either.

Might be worth sending your plan to Mianne to see what they can do for your layout. IMO, the Mianne is well worth the cost and it's so easy and fast to assemble with no mess! I think I said this earlier, but I am sold on using Mianne from now on. My wife even likes it and wants to make a table out of it for her projects.

rtr12 posted:

Plywood overhang is a good idea. Also something I sort of regret not doing, but didn't think of it at the time. Maybe I can change a few things during my expansion one of these days.

Mark Boyce posted:

Joel,

Your's looks great too!!  I like seeing your turn-back curves and the angles involved, because that is what is on my plan.  Even though I have a fairly local Forum member who I am going to team up with helping on each other's layouts, I don't really feel up to figuring out and building my benchwork from scratch again either.

Might be worth sending your plan to Mianne to see what they can do for your layout. IMO, the Mianne is well worth the cost and it's so easy and fast to assemble with no mess! I think I said this earlier, but I am sold on using Mianne from now on. My wife even likes it and wants to make a table out of it for her projects.

I think you are right about letting them look at my plan.

My wife and I help Tim and Lynn out in the booth both at York and Springfield. They got here Sunday and us Monday night. We will be setting up the booth tomorrow and Thursday morning. I spoke with him and alerted him to this thread and he thanks all for the nice comments that have been posted. The focus this week is on the show and a short time after until they get back to Massachusetts, unpack and get things settled. After next week, don't hesitate to call him at the shop. He is the only one who answers the phone.

Cape Cod Northern posted:

My wife and I help Tim and Lynn out in the booth both at York and Springfield. They got here Sunday and us Monday night. We will be setting up the booth tomorrow and Thursday morning. I spoke with him and alerted him to this thread and he thanks all for the nice comments that have been posted. The focus this week is on the show and a short time after until they get back to Massachusetts, unpack and get things settled. After next week, don't hesitate to call him at the shop. He is the only one who answers the phone.

Thanks!!!  I need to make sure I let him know the plan I emailed has already been changed   Nothing as far as trackage, basically the 45 degree corners.

I'll give him a call Monday or Tuesday.

I'm also getting my kitchen remodeled (find out tomorrow if the price is near what I think it'll be), both these projects ought to take care of everyone's Christmas presents for the next few years.

I'll be glad to get rid of my dropdown/duckunder section of track on the current layout, and more than doubling the mainline.  Hopefully next year I'll have the GGD Silver Meteor polishing the rails of a new layout!

Smart move John.

I've been playing with this track plan for a year now.  This will be in 2-rail code 148.  I'm getting/got sections of Micro Engineering track and have built six #5 (I think, I'll have to go back and look!) turnouts (3LH, 3RH):

DSCN0830_651

The 2-rail gurus have been a big help with the turnouts, but there's nothing like getting your feet wet to find out if you can do it.  Jay Criswell will be hearing from me soon (again) for more parts.

I've tested them and all my 3-rail equipment seems to run on them without any problems.  All my engines will be BPRC on this layout, I'm surprised the big flanges on the Williams brass USRA 4-6-2 don't bottom out but they ran great.

Attachments

Images (1)
  • DSCN0830_651

I spent quite a while at York talking with Tim both Thursday and Friday and I would have trouble thinking or a more accommodating person to deal with. As busy as he was when it was my turn I got his undivided attention for as long as it took to answer my many questions. 

I'm the type that likes to touch and feel before I buy and having done so I am totally impressed with the quality of this benchwork. I am also totally impressed by the attitude of the people I met at the booth at York. Tims answer to my many questions after going over my layout drawings was he could custom make whatever I need. Im having a hard time justifying going in any other direction.

One could certainly purchase one of the many "kits" that Tim has listed in his catalogue and then design a layout to fit the space. Rather than you conforming your layout to his benchwork, Tim would rather design his benchwork to conform to your layout. That would include available space, obstructions or space limitations, areas that need access. If you have a trackplan and send it to him, he can then design his benchwork to fit it rather than the other way around. If there are special features you want to put on the layout, rivers or water scenes, turntables, he can make sure they can be where you want them. This is a service that Tim provides at NO CHARGE. The more homework you do and the more information you provide to him, the more he can design his product to fit the layout you want to build.

gunrunnerjohn posted:

Just checking it on at York convinces me that it'll be a good investment.  I can build it myself, but I'd like to hit the ground running and get on with doing the actual layout.

John....I think you will be very pleased. Great product, and even better customer service.

Pics from 2011:

IMG_3235IMG_3246IMG_3264IMG_3265

More recent pics:

IMG_7599IMG_8119IMG_8157IMG_9032IMG_9036IMG_9040IMG_9041

I spent about $1000.....I figured it more than covered the ER copays that I would have had to pay to cover sewing my fingers back on...........I am terrible with woodworking and carpentry.......

Peter

Attachments

Images (11)
  • IMG_3235
  • IMG_3246
  • IMG_3264
  • IMG_3265
  • IMG_7599
  • IMG_8119
  • IMG_8157
  • IMG_9032
  • IMG_9036
  • IMG_9040
  • IMG_9041
Last edited by Putnam Division
gunrunnerjohn posted:

I'm going to let Tim design the benchwork to fit my space, that will logically give the best outcome.  My plan is to draw up a rough outline of what I think will fit and see what he can do with it.  I also plan on listening to his suggestions for any improvements.

This is what I did; however, the benchwork has grown toward the middle of the room since the original design, and is going to grow a bit more in the very near future. Tim was great at helping me to maximize my space. 


John

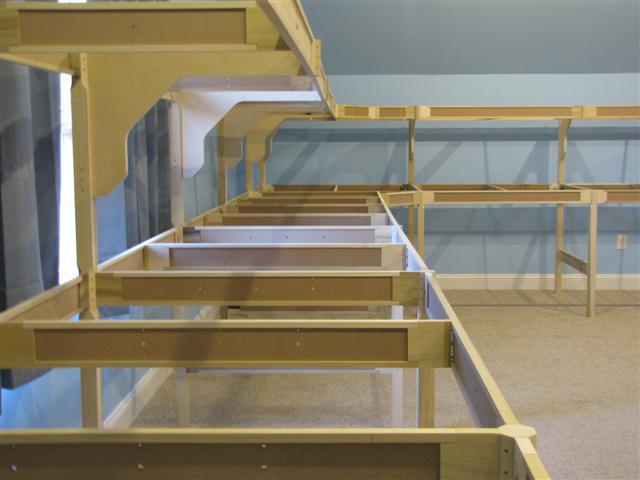
As I have said before, I am sold on the Mianne benchwork. Tim added extra holes in the legs for more storage shelves. I got the idea from Peter and then Tim helped me figure out where to put everything. You can see some of the extra holes in the top pic, leg on the right. Worked out great. 

IMG_0078IMG_0080

I initially ordered a 6'x16' kit. It arrived Fed-Ex in the 3 boxes shown below.

DSCF6069

This is what it looked like un-boxed and sorted while I was reading the directions, which were very detailed and color coded.

DSCF6074

Here it is partially assembled.

DSCF6077DSCF6078

The table completed and ready for the top.

DSCF6081

A trip to Home Depot the next morning for the top made of 1/2" sandply. HD cut it to size for me so I could handle it myself. And below is the completed kit with top installed. This took me about 7-8 hours total, including the trip to HD for the plywood. Very easy and very fast!! No saw, no sawdust and no mess!! Just a screw driver and rubber mallet as I recall. Rubber mallet not actually required, I already had a couple.

DSCF6088

You can also see here what has been mentioned about the center to center measurement. Plywood, when installed, is 6' wide and 16' long and as you see there is about half of the cross braces and legs left exposed so the benchwork is actually slightly larger than the stated 6'x16' size of the kit. I believe they explain this on their website as well.

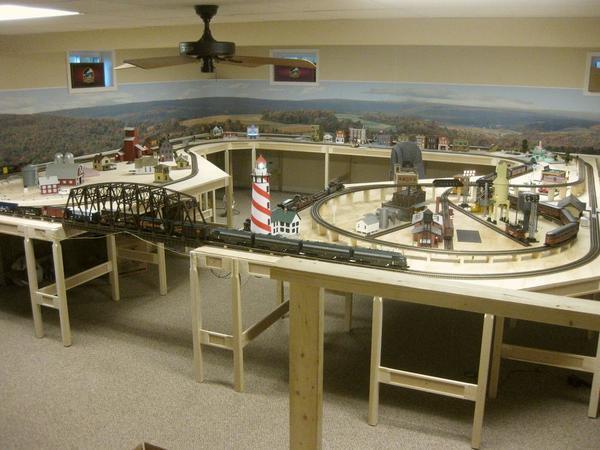
A couple of weeks later I ordered the cross pieces for the extra shelves and also a transformer cart (not shown). Shelves were an easy add with the holes they put in the legs for me on the initial order. All parts and hardware is included, including all the screws and brackets to fasten down the top from below. Nothing else needed but the plywood for the top.

This was their standard kit at their standard leg height of 40". This can also be modified at time of order. Just about anything can be somewhat customized if you go over it all with Tim before ordering. Needless to say, I am a big fan of Mianne!!

Attachments

Images (8)
  • IMG_0078
  • IMG_0080
  • DSCF6069
  • DSCF6074
  • DSCF6077
  • DSCF6078
  • DSCF6081
  • DSCF6088
Last edited by rtr12

Sandply is about the same price as birch, but when I got mine the sandply had more plys and looked much better than the birch and other furniture types they had. It is really pretty smooth on both sides although pretty sure one is supposed to be better than the other. 3 years ago the 1/2" was about $35 for a 4'x8' sheet. Tim also recommended 1/2" sandply when I asked about the top. 1/2", IMO, is plenty strong and also lighter and easier on old backs and knees, especially if you have them cut it up into smaller, more manageable pieces. They did that for free when I got mine.

I am still excited about mine (in case you hadn't noticed) and glad to see you guys getting excited about it too!  It also looks good too, IMO. My wife even asked me about getting a table made from Mianne. One forum member, Strangtrain (I think it was) stained his and it really does look like nice furniture. He added shelves to the sides and some other stuff and it really looks good. I believe he has it in his living room or family room, very nice! He may have posted pictures earlier in this thread, I have seen them somewhere around here fairly recently.

Thanks guys!  Anything lighter is fine with me, I need to get it cut so I can carry it upstairs and get it around a corner.  I made the railing so it comes apart and know a 36" wide piece 8' long can go up, maybe a 48" wide can but I don't need any.

My dad was a carpenter and I saw him carry 2 sheets of 3/4" plywood around like it was nothing, 5'-6" of pure muscle.  I'm not sure if I could have done that at 25, but at 66 I'm not even going to try

IMO, Mianne Benchwork is very nice, well made and constructed with precision, but I preferred to have most of my layout bench work constructed by a carpenter from one inch clear 1 x 4 pine.  My basement has a humid environment and all wood construction seemed the best way to go. I would not feel comfortable with table work with masonite (that is not solid wood) in my hostile basement environment.

Dennis LaGrua posted:

IMO, Mianne Benchwork is very nice, well made and constructed with precision, but I preferred to have most of my layout bench work constructed by a carpenter from one inch clear 1 x 4 pine.  My basement has a humid environment and all wood construction seemed the best way to go. I would not feel comfortable with table work with masonite (that is not solid wood) in my hostile basement environment.

A dehumidifier should be used for a variety of reasons if you really have a humid environment, excess humidity can adversely affect all sorts of stuff on the trains, especially modern stuff.

It seems that Mianne has addressed this concern in their FAQ, and they also use hardwood instead of pine.    I find it hard to believe that clear pine is going to be more dimensionally stable than what that Mianne's design has done.

Q. Why not just use solid wood for frame members instead of I-beams?
A. There are a few of reasons for utilizing a built up I-beam instead of solid wood.
1) Stability - every piece of wood is different and therefore reacts to seasonal changes differently. Our I-beams have a MDF core, with a hardwood frame. This creates consistent seasonal movement in all pieces. More stability equals more reliable trackwork and running of trains.
2) Consistency - the I-beams are produced on dedicated machines and are therefore consistent in tolerance. This makes for easy and reliable assembly.
3) Weight - we have achieved great strength with low weight. This makes for easy construction and helps keep shipping costs down.

Last edited by gunrunnerjohn
Dennis LaGrua posted:

IMO, Mianne Benchwork is very nice, well made and constructed with precision, but I preferred to have most of my layout bench work constructed by a carpenter from one inch clear 1 x 4 pine.  My basement has a humid environment and all wood construction seemed the best way to go. I would not feel comfortable with table work with masonite (that is not solid wood) in my hostile basement environment.

Dennis,

You have made this same statement ever since you joined (since around 2003) the OGR forum and when the Mianne Benchwork subject comes up. You may choose to believe that a 1" piece of clear soft pine is less apt to warp than an engineered piece of straight grained poplar that is glued and stapled into an "I" beam configuration (with an MDF core) if you like. If the humidity in your basement is as "hostile" as it is, the least of one's worries would be a model train layout located within it. ( I think I have been saying this in response to your post since 2003).

I am now working on my second layout built on Mianne benchwork. The first layout (12-by-8) was begun in 1999 and took about five years to complete. It is still up and running. The second is 10-by-5 and 90% complete. I would never consider doing a layout on anything except Mianne benchwork. Tim Foley is a very capable and helpful fellow.

MELGAR

MELGAR_12X8_LAYOUT_OVERVIEW

2017_0716_10X5_LAYOUT_STATUS_43_OVERVIEW

Attachments

Images (2)
  • 2017_0716_10X5_LAYOUT_STATUS_43_OVERVIEW
  • MELGAR_12X8_LAYOUT_OVERVIEW
Last edited by MELGAR

I have been very happy with my Mianne benchwork. As has been pointed out, it is a well designed and manufactured product. It allowed me to jumpstart building my first ever layout, and since I am not a good carpenter, the end result was infinitely better than anything I could have done myself. Likewise, when I wanted to add a freight yard a year after I started, Tim was able to easily tie the addition into my existing layout.

One point I would like to strongly underscore was Gunrunner's comment about leaning on Tim for help with the design. I would definitely recommend getting as much help as possible from Tim. My problem was an unfortunately placed lally column which supports the central support beam of the house, so moving it wasn't an option!!!  I gave Tim the best room measurements I could and he sent me back a design diagram showing a way to get what I wanted with less than an inch to spare around the column. Keep in mind that all Mianne measurements are from the center of the I-beams, so my 30" system (which is the width of the plywood top) is actually 31.75" wide.

IMG_0910

This leads to an issue which was mentioned above - what to do with the edge. In my case, bringing the plywood out to the edge would have created a good bit of waste in cutting the plywood/homosote. I chose to attach a band of 1"x2" pine around the top which covers most of the tops of the legs, all of the edge of the plywood and homosote, and gives a lip that keeps and scenicing material on the board!!!

IMG_0911

Attachments

Images (2)
  • IMG_0910
  • IMG_0911

I believe the Mianne to be well constructed and generally a nice system.  For me it is really a case of how much you want to customize your self.  I think you either like to build bench work, and have the tools, or you don.t, and it is a necessary evil.  

If you don't like building bench work, then this system is for you, if you like to build then a trip to the lumber story and your pick of building materials.  For me,  like to build bench work, so while this is very nice, it was not for me.

Rich883 posted:

I believe the Mianne to be well constructed and generally a nice system.  For me it is really a case of how much you want to customize your self.  I think you either like to build bench work, and have the tools, or you don.t, and it is a necessary evil.  

If you don't like building bench work, then this system is for you, if you like to build then a trip to the lumber story and your pick of building materials.  For me,  like to build bench work, so while this is very nice, it was not for me.

I agree. I like building benchwork also

But, sometime buying ready made benchwork is almost a necessity. I built my first O layout when I was still in the Army, living in an apartment with my wife and tiny kids. I wanted a layout for them, so I bought benchwork from Sievers. (Amazing, light stuff btw .... still as solid and warp-free as the day UPS delivered it)

Jim

I was going to do my own bench work. I always thought about  how to design it with versatility so it could be reworked if I decided to change it up.  Also wanted to keep the design light weight.  The Mianne bench work looks great and very adaptable. I'm sold and would like to use it so I can get to running trains faster.  Is it fairly stable when completed?

PRR Mark posted:

I was going to do my own bench work. I always thought about  how to design it with versatility so it could be reworked if I decided to change it up.  Also wanted to keep the design light weight.  The Mianne bench work looks great and very adaptable. I'm sold and would like to use it so I can get to running trains faster.  Is it fairly stable when completed?

It's very stable--especially after you attach plywood to the top.

Mianne is usually pretty busy for a while after York, so be patient. I got my first order in about 2 weeks, placed it in mid August I think it was. The 2nd order (much smaller) was placed right around the time of the fall York meet, just before I think it was, and it took at least a couple of weeks longer than the first. Of course a week of that was their trip to York.

It will be very solid when the top is attached. It is also very easy to re-arrange, modify or add on to by just ordering different (or more) parts which they sell separately. They will help you figure out what you need with that too. As was said above, it's a really well designed and thought out system. Also, fast, easy, no hardware to buy and no mess. 

GRJ, I hope you have recovered from your big race last Sat. !! 

You shouldn't have any problems if it takes a while then. I am also pretty patient myself. During my working life everything was always 'we need this yesterday' so I try to just go with the flow these days! Whenever something gets here, it gets here and I am good with it. 

I hope you are pleased with it, which I am pretty sure you will be. It is really neat stuff and as I have said, I'm 100% sold on it. Good luck!!

Mark Boyce posted:

Thanks RTR, I have always been told I am a very patient man.  With 4 needy seniors and an empty house to take care of, my order will probably sit in my train room a while before building any way.  LOL

Mark;

Looks like your plate is pretty full, but from experience I can tell you, don't forget to look after yourself. One of the beauties of the Mianne system I found is that you don't need to do everything at once (unless you are one of those people who has to finish something once you start!!!). When I received my shipment, I laid out all of the pieces and then started putting together the leg assemblies, then assembling the corners, and finally, adding the connections between the corner. My recommendation would be to put together at least one small piece every day to take your mind off "real life", even if for a few minutes - it also helps to keep the ultimate goal in sight. Here are a few pics of the early stages of my build.

IMG_0075

IMG_0076

IMG_0078

IMG_0083

Attachments

Images (4)
  • IMG_0075
  • IMG_0076
  • IMG_0078
  • IMG_0083

Paul,

Your advice is well taken.  My wife and I are trying to not let the seniors overrun us.  At 61, we aren't as young as the older folks (her mom especially) think we are.    Have to get everything done right away?  No, I gave up on that many years ago.  I have an MTH PS-3 upgrade sitting on my work area 3/4 finished that has been going on since mid summer.    If I didn't have an electronics background, I could never get away with that.  I like your plan of just keep plugging away.  You have a very nice room for your layout, though I see your May Pole right in the middle.  We work with what we have.  I have a nice room too finally, although it is only 11' 6" x 11' 4"; it is the largest space I have ever had for a layout, going back to when I was about 12.  Thank you for the advice!!

Last edited by Mark Boyce
gunrunnerjohn posted:

Paul, I'm curious about something in your pictures.  You seem to be in a basement, yet you have a wood floor.  How exactly does that work?  Are you going to leave it that way?  I gather it's probably yes as you're building the benchwork on it...

John;

You are correct, my layout is in an in-ground basement. When I built the house a bit over 20 years ago, the basement was just a concrete slab floor and concrete block walls. Shortly after I moved in, I had the first of three "floods of the century" - I guess Mother Nature was catching up on floods. I put in the floor (tongue and groove plywood over pressure treated 2x4's) to raise everything, including my feet, off the cold concrete floor. I tried putting peel and stick tiles on the floor, but that didn't work out too well, so I left the majority of the floor bare. Before I began the layout, I put up the wood paneling and some insulation which led to some umbrage when I suggested that I had a crappy basement. Umbrage aside, it is a crappy basement!!!

Apples55 posted:

John;

You are correct, my layout is in an in-ground basement. When I built the house a bit over 20 years ago, the basement was just a concrete slab floor and concrete block walls. Shortly after I moved in, I had the first of three "floods of the century" - I guess Mother Nature was catching up on floods. I put in the floor (tongue and groove plywood over pressure treated 2x4's) to raise everything, including my feet, off the cold concrete floor. I tried putting peel and stick tiles on the floor, but that didn't work out too well, so I left the majority of the floor bare. Before I began the layout, I put up the wood paneling and some insulation which led to some umbrage when I suggested that I had a crappy basement. Umbrage aside, it is a crappy basement!!!

Thanks, makes perfect sense.  I have to say, it's the first time I can remember seeing a basement with a wood floor, but the reasoning seems pretty solid.   I've never had water in the basement, but I've come close when we had 7" of rain in about 8-10 hours.  I had to put a 3rd sump pump in the hole and toss the hose out a window to keep up with the incoming water!

Last edited by gunrunnerjohn

A company called DriCore makes these 2'x2' tongue n' groove subfloor panels that have a rubberized bottom that raises the panel about 7/8" off the basement floor, which may be an option for those designing a new train room and wanting to use a floor besides the cement slab. They also make a leveling kit to go with it.

https://www.lowes.com/pd/DRIco...SB-Sheathing/3603370

It's also a bit lower than using 2'x4's for those with height restrictions.

Wish they had made it 30 years ago when I re-did my basement.

Richie, Those are pretty nice.  I was looking at them a few weeks ago at lowes.  My train room is on the basement level; walk out to the patio.  While there is no moisture problem there, the floor is hard and gets cold in the winter.  I plan to put something down.  I was looking at the carpet squares also.  I don't know yet.  Thank you for the link.

Like John, mine is fully carpeted, but I always sweat the "100 year" rains that seem to occur every few years nowadays, rather than every 100 years.

Mark - don't know if you also have to be concerned about the height of the DriCore. You don't want to trip every time you go in or out of the patio. For a 12'x12' room the DriCore would run you about $225, plus the cost of carpet squares on top for a nice, finished look. If there's absolutely no water issues though, I'd think about just a vapor barrier and a commercial grade carpet from a discount remnant store.

Add Reply

Post
The Track Planning and Layout Design Forum is sponsored by

AN OGR FORUM CHARTER SPONSOR

OGR Publishing, Inc., 1310 Eastside Centre Ct, Suite 6, Mountain Home, AR 72653
800-980-OGRR (6477)
www.ogaugerr.com

×
×
×
×
Link copied to your clipboard.
×
×