I'm building a track and plan on suspending it. My room is 24x10 and has a vaulted ceiling to one side. One side is 25' at 9' height and the other is 25' at 12' height.

My plan is the have run at 9' around until it reaches the 12' wall and do a spiral at each side. I plan on using L bracket supported by fishing line from the ceiling with the spirals using more lines for support.

I'm new to this so please be gentle lol. I'm here for advice and I believe the planning of this is the most important step. Any information would be greatly appreciated!

Original Post

Replies sorted oldest to newest

Can't picture exactly what you are planning but I have lost some strong tugging fish due to broken fishing line  over the years.  I would think first of fine metal cable as is used for decorative modern lighting.  Maybe even clear plastic subroadbed as used in restaurants.  I seem to remember Flounder rigs have a metal connecting cable.  Not sure what it's breaking point is.  Just not warm over line, think string, think $$$$ train.

Think of the extensive  damage resulting from a 9' drop, also a possible injury.  Nix on the fishing line.

There are no bad questions on this forum.  Maybe some interesting answers but all questions are in play.  Thank you for asking.

By my own calculations, the helix (spiral) would have to be at least 6.5 feet in diameter, to permit a minimum of 7" between successive turns.  You would need 5 1/2 turns to achieve the desired 36" difference in height.  The grade would average about 2.8 percent.  That's as steep as I would go personally, and I don't advise using any curves sharper than O72. This is for a very basic single-track helix.  There are more complex variations with two tracks, sidings to store a train out of sight, etc.

I believe @Susan Deats has a spiral like this, and I believe hers is also suspended from the ceiling.  Maybe she will chime in and share some details of its construction.  Check out this link provided by Dale Manquen:

Susan Deats' Run Room

A popular way to support successive layers of the helix, is to use threaded rod.  This allows adjusting the height of the sub-roadbed in precise increments.  Good luck with your project!

I'll check out the cabling. So I'll use L brackets to hold the track. I only suggested the line as an additional support at the end of the L bracket. I believe the L brackets will hold it just fine so the line is probably overkill, possibly decorative.

Where the cabling may come in handy is the spiral. When the track goes across the 10' walls it'll hit a spiral on each side to go up or down from the 12' walls. I'll need to depend on some suspension there.

Flounder? I think we need a bigger boat...

https://www.amazon.com/dp/B005..._apa_i_0z4kFbJA8Y6J1

Fluorocarbon allows light to pass through which is why I was leaning to it. That's 80 lbs test that would take an unbelievable amount of pressure to snap. Flounder would use 12-14. I'd just need to use enough lines but I'm definitely going to look into the cables because I think I might like that metal look a bit more.

My understanding is the key here will be the spirals radius and pitch. Everything else I think is just spacing out the L brackets at a safe distance.

@Ted S Thanks that's super helpful.  Hoping not to walk into this shop on Friday completely clueless.

I'm going to stick to single tracks and if I add a train in the future I'll split it down the middle on the 10' walls and suspend a double track down the middle going 25'. That's the idea for an easy expansion at least as well as avoiding adding any more helixes. Basically one train would run a level oval at 9' and the other would travel across the room next to the 1st one while still using the helixes to go up and down.

On the high end I don't have to go all the way up but I would like to make one turn at least in a helix at those two corners.

If you have any advice for a reasonable helix that won't overlap and how much higher that would get me on the high wall I'd appreciate it.

Thanks for all the help from everyone so far!

Last edited by Sprovo

You have 10' of wall to play with too, so why not use it to split a helix into an oval wedding cake version. I.e., a switchback without switches might be possible if you can manage the over/unders . 

You are aware of super elevation and proper transitions for 6 driver & longer steam to handle curves or grade changes?

Cable won't work well for hanging without some lateral bracing too IMO. For something static maybe, but the centrifugal forces, especially downhill are gonna cause some sway. (I've strung thousands of cable hangers and rod suspensions in industrial applications. Rod is the way to go imo.

3' at 6" per loop is 6 loops. 72xπ 226.195"÷12 = 18.85' length per loop. Seems steeper than 2.5% offhandedly.  

I'd run a 90°/ -l (T) rod/tube brace laterally to both walls and across each dia if possible, cable supporting the vertical. With an oval you'd still have I.D. pop-in ability w/36" reach into 72" curves  (-l👈😬👉l-) 

If I'm allowed to solder the rails together/ solder a wire tether to hold them/use lionel tubular track clips/, etc. then the T really isn't needed as bad.

It is not physically possible to raise the track to 12' in this room with a 6' diameter spiral. The spiral extends back 6' from the 12' high wall toward the 9' high room wall. The ceiling has a 30% slope to get from 9' to 12' in a 10' horizontal run. So the spiral will touch the ceiling where it is only 10'-4" high. With a 3% grade on the spiral, then one half of the spiral return to the 12' wall gives 3" of additional rise to a maximum height of 10'-7" for the track. I did a small amount of rounding off on the numbers. Assuming we are starting with an 8'-6" track height on the 9' high wall, then the height of the track on the 12' wall will be 10' to 10'-2".

@Sprovo posted:

Any advice for measuring the grade and keeping it under 2.8? I can pitch the track up and down on the 10' wall to make up some of the lost height by downsizing the helix if need be. It'll make the first turn at the wall so it'll have a 2.8% grade for as far as I can on the 10' walls.

A grade is calculated as rise over run.  With a 6.5-foot diameter helix, each circle is 245" around, that's more than 20 feet of run.  If it gains 7" in height on each loop, 7 / 245 = .0286 or 2.8%.  Personally that's as steep as I would want to go.

It's always possible to reduce the steepness of the grade by achieving the same height over a longer "run."  So you could make the helix 8 feet in diameter instead, which would reduce the grade to 2.3%.  If your equpiment requires O72 curves, 6.5 feet is about the smallest you can use.  Even for smaller equipment, it's best to avoid sharper cuves because longer trains will tend to stringline.  One rule you can't break is that the track cannot cross over itself unless there's at least 7" of separation between levels.  I'm allowing about a half-inch for the sub-roadbed (wood supporting the track.)

If I'm understanding you, you're asking about putting curves in the corners of your room, and having a "ramp" along the side walls.  The track will still have to swing out from the wall as you approach the corners to turn back on itself.  My gut instinct is that a circular helix will have the smallest "footprint," leaving more sq ft. in the room for the rest of the layout.  It might also be easier to construct.  Your yards, sidings, industries, etc. can be dead-level along the 24' walls. 

You might be tempted to keep the curves level, and use the straight run to create a "ramp."  You have to be careful about transitions from flat to graded track.  Often they cause more problems, loss of traction, etc., than the grade itself.  So once your train is on the grade, you really want to keep the drag as constant as possible until you top out at the next level.  If you make those transitions gradual like you should, you might find that parts of the grade have to be even steeper to achieve the same total increase in height.

I've been using a layout design software called SCARM, which I heartily recommend.  I've attached a helix I made for someone else.  Including the transition back to the wall, its dimensions are 6.5 x 10 feet.  If you also have this software, you're welcome to integrate the .scarm file into your own plans.
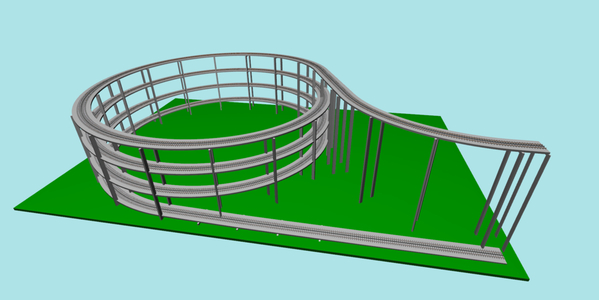
Helix 6pt5 by 10

Attachments

Images (1)
  • Helix 6pt5 by 10 image
Files (1)
Last edited by Ted S

@AmFlyer Sounds like a valid point on the slope of the ceiling. Maybe I can do a helix closer to the short wall and another at the tall wall. They'd overlap by about a foot in the middle based on the 6' you guys have mentioned so I guess if there's enough clearance for the train to pass under the second helix while it's at the top of the first one that might work?

Maybe 2 turns on each? Seems like that might get me a little over 2' and I can pick up a little more with an slight incline between the helixes across the 10' walls.

Thanks I really appreciate the knowledge and all the help from everyone!

My helix has 3 1/2 turns and it only gains 2 feet.  At the minimum and recommended 7" per turn, you would need 5 1/2 turns to gain 3 feet.

You actually don't need 2 helixes because that would use up almost all your space.  Just one at the end of the long wall can serve as the transition between levels.  Each level would be like a shelf that wraps around the room.  At the "end" of each level (furthest away from the helix), you can create a loop, or a reversing loop that sends the train back along the same level.

If I get a chance I'll make a rough sketch to show  you what I mean.  Interesting project!!

@Ted S The space isn't an issue. I don't mind multiple helixes on each 10' wall. That still leaves 13' in between.

Let me put it this way. There's an 8' bank of 8 slots coming off one of those walls lol. Outside the box with design is welcome here. I might take my old LGB set and run it in an oval over on top of the slot machines.

I believe someone said I'd need about 6 turns to reach the target height. I wouldn't even mind 3 double helixes across both 10' walls that overlap to fit. Looks cool in my head.

If you want to see how someone on this Forum built their helixes, click here. This is Big Boy 4004's Dream/Nightmare thread. You need to go way back to some where in the first 10 pages or so. (The thread is currently 50 pages.) Quite insightful. When I saw what he did, I decided not to build a double layer layout. The helixes do use a lot of real estate! If you go with O72, plan on using roughly 64 square ft. (8x8)   6x6 does not allow for overhang!

Chris

LVHR

@dkdkrd I'm definitely leaning to the side of caution. I've been researching the cables the other options mentioned here for suspension. Maybe I can use the line I originally was thinking of using for suspension as safety line grids going around the helixes so in the event of an issue it would be contained to where it happened.

I plan on restricting the controller speed and keeping it in a safe place where only I can access it.

I live alone so no kids to worry about besides friends that bring theirs over. The room will mostly be used for entertaining casino nights.

I've been in the commercial security industry for a long time and grew up around it so I'm programmed for caution lol.

A helix does not have to be round.  If you make it a series of ramped ovals that will increase the run for each lap and you can cut the grade % way down.  I would run cars which would permit vertical separation of  less than 7".

I have had situations where + or - 5" of net clearance worked out fine.  High cube cars are not your friend in certain situations.

To keep trains from string lining into the abyss reducing speed is not that effective.  String line pulling off to the inside can occur at any speed.  It is more an action of weight distribution through out the train consist.

A reverse super elevation is  consideration for keeping the train on the track .

Suspended trains in a local supermarket and a diner uses 1/4" clear plastic  foundation with two cable safety wires on each side of the train.  A derailment  would be fully contained.

No amount of words or signatures will keep you from being sued.

@Tom Tee Great point with the oval. I planned on the foundation to be acrylic or plexiglass and I'm keeping it to a single track so I can make it as wide as need be to contain a derailment.

I've been cutting plexiglass recently and learning about cutting acrylic. Worst case is I bring the dimensions of the rounded cuts to a glass shop. I think I can use strong double stick tape or even glue to sequre the tracks to the clear foundation.

I picked up the train tonight! It's an MTH NJ Transit E8 Diesel Set

https://mthtrains.com/30-20437-1

Unfortunately I'm unable to find any passengers cars for it so I'm using Lionel NJ Transit cars from this set.

http://www.lionel.com/products...t-u36b-4167-6-30169/

I'm going to continue searching for the MTH ones but these will do for the time being.


Update

I have big ideas but I'm a reasonable person. The helixes are biting off more than I can chew. New plan...

So it's 24x10 with the ceiling at 9' and 12' on the 24' runs. On the lower end I'm mounting 12" sheets of 1/4" acrylic as a shelf across. At each end will be a 4% grade Woodland Scenics foam trestle.

That gets me to 7'7" so the acrylic shelf on the 10' walls will be mounted at that height also with a trestle on each side getting me another 7".

I'm then at 8'2" on the 24' long high wall.

I've found some 3D 1/2" deep buildings that will take advantage of the addition height from the track to the ceiling on the high wall.

Also I've abandoned the use of the Lionel passenger cars and will be modifying New York Central MTH RailKing Streamlined cars as NJT. That should balance the line much better.

The train will be set closer to the wall to leave room on the acrylic shelf to catch a possible derailment.

I'm building the layout on the ground this week for testing.

If the 12" of shelf isn't enough to protect the train in a derailment I plan on mounting eye bolts above and connecting safety lines as a barrier from anything falling as well as addition stress support.

Any advice on track brand, corner track size, depth from wall, trestle positioning, shelf thinkness/dimensions or can anything you can think of would be a help.

I appreciate all the advice I've gotten here and you've likely saved me from jumping into something that really isn't for someone doing their first layout.

Last edited by Sprovo

1/2" or better thickness (depends on how far apart the bracing is, but I'd start at 1/2")

Positioning from the wall you must look at the curve dia overhang on your worst offending rolling equipment, as that overhang continues into the straghts a few inches.

Track brand, I'm partial to Super-O and GarGrave, but tubular is fine up on a shelf. I also really like the long track pieces of the latter two.

Tressel spacing goes 1 per joint. The joints need support.

For one 36"-40" I'd use 3 or 4 as the length can twist some as well if not supported. (some locos and stock are very heavy, some light; also a factor.)

Play with the 4% grade on the floor with short and long trains. It still may be steeper than you think. Pay attention to how much of your attention to the throttle is needed and if that suits your real life run style.

(I wish I could've managed less, even 3.5%.  Those PW over unders are small trains that use the curve geometry to a traction advantage as well. It's a careful balance on those.  (I guess maybe I just like long trains; eight to ten cars to climb is a little shy of my norm on flatland tracks.)

Add Reply

Post
The Track Planning and Layout Design Forum is sponsored by

AN OGR FORUM CHARTER SPONSOR

OGR Publishing, Inc., 1310 Eastside Centre Ct, Suite 6, Mountain Home, AR 72653
800-980-OGRR (6477)
www.ogaugerr.com

×
×
×
×
Link copied to your clipboard.
×
×