DoubleDAZ posted:

Roger, I'm not trying to be argumentative either, but it sounded like you were/are upset by the comments. My caution was about resale value when you cut a costly switch. It destroys the resale value and alters the geometry forcing you to cut more tracks to make things fit. And if you don't do it right, you can end up with problematic joints, especially with already tight O31 curves and passenger cars that are generally longer than other rolling stock. I wasn't saying it won't work.

In your design, you appear to be joining 2 cut O31 switches and adding a small piece of cut flex track to complete the O31 curve into the siding. In all I counted 10 switches and a bunch of small pieces of flex that you plan to chop up. I don't know how much experience you have with flex track, but it might not be as easy as you think to bend those small pieces. And that's not even considering the small "S" curves you have in your yard. Even NJSCOTT said he wouldn't do it again and he was cutting #4s which don't have the tight turnouts of the O31's.

And when you asked in the other forum, did you tell them you were cutting 10 O31 switches and a bunch of other track or show them how you were going to make all this stuff fit? No one here said you can't cut a switch, but you're chopping up a bunch of switches and track and I can't imagine many members here suggesting you do that.

Also, when I commented, alternate designs had been offered and not having to cut switches was a reason to consider one of those designs. However, I also said that if you want to stick to your original plan, then the only option is to cut them. I was just offering the cons of cutting before you made your decision to try to build the original design.

And I don't know what the limitations are for your bench work space and why you can't expand it so you don't have to cut so much track. I get that you want what you want, but you asked for comments, so we gave them. I think you're asking for trouble with all the cutting, especially all the small tight curved pieces, to make things fit, but it's your choice and I hope it all works out. I recently bought some ScaleTrax flex track and bending a full section, much less just a small piece, to O31 is not an easy task.

I apologize if I gave any impression of being upset about any of the comments made here. I have the highest regard for everyone in this forum, and that is why I have asked for comments and opinions. In fact I am at present trying to rework my layout to incorporate some of these suggestions, as well as some of the aspects of Ace’s alternate layouts.

I asked about the cutting down of the switches, not because I am upset that several have spoken against it, but honestly because I want to hear the cons regarding doing that, before I get too committed to it. 

Now that said, I really have tried to be clear, and have stated several times, that I plan to use Ross Switches and Track exclusively, and that the Atlas flex track, and other bits that are not Ross, are only shown in my plan, so that I could get actual finish out lengths of straight track in the SCARM software plan. I have used the longest Ross sections available, and then filled in with Atlas flex track, making sure not to use any sections that are longer than the longest Ross sections (29.3”). I have also used Atles flex track to create special length curves that would be cut from standard curve sections. Further, the pieces making up my straight sections are still subject to a fair amount of redesign so that there will be as few short little pieces as possible.

Again, I sincerely appreciate all of the comments, suggestions, and recommendations given here. I will use some, but probably not all of them. 

Roger

Here is another idea that retains the passenger siding and long passenger platform, but it brings back O31 curves. All track is Ross, cut to fit as necessary. It doesn't have reversing for both directions unless a cutoff track is added across the upper oval, which disturbs the platform location. However trains can back through the wye to reverse from counter-clockwise to clockwise direction.RWL layout 131aRWL layout 131b

Attachments

Images (2)
  • RWL layout 131a
  • RWL layout 131b
Files (1)
Ace posted:

Here is another idea that retains the passenger siding and long passenger platform, but it brings back O31 curves. All track is Ross, cut to fit as necessary. It doesn't have reversing for both directions unless a cutoff track is added across the upper oval, which disturbs the platform location. However trains can back through the wye to reverse from counter-clockwise to clockwise direction.RWL layout 131aRWL layout 131b

Looks pretty good Ace.

As I said before, you must love playing with this software as much as I do, probalby more.

I have to learn how to cut track. The only way I know how to get specifict lengths is to use the Atlas flex tack, and select the strait function.

RWL posted:

I asked about the cutting down of the switches, not because I am upset that several have spoken against it, but honestly because I want to hear the cons regarding doing that, before I get too committed to it. 

Now that said, I really have tried to be clear, and have stated several times, that I plan to use Ross Switches and Track exclusively, and that the Atlas flex track, and other bits that are not Ross, are only shown in my plan, so that I could get actual finish out lengths of straight track in the SCARM software.

For my part, I guess I'm frustrated because I don't understand why the question keeps coming up, so I'll apologize for that. Those of us against cutting switches have said it's because we think switches cost too much money to be chopped up and require more tracks to be cut to make things fit. It's no more complicated than that. So if you don't care about the cost, etc., we can move on, but I see yet another design has been posted to try to avoid cutting switches.

And, you're right, I forgot the flex was just there to fill in, sorry. I would have used the snip off tool to put pieces of curved track in rather than use flex to avoid the confusion. And until now I didn't realize the snip off tool didn't work on switches, so maybe that's something Mixy will take a look at.

I happen to like your original design. I like to run trains, so I'm all for having as much track as possible. And although I like the idea of separate sidings on both sides of the passenger station, presumably so trains run in different directions like a real station, its design and that of the yard requires cutting a lot of track, too many for my tastes.  But like we always say, it's your layout, your money and your time.

RWL posted:

I have to learn how to cut track. The only way I know how to get specifict lengths is to use the Atlas flex tack, and select the strait function.

Check out the Snip Off tool. You highlight a track, place the cursor where you want to cut, right-click and select Snip Off. Then just delete the part you don't want. If you lay 2 tracks like you have, you can estimate where one or both need to be cut, so they'll join properly. It takes a little practice and doesn't work with switches.

DoubleDAZ posted:
RWL posted:

I asked about the cutting down of the switches, not because I am upset that several have spoken against it, but honestly because I want to hear the cons regarding doing that, before I get too committed to it. 

Now that said, I really have tried to be clear, and have stated several times, that I plan to use Ross Switches and Track exclusively, and that the Atlas flex track, and other bits that are not Ross, are only shown in my plan, so that I could get actual finish out lengths of straight track in the SCARM software.

For my part, I guess I'm frustrated because I don't understand why the question keeps coming up, so I'll apologize for that. Those of us against cutting switches have said it's because we think switches cost too much money to be chopped up and require more tracks to be cut to make things fit. It's no more complicated than that. So if you don't care about the cost, etc., we can move on, but I see yet another design has been posted to try to avoid cutting switches.

And, you're right, I forgot the flex was just there to fill in, sorry. I would have used the snip off tool to put pieces of curved track in rather than use flex to avoid the confusion. And until now I didn't realize the snip off tool didn't work on switches, so maybe that's something Mixy will take a look at.

I happen to like your original design. I like to run trains, so I'm all for having as much track as possible. And although I like the idea of separate sidings on both sides of the passenger station, presumably so trains run in different directions like a real station, its design and that of the yard requires cutting a lot of track, too many for my tastes.  But like we always say, it's your layout, your money and your time.

Thanks for that.

BTW, the reason for the two long sidings is because I have two fairly long passenger trains that I would really like to have on the tracks at the same time. One is a Lionel Grand central express with the 3 3 passenger cars and the extra baggage and dining car, and the other is a set of 4 Pennsylvania Madisons plus the extra combo car, behind a Polar Express Berkshire and tender. Both are right at 80" long, and all are O-31 compatible.

I do understand about the switches, and I really don't want to cut any more than I have to. 

RWL posted:

BTW, the reason for the two long sidings is because I have two fairly long passenger trains that I would really like to have on the tracks at the same time. One is a Lionel Grand central express with the 3 3 passenger cars and the extra baggage and dining car, and the other is a set of 4 Pennsylvania Madisons plus the extra combo car, behind a Polar Express Berkshire and tender. Both are right at 80" long, and all are O-31 compatible.

I figured that, just didn't know how long your passenger trains were. SCARM says the length of the track between the switches for the top siding is just over 77" and the bottom is just over 85", so it looks like 80" might be a tight fit if you want all the switches clear. Of course you can always schedule the trains so the bottom one arrives in first and departs second or they aren't there together.

BTW, are you buying switches with the DZ1000 or DZ2500 switch machines? I ask because the 2500 wiring requires isolation points to be cut before the frog, but I think you'll be leaving enough track to make those cuts.

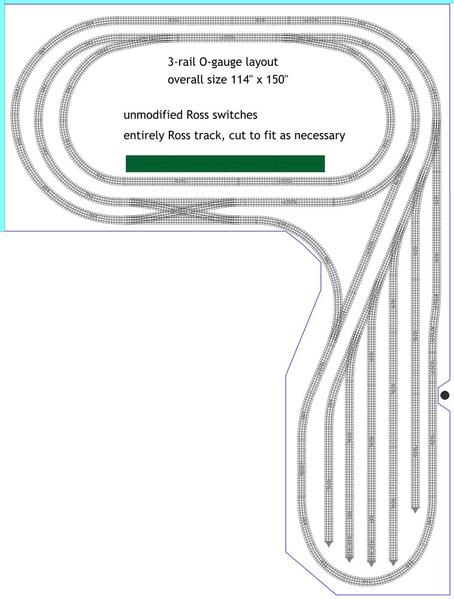
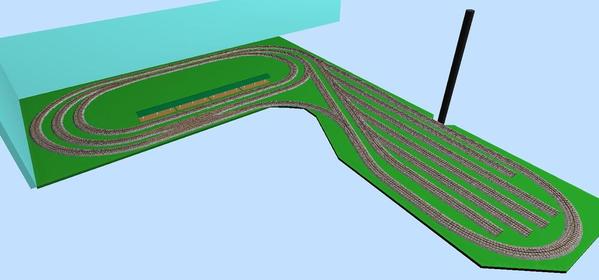
Here's something else to consider if I got the space right at 114"x151". It only requires cutting the 2 upper left switches, but I'm not sure they can be cut enough for things to fit. Just throwing it out there.

roger-daz

roger-daz-3d


Attachments

Images (2)
  • roger-daz
  • roger-daz-3d
Files (1)
DoubleDAZ posted:
RWL posted:

BTW, the reason for the two long sidings is because I have two fairly long passenger trains that I would really like to have on the tracks at the same time. One is a Lionel Grand central express with the 3 3 passenger cars and the extra baggage and dining car, and the other is a set of 4 Pennsylvania Madisons plus the extra combo car, behind a Polar Express Berkshire and tender. Both are right at 80" long, and all are O-31 compatible.

I figured that, just didn't know how long your passenger trains were. SCARM says the length of the track between the switches for the top siding is just over 77" and the bottom is just over 85", so it looks like 80" might be a tight fit if you want all the switches clear. Of course you can always schedule the trains so the bottom one arrives in first and departs second or they aren't there together.

BTW, are you buying switches with the DZ1000 or DZ2500 switch machines? I ask because the 2500 wiring requires isolation points to be cut before the frog, but I think you'll be leaving enough track to make those cuts.

Here's something else to consider if I got the space right at 114"x151". It only requires cutting the 2 upper left switches, but I'm not sure they can be cut enough for things to fit. Just throwing it out there.

roger-daz

roger-daz-3d


Hay there Dave, 

If I get the switches Ross Ready, they will have the DZ1000's.  

That is an interesting layout, however, the way your layout is displayed, the top portion is where the main oval is, and it is 114” long by 57”deep, and the right side is 150”long, and the leg extension is 42” wide. If you go back and look at my original post, you will see what I mean.

The 114” x 57” portion is in place. I have not added the 42” leg yet, but that is pretty much where it has to go.

Regarding the passenger trains, one is actually 75” and the other is 81”. I just gave general numbers to show why I hope to keep the longer passenger sidings. 

Roger

Last edited by RWL
RWL posted:
DoubleDAZ posted:
RWL posted:

BTW, the reason for the two long sidings is because I have two fairly long passenger trains that I would really like to have on the tracks at the same time. One is a Lionel Grand central express with the 3 3 passenger cars and the extra baggage and dining car, and the other is a set of 4 Pennsylvania Madisons plus the extra combo car, behind a Polar Express Berkshire and tender. Both are right at 80" long, and all are O-31 compatible.

I figured that, just didn't know how long your passenger trains were. SCARM says the length of the track between the switches for the top siding is just over 77" and the bottom is just over 85", so it looks like 80" might be a tight fit if you want all the switches clear. Of course you can always schedule the trains so the bottom one arrives in first and departs second or they aren't there together.

BTW, are you buying switches with the DZ1000 or DZ2500 switch machines? I ask because the 2500 wiring requires isolation points to be cut before the frog, but I think you'll be leaving enough track to make those cuts.

Here's something else to consider if I got the space right at 114"x151". It only requires cutting the 2 upper left switches, but I'm not sure they can be cut enough for things to fit. Just throwing it out there.

roger-daz

roger-daz-3d


Hay there Dave, 

If I get the switches Ross Ready, they will have the DZ1000's.  

That is an interesting layout, however, the way your layout is displayed, the top portion is where the main oval is, and it is 114” long by 57”deep, and the right side is 150”long, and the leg extension is 42” wide. If you go back and look at my original post, you will see what I mean.

The 114” x 57” portion is in place. I have not added the 42” leg yet, but that is pretty much where it has to go.

Regarding the passenger trains, one is actually 75” and the other is 81”. I just gave general numbers to show why I hope to keep the longer passenger sidings. 

Roger

I like the way the above layout has been flip flopped if you will.  But FWIW I kinda liked the original with the wye configuration and long storage yards.  But thats just my 2.5 cents.

rrman posted:

I like the way the above layout has been flip flopped if you will.  But FWIW I kinda liked the original with the wye configuration and long storage yards.  But thats just my 2.5 cents.

I don't like this one either. I just wanted to offer yet another option for not cutting too many switches.  Plus I wanted to play with the new Flip tool. I didn't know the tabletop was locked.

Last edited by DoubleDAZ
RWL posted:

The 114” x 57” portion is in place. I have not added the 42” leg yet, but that is pretty much where it has to go.

Regarding the passenger trains, one is actually 75” and the other is 81”. I just gave general numbers to show why I hope to keep the longer passenger sidings. 

That's cool. I didn't realize bench work was in place, but I wanted to play with the new Flip tool anyway, so it was a good exercise.

Sounds like both trains will fit and I'm anxious to see how this all comes out. I hope you'll post photos of the cuts, etc., and offer tips if you learn something about making cuts easier. It'd be nice if SCARM let you cut one switch and you could see if that would work everywhere instead of having to make custom cuts on every switch.

DoubleDAZ posted:
rrman posted:

I like the way the above layout has been flip flopped if you will.  But FWIW I kinda liked the original with the wye configuration and long storage yards.  But thats just my 2.5 cents.

I don't like this one either. I just wanted to offer yet another option for not cutting too many switches.  Plus I wanted to play with the new Flip tool. I didn't know the tabletop was locked.

How about this one?

It still doesn't have the nice smooth curves like you guys have suggested, but it does have the reversing section, the wye, a nice 90 degree turn at the L, and 7 uncut switches, and 9 cut down switches.

It also still has my long passenger sidings.


The yard spurs are 84", 81", 75", 66", 63".

Better?

Attachments

Last edited by RWL
DoubleDAZ posted:

That's super....with one exception. Once you go from inner to outer, there's no way to get back in without backing. That is solved by reversing the direction of the #11 switches and cutting different fitter pieces.

RWL-alt


I wondered about that, but was too tired to finish, and thought I would look at it tomorrow.

Thanks Dave

RWL posted:
DoubleDAZ posted:

That's super....with one exception. Once you go from inner to outer, there's no way to get back in without backing. That is solved by reversing the direction of the #11 switches and cutting different fitter pieces.

RWL-alt


I wondered about that, but was too tired to finish, and thought I would look at it tomorrow.

Thanks Dave

That is actually a really good alteration Dave.

Between you and Ace, I think we have come up with a very workable layout.

I have had some more time to study it, and as I suspected, the change in direction of that single cross over, on the bottom horizontal section of the upper ovel, does allow for getting from one loop to the other, from either direction, and then for comeing back into the other loop in, again, in either direction.

The only real issue that I need to come to terms with, is that that inner passenger siding is now a fair amount shorter, so that I can’t store the 2nd full length train there.

I could always store it in one of the yard spurs, and just remove that second siding, beyound the reversing loop curve, all together. That way the area beyond the reversing loop, behind the station platforms, would be freed up a bit for extra sceanic activity.

I will make that change to your layout, and put up the new version tonight.

Thanks again to all of you. I am really getting excited about this

Roger

DoubleDAZ posted:

That's super....with one exception. Once you go from inner to outer, there's no way to get back in without backing. That is solved by reversing the direction of the #11 switches and cutting different fitter pieces.

RWL-alt


Here is the layout so far.

Attachments

Last edited by RWL
RWL posted:
DoubleDAZ posted:

That's super....with one exception. Once you go from inner to outer, there's no way to get back in without backing. That is solved by reversing the direction of the #11 switches and cutting different fitter pieces.

RWL-alt


Here is the layout so far.

Oh crap!

My wife was calling me for dinner, and in a rush to get this up I completely forgot to reverse the single cross over.

I meant to put it in like you had it. You get the idea

Roger

Last edited by RWL
RWL posted:
RWL posted:
DoubleDAZ posted:

That's super....with one exception. Once you go from inner to outer, there's no way to get back in without backing. That is solved by reversing the direction of the #11 switches and cutting different fitter pieces.

RWL-alt


Here is the layout so far.

Oh crap!

My wife was calling me for dinner, and in a rush to get this up I completely forgot to reverse the single cross over.

I meant to put it in like you had it.

OK, here it is like it should have been.

Roger


Attachments

DoubleDAZ posted:

I think you'll like it and am looking forward to watching the build.

I will keep ya all posted, but it will be just a bit.

Oh BTW, I sold all of my FasTrack, so I now have some cash to work with to get started.

My wife and I are going out to CT to see Steve at RCS and get a first hand look at what goes on there.

We are making a long weekend of it in a nice hotel, and plan to spend some time in Mystic as well, as my wife knows that area, and has wanted us to go there for awhile. I am really glad she is somewhat onboard with this, as it is "all" for my twin grandsons ya know.

Should be a lot of fun on a lot of levels.

Roger

RWL posted:

I will keep ya all posted, but it will be just a bit.

Oh BTW, I sold all of my FasTrack, so I now have some cash to work with to get started.

My wife and I are going out to CT to see Steve at RCS and get a first hand look at what goes on there.

We are making a long weekend of it in a nice hotel, and plan to spend some time in Mystic as well, as my wife knows that area, and has wanted us to go there for awhile. I am really glad she is somewhat onboard with this, as it is "all" for my twin grandsons ya know.

Enjoy. We'll be spending a night at the Navy Lodge New London in late July on our way to Maine and Nova Scotia. We spent a few nights there way back in '93 and spent some time in the Mystic area, aquarium, etc. When you see Steve, you can get some tips on cutting their switches.

As for the layout, I'm sure it's not going to happen overnight, just take your time and keep us posted. I thought I'd have mine started by now, but life happens and now I have more work to do before the space is even ready, but it'll get there sooner or later.

You can solve the backing up to reverse with a figure 8 in the center loop.  My childhood had an oval and figure 8 with only four switches and I loved the action that simple layout had so I made that the starting point for my later layout.  It is fun see how fast a lone loco can go from oval to Figure 8, to reverse etc.

My Trains 4-18-2016 014

My layout is 027 with 27 Marx 1590 metal frog switches.  The size of the section shown is 156 inches wide and 72 inches high in the the picture shown ( the top siding is hidden and on a separate 6 inch wide board).

For extra action consider a turntable.  Mine is homemade and controlled with a hand crank and uses a clothes dryer belt to turn the turntable pulley.  It is small with only two sections of 027 track and will handle all but the biggest 027 designated locos and coal tenders.  Cost was almost nothing as I had a spare dryer belt.


Charlie

Attachments

Images (1)
  • My Trains 4-18-2016 014
Last edited by Choo Choo Charlie
Choo Choo Charlie posted:

You can solve the backing up to reverse with a figure 8 in the center loop.  My childhood had an oval and figure 8 with only four switches and I loved the action that simple layout had so I made that the starting point for my later layout.  It fun see how fast a lone loco can go from oval to Figure 8, to reverse etc.

My Trains 4-18-2016 014

My layout is 027 with Marx 1095 metal frog switches.  The size of the section shown is 156 inches wide and 72 inches high in the the picture shown ( the top siding is hidden and on a separate 6 inch wide board).

For extra action consider a turntable.  Mine is homemade and controlled with a hand crank and uses a clothes dryer belt to turn the turntable pulley.  It is small with only two sections of 027 track and will handle all but the biggest 027 designated locos and coal tenders.  Cost was almost nothing as I had a spare dryer belt.


Charlie

Thanks for the input Charlie,

I would really like to see a pic of your actual layout, and especially that homemade turntable.

BTW, in the last pics of my layout, the backing up issue is corrected, while still using only the single reversing loop. I had just forgotten to reverse the single cross over, like Dave had done in his version. I corrected that and with this latest layout, shown above, trains can enter the smaller loop from the larger loop coming from either either direction. Even so, they can only enter into the smaller loop in one direction, and must revers direction in order to exit the smaller loop, but trains can run in both directions in the smaller loop. Trains can also exit the smaler loop onto the larger loop in either direction.

If you go back to my original post, you will see that I had a double cross over, and did not have the wye over by the yard, which did not allow for running trains in both directions, not that I wanted that at the time, but Ace showed me the Wye, over by the yard, and that made it possible, with the correct direction of the single cross over, to run trains in both directions, and to get in and out of bothe loops in either direction.

I would love to do a turntable, but I just don't have the space, with the other things that I want in my layout, but again, I would love to see pics of your turntable, and layout.

Roger


Last edited by RWL

The whole layout is blocked and the slide switch kills or make live the section it is on.  The slide is white when live and black or blocked by the slide when dead.  I see only two sections black on the picture, the one to the right of the turntable selector switch and the other the second track from the top.  The Black momentary push button switch on the track to the TT is for activating the turntable and the section chosen by the TT selector switch.

The Blue momentary push button switches are for uncoupling tracks or to activate log or coal dumping cars, etc.

You are correct the momentary push button switches that are Red and Green operate the Marx 1590 metal frog switches.  An effort was made to keep the Green on an oval and Red on the Figure 8, but is not completely accomplished.  The two Yellow switches (on the top track) are for switches to the rear hidden track behind the background and in a tunnel to hide trains. There is a signal showing three locations on this track to show if it occupied right, center and left.  This saves many wrecks from happening when running a train to that track when it is occupied.

The green area is a mountain and tunnels with two switches inside.  Two tracks in and four out.

Charlie

Last edited by Choo Choo Charlie
Choo Choo Charlie posted:

The whole layout is blocked and the slide switch kills or make live the section it is on.  The slide is white when live and black or blocked by the slide when dead.  I see only two sections black on the picture, the one to the right of the turntable selector switch and the other the second track from the top.  The Black momentary push button switch on the track to the TT is for activating the turntable and the section chosen by the TT selector switch.

The Blue momentary push button switches are for uncoupling tracks or to activate log or coal dumping cars, etc.

You are correct the momentary push button switches that are Red and Green operate the Marx 1095 metal frog switches.  An effort was made to keep the Green on an oval and Red on the Figure 8, but is not completely accomplished.  The two Yellow switches (on the top track) are for switches to the rear hidden track behind the background and in a tunnel to hide trains. There is a signal showing three locations on this track to show if it occupied right, center and left.  This saves many wrecks from happening when running a train to that track when it is occupied.

The green area is a mountain and tunnels with two switches inside.  Two tracks in and four out.

Charlie

I would still love to see pics of your actual layout, and I would really love to see that turn table.

Roger

Here is a picture of the first board built in 1978 in Jamaica and moved to 5 houses in 5 states.  The layout was down from Nov to March in living rooms, sun rooms and game rooms on the floor.   Both loops are relayed and allow two trains to run each loop.  The whole layout can be operated by the red lighted LW on the left.  The red knob on the wheel to the left of that trans turns the TT via cloths dryer belt.

Two switches are in the mountain and one leads to a track in a tunnel and comes out the building behind the round house.  That building and round house are made from 1/8 masonite covered with brick paper, old 1950s building methods.

For action there is capability to run five trains and one trolley at once, engine changing with TT, and numerous operating accessories.  A new operating gantry crane has been added (not in this picture), barrel loader, cattle pen and loader, milk  car and platform, ice loading, log loader, saw mill and AF drum loader.  The coal mine near the mountain loads coal.

The TV monitor in the bottom right below the control panel is for a X-10 camera car.  The signal also goes to a larger TV in the room.


Train Complete 1-17-2015 116


This second board below is the newest section built around 2000.  Trains from the first board can run on this outer loop.  The LW on this board can run this board.  The  other two LWs can also run this board.  The two reversing loops (dog bone) here are not as runner friendly as the Figure 8 on board 1.  There is an HO Trolley on this board that runs back and fourth automatically via the brown HO dc trans on right of control diagram.

Train Complete 1-17-2015 117


This a close up of the turn table.  The circle of bagas (sugar cane hull) board cut out for the TT was made into a pulley and mounted to the built up bottom underside of the pit with a 10" dia  lazy susan bearing.  The TT is turned by a the crank on the 1st board control panel and lined up by eye.

Train Complete 1-17-2015 089

Charlie

Attachments

Images (3)
  • Train Complete  1-17-2015 116
  • Train Complete  1-17-2015 117
  • Train Complete  1-17-2015 089
Last edited by Choo Choo Charlie
Choo Choo Charlie posted:

Here is a picture of the first board built in 1978 in Jamaica and moved to 5 houses in 5 states.  The layout was down from Nov to March in living rooms, sun rooms and game rooms on the floor.   Both loops are relayed and allow two trains to run each loop.  The whole layout can be operated by the red lighted LW on the left.  The red knob on the wheel to the left of that trans turns the TT via cloths dryer belt.

Two switches are in the mountain and one leads to a track in a tunnel and comes out the building behind the round house.  That building and round house are made from 1/8 masonite covered with brick paper, old 1950s building methods.

For action there is capability to run five trains and one trolley at once, engine changing with TT, and numerous operating accessories.  A new operating gantry crane has been added (not in this picture), barrel loader, cattle pen and loader, milk platform, ice loading, barrel loading, log loader, saw mill and AF drum loader.  The coal mine near the mountain loads coal.

The TV monitor in the bottom right below the control panel is for a X-10 camera car.  The signal also goes to a larger TV in the room. 

This is the newest section built around 2000.  Trains from the first board can run on this outer loop.  The LW on this board can run this board.  The  other two LWs can also run this board.  The two reversing loops here are not as runner friendly and the Figure 8 on board 1.  There is an HO Trolley on this board that runs back and fourth automatically via trans on right.

This a close up of the turn table.  The circle of bagas (sugar cane hull) board cut out for the TT was made into a pulley and mounted to the built up bottom underside of the pit with a 10" dia  lazy susan bearing.

Charlie

That is an awesome layout Charlie.

I have a real fondness for the O-27 track, as I had an O-27 Marks set as a kid, and I had a lot of fun with it. I eventually bought a pair of switches for it so that I could have a siding, and that was more fun.

Thanks so much for posting the pics.

You have given me several ideas of how to fit a lot of scenic action into a relatively small space

Roger

Roger

Thanks for the reply.  I hope you get some ideas from my layout.  I kept getting more ideas from OGR and CTT and reading books.  Also just added things to make the layout more fun, interesting and active to keep up interest.  My lay out can be run by one, two or three people.  That is one reason I use three LWs where one ZW could run the layout.  The LWs run only the trains and track voltage supplied accessories.  There are two or three 12 v trans for lights and one unwound 12v trans (remove several rounds of the secondary coil to raise the volt by 2v) to give 14v to snap the Marx switches.  A few of the Marx switches are operated by pairs with one set of push buttons and 14v help.


Charlie

Last edited by Choo Choo Charlie
Choo Choo Charlie posted:

Roger

Thanks for the reply.  I hope you get some ideas from my layout.  I kept getting more ideas from OGR and CTT and reading books.  Also just added things to make the layout more fun, interesting and active to keep up interest.  My lay out can be run by one, two or three people.  That is one reason I use three LWs where one ZW could run the layout.  The LWs run only the trains and track voltage supplied accessories.  There are two or three 12 v trans for lights and one unwound 12v trans (remove several rounds of the secondary coil to raise the volt by 2v) to give 14v to snap the Marx switches.  A few of the Marx switches are operated by pairs with on set of push buttons and 14v help.


Charlie

Hi Charlie,

You have done a great job there.

I am impressed, and am getting plenty of ideas from it, especially how you can put a lot of action and fun into small spaces. I wouldn't have thought so, but there it is.

Thanks for posting the pics and info.

Roger

..."Charlie Says.."

"My lay out can be run by one, two or three people.  That is one reason I use three LWs where one ZW could run the layout."


  Your forgetting all about the cool glowing dial, and thereby, how it's the best transformer for easy viewing while running trains at night .

Ideas? Seen years ago, I"d have just copied it all I could.

   It really has a bit of everything, roundhouse & table, small loops, large loop, reverse loops, yard, town, country, varied structures and industries. Looping, or working, the run options here are very apparent. 

DoubleDAZ posted:

I think you'll like it and am looking forward to watching the build.

Yes it is much improved, again, thanks to you guys takiong my layout and actually creating new layouts, in SCARM, and making major changes, some of which I used, and some of which I didn’t.

BTW, a guy saw my eBay adds for switches and such, and contacted me about taking it all. We came to terms, and he took every bit of my FasTrack, switches, bumpers, uncoupler, as well as my big MTH passenger station, so I, now, have a good amount of ready cash to start this project with.

I really like that you can invoice thru PayPal, without going thru an eBay sale.

The reversing track took me a while to see the merits of, in light of the fact that it took a lot of length out of the inner passenger siding, which I had planned for storage of a second passenger train. However with the addition of the wye over by the yard, it all came together.

I, now, see that this allows trains to enter the inner loop, from the outer loop, from either direction. They can, then, reverse and exit the inner loop to the outer loop, again, heading in either direction.

This was when I decided that I could store that second passenger train over in the yard, and just remove the second passenger siding altogether, which would in turn open up more of the layout for a bit more scenery, business, village, etc….. I would just have to give up a little of the freight storage there to make this happen.

I had thought about running a wye track along the yard like that, but didn’t see enough reason to add the extra switches, and take up more of the table space with track. I didn’t see all of the reversing functionality that it would add until I actually put it in and started tracing all of the possible train routs in my head.

All of this is why it is always a good thing to get other eyes on things besides your own.

There is one other major improvement in regards to accessibility. You see, the top and left sides are up against a wall, and access to that area, especially switches, would be a bit difficult, not impossible, but not fun either. With this layout the only switch on the top is the one for the reversing loop, which will be close enough to the right side for me to reach with relative ease.

I am in hopes that there won’t be any, or at least very few derailments in that top left quadrant of the layout.

The actual building plan is as follows:

1 Build the inner loop, without the yard leg, because that part of the table is not yet built, and won’t be until I am reasonably certain that all is well with the rest of the layout.

a. Run Trains to verify that all wall and edge clearances are good.

2 Install the single crossover and inner loop.

a. Run trains to insure that the track to track clearances are good.

Note: I am aware of the constraints of the single cross-over, but it will be temporary.

3 Add the inner passenger siding.

a. Run trains to check it out for functionality.

4 Add the revering section.

a. Run trains to make sure that they can negotiate it, and to verify that I am happy with this part of the layout.

5 Build the table extension for the Yard-L.

6 Add the loop around the Yard-L.

a. Run trains to verify edge clearances, and to enjoy that nice new longer loop.

7 Add the Wye across the Yard-L section.

a. Run trains for a while to verify that all reversing functionality actually works as expected.

8 Slowly add in the yard ladder and inner loop sidings.

I realize that these steps will result in track pieces that will be removed, over time, to add switches, but I am confident that I can find places to use all or most of these pieces, as I continue to add to the layout, especially when adding the yard.

The next step, at this point, is to go see Steve at RCS in a couple of weeks. As mentioned above, My wife and I are taking a long weekend out there, and will spend a couple of days in the area Around Mystic CT. It is a very nice area, with lots to do.

I am getting really excited, but it is summer and there are a lot of outdoor tasks and things to do and enjoy. However, I hope to still be able to work on this project from time to time.

Roger

Add Reply

Post
The Track Planning and Layout Design Forum is sponsored by

AN OGR FORUM CHARTER SPONSOR

OGR Publishing, Inc., 1310 Eastside Centre Ct, Suite 6, Mountain Home, AR 72653
800-980-OGRR (6477)
www.ogaugerr.com

×
×
×
×
Link copied to your clipboard.
×
×