THIS IS THE 50,000 POST IN THIS THREAD!
This is a record, even for our hosting provider, Crowdstack! None of their other client forums are anywhere close to this one.
|


|
This is a record, even for our hosting provider, Crowdstack! None of their other client forums are anywhere close to this one.
One more thing...I have a separate thread going for those folks that would like to make comments about this achievement so please do so there rather than here since we want to keep the focus of this thread on what you did on your layout today. Thanks!
@NJCJOE posted:Chris,
Please tell your daughter those clouds are amazing. You are right, she has the talent.
Joe, Thanks so much, I absolutely will pass along your compliments to Emma !!
She also painted the rolling hills below behind my Mine Run Scene.... Amazing what an improvement that made in creating depth and realism....
Emma did a great job, Chris. Our artist daughter, Heidi, gave me appropriate paints and I struggled along. I didn’t ask her to paint because I knew she would procrastinate. 😄
@chris a posted:Joe, Thanks so much, I absolutely will pass along your compliments to Emma !!
She also painted the rolling hills below behind my Mine Run Scene.... Amazing what an improvement that made in creating depth and realism....
Chris, you have a very talented daughter.
Of my many talents, this type of painting is outside my skill set. Give me a 3" brush or roller and I'm your guy though.....![]()
Bob
Bob, I have some 3” brush and roller painting that needs done. If you want to get off Lawn Guy Land for a while and come to the west edge of Appalachia, I have some painting that needs done! 😉
You could help me knock out that last wiring I mentioned over on my Blackwater Canyon Line thread while here. Of course train running would be a necessity! 👍🏻 Yes folks I need to wire a programming track and some DZ1000s before my body won’t let me get at it anymore.
My adult beverage of choice is Diet Pepsi, but I could provide your choice! 😎
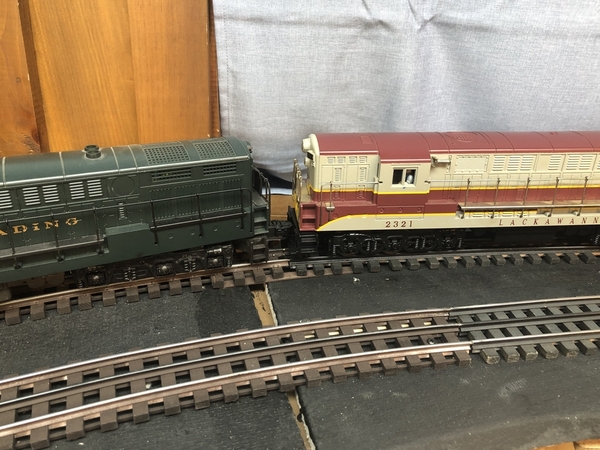
After mowing our grass early this morning to cool down I ran some Yellow Belly with Madisons.
@chris a
Always Enjoy your wonderful work and train scenery. I like the building today too. Such a talented fella.
Morning guys its been awhile!
@chris a Chris your daughter is one talented young lady! Seeing your work I know where she gets some of it from!![]() The background looks just amazing!
The background looks just amazing!
@Seth Thomas Sounds like a good plan on a hot day! Nice video!
Well all I have been able to do is move a wall to make the dimensions for my new train room which will be 20' D x 16' W.
Some of the guys on here are already helping with a new layout plan and are doing an amazing job! There is so much to think about when building a layout that I never really thought about with my other 2. But with what I hope is my last one I am trying to think of everything and asking for help from others. I will post the plan here when we get closer!
I hope you all have a great weekend and find time to have fun with your layouts and trains!![]()
After completing my scratch build of the old Cambridge train station, I started in on the nearby Cambridge Creek bridge. After a couple of trips to Cambridge to measure and photograph the bridge, I had earlier this week breadboarded the motor and control system:

Today I attempted to mock up a manual version of one of the lift sections, to be sure I understood the design geometry correctly, and to confirm that there would be adequate room for the gear motors and limit switches in the bases. After a bit of fiddling, I came up with a foam board version that replicates the pivoting action of the prototype bascule bridge mechanism:
So, now I can begin to replicate the base and lift sections in more durable materials, fit the motor and switches, and build out the rest of the bridge! Easy-peasy . . . ![]()
@Steve Tyler posted:After completing my scratch build of the old Cambridge train station, I started in on the nearby Cambridge Creek bridge. After a couple of trips to Cambridge to measure and photograph the bridge, I had earlier this week breadboarded the motor and control system:
Today I attempted to mock up a manual version of one of the lift sections, to be sure I understood the design geometry correctly, and to confirm that there would be adequate room for the gear motors and limit switches in the bases. After a bit of fiddling, I came up with a foam board version that replicates the pivoting action of the prototype bascule bridge mechanism:
So, now I can begin to replicate the base and lift sections in more durable materials, fit the motor and switches, and build out the rest of the bridge! Easy-peasy . . .
This looks like a really cool project Steve. Brain power on 11! ![]()
The mock up is a good idea for proof of concept.
Bob
That is brain power for sure! I wired my programming track this week. I have also been wiring three DZ1000s. I documented what I did before, but brain power seems to be on 0. Getting a simple wiring diagram converted to a DZ1000 switch machine, DZ push button unit, and wires back to the power and AIU seems to be baffling me. I’m going the way my cousin who is 10 years older than me joked he is going. 😄
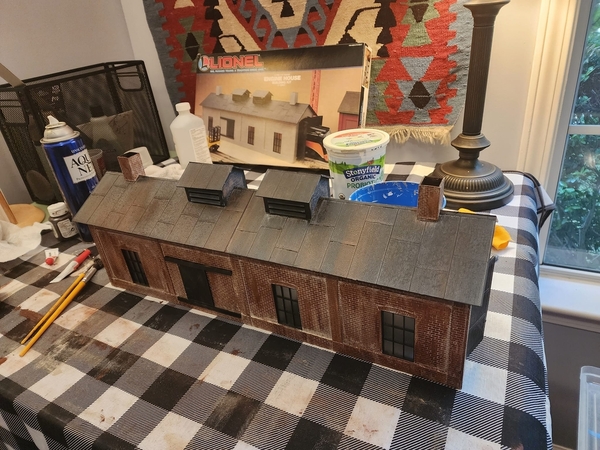
I spent the past 2 1/2 days putting together the Lionel single train shed kit. Obviously, I did not want to keep it the boring gray and black for my industrial area. I really should be doing these things outside as the plastic cement gets to me even with open windows and fan on high. I moved it from worktable to my still under-construction layout. No details or people yet; can't wait until I have enough done to populate it.



Spent the day trying to think out of the box where I have a three track, multiple switch on the back of the layout. They all have to go into tunnels and the upper level overhang ended up further out than originally planned. Made a tunnel portal train show find into a 4 ft tunnel opening.
Hi fellas, sorry for the late “get back to you information “. With the nice weather I’ve been busy painting locomotives and a few coaches on Gary’s tourist railway in Eastend. I’ll add a couple pictures at the end of this note.
Anyway , catching up with PRR8976 ‘s request on making my fir trees, it’s actually quite simple. Here’s a more detailed description with some photos to help everyone interested along.
First photo shows the materials I prefer to use and here’s a list. Hardware stores like Tractor Supply or Harbour Freight are good starts. First you’ll want to get , what we call up here anyway, a roll of Fence mending wire or “rebar” tie wire. It’s 1/16th diameter round but very strong metal/steel. Expect to cost $12 to 15 dollars, but you get lots ! It maybe coated with oil to prevent rusting, don’t worry about this . Next, buy yourself a 20 or 25 ft packaged nylon rope. This will be untwisted and cut into 2 to 3 inch lengths for branch material. A hot glue gun, a 1.5 to 2 foot piece of 2x4 and a twist in “hook”, side cutters, needle nose pliers, sharp scissors and a regular battery drill. Also needed, a plastic bag , a brown or gray primer spray can color , a brand of preferred fine and course green flocking material and a can of 3M spray glue.
Now for assembly. Using side cutters, unroll about a 2 foot long length of wire and fold into an “L” shape. Instead the yellow rope right down to the single “hairs”. Cut a bunch into 2-3 inch long lengths. Using a hot glue gun squeeze onto the wire some glue working in 2 to 2.5 inch lengths and lay some of the cut rope strands centering across the wire. Work your way down the “trunk” to about 3 inches from the bottom. Make several of this same assembly. I usually make 20 at a time. Next, fold the wire over itself over top of the glued on rope strands. Cut the bottom off even. Using scissors, trim the rope strands into a “raggedy bell shape” , trimming the lengths shorter towards the top. (Almost no rope length at all sticking out from the steel wire.) Place the folded end of the trunk wire over the “L” shaped “hook” screwed into the short 2x4 and the two loose ends of trunk wire into the center of the drill chuck. Tighten up good so it won’t slip out. Placing each foot on both sides of the short piece of 2x4, slowly begin twisting the whole assembly into a “bottle brush” appearance. Twist this around so it has a “tight” appearance but still able to unhook the top of the tree off the end. Trim off any unnatural long branches sticking out. Spray paint the whole tree a primer brown or gray color. Using the plastic bag, dump in a bunch of fine and course green material for the foliage. Spray on a coat of 3M glue over the whole tree and drop into the bag of foliage. Shake the bag vigorously for a short time, 3 to 5 seconds, and pull out the tree spinning off any loose materials. It will look thin and sickly. Spray on another coat of glue and drop in the bag again shaking it more. Add as much material as you prefer giving the tree a dense appearance. Set aside to dry. I use a piece of styrofoam and set them into premade holes to stand them up till dry. Important !! Handle trees from the bottoms of the trunks while planting. Otherwise you’ll squish the rope material together and loose tree branch 
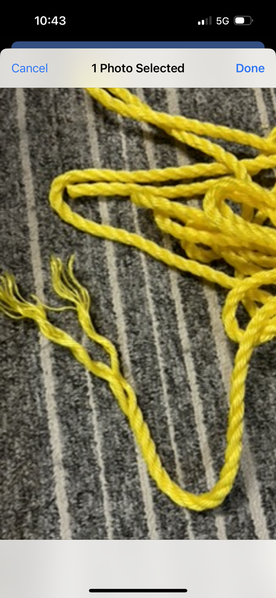

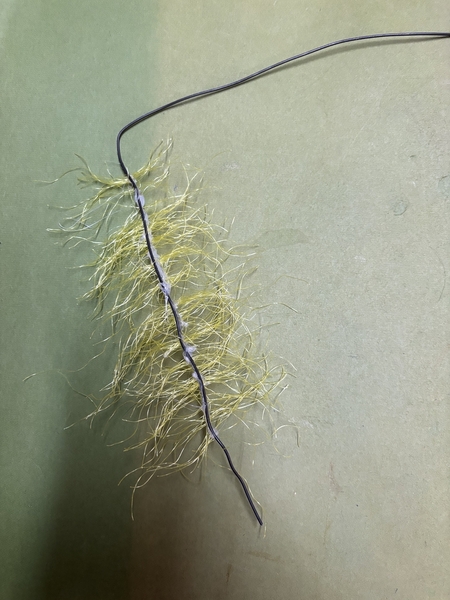
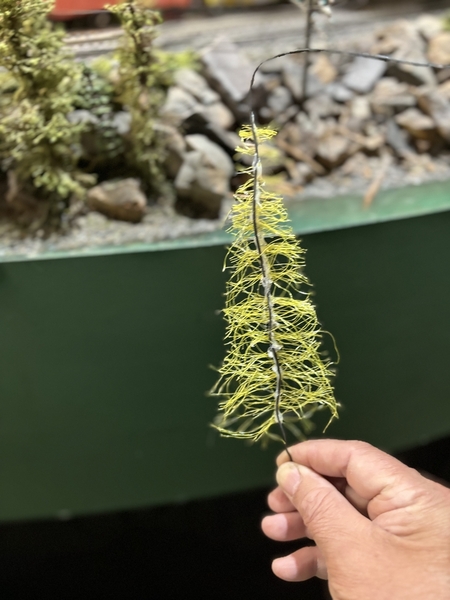


 shape. Drill some holes into the layout base and start planting . Trees look good in groups of 1’s - 3’s and 5’s. Dead or dying trees can be planted without flocking material on them. Just painted gray. I’ll do another clinic on how I make mine later. Place the “better looking” trees towards the front and others behind or between nicer looking ones. Your done ! Look at the photos I’ve included or ask questions if unsure. I’ll be glad to help out.
Finally, I’ve included a couple pictures of my paint progress on the CNR FP-7. Some more sanding and we’ll be ready to spray on the 3 colors. They’re running great and should look fabulous when I finish ! Come for a ride, lots of seating and even a private car !
They are great looking trees, Myles. Thank you for escribing how you make them.
Nested three loops - inside loop was 48 curves, next loop was 60 curves and final outside loop was 72 curves.
 Building my “up & over” mainline . The outer loop pictured is a Ross 072 into a lightly curved piece of used Gargraves. I just wasn’t happy with the truck wiggle I was getting while crossing the joint. Sooo, I tore out the used GG section & replaced it with a different used piece. Much better now, & the TM engineers have stopped complaining !
Rich, workin’ on the RR
Access to this requires an OGR Forum Supporting Membership
