@WesternPacific2217 posted:Bob, as with most of us, too many projects and not enough time!!! No pressure Bob, it took me 2 years to populate all my 13" cars!
Sometimes I feel like a squirrel running in 10 different directions!


|
|
@WesternPacific2217 posted:Bob, as with most of us, too many projects and not enough time!!! No pressure Bob, it took me 2 years to populate all my 13" cars!
Sometimes I feel like a squirrel running in 10 different directions!
Trying to make my Fastrack look a little less like Fastrack on these two spurs. I really thought the results looked better until I saw this photo. But compared with the way it looked before, I do like this dirtied-up look better.

Well, technically not on *my* layout -- I'm working on a piece intended to go on the Cambridge, MD RFC's train garden layout, and specifically a model of the old Cambridge train station -- but I did make some progress on the scratch build.
Specifically, over the past several days, I completed adding the cardstock-printed texture files from Clever Models to the outside of the basswood wall sections, after cutting the openings for doors and windows, adding a layer of basswood to recreate the brickwork around the base, and painting the exposed edges in brown. Today, I cut free the laser cut door, window and trim pieces I earlier sourced from Rail Scale Models and spray painted brown to match the trim, added the glazing that came with the sheets, and fitted and glued them into the door and window openings.
A quick test fit of several sections showed me I was heading in the right direction, so tonight I painted the back edges of the window and door frames with brown paint, in order to eliminate the light leaking around the door and window frames:

This has been my first fully scratch-built project with this level of detail, and there's still a lot of design, construction and detail work to go, but so far I think I'm on the right track. I have the lighting plan pretty much in hand (interior and exterior warm white LEDs), and plan to use multiple real photos of the interior of the prototype to create shadowboxes behind each window and door to show the interior as it has been nicely restored with railroad station touches (it was long ago repurposed -- and currently serves -- as a real estate office). Once the wall panels are assembled and the roof brackets added, the finished roof structure will go on top:

And yes, I still need to design and fabricate the pair of dormers and two chimneys, plus I need to wire up everything and attach it all to the basswood base plate, so . . . plenty more days' work! ![]() Wish me luck!
Wish me luck!
@ScoutingDad posted:What did I do to my layout today? Well, started deconstruction to make way for the reconstruction.
There is always a reason for my slow progress on the layout build at times and that is I am fundamentally unhappy with the status quo. Rather than continue to build, I slow down and try different approaches. The CEO suggested this location a while ago but it would not work with the current track configuration. I tried to get it onto the pink foam to the right, but that was too tight. Left side blocked the town too much.
Solution is to move the inner track back toward the wall 7 inches to allow the grain terminal to move forward and be close to what will be a revised waterfront. I like the idea of a grain loading double track and then a barge loading area. Good thing I built this to be easily disassembled.
Jeff, you will get it right sooner or later. Keep plugging away at it to find the best location for the grain silos.
I’m ballasting my layout. Here is my genius idea. Not really but here goes
To pour the glue I used a lipton iced tea plastic bottle. Pro tip I drilled an exit hole in the middle of the cap. Then a small hole at the top to let air in.
The end result is that the bottle fits comfortably in my hand and I can turn it different directions to get around buildings. The holes allow a smooth poor that is not too fast or slow. I got very little on the rails too. All this sped up the process a lot from what I used to do. See pics below.


@ScoutingDad- I'm sure you'll figure it out Jeff. At least you aren't too far along and changes are easier to do.
@John's Trains- Fastrack is tough. I have just a few sections and ballasted the sides but left it alone otherwise. Painting the plastic roadbed and rails would probably be a good method. I think it looks good.
@Steve Tyler- Nice work Steve. Going to be a great looking building.
@ChiTown Steve- Good idea. I use a large Elmer's bottle for gluing ground cover and ballast. The small nozzle gives good control.
Bob
@ChiTown Steve posted:I’m ballasting my layout. Here is my genius idea. Not really but here goes
To pour the glue I used a lipton iced tea plastic bottle. Pro tip I drilled an exit hole in the middle of the cap. Then a small hole at the top to let air in.
The end result is that the bottle fits comfortably in my hand and I can turn it different directions to get around buildings. The holes allow a smooth poor that is not too fast or slow. I got very little on the rails too. All this sped up the process a lot from what I used to do. See pics below.
Steve, were you pleased with the outcome after the glue set up?
Jay
@Tranquil Hollow RR posted:Steve, were you pleased with the outcome after the glue set up?
Jay
Yes Steve, we need an after photograph! @ChiTown Steve
Morning guys, its going to be a rough one today but about that later! LOL
@John's Trains I am with you I think the fast track looks tons better with the dirty look!
@Steve Tyler Your doing wonderful work on the train station! I hope you post a finish product shoot!
@ChiTown Steve Steve great idea and I also would like to know how you liked it after it dried, also are you using a 50/50 water glue mix?
As for the rough day it is going to get to 98 today and the AC went out last nigh. Hope to get a guy in today to fix it! LOL
I hope you all have a great week and find time to have fun with your trains and layouts!![]()
@mike g. posted:Morning guys, its going to be a rough one today but about that later! LOL
@John's Trains I am with you I think the fast track looks tons better with the dirty look!
@Steve Tyler Your doing wonderful work on the train station! I hope you post a finish product shoot!
@ChiTown Steve Steve great idea and I also would like to know how you liked it after it dried, also are you using a 50/50 water glue mix?
As for the rough day it is going to get to 98 today and the AC went out last nigh. Hope to get a guy in today to fix it! LOL
I hope you all have a great week and find time to have fun with your trains and layouts!
Mike:
98 degrees and no air conditioning. So now, do you miss the Pacific northwest? Take care and try to stay as cool as you can. Also, don't overexert yourself in such heat. We need you here on the forum.
@mike g. posted:@ChiTown Steve Steve great idea and I also would like to know how you liked it after it dried, also are you using a 50/50 water glue mix?
As for the rough day it is going to get to 98 today and the AC went out last nigh. Hope to get a guy in today to fix it! LOL
Mike,
Find your local Costco and go in the fruits and veggies room. That will cool you down fast!
@Tranquil Hollow RR @Mark Boyce
Yes 50/50 water glue. I skipped the wet water step with chicken grit. The glue mix flows right in. The one on the left is 24 hours dried. It's hard as a concrete. I'll take the screws out next. The one on the right I just did this morning.
It will need some cleanup of rogue pieces.

@ChiTown Steve posted:Mike,
Find your local Costco and go in the fruits and veggies room. That will cool you down fast!
Yes 50/50 water glue. I skipped the wet water step with chicken grit. The glue mix flows right in. The one on the left is 24 hours dried. It's hard as a concrete. I'll take the screws out next. The one on the right I just did this morning.
It will need some cleanup of rogue pieces.
Great looking work, Thanks for the information. I never thought about taking out the screws after ballasting, I guess the ballast and glue are enough to hold everything together!
Great work!![]()
@ChiTown Steve posted:I’m ballasting my layout. Here is my genius idea. Not really but here goes
To pour the glue I used a lipton iced tea plastic bottle. Pro tip I drilled an exit hole in the middle of the cap. Then a small hole at the top to let air in.
The end result is that the bottle fits comfortably in my hand and I can turn it different directions to get around buildings. The holes allow a smooth poor that is not too fast or slow. I got very little on the rails too. All this sped up the process a lot from what I used to do. See pics below.
Good idea - I like these plastic hairdressing bottles with the angled tip. If your significant other doesn't have a spare one, they're pretty cheap on the 'net.


@Richie C. posted:Good idea - I like these plastic hairdressing bottles with the angled tip. If your significant other doesn't have a spare one, they're pretty cheap on the 'net.
It looks like it will hold a lot too. It's helpful to not have to stop and refill. Great tip!!
The after photograph looks great, Steve!
Richie, that is a neat little bottle.
An afternoon mailtrain led by a GG1 leaves Elizabeth City for the terminal...
@mike g. posted:Morning guys, its going to be a rough one today but about that later! LOL
@John's Trains I am with you I think the fast track looks tons better with the dirty look!
@Steve Tyler Your doing wonderful work on the train station! I hope you post a finish product shoot!
@ChiTown Steve Steve great idea and I also would like to know how you liked it after it dried, also are you using a 50/50 water glue mix?
As for the rough day it is going to get to 98 today and the AC went out last nigh. Hope to get a guy in today to fix it! LOL
I hope you all have a great week and find time to have fun with your trains and layouts!
Mike - if it’s 98F & no A/C…time to work in the train room/basement….I mean a guy can only take so much heat !
Morning guys, just checking in!
@Papa Dave Great looking switchers! Looks like you have a busy yard going on there!
@trestleking As for working in the train room, that would be a great idea, but I am still in the process of building a train room out in the shop with no AC or fan. It will have heat and AC when done but its even hotter in there right now! LOL
The good news is the AC is fixed, just a capacitor so we ordered a new one for in the future!
Well it was a very busy Sunday. My son came up from Newport, RI and helped me put up 95% of the ceiling over the last section of "unfinished, or at least not scenicked" portion of the RR. I did the rest of the train room several years ago with 5 ft x 5ft Baltic Birch Plywood painted ceiling white. It's ideal for those of us who got it backwards, and built the layout before installing the ceiling !!!
Had to remove all the temporary table top and buildings I have been mocking up down there, that took a lot longer than I thought it would. The area is approximately 8 ft x 15 ft, 48 inch radius, or 096 curves.
I am pretty stoked, now I just need to build some smaller trim panels to cover the condensate line and the Freon Line for the Central AC, and do some finish trim work. At least now I can get serious about installing some of those very shallow relief 6 inch LED color temp adjustable overhead lights in this room and then get back to finishing the Urban - Industrial District.
Finally got all the OCD detail work done on the Chemical Business, kitbashed a "Hip Roof" for the center building section. Last thing on the to do list tonight is to cut and glue and screw a 3/4 inch Oak Spline down the center of the 12 x 40 inch foundation the base plate for the complex. The oak spline will keep the base from deflecting as it's only 1/4 inch luan plywood. Then it's on to piping, install windows, lighting, details and on and on.....


Projects like that go better when your helper has younger shoulders.
Many thanks to Dave @luvindemtrains for the Moss Green Color information that he used on his steel mill. Did a bunch of painting today, that color is Perfect for my Chemical Business. As it's Satin Finish, I ended up dull coating it with some Krylon Matte Finish, to kill off the slight sheen. What a Killer Industrial Green color.
Time to let it all dry overnight, and go make dinner.
Yes, absolutely @Tranquil Hollow RR, he's about 6'-5", 6 inches taller than I am, works out in the gym everyday so makes fast work out of putting up 5 x 5 sheets, he just picks them up raises them to the joists, voila !


That structure is really coming along nicely, Chris.
Nothing going on in Magooville that ambitious. I've always wanted to try to add some lights to the WS finished buildings, wasn't sure how to go about it without damaging them. I turned to Evan Designs for some pica-sized lights and added one to the WS Bike Shop. Does add light to the area like I wanted, now just need to hide the wire a little better.


Chris,
The complex is coming along very nicely. The green really is a good contrast and compliments the brick work.
Dave
@luvindemtrains posted:Chris,
The complex is coming along very nicely. The green really is a good contrast and compliments the brick work.
Dave
Dave and Mayor Magoo, thanks for the kind words. Dave, I am really glad I drove out the other day and picked up the Moss Green, it going to be a very usable color. I purchased some 3D printed machine tools some time back, this color is spot on for machine shop tools .
I am also going to follow "your lead" on doing some tank weathering with oil base paints and pastel powders. I did one or two boxcars with the diluted oil base paints and turpenoid, they turned out great, just wasn't too patient to wait for the extended drying times, but it will be worth the wait on these tanks as it creates very realistic weathering effects.
Chris,
Sounds good. Keep us posted with your progress.
Dave
To “Johns Trains”, ….I like the street scene with the flowering shrubs. Looks great with the shops across the street. You’re catching a lot of details there. The switch stand is a nice touch as well .
Steve, your depot is looking fabulous, I like the colors and that shingled roof is perfect !
Criss, your factory is a great “mini scene” , if we can regard anything we do in “O” scale ‘mini’. I still like the overall profile of the wall sections.
Gandydancer. Your scene with the small details scattered about keeps the eye focused on what else is buried along the tracks.
For Richie and Steve,…..don’t you just love ballasting track. Sometimes I wonder if I should have laid so much myself !
Keep up the great work guys !
As for me, here’s an update on the scenery I’m workin at. I poured the pond just now and am adding bushes , lychen, tight along the banks. A bunch of fir trees around it will finish this small area. The clear resin is made by SAMAN , EPOX-Y. ( No Oder and non combustible) Great to work with. I’ll add just a few ripples in the narrow stream part to simulate movement . I’ll attack the BOW River in the background next. 

Late afternoon arrival.....Lionel 675 and heavyweight coaches...
Gandydancer, very nice detail, thanks.
@chris a posted:Many thanks to Dave @luvindemtrains for the Moss Green Color information that he used on his steel mill. Did a bunch of painting today, that color is Perfect for my Chemical Business. As it's Satin Finish, I ended up dull coating it with some Krylon Matte Finish, to kill off the slight sheen. What a Killer Industrial Green color.
Time to let it all dry overnight, and go make dinner.
Yes, absolutely @Tranquil Hollow RR, he's about 6'-5", 6 inches taller than I am, works out in the gym everyday so makes fast work out of putting up 5 x 5 sheets, he just picks them up raises them to the joists, voila !
Great weathering, Chris…….really nice!
Peter
Started a new building…….River Leaf Models Walter’s Building…..

Wall assembly……


Rustoleum Flat Red…..

These bricks need a different color since the windows were “filled in later”. Acrylic terra cotta……


DAP compound applied with a wet finger…..


Wiped clean with a damp cloth…..

Have a great and safe weekend folks…..
Boy, I wish Andre was still making kits……he did great work!
Peter
Obviously your dog enjoys watching the paint dry. That is a very unique piece and it would probably work well on a corner.
Jay
@Tranquil Hollow RR posted:Obviously your dog enjoys watching the paint dry. That is a very unique piece and it would probably work well on a corner.
Jay
Winnie is a grand dog……I always watch her when my daughter and her family are away…..she is good as gold and hangs with me no matter what I’m doing……
You are correct about placement……it will be where a street makes a 90 degree turn…..
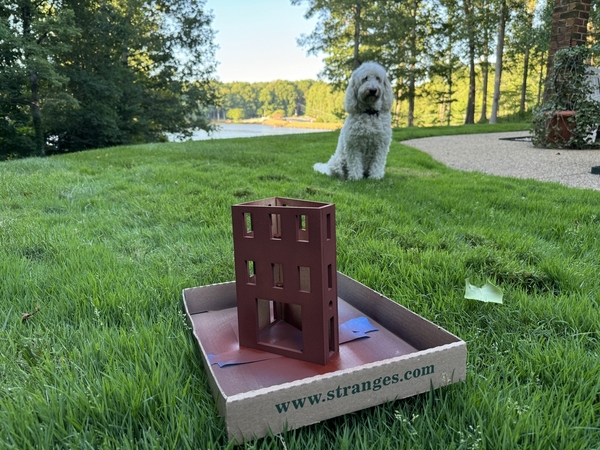
Peter


Mostly ran some models I haven't ran in months! Also testing out a new Diesel set my friend DJ sold me.


@myles posted:Made up some more bushes and twisted up a few trees this morning. They look pretty baron before the foliage is added. They’re just rope, wire, some spray glue and your choice of ground foam, medium or fine, give’em a couple coats for density.
Myles, Can you talk a little more about how you assembled these seen in this picture, such as what was used for the trunks, branches, how were they inserted, etc. They came out really well.
Tom
@Putnam Division posted:Winnie is a grand dog……I always watch her when my daughter and her family are away…..she is good as gold and hangs with me no matter what I’m doing……
You are correct about placement……it will be where a street makes a 90 degree turn…..
Peter
I thought she was there to deter birds and small critters from getting to close.
@pennsyfan posted:I thought she was there to deter birds and small critters from getting to close.
She does that, too………and chases the deer.The geese try to get away by going in the lake. Winnie is a great swimmer, and follows them in!
She is good company while I work on models…..
Peter
Added a power drop to the end of the oval where trains always slow. My soldering gives a new meaning to the word "ugly," and I'd be forever banned from the forum for posting a photo of this affront to all that is right and good. But it's a simple pleasure to watch the train go around the oval at the same speed.
John
Morning guys I hope you are all doing well with this heat that's going on! I know it's been a while since you have seen me post on here. I have been busy with the new house!
@chris a , Chris it sure was great that your son came over to help you with the ceiling, it sure looks good and should be an easy finish for the AC lines!
I have to say you are killing the Chemical Business! It really looks perfect and is going to be amazing on your layout! Sure is nice that @luvindemtrains Dave shared the information about the Moss Green color and for you to share it with the rest of us! It sure looks perfect!
@Mayor Magoo Steve looks great! You just have to love Even Designs!
@myles, Myles the pond looks wonderful, I bet the river is going to look Outstanding! The trees look Perfect and I am with @PRR8976 Tom if you could give a little more information on your tree construction!
@Putnam Division Peter you are just nonstop when it comes to buildings! I love watching you build them and the step by step which is something I need! LOL I hope you can post an updated photo of your layout when you get this one on it!
Well buys as I stated before I have been busy with the new house, but the good news is it also came with a 20' X 36' shop. I was able to take down one existing wall and move it out towards the front, so now I have a 20' X 16' train room and a 20' X 20' shop to use to build things for the layout and still work on cars and trucks!
To the left where the bench and cabinet is located with move and I will have a hidden staging yard the sneaks into the shop area, if I build it correct, I will be able to use the top for a light work bench!
At least it's a start! LOL


This photo below is taken from the corner where the hidden staging yard will be located!
I hope you all have a good week and find time to have fun with your trains and layouts!![]()
Access to this requires an OGR Forum Supporting Membership


