all of the supports are temporary, am using them to get grade as smooth as i can
Original Post


|
|
all of the supports are temporary, am using them to get grade as smooth as i can
Replies sorted oldest to newest
Way to go! Do it right the first time.
Slow & steady wins the race.
HAVE REACHED MAX ELEVATION 28' TOP OF TRACK TO BOTTOM OF BRIDGE, Then will need to decide what kind of portal to make, will have four of them, maybe one of four most popular. I kind of like natural stone
I was doing the same thing and it took me quite awhile to get the grades smooth and even and then the curves were super elevated the wrong way. I coulden't change that so I glued cut out cardboard strips until the curves were banked a little the right way.
all of my supports (at this time) are loose, and i have a cross cut set up to nibble away at as i need to shorten , hard to eliminate dips, but like you said cardboard under track does the job, i also use cardboard under entire layout, twofold, one it is about right scale for ballast, and it quiets the whole thing, i use standard cardboard and box cutter right up to edge of ties. once that is done paper mache and that is done,,, then smooth in the structure for the terrain, then plaster it so it has some strength.
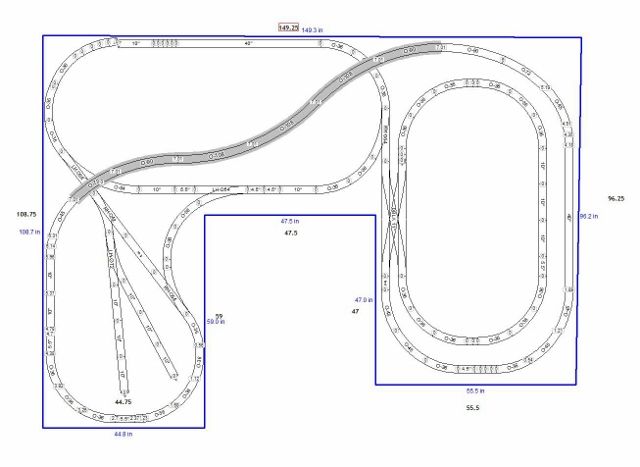
here is the layout plan
I Started out setting my grades with 2" and 3/4" scraps of styrofoam and 5/32" strips of plywood. Than I switched to constructed piers made from three scraps of wood ripped down to 3/4" X 3/4" screwed down to strips of 5/32" plywood. Extra scraps of plywood allowed me to increase the grade if needed, the nearby table saw allowed me to decrease the grade. There was a lot of back and forth work, especially when you start working out clearances for over / under , tunnel portals and tunnel linings. I used a four foot level, yardstick and 18" ruler to check how straight the grades were and avoid dips. The longer the straight edge and the more pieces of sectional track you can span the better the accuracy.
The table saw was also used to make shims less than 5/32" I'm not sure if that can be accomplished with a cross cut saw but having a bunch of shims available in different thicknesses is a good time saver and you can never have too many when in the process of setting the grades. I still needed them as I continued construction, even after I thought the final grades were set. dips are the main cause of drive wheel slipping when you move into operating and you'd be surprised how small of one can cause trouble with longer trains.
Good luck it looks like you have a great start
Way to go! Do it right the first time.
words to live by, seems some people have the time to do it twice wasting energy and resources, but never the time to do it right the first time. temporary supports are the way to go until everything works smoothly. there is always tweaking to do on grade transitions and alignment of tracks.
It has been really interesting watching the progress on the building and now the payout. You have come a long way in a relatively short space of time.
Please keep posting photos of your progress. ![]()
coup of the year
my wife said when i have track down and a train can run on it i can get a new engine
!!!!!!!!!!!!!!!!!!!!
MAIN HOLDUP!!
concerned about elevation, have it set at 28' (scale) but i will never run the big cars, and i think i can take it down to 24' that is from top of track to bottom of bridge, there will be multiple bridges and four portals
so really thinking hard on this 7" is a pretty stiff elevation wise from zero anyway and i did it in about 11 feet linear wise, really really considering losing a full inch maybe inch and a quarter, i know in Europe and parts of us, you are in big trouble if you are on top of a train when it enters a tunnel, wind up like a bug on the windshield
It does take time and a lot of consideration to determine and set elevations. After you determine the tallest car you'll be running something will show up just a little higher or some variable you didn't consider will bite you in the butt. You're thinking about dropping the elevation to 5 3/4"? if I remember correctly traditional searchlight cars just barely clear 5 3/4" and than you have to make sure the peak of an arched tunnel portal is dead center above the track, preferably not on a curve, even then you can still run into trouble.
After a lot of trial and error, I recalled my earliest displays when I never had any problems. I figured my elevations were set then by convenience of having a large supply of Folgers coffee canisters on hand. They measured 6 1/2" and that worked fine until I tried to run a boom car through an arch on a curve.
You mentioned earlier you like the look of natural stone tunnel portals, so my assumption is you'll also like arched tunnel portals which have variable height clearances, especially if they're placed on curves or over a double rail line. Also tunnel liners may require additional clearance above the height of a portal. These are some of the less obvious variables that gave me trouble later on.
Another way I've cheated with grades and elevations after the bench work is complete, is to raise the overall baseline allowing me to keep one section of track below the baseline for more clearance. Looking at your track plan I'm not sure this would help.
I built a set of adjustable trestle supports using 3 or 4 inch PVC screw-together pipe couplers, etc. I can rotate them to shorten or lengthen about an inch or a bit more. They help when I'm installing or working on track, particularly when I was trying to get all my inclines exactly right. Once I have it right I measured and cut wood supports to go in, of course.
I built a set of adjustable trestle supports using 3 or 4 inch PVC screw-together pipe couplers, etc. I can rotate them to shorten or lengthen about an inch or a bit more. They help when I'm installing or working on track, particularly when I was trying to get all my inclines exactly right. Once I have it right I measured and cut wood supports to go in, of course.
Great Idea Lee!
Any chance of a component list and some pictures of the adjustable trestle supports?
some real great comments and ideas,
what i propose to do is build a cardboard portal with the dimensions mentioned
put track down, put portal down with whatever tape, staples and run trains thru it
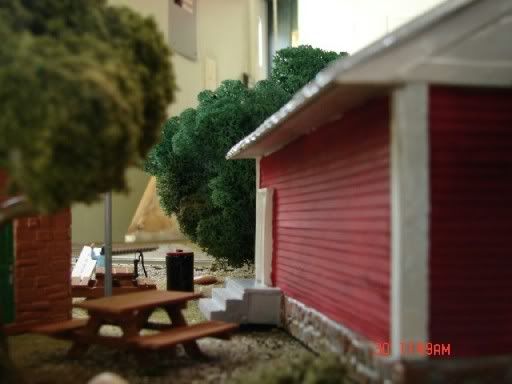
then when satisfied with height and width and shape build the critter. I developed a way to carve balsa, paint it and make it look like field stone
if you look at the photo, this is my first attempt, balsa easy to conquer, easy to paint and if you dont like the colors do it again, i used acrylic and the finished product looks like a fieldstone traditional foundation
Access to this requires an OGR Forum Supporting Membership
