
I finally got around to a project I've had in mind for some time. I took a K-Line Plymouth switcher and upgraded it to TMCC command with full Railsounds. The ERR MiniCommander 2 is under the front hood, and the ERR Railsounds Commander and speaker is in the cab behind the shield.

I would have loved to have electrocouplers, but that wasn't happening, so I settled for sound. With TMCC upgrades, the antenna is always a sticking point. I solved that problem by removing the handrails and replacing them with black insulated wire, they connect inside to the antenna of the MC-2. The only issue is the wire is much softer than the steel handrails, so I have to straighten it occasionally.


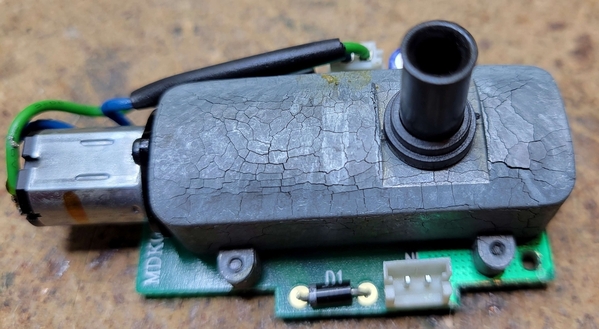
I did have to eliminate the rather large smoke unit for the task, but my smoke unit in this one happened to have been consumed by Zinc Pest anyway, so no loss! I did remove the stack extension and use it on the engine, but there's no smoke unit under it.

Here's a "quickie" video of it's first track test.

Attachments

Images (3)
  • mceclip0
  • mceclip1
  • mceclip2
Original Post

Replies sorted oldest to newest

@BillYo414 posted:

I also thought the bell cord was the antenna. Pretty cool project! I bet it's a blast to zip around the layout.

It's good for a couple of boxcars, that's about it's limit going up the grades.  On the level track, it will haul half a dozen modern boxcars with low rolling resistance.

@John1361 posted:

Awesome GRJ

I've been contemplating doing that with my Plymouth.

What sound card did you use?

Nothing available really sounds like a Caterpillar engine to me ( which is one reason I haven't decided to do the project yet)

I used the Gasoline powered doodlebug ERR board, it's the closest thing to a small engine like this would have.  There are very limited options available.  I decided that sound that wasn't totally prototypical was way better than no sound.  I didn't want to do this without sound, that just adds a whole dimension!

I used the same sounds in my K-Line Speeder command upgrade.

@RSJB18 posted:

very cool John. Gives me more projects to add to the list......Love to see a picture of the innards.

Well, I thought of the innards after I put it together.  After that exercise, I didn't feel like taking it apart again!

I will say the layout is pretty simple.  The MC2 is under the hood mounted to the top with foam tape.  I used the MC2 with the two incandescent light outputs so I could use all the existing lights.  I added a connector in addition to the MC2 connectors so that I could separate the hood from the rest of the body for maintenance.

The RSC is in the cab, it neatly fits behind the plastic cab shield if you take the plastic carrier off the board.  I managed to cram a small speaker in behind it and use the rear window opening as the grille opening.  The running lights were wired in series and directly to track power.

@RSJB18 posted:

The grab bars on these are metal, had you considered just attaching a wire to them? Not sure if they would take solder though.

The problem is the hangers are also metal, so they shorted them to the diecast chassis.  I needed some insulation in order for the handrails to work.

@RSJB18 posted:
Oh... and where's the swinging bell...

I got your swingin' bell!

Well, I thought of the innards after I put it together.  After that exercise, I didn't feel like taking it apart again!

I will say the layout is pretty simple.  The MC2 is under the hood mounted to the top with foam tape.  I used the MC2 with the two incandescent light outputs so I could use all the existing lights.  I added a connector in addition to the MC2 connectors so that I could separate the hood from the rest of the body for maintenance.

The RSC is in the cab, it neatly fits behind the plastic cab shield if you take the plastic carrier off the board.  I managed to cram a small speaker in behind it and use the rear window opening as the grille opening.  The running lights were wired in series and directly to track power.

The problem is the hangers are also metal, so they shorted them to the diecast chassis.  I needed some insulation in order for the handrails to work.

I got your swingin' bell!

Thanks John.....

thought you'd appreciate the bell comment (made with tongue firmly planted in cheek)

@coach joe posted:

Very nice John.  So Pat's smoke unit wasn't needed?

Nope, I was going to have to sacrifice the smoke unit anyway.  I'm thinking of trying to stuff a MiniCommander2 in one of my other ones and keeping the smoke unit, that would be cool.  However, I think the MC2 is just a bit too tall for the cab, which might doom that option to failure.

Add Reply

Post

OGR Publishing, Inc., 1310 Eastside Centre Ct, Suite 6, Mountain Home, AR 72653
800-980-OGRR (6477)
www.ogaugerr.com

×
×
×
×
Link copied to your clipboard.
×
×