
just wondering if anyone has any tips for wiring a new layout, or if there are books to help from keeping it from becoming a rats nest. I will have 3 loops total, and plan on running DCS, TMCC,  AND Conventional, with a possibility of adding Legacy later on? I am aware of the star wiring patterns needed. 

I am just looking to make a wire pattern that is clean, and not all over the place.

Thanks,

Joe Gozzo


Original Post

Replies sorted oldest to newest

The key to me is making sure you have holes drilled in your benchwork support beams so wires can run in as straight a line as possible from their source to their destination.   There are many items which can be mounted on the underside of the plywood (or foam) top of your layout to keep the wires grouped together.   You can print out adhesive labels to wrap around each wire to help in easily identifying what they go to.   Using different colored wire also helps (say red and black for track power, yellow for switches, white for all lights/buildings, green for accessories, etc. 

I'm sure the experts will chime in with more specific and better ideas than mine.

-Greg


A start  Click on the link for a slideshow. 

1. Right angle wire pulls.   Either Along the side of framing, or holes drilled perpendicular ( in a straight line).   

2. The amount of wire you will use, is at least double what you would think. 

3. There are number books. 1 to 45.  Number the wires both ends. 

4. There are also different wire colors that may help with maintaining order to the system.   

5. Note:  Even with a life-time of wiring experience, I under-estimated the amount of wire, replaced a lot of smaller wire tray, with tray twice the size.  

Last edited by Mike CT

IMG_0972IMG_0973IMG_0975Mike CT

what are those wire brackets called and where did you purchase them ?

That is the neatest wire job I have ever seen for a layout.

When I built my Lazy L a few years ago I admired guys like you and followed that idea of NEAT under mine as well. Only a fraction of what you have going on there. But my next layout (once the new house is built) is going to be much bigger.

Those wire guides seem to be the way to go.


Attachments

Images (3)
  • IMG_0972: Lazy L wiring
  • IMG_0973
  • IMG_0975
Last edited by BrianEso

Being one of the most seat of the pants, unorganized wirers around,  I have been thinking about my approach (I am in the same spot you are in). Based on my prior experience with wiring a layout and trying to debug it later, here is what I am planning:

1)color coding the wire beyond white/black/red.  So for example, if my blocks have 4 channels (each channel of a ZW), I am going to try and use a different color for each channel/handle. Likely will use pink/black/blue/green (or some such, you can also use wiring with stripes, etc). This is between the transformer and the block selector switch. For the output to the block, I will likely stick with a single color, like red, to the blocks. I also plan on putting labels on the wires to each block at regular intervals, so for example "1" or "block 1". I found the hardest thing was tracking the wire to the track. 

2)With the ground side I am going to use a buss, so not doing point to point (I did that on my old layout, I don't know why, brought it back to a jones block near the panel..)

3)In terms of wire gauge, I plan on using 14 for the track feeds (ideally solid core, not stranded), then use 16 or 18 for the drops. Might be overkill, if the 14 looks like it is too hard to work with, I'll switch to 16 gauge for the main feed and 18 on the drops.

4)I am going to use so called suitcase connectors, 3M makes them, but I have seen them at harbor freight and other places. Lot easier than stripping and soldering, oye. 

5)Rather than drill through the frame to hold the wires, I am going to use the wiring harness holders , the things with a cylindrical body with a flat leg on each side of the opening, it is screwed to the underside by a screw through the flag legs. Advantage is you can easily open it again to add wires, or pull one out to be able to work on it. 

6)Even though I likely won't have command control when I first run the layout, but I plan to wire for DCS (with its own color code, like purple. Trick there is only having one of these connected to the center rail of each block, I'll wire star formation from a jones block. Legacy will be wired through the ground buss. 

7)And yep, I'll make sure to order more than I thought I needed, probably order 30% more for the long run wiring. Nice part is, it is never wasted, will be lots of other projects to wire down the line.

8)Even if color coding and labeling, try and create a wiring diagram, over time you may forget the color scheme you were working with! (Kind of like NYC transit, when they built the IND line, the tile on the stations had a color scheme that supposedly could let you know all kinds of things at a glance, only problem is the scheme's meaning has been lost to time from what I recall). 


Mike CT,

I just looked at that link for wire duct, Thanks

One more quick ? please..

What diameter do you recommend so I do not underbuy the wrong size.

It looks like the smallest inside diameter is like 1/2 inch...If so way to small.

I am thinking more like 1.5 or 2.0 inch wide..

Whats your opinion.


I am starting wiring hopefully soon

My suggestion  is labeling or naming the different tracks or loops for example my loops are called:

54 B=54 inch radius Bridge track

72 T=72 inch radius top level track

72 OL= 72 inch radius Outer Lower

72 IL = 72 inch radius Inner  Lower

Ill use these names for buss bars, wiring labels and on drawings wherever 

jm2c

Steve Taylor


For holes in your cross members use the center third of the body.  For 3 1/2" cross members use a 1 1/8" bit.

benchwork VI2 ft X 13 ft w 10 inch drop valley

Pre drill the holes with a dust collector due to excessive chips.

IMG_8679

Most electrical supply shops carry 12 different colors of wire in a range of ga. size.

Prices to purchase 100'  cut pieces of wire often is almost the cost of a 500' roll of that same wire.

IMG_8872
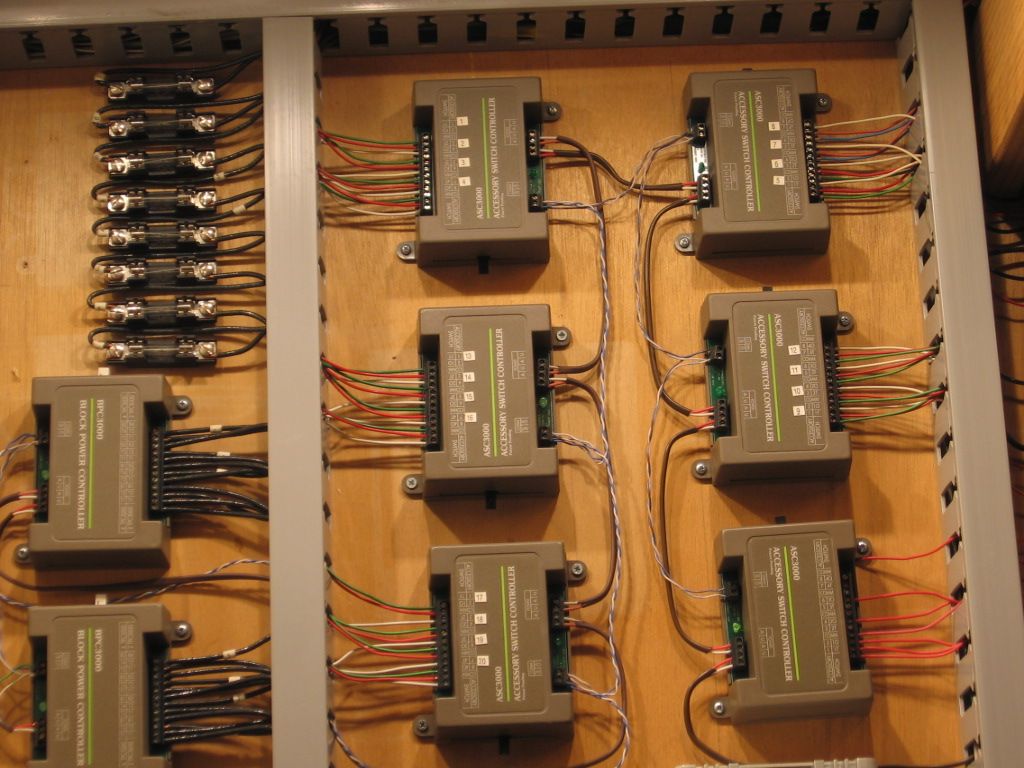
Note the red, black, yellow & white tape connecting the terminal strips with their respective MTH panel
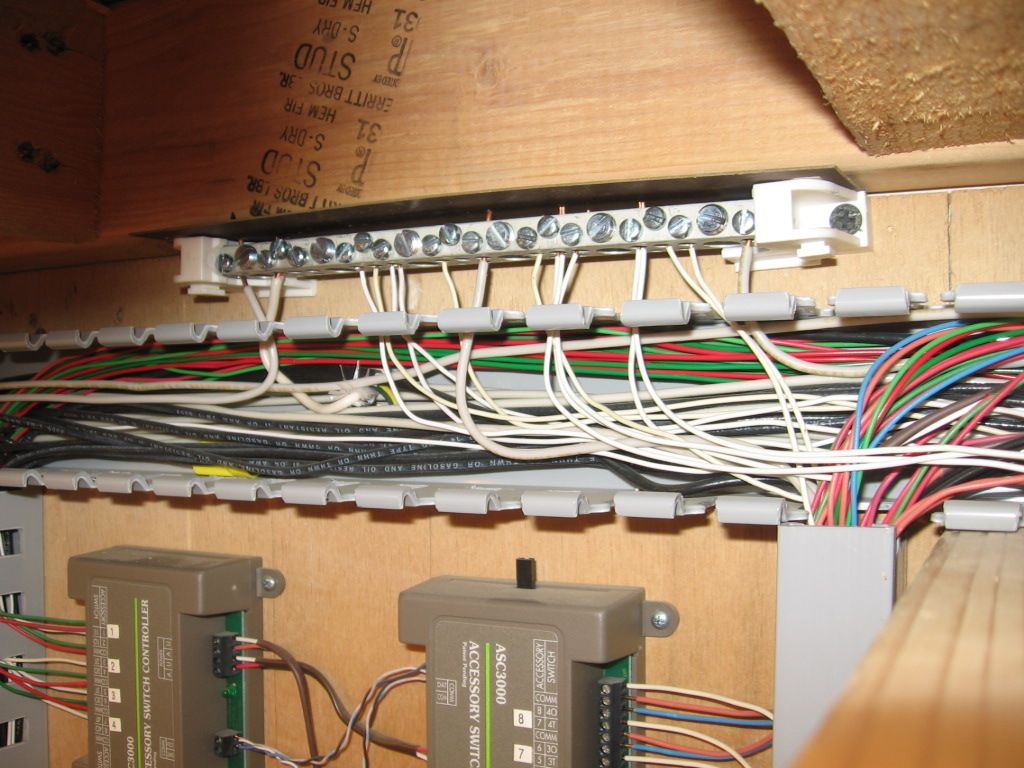
Number books are 1-45 and 46- 90 plus an alpha letter book.  I use all the books plus 12 different colors of electrical tape for various bundles.


I use the same color of tape for each bundle that goes to each power supply that goes to each MTH terminal panel.

IMG_8868

Note the different colors of tape across the top of each power source on this one of several control panels.  There are four basic sections each with it's own selectable AC or DC power.

Not seen are two additional Z-packs and  Lionel Z transformer .

Attachments

Images (4)
  • benchwork VI2 ft X 13 ft w 10 inch drop valley
  • IMG_8679
  • IMG_8872
  • IMG_8868
bigkid posted:

Being one of the most seat of the pants, unorganized wirers around,  I have been thinking about my approach (I am in the same spot you are in). Based on my prior experience with wiring a layout and trying to debug it later, here is what I am planning:

1)color coding the wire beyond white/black/red.  So for example, if my blocks have 4 channels (each channel of a ZW), I am going to try and use a different color for each channel/handle. Likely will use pink/black/blue/green (or some such, you can also use wiring with stripes, etc). This is between the transformer and the block selector switch. For the output to the block, I will likely stick with a single color, like red, to the blocks. I also plan on putting labels on the wires to each block at regular intervals, so for example "1" or "block 1". I found the hardest thing was tracking the wire to the track.k

2)With the ground side I am going to use a buss, so not doing point to point (I did that on my old layout, I don't know why, brought it back to a jones block near the panel..)

3)In terms of wire gauge, I plan on using 14 for the track feeds (ideally solid core, not stranded), then use 16 or 18 for the drops. Might be overkill, if the 14 looks like it is too hard to work with, I'll switch to 16 gauge for the main feed and 18 on the drops.

4)I am going to use so called suitcase connectors, 3M makes them, but I have seen them at harbor freight and other places. Lot easier than stripping and soldering, oye. 

5)Rather than drill through the frame to hold the wires, I am going to use the wiring harness holders , the things with a cylindrical body with a flat leg on each side of the opening, it is screwed to the underside by a screw through the flag legs. Advantage is you can easily open it again to add wires, or pull one out to be able to work on it. 

6)Even though I likely won't have command control when I first run the layout, but I plan to wire for DCS (with its own color code, like purple. Trick there is only having one of these connected to the center rail of each block, I'll wire star formation from a jones block. Legacy will be wired through the ground buss. 

7)And yep, I'll make sure to order more than I thought I needed, probably order 30% more for the long run wiring. Nice part is, it is never wasted, will be lots of other projects to wire down the line.

8)Even if color coding and labeling, try and create a wiring diagram, over time you may forget the color scheme you were working with! (Kind of like NYC transit, when they built the IND line, the tile on the stations had a color scheme that supposedly could let you know all kinds of things at a glance, only problem is the scheme's meaning has been lost to time from what I recall). 


You might want stranded vs solid if you're doing command eventually. It's better for most signal carrying.

Also look at the lever lock connectors vs suitcase type. The suitcases often cut the wire slightly which very effectively decreases the gauge some (any nick or cut does).  More expensive? Sure, but reusable and as easy to use as a flick of a tiny lever.  With a few other reasons too, you'd have trouble paying me to use suitcase connections. 

 I like to solder.  Or more precise; I trust it

I used to get my I.D. packs in various colors; not all white.

I used my ohm meter and a semi- dedicated 14' jumper wire for chasing wire ends on a 10' layout.  You could be color blind with one With mine you could be blind... it beeps if the connection shows continuity 

I think about 300ft of jumped meter is my "record". Think 3 businesses, 50 years, and God knows how many remodels... and no old wire was ever pulled out, lighting, alarms, hvac, P.A. systems, etc. etc. Some still went into the wall to the next business's ceiling/boxes; they hadn't been "one building" since I was a kid. I spent more time walking to move the clips than reading it 😂 

Once you get used to a meter and soldering; you get to really like them.


I used to work with IBEW electricians. We could always tell the difference between work done by electricians and the quality work done by those in the International Brotherhood of Electrical Workers. Tom Tee has done some FINE terminations and wire pulls. It definitely looks like UNION work. 
If any of you take it upon yourself do follow his example, it will truly be to your advantage. You may think it looks good. It does. The real reason for wiring that way is the ease of which it takes to upgrade, troubleshoot, or disassemble and reassemble you’re layout. 

Carl Peduzzi posted:

MikeCT,

As I am getting up to speed on how to wire for DCS/Legacy systems, I always have questions. As I was looking at your images, you have there block controllers?  What are those for?  They don’t look like MTH or Lionel products.  How do they fit into your wiring. 
Thanks,

Very old IC Controls, early Lionel controls.    They are TMCC controlled, capable of connecting (4) track block, to (2) different power sources.   As pictured (8) track blocks. 

Two boxes lower far left are  block controllers. 

Thank you everyone. All input is appreciated! Loved seeing pics and will take ideas from all. Since there will be 3 loops, I like the idea of naming them all, and labeling wire at both ends. Not sure I will need several different colors of wire.

I like the the looks of Tom Tee's, just not really sure how to get there. I have seen the suitcase connector, but not the lever connector. I am not sure I would ever use either one, as I prefer continuous wire from terminal blocks or boards. I plan on soldering wire to track and running back to terminal boards in the star pattern for each loop. Plan on doing the same seperately for accessories. 

Joe Gozzo

Adriatic posted:
bigkid posted:

Being one of the most seat of the pants, unorganized wirers around,  I have been thinking about my approach (I am in the same spot you are in). Based on my prior experience with wiring a layout and trying to debug it later, here is what I am planning:

1)color coding the wire beyond white/black/red.  So for example, if my blocks have 4 channels (each channel of a ZW), I am going to try and use a different color for each channel/handle. Likely will use pink/black/blue/green (or some such, you can also use wiring with stripes, etc). This is between the transformer and the block selector switch. For the output to the block, I will likely stick with a single color, like red, to the blocks. I also plan on putting labels on the wires to each block at regular intervals, so for example "1" or "block 1". I found the hardest thing was tracking the wire to the track.k

2)With the ground side I am going to use a buss, so not doing point to point (I did that on my old layout, I don't know why, brought it back to a jones block near the panel..)

3)In terms of wire gauge, I plan on using 14 for the track feeds (ideally solid core, not stranded), then use 16 or 18 for the drops. Might be overkill, if the 14 looks like it is too hard to work with, I'll switch to 16 gauge for the main feed and 18 on the drops.

4)I am going to use so called suitcase connectors, 3M makes them, but I have seen them at harbor freight and other places. Lot easier than stripping and soldering, oye. 

5)Rather than drill through the frame to hold the wires, I am going to use the wiring harness holders , the things with a cylindrical body with a flat leg on each side of the opening, it is screwed to the underside by a screw through the flag legs. Advantage is you can easily open it again to add wires, or pull one out to be able to work on it. 

6)Even though I likely won't have command control when I first run the layout, but I plan to wire for DCS (with its own color code, like purple. Trick there is only having one of these connected to the center rail of each block, I'll wire star formation from a jones block. Legacy will be wired through the ground buss. 

7)And yep, I'll make sure to order more than I thought I needed, probably order 30% more for the long run wiring. Nice part is, it is never wasted, will be lots of other projects to wire down the line.

8)Even if color coding and labeling, try and create a wiring diagram, over time you may forget the color scheme you were working with! (Kind of like NYC transit, when they built the IND line, the tile on the stations had a color scheme that supposedly could let you know all kinds of things at a glance, only problem is the scheme's meaning has been lost to time from what I recall). 


You might want stranded vs solid if you're doing command eventually. It's better for most signal carrying.

Also look at the lever lock connectors vs suitcase type. The suitcases often cut the wire slightly which very effectively decreases the gauge some (any nick or cut does).  More expensive? Sure, but reusable and as easy to use as a flick of a tiny lever.  With a few other reasons too, you'd have trouble paying me to use suitcase connections. 

 I like to solder.  Or more precise; I trust it

I used to get my I.D. packs in various colors; not all white.

I used my ohm meter and a semi- dedicated 14' jumper wire for chasing wire ends on a 10' layout.  You could be color blind with one With mine you could be blind... it beeps if the connection shows continuity 

I think about 300ft of jumped meter is my "record". Think 3 businesses, 50 years, and God knows how many remodels... and no old wire was ever pulled out, lighting, alarms, hvac, P.A. systems, etc. etc. Some still went into the wall to the next business's ceiling/boxes; they hadn't been "one building" since I was a kid. I spent more time walking to move the clips than reading it 😂 

Once you get used to a meter and soldering; you get to really like them.


Just looked up lever lock connectors. I never knew these existed. They will be perfect for temp holiday layout.

Adriatic posted:
bigkid posted:

Being one of the most seat of the pants, unorganized wirers around,  I have been thinking about my approach (I am in the same spot you are in). Based on my prior experience with wiring a layout and trying to debug it later, here is what I am planning:

1)color coding the wire beyond white/black/red.  So for example, if my blocks have 4 channels (each channel of a ZW), I am going to try and use a different color for each channel/handle. Likely will use pink/black/blue/green (or some such, you can also use wiring with stripes, etc). This is between the transformer and the block selector switch. For the output to the block, I will likely stick with a single color, like red, to the blocks. I also plan on putting labels on the wires to each block at regular intervals, so for example "1" or "block 1". I found the hardest thing was tracking the wire to the track.k

2)With the ground side I am going to use a buss, so not doing point to point (I did that on my old layout, I don't know why, brought it back to a jones block near the panel..)

3)In terms of wire gauge, I plan on using 14 for the track feeds (ideally solid core, not stranded), then use 16 or 18 for the drops. Might be overkill, if the 14 looks like it is too hard to work with, I'll switch to 16 gauge for the main feed and 18 on the drops.

4)I am going to use so called suitcase connectors, 3M makes them, but I have seen them at harbor freight and other places. Lot easier than stripping and soldering, oye. 

5)Rather than drill through the frame to hold the wires, I am going to use the wiring harness holders , the things with a cylindrical body with a flat leg on each side of the opening, it is screwed to the underside by a screw through the flag legs. Advantage is you can easily open it again to add wires, or pull one out to be able to work on it. 

6)Even though I likely won't have command control when I first run the layout, but I plan to wire for DCS (with its own color code, like purple. Trick there is only having one of these connected to the center rail of each block, I'll wire star formation from a jones block. Legacy will be wired through the ground buss. 

7)And yep, I'll make sure to order more than I thought I needed, probably order 30% more for the long run wiring. Nice part is, it is never wasted, will be lots of other projects to wire down the line.

8)Even if color coding and labeling, try and create a wiring diagram, over time you may forget the color scheme you were working with! (Kind of like NYC transit, when they built the IND line, the tile on the stations had a color scheme that supposedly could let you know all kinds of things at a glance, only problem is the scheme's meaning has been lost to time from what I recall). 


You might want stranded vs solid if you're doing command eventually. It's better for most signal carrying.

Also look at the lever lock connectors vs suitcase type. The suitcases often cut the wire slightly which very effectively decreases the gauge some (any nick or cut does).  More expensive? Sure, but reusable and as easy to use as a flick of a tiny lever.  With a few other reasons too, you'd have trouble paying me to use suitcase connections. 

 I like to solder.  Or more precise; I trust it

I used to get my I.D. packs in various colors; not all white.

I used my ohm meter and a semi- dedicated 14' jumper wire for chasing wire ends on a 10' layout.  You could be color blind with one With mine you could be blind... it beeps if the connection shows continuity 

I think about 300ft of jumped meter is my "record". Think 3 businesses, 50 years, and God knows how many remodels... and no old wire was ever pulled out, lighting, alarms, hvac, P.A. systems, etc. etc. Some still went into the wall to the next business's ceiling/boxes; they hadn't been "one building" since I was a kid. I spent more time walking to move the clips than reading it 😂 

Once you get used to a meter and soldering; you get to really like them.


That's what I love about this forum, you always find out things you wouldn't  of otherwise known. I have never run command control, I sort of assumed solid core would work better (not based in any kind of knowledge, mind you, pure voodoo thinking that solid=better, plus yeah, stranded is better. The best wire I ever used, to  my dad's consternation, was this surplus wire he had picked up someplace that was teflon insulated, wonder how he felt about me using it to wire my homemade street lights *lol*. 

I didn't know about the level lock connectors, they sound promising, the cost isn't the issue with me, I didn't know they existed.

I used to be okay at soldering, the real reason for using the lever lock or suitcase is not having to strip wire, if I run a buss on each block section, would mean having to strip the buss wire and then solder the jumper to it, and given I'll be working under the table, a connector just sounds more civilized

As far as tracing wire down with a meter, have a lot of experience with that one, even have a newfangled RMS meter that also can be interfaced with a computer (not that I would use it *lol*), bought it for like 20 bucks at a Radio shack going out of business sale. growing up had some monster long test leads, not for the layout, but to trace not so great wiring on a variety of cars, including a very obnoxious volvo 142 and its bizarre electrical system (for one thing, was supposed to be a 142 sedan, had the wiring of a 145 wagon, go figure), and then we had the Italian cars,not to mention friends with British electrical systems aka mighty god of darkness....won't go anywhere without that


Thanks again to everyone on this thread, really is gonna make a difference. Might even buy a new soldering iron and give it a shot, in case my dad is around (in spirit, he died a long time ago) so I can once again hear his comments about my soldering ability, now with nostalgia, back then cringing

Mike CT posted:

A start  Click on the link for a slideshow. 

1. Right angle wire pulls.   Either Along the side of framing, or holes drilled perpendicular ( in a straight line).   

2. The amount of wire you will use, is at least double what you would think. 

3. There are number books. 1 to 45.  Number the wires both ends. 

4. There are also different wire colors that may help with maintaining order to the system.   

5. Note:  Even with a life-time of wiring experience, I under-estimated the amount of wire, replaced a lot of smaller wire tray, with tray twice the size.  

Mike,

Awesome pics, Thanks for sharing, and also appreciate the tips.

Joe Gozzo

BrianEso posted:

Mike CT,

I just looked at that link for wire duct, Thanks

One more quick ? please..

What diameter do you recommend so I do not underbuy the wrong size.

Wire duct that I uses was 1" wide, 2" deep.  Covers had to be purchased, in addition to the slotted duct.  

It looks like the smallest inside diameter is like 1/2 inch...If so way to small.

I am thinking more like 1.5 or 2.0 inch wide..   Larger duct was 2" X 2"  


Last edited by Mike CT

Mike CT

Thanks again for the update. That wire duct is a lil pricy but I am gonna make that purchase anyway.

Of course I will shop around in my local electric supply first for better pricing.

Thank you and everybody in this forum. Sometimes just looking at pictures and reading all the replies to all the topics gives me a much better understanding of what I have achieved and what I want to achieve in the future layout.

Thank you one  and all.


You must be trying to avoid wiring like my layout below.

102_0448102_0459

Layout has 28 switches plus many accessories.  By the way some wires are labeled but ID ing a wire is not  that hard:   find the switch on panel or the item on the layout and go to town.  Layout is over 40 years old, moved 6 times, has three terminal strips between boards and was portable and move to living room for 3 months each year and has had few electrical problems over the years.

Charlie

Last edited by Choo Choo Charlie

Add Reply

Post

OGR Publishing, Inc., 1310 Eastside Centre Ct, Suite 6, Mountain Home, AR 72653
800-980-OGRR (6477)
www.ogaugerr.com

×
×
×
×
Link copied to your clipboard.
×
×