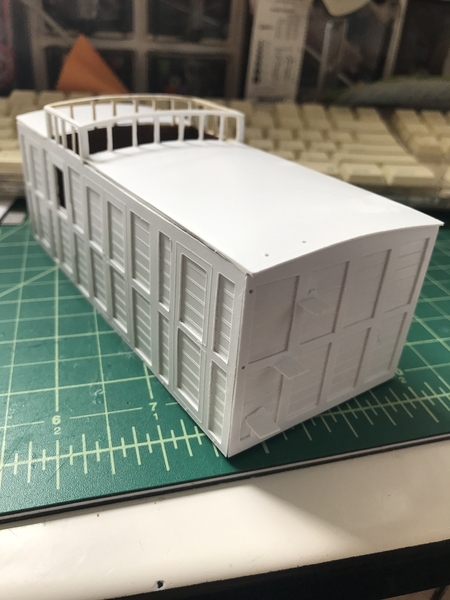
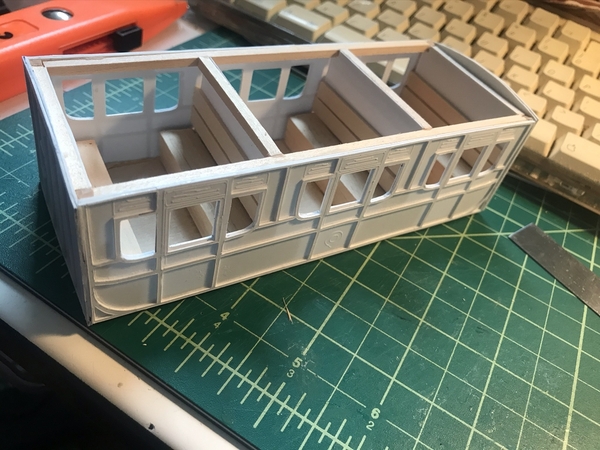
I recently purchased a poor man's "laser cutter called the Cricut Maker 3 (https://inspiration.cricut.com...ate-cutting-machine/). It uses a knife blade to cut the material I am interested in. In this case 1/16 inch basswood.I have not tried plastic as yet but will do so. The machine plus the knife blade / tool holder along with extra blades plus a couple of super stick pads cost me about $550.  I can cut about 11 inches wide by about 24 inches long.

I just set it up today for my first test cut.

https://www.youtube.com/watch?v=WcTaHF-W8rE  This video below shows how one user designed the patterns by simply using LibreOffice / Microsoft Office Drawing platform - transferred to Cricut design space for the actual cutting.

You could always pitch it as machine your wife/husband could use for their arts&crafts projects................

I designed, uploaded and cut my first project. This was a test cut. It consisted of two end walls. The sizes for the openings were taken off the Grandt Line and Tichy web sites. I used LibreOffice Draw to make the basic wall outline then added the openings in the Critcut Design Space. It took about 15 minutes for the machine to cut the walls out. Note the video used Open Office Draw which is different than LibreOffice so I had to export the drawing as a jpg.

2021-10-09 Cricut Maker 3 008


2021-10-09 Cricut Maker 3 010


2021-10-09 Cricut Maker 3 011

The window and door were perfect fits

2021-10-09 Cricut Maker 3 012

2021-10-09 Cricut Maker 3 012

Attachments

Images (4)
  • 2021-10-09 Cricut Maker 3 008
  • 2021-10-09 Cricut Maker 3 010
  • 2021-10-09 Cricut Maker 3 011
  • 2021-10-09 Cricut Maker 3 012
Original Post

Replies sorted oldest to newest

Thanks Alan - Though I procured this primarily for basswood but I am going to try some 80 mil styrene this week. I see no reason why it should not work. If it does work it could come in handy for complex dual angles (like a roof line that changes slope mid way).
I am also going to try the 'print and cut' option on card stock. One can load designs like bill board signs into the design space, size and move them around then hit a 'print and cut ' icon. Design space instructs your printer to print the sheet then you load it into the cutter and press 'go' to cut out each individual sign. When the sheet is printed a perimeter border is auto printed. The machine aligns the cutter head to the border with a laser to register the position of the signs and then cuts. I'm looking at complex signs with a lot of curves.

Only issue so far is that any material on the 'materials' list that uses the knife blade can not be edited (change number of cuts of pressure). I also can not make a new material for the list and specify the knife blade. All I got from Cricut was 'those options don't exist at this time'.

@AlanRail posted:

I should have bought the MAKER instead I got the Explore Air 2.

But then again I have a Glowforge.

I like the way the Cricut synchs with a printer. So that you can simply and perfectly cut out color prints or decals.  The Glowforge can't do that yet.

Alan - The Explore Air 2 will cut basswood. Use the deep point blade. This is the machine that was used in the video - https://www.youtube.com/watch?v=WcTaHF-W8rE. Advantage to the deep cut blade (which I can't use on the Maker 3) is that the software allows you to make a new 'material' so you can choose the blade, pressure and number of cuts. So far Cricut Maker 3 does not have the capability to make new materials list and choose the knife blade nor does it allow me to change the pressure or number of cuts on an existing 'material'.

The syncing you are alluding to is called print and cut. I am going to try it for card stock signs with other than rectilinear sides.

Nicely done. Do you have specific projects in mind for this? What was the motivation?

Don Merz

Don:
I plan on using the Cricut for almost all basswood custom building, making card stock building front signs with other than rectilinear sides and hopefully to cut out windows and doors on styrene sheets. I have to build a grain elevator this next project so will cut the styrene sheets to size for the walls then try using the Cricut to cut out all the window openings. The machine is supposed to be good for about 10.7 by 24 inches which is more than enough for my work.

I have been using a Cricut Maker to do car sides for a while. I don’t really like their interface and I HATED that they were going to charge a fee for this and then thank goodness they saw the light and backed off monetizing something that was originally  billed as free. It would have bricked all existing Cricuts. Still leaves a bad taste in my mouth.  

Here are some car sides I cut in styrene using it.

45B983FD-7B46-45A4-BDC4-7F1EE2912808952B56BC-94E4-4CC8-AC64-B0602969C014CD0822FF-BD2D-4A39-9D34-9A0600FDA0C6


Some 19th cent British cars and some 19th century NYC Elevated cars.  I like odd things. I can say that not many others have these in O scale.

Attachments

Images (3)
  • 45B983FD-7B46-45A4-BDC4-7F1EE2912808
  • 952B56BC-94E4-4CC8-AC64-B0602969C014
  • CD0822FF-BD2D-4A39-9D34-9A0600FDA0C6
Last edited by Silver Lake

Set up the Cricut "Print and Cut" for building front signs. Up to now I always used rectilinear designs because cutting out curves was pretty difficult for me for the thick backer board.

I set up a single image in LibreOffice presentation (can also use draw) and sized it to the dimensions I needed. This is a good idea to do if you want to print on regular bond paper to see how the size fits your structure. I then selected and exported the image as a ".png". Once in Cricut Design Space I uploaded the image, resized it to the size I had in draw then duplicated and re-positioned the images. These images must fit inside a rectangle that is 6.25 max by 9.75 max. Once done you click on print. Note - I used Card Stock paper - 80 or 100 pound - not sure. Cricut automatically adds a border around the images to act as registration for the cutter. There is a way to utilize a whole sheet using Inkspace to set it up but I am not comfortable with that yet. Once printed Design space prompts you to place the card stock on the sticky mat and load into the machine. Press 'go' and sit back.

2021-10-12 Cricut Building Signs 001

It came out pretty good

2021-10-12 Cricut Building Signs 002

The card stock is obviously too thin to stand on its own as a sign so I usually use conservation board (type of cardboard) as a backer board. This board is thick but the Cricut will cut it. Back in LibreOffice Presentation I copied the image onto a new sheet and blacked it out. I then exported this as a .png. I uploaded this image into design space as a new project  but made sure it cut only not print and cut. I placed the board onto the strong mat but forgot to tape the perimeter. I used the 'heavy matte board" material setting which meant 24 cuts so a pretty long cutting (38 minutes). I loaded the cutting mat into the machine and sat back. At cut 10 because I did not tape the board to the mat the knife blade was deep enough to push the board out of position so I had to stop the cut and finish up with a razor blade. That's why you see the ragged edges. However the process does work. I can start adding a lot more curves to signs from now on.

2021-10-12 Cricut Building Signs 005

Tomorrow I will be cutting out 80 mil styrene for the walls on the main building for a grain elevator I am building. My plan is to cut the styrene walls to size then use C ricut Design Space to place rectangles for window openings. This will be simple black rectangles placed at specific locations on the design space but I will need to pay attention to the x-y location of the building wall so that I place the styrene on the cutting mat in the precise location.

Attachments

Images (3)
  • 2021-10-12 Cricut Building Signs 001
  • 2021-10-12 Cricut Building Signs 002
  • 2021-10-12 Cricut Building Signs 005

I set up the Cricut for cutting 80 mil styrene. It did not go all that well. With the cutting options available the 80 mil thickness was too much for the machine so I had to finish up using my nibbler. 20 mil should be no issue. 40 mil should be ok also. I am going to try 60 mil. I am also purchasing the deep cut blade to see how well that works versus the knife blade.

Things Cricut needs to do:
1. Allow editing of knife blade material settings (pressure and number of cuts) which one can not do right now.
2. Though this won't make sense to a non Cricut user in order to cut out the window/door spaces one has to 'weld' all the openings together so they stay in the same position for the cut. Once welded one can not un-weld if a mistake in positioning is made. The project has to be deleted and you need to start over again with a new project. This is why I have learned to make copies of the basic cutting project to save all window /door space sizes and positions before I weld.
3. Right now if the basic cutting program does not result in cutting all the way through the styrene Cricut allows one to make one more cut before removing the mat from the machine. Yea you can keep pressing the 'go' button but Cricut should allow you to repeat the entire cut program without having to keep pressing the 'go' button. Note - there is too much wriggle room in loading the mat so if you remove the mat and reload it for another program pass it is virtually impossible to orient it in the same position as before.

One thing I learned after wasting some styrene is that you should always test the cut pattern on card-stock or even regular printer bond paper before committing to styrene.

Below is the styrene taped to the 24 inch mat ready to load into the machine. I forgot to take a photo of the card stock I used to make the cuts.

2021-10-13 Cricut Cut Styrene 001

Below is the result on the card stock setup unit. The bottom window was too low so since I 'welded' the image I had to go back and create a new project to fix the position.

2021-10-15 Cricut Cut Styrene 001

As I said the Cricut could not cut all the way through after even a 24x cut program and even pressing the 'go' button an other 5 times so I resorted to drilling holes and using my nibbler. at least I had the precise boundaries of the cuts visible.

2021-10-15 Cricut Cut Styrene 003

Attachments

Images (3)
  • 2021-10-13 Cricut Cut Styrene 001
  • 2021-10-15 Cricut Cut Styrene 001
  • 2021-10-15 Cricut Cut Styrene 003

Great information! Thank you!  My wife has a Cricut  Personal Cutter 29-0001, still new in the box. she never used.  From what I can find on the web, its cutting capacity is pretty limited.  There are many newer models for sale in the area, probably similar usage to my wife's.  The Cricut naming is a bit confusing, with many models with similar names.

If I were to go shopping for a second hand cutter, which models would you recommend?  I would definitely use it with the computer app.

Cheers,

Geary

Last edited by Geary

Geary:
If you plan on using the machine for model railroading then the Maker or Maker 3. There may be more difference but the only thing I saw was the Maker 3 'cuts faster' however this is only for smart vinyl (does not require a mat). If your wife does not use smart vinyl then the older Make is just fine. You will have to double check to see if the older Maker can use the knife blade otherwise you are confined to the deep cut blade for you RR stuff. I don't know much about the Explore Air other then the fellow in the YouTube video I post earlier used the Explore and a deep cut blade to cut his clapboard. When I called Cricut and asked what was the best machine for my RR business they said the Maker 3 because of the knife blade.

https://www.makersnook.com/cri...ricut-explore-air-2/

Add Reply

Post

OGR Publishing, Inc., 1310 Eastside Centre Ct, Suite 6, Mountain Home, AR 72653
800-980-OGRR (6477)
www.ogaugerr.com

×
×
×
×
Link copied to your clipboard.
×
×