
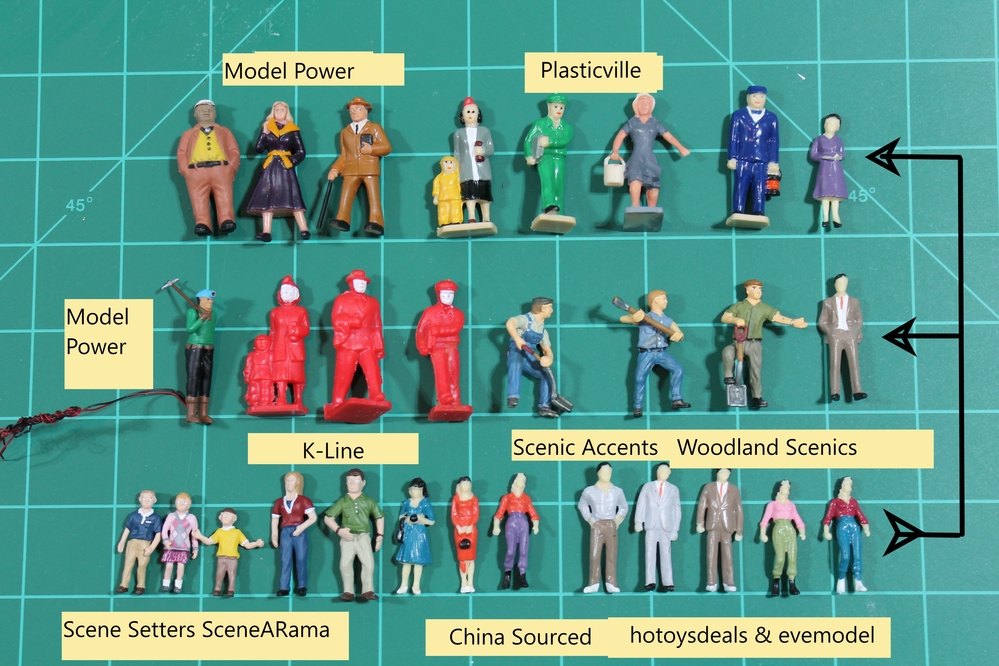
Using figures to enhance scenes is always a good thing.  Lately I've been hand painting figures and stumbled across a trick while watching YouTube videos on the topic.  Figures at 1/48 are a PITA to handle while painting, especially small details.  So, this trick is a great help to me.  QuarterGauger48 suggested I pass it along.

I super glue the figure to a Dry-Wall screw that I attached to a scrap piece of wood.  The figure is held securely (I used to use wax but any real force and the figure goes flying) but easily pops off when the painting is complete.  I wish I could remember the folks on YouTube I copied so I could credit them...  Thanks.

Soldier On a Screw

Attachments

Images (1)
  • Soldier On a Screw
Original Post

Replies sorted oldest to newest

When I had been married a short time my wife became pregnant and stay at home a lot.  I came home one eventing and found she had painted the figures on a Revell small town station.  I was very upset until I found an HO station master with a watch chain, gold buttons, a moustache, dragging a mail sack with U. S. Mail printed on the side.  My railroad got a new VP that day and she ended up painting all the  small details(like the windows on a cigarette machine, house numbers, and the like).


She glued them to a bit of sprue and held them in a tiny little vise she picked up at the PX.


I wish I had kept some of them when I changed over to O27 and sold all if my HO stuff.

@ScoutingDad posted:

Hard to believe you got that much detail out of those figures- especially the faces. Do you have a preferred manufacturer?

You have hit upon an important aspect of the process:  you have to start with sell-mastered and reproduced figs.  No matter the skill of the painter of the techniques used, poorly carved or molded figs don't turn out as well.

@ScoutingDad posted:

Ed, thats far more than slapping some paint on.  Hard to believe you got that much detail out of those figures- especially the faces. Do you have a preferred manufacturer? Thanks - Jeff

Jeff, most of my military figures come with models I build. Primarily Tamiya. The figures in the pic are from an outfit called Gaso.Line.  They show up on the Bay from time to time.  I have a few others from them as well.  There also other European outfits such as ICM Holding in Kiev.  Not sure they are still in business as I bought pre Putin insanity.  Frankly, I just search for 1/48 military figures on the web...  Hope this helps.

WARNING!!!!                               WARNING!!!!                               WARNING!!!!


I was advised by a Forum member that this technique did NOT work for him.  In attempting to remove the figure it was damaged.  I'm sorry if anyone else has had the same experience.  If you do use this technique and are experiencing trouble removing the figure, you may try "un-cure" to soften the CA glue:

IMG_6793

Attachments

Images (1)
  • IMG_6793
@RSJB18 posted:

A dab of hot glue will hold the figure securely. The glue can easily be softened for release with a little heat from a heat gun on a low setting.

Bob

That's how I do it too.  I use a wooden BBQ skewer that rotates easy in my fingers and is nice and long to prevent overspray on my hands.  Then I just stab it into a block of foam to sit and dry.

IMG_20210310_093850908IMG_20210310_171645210IMG_20210313_084103372

Attachments

Images (3)
  • IMG_20210310_093850908
  • IMG_20210310_171645210
  • IMG_20210313_084103372
Last edited by Ron045

My primary hobby is military figure painting for games. I paint a lot of figures. If the figures have a base, I use the cheapest store brand of basic white glue (aka “Elmer’s” or PVA) on a small wood or plastic base. When complete, the figure pops off the white glue with a little finger pressure or at worst the blade of a screwdriver.

For figures without full bases, I recommend the head of a screw as OP suggested but use a product called “Blu tack” which is a temporary adhesive that is designed to release without residue. A small pea sized blob of blue tack is all you need. Available at craft stores or the usual online sources.

Last edited by ByronB

I have been doing a fair amount of figure painting and concur with SIRT's idea of first painting with a grey, or in my case flat black, before doing any detail painting with acrylics.  I've found having the smallest detail brushes and a magnifying glasses headset can give you pretty good results.  And, when I finish painting, I spray a protective coat with Rustoleum Matt Clear spray.
I haven't mounted a figure on a stick yet but may try that as well.

figures

Attachments

Images (1)
  • figures

Hey guys - do you mind posting what "brand" of figures you have?  @EmpireBuilderDave  I have never seen those types of figures before. Finally got my hands on a couple of Preiser workers.

Various figures

I am finding the China sourced people are decent for adding to passenger cars as well as on-the-street cars and trucks mainly due to their smaller size and thinness. But they do not have the facial details to do much with.

@ScoutingDad posted:

Hey guys - do you mind posting what "brand" of figures you have?  @EmpireBuilderDave  I have never seen those types of figures before. Finally got my hands on a couple of Preiser workers

.

Those figures are actually 1:50 and 1:48 figures from China - Wehonest on the 'Bay.  I've been pleased with their quality for some of my city areas where I need alot of people and didn't want them all to be painted the same. I had avoided figure painting for awhile but have found it is not as difficult as I expected as long as I don't get too close...

@Tom Q Fan posted:

Any thoughts on painting eyes?  I was told not to paint the "white" part of the eye as it would make a google eye effect.

Tom

There are so many different kinds of figures... Maybe some need painted eyes.  But look at this real life shot.  Can you ID any eye color?  Can't even see white.  You just need shadow and contrast.

Screenshot_20220802-214446

Some light weathering powder just brought this face and hands to life.

FB_IMG_1632505483721

Attachments

Images (2)
  • FB_IMG_1632505483721
  • Screenshot_20220802-214446

I agree with @Ron045 and you generally don’t need or want to paint eyes on the size of figures we are discussing here.

But since it is very hard to say no to one’s granddaughter 😀 I will share how I paint teeny tiny eyes. When the face is finished and shaded, use a very small brush and paint a horizontal line with an off-white color. Do not use pure white. Then using the same brush, paint a vertical line with black or a near-black dark blue. Don’t try to paint a dot pupil as you’ll only get frustrated. At this point the “eye” will be bigger than you want and look kind of like a black and white cross shape.

Then take your base skin color and go back and paint slightly curved horizontal lines top and bottom of the eye to narrow it down to near-scale size. This should leave you with a very small eye and the “whites” will be extremely small triangles on either side of the pupil.

@ByronB posted:

I agree with @Ron045 and you generally don’t need or want to paint eyes on the size of figures we are discussing here.

But since it is very hard to say no to one’s granddaughter 😀 I will share how I paint teeny tiny eyes. When the face is finished and shaded, use a very small brush and paint a horizontal line with an off-white color. Do not use pure white. Then using the same brush, paint a vertical line with black or a near-black dark blue. Don’t try to paint a dot pupil as you’ll only get frustrated. At this point the “eye” will be bigger than you want and look kind of like a black and white cross shape.

Then take your base skin color and go back and paint slightly curved horizontal lines top and bottom of the eye to narrow it down to near-scale size. This should leave you with a very small eye and the “whites” will be extremely small triangles on either side of the pupil.

do you have any examples of your painted eyes that we can see'...👀

I think the key to a great figure/little people paint job really depends on the quality of the figure.  The past few years I've been buying "Model U" real scanned humans that are 3D printed.  And from "Printle", a shapeways affiliate company.  The are very realistic, however, some times the facial details are not 100%.  Regardless of how much time you spend trying to get them to look acceptable is fruitless.  Here is my latest batch from Model U.

I mount them on cork screws held by model wax.  I do undercoat with auto gray or tan camouflage.  Just a very light coat.  I tried Vallejo primer, but unlike their paints, [which I love] I don't like the results.  After a few hours I start painting.  Skin tones first, then clothes, hats, shoes etc.  It is generally easier to touch up the skin later, rather than the entire figure.

I use a very ultra fine tip marker for eyes and lips.  I rarely use a wash and never powders.  But I am going to give that a try.  A/I will damage the paint as well as other washes,,,  Again, like everything else in the hobby we all have our individual approach and techniques to our projects... So bottom line, good figures, good brushes and paint, a steady hand gives good results'..  Main thing is enjoying and having fun bringing your little folks to life'..😁


little people


IMG20220806160102


IMG20220806160033

Attachments

Images (3)
  • little people
  • IMG20220806160102
  • IMG20220806160033

I have an old slant top desk in my workshop that I use for people painting, or other details. That is my refuge when I don't feel like scenic work on the layout, or structure building. In the cubby holes are flesh type acrylic colors, and logical shades for clothing. Also handy are my tiny brushes from the art supply store. I also have a dedicated flood light. I find it is cool to have everything ready when the mood to paint people strikes - I can just sit down and focus...

I think the key to a great figure/little people paint job really depends on the quality of the figure.  The past few years I've been buying "Model U" real scanned humans that are 3D printed.  And from "Printle", a shapeways affiliate company.  The are very realistic, however, some times the facial details are not 100%.  Regardless of how much time you spend trying to get them to look acceptable is fruitless.  Here is my latest batch from Model U.

I mount them on cork screws held by model wax.  I do undercoat with auto gray or tan camouflage.  Just a very light coat.  I tried Vallejo primer, but unlike their paints, [which I love] I don't like the results.  After a few hours I start painting.  Skin tones first, then clothes, hats, shoes etc.  It is generally easier to touch up the skin later, rather than the entire figure.

I use a very ultra fine tip marker for eyes and lips.  I rarely use a wash and never powders.  But I am going to give that a try.  A/I will damage the paint as well as other washes,,,  Again, like everything else in the hobby we all have our individual approach and techniques to our projects... So bottom line, good figures, good brushes and paint, a steady hand gives good results'..  Main thing is enjoying and having fun bringing your little folks to life'..😁


little people


IMG20220806160102


IMG20220806160033

Ted, great painting skill and choice of figures...I hope to have your patience and skill some day  Look forward to seeing the above figures on your layout...

@poconotrain posted:

Fantastic looking. I only wish I was that good at painting.

Pocono, no need to be a great painter. Use the simple method of block-painting (i.e. paint the basic colors for the head, hands, clothing, accoutrements, etc.) followed by application of a wash or dip, then an overspray of clear matte. Nine times out of ten the results will be a decent-looking figure suitable for the layout or wargame table. Sculpted detail is the critical thing to look for in figures, but even old Plasticville people can work:

Give it a try sometime...it's not that tough and can actually be a lot of fun.

PD

Add Reply

Post

OGR Publishing, Inc., 1310 Eastside Centre Ct, Suite 6, Mountain Home, AR 72653
800-980-OGRR (6477)
www.ogaugerr.com

×
×
×
×
Link copied to your clipboard.
×
×