This is my first time I'm going to try building a layout for my trains. I've been buying Lionel engines, rolling stock, accessories etc over the past couple years. I want to build a layout that has multiple loops a turntable and a switch yard with some longer sidings using O72 curves for some of the larger engines I've bought. I want the layout to be 24' X 16'. The problem is I have no idea how to do it.


I bought RR Track software to help me design a layout but I really don't know what I'm doing yet. 

I was wondering what the best way of doing the benchwork is? What should I use to cut down on noise?

What kind of track is good. I have some Fastrack already. Is that okay to use?

I plan on using Lionel Legacy controller. 

How far should the tracks be spaced apart? Do I need special switches or crossings?

I know I'm missing a lot more but I have to start somewhere and soon.


Thank you for any help you can offer. 

Ron


Original Post

Replies sorted oldest to newest

Originally Posted by Penn-Pacific:

Is your layout going to by a 24" x 16" island/ table layout or around the walls with an empty center? I've read where homosote is a good sound deadener for the top of the plywood, dont use it myself. Foam (4x8 sheets) is also good for sound-proofing the plywood top as well.

It's going to be a table layout.

A basic suggestion would be to subscribe to 'Classic Toy Trains' magazine, published by Kalmbach Publishing Co.  They cover all aspects of the hobby from table structure, surface, track plans, etc.  In it are classified ads by some reputable firms that suppy materials, software, everything you need to build a layout.


The second suggestion is attend major Train Shows where you can talk with members of train clubs and vendors.


Do NOT rush into it without a variety of ideas.


It is a wonderful hobby.  enjoy.


bruce

Hi Ron,

Perhaps this easy read will help you get some direction.(see attached).

The answers to your questions are like a lawyer's answer..."it depends".


Getting your thoughts and ideas organized and then viewing as "Givens and Druthers" will provide a lot of answers.


You can do a lot for your layout plan\design just by using pencil and graph paper.

Then use the software to create a build plan from the drawing.


So, start here by reading this.

Attachments

To address one thing you mentioned in your opening post which is noise reduction. I understand, from reading others post on the forum, that the Lionel Fastrack is loud, especially on a hard sounding board like plywood. When starting fresh like you are, researching and deciding on the 'right' track system would be the 1st order of business. When I started out, it was tubular or Gargraves flextrack. The tubular was a good starting point but the limitations of the curves and the switches quickly made it undesirable so I went to Gargraves. It's not a 'plug & play" system as the curved track has to be bent. Bending causes the the rail ends to be uneven so it has to be cut. Gargraves and Ross both now offer sectional curved track in different radii to make it less labor intensive. Once laid on cork roadbed and wired, it is about the best looking, running and quietest track around.

    If you're going flat tabletop style, the choice of sheets goods is next. I started out with Homosote and have stuck with it. I never found the need to lay it over plywood, but use supports spaced 12" to 16" apart and it doesn't sag. There are more choices now but whichever you chose, you might want to start with 1 or 2 sheets of 4x8 material and build a small temporary layout, like others have advised.  This will give you time to play and grow into what you eventually want in a layout. Is is an evolving process that never ends. The fun is in operating and building and a layout is never finished unless you're bored with it.  Read as much as you can about what others have done with theirs and take what you like & leave the rest. Good luck, don't be too serious & don't be afraid to play.

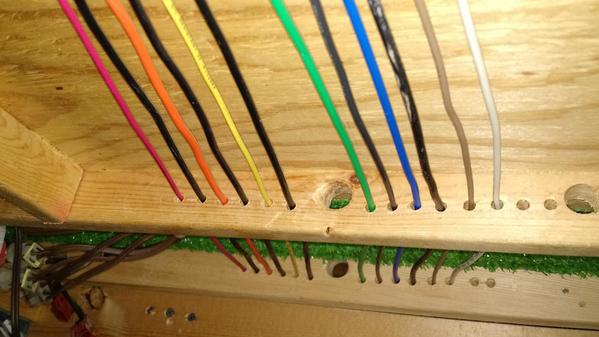
Buy graph paper and sketch out what ideas for your track plan will be. You need to plan it out before construction. Each square could be a foot.  Don't try to cram too much into your railroad,try to keep it simple. All hobbies can be VERY costly. Have a budget and take your time and enjoy the building process. I did my table at 48" as i Have a duck-under.At this height you can sit under your layout and due wiring easily. Color code your wire runsSO you can easily trace them to your switches,buildings etc.Use 14or 12 guage wire for your bus lines.

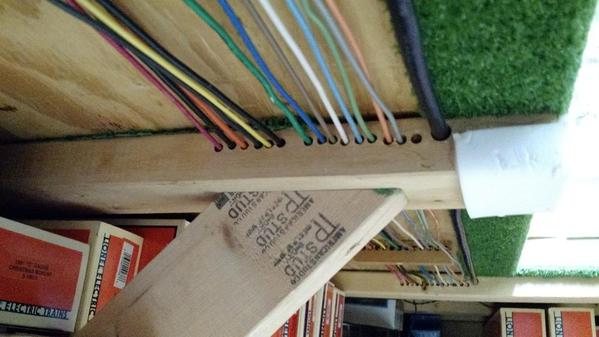
I also used 12 gauge solid wire for running the major power to the layout.  I drilled holes in the cross braces and table top support pieces.  This allowed me to route the bus wires all through the layout.  The solid wire is very strong and can be pulled tight like a guitar string to avoid drooping/dangling wires.  Every other wire is a black common wire.  The large holes are for routing AC power cable through to an outlet if needed. 


IMG_20150826_185119154


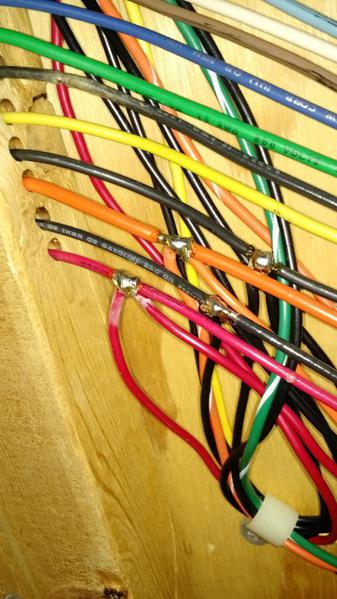
To connect I just drill a hole down from the top through the astro turf and plywood.  I poke the wires through and connect usually by splicing into the bus wire.  I like to have the connections staggered so there is no chance of shorting.  If the wires are possibly not permanent then I will use a male-female quick disconnect amphenol connectors.

IMG_20150826_185519839

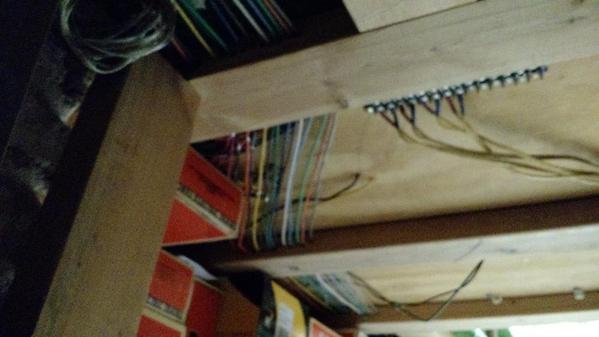
After long lengths I will terminate all the wires into a screw terminal block as shown in upper right area of this really poor photograph.  You can also see a couple of places where track wires come through and go to splice into the bus wire.


IMG_20150826_185219185_TOP

This pic shows an 16 gauge 3 wire AC power cable running from a ZW location to get some outlet power.


IMG_20150826_185248642

You can also notice the white padding hot melt glued to the end of the 2x4 brace.  My head got tired of hitting and polishing the braces.  This is also the edge of the table where the astroturf carpet wraps under the table for a few inches and gets stapled and glued to the bottom of the plywood surface.

The wiring colors loosely follow the resistor color code with black and brown reserved for different grounding schemes.

Not very elaborate, but neither am I.

Attachments

Images (4)
  • IMG_20150826_185119154
  • IMG_20150826_185519839
  • IMG_20150826_185219185_TOP
  • IMG_20150826_185248642

I agree with what others have said: start small!!! Maybe two 4X8s, or something like that. You have to build a small layout to gain confidence and skill. That way, your mistakes will be smaller, and you will only have to live with them for a couple of years before you tear it out and build the REAL layout, the one you will live with for a long time.


Also, see this layout as an opportunity to find out what you like. Try to build something that has at least one loop for continuous running, at least one passing track where two trains can meet, and a handful of spur tracks for making trains or setting out cars. That way you can try your hand at the 3 main operating styles (engineer, dispatcher, spectator) and learn which one you like best. You might have to sacrifice O72 curves to get all that in, but this is also a learning experience. Some people can't stand stubby trains on tight curves; some people don't mind them, and some positively love them. After being forced to run on O42 or smaller for a year or two, you will know which camp you fall into--whether you are happy with it, or just dying to break those chains and lay some curves with 3-digit diameters.

Well our layout 26x17, and has most of the things you want in yours. You will find however, doing a big engine service area and a yard in the space you have, will be very difficult, if not impossible. We sacrificed the yard. It's 3 separate loops, 3 different levels, with a big engine service facility. We also used RR Tracks to design the track plan. it does take some time to learn how to use it.


Track Plan:


Final Revision II


There is a link to my YouTube Channel below, in my signature. I have 6 Update videos of our layout, almost from the beginning. Check them out... I show various phases of construction and explain how we did a lot of it.


Other than track on the carpet, and a few sheets of plywood on top of the pool table years ago, this is our 1st layout of this magnitude.

Attachments

Images (1)
  • Final Revision II

My Friend, you have asked a very Diversified Question...I would begin with your Local Hobby Shop.  There may be nice layouts in your area that you are not aware of. Thats where I would begin. I live in Tennessee and you are very welcome to visit, Clarksville, Tennessee.  My layout is 38 by 17', 5 level...There are many layouts in the EVANSVILLE, Indiana, Madisonville, KENTUCKY, Owensboro, Kentucky, Clarksville, Tennessee, and Nashville, Tennessee....Lots of Opportunities for your consideration.....There are so many choices of Operation, Command, Conventional, Scale Like, Toy Train Like, so, visiting friends in the Hobby is Your Best Bet...Wecome Aboard!!!! Thanks for posting...

I would suggest you purchase RR-Track, download MTH or Atlas O software applications and draw the layout you want. Spend time on it. I have built 3 model railroads in 30 years, each with different results. I am now designing my latest and the software helps a lot. You can see what four going to build. So if you want a turn table, it is better to design  it into the layout on the screen with the ability to make changes than try to add it later.. Plus many of the applications spit out a laundry list of stuff you need to purchase. 


Curves - 054? O72 or larger? Depends on what you have in terms of equipment, what you think you might want? Turn Table? what size 28" or 34". I wish I bought the 34" now because I now have a big boy and am going to buy another one. Diesel shed? staging tracks? yards? Make it easy on yourself - design it on a software package first.


Benchwork - prefab or Lowes / Home Depot for lumber, homosote, etc?


Once you get that done, benchwork then wiring, etc can be done over time. 


As they say measure twice and cut once.

That's exactly where we started...Rich Battista and his Black Diamond RR. His DVD's are fantastic. I blame Rich for this sickness I have now


Not to mention you could spend hundreds of hours on YouTube watching "How To" videos from various individual people. Not just O Gauge either. I learned how to wire Tortoise Switch Machines from a guy with an N Scale layout, how to do tunnel liners from Eric Siegel, trees from HO guys. A lot of vendors also do YouTube videos showing how to use their products.


There is a TON of information on the web....and it's FREE.  

Originally Posted by Ron's Lionel:

...cons of using Mianne Benchwork. Besides price.

Two cons I have witnessed. Sagging under load (3/4" tops). The cam lock fasteners allowing joints to open up over time.


For my money a good power miter saw, a Kreg Tool, and Gorilla Glue just can't be beat. Make your own benchwork and you can make and size/shape you choose.

Last edited by Gilly@N&W

IMO.


Model railroad benchwork.com is my favorite for permanent benchwork. Nice curved custom designs.  Flows with the right of way.


Mianne is best for lightweight versatile reconfigurable setups.  Great for non wood workers.  Screw driver assembly.  Angular footprints not known for smooth free flowing benchwork shapes.


Both companies very easy to work with.


You may get some ideas from stuff I have done in years past:


www.curvedbenchwork.net

Last edited by Tom Tee

Ron,

You are going to get LOTS of great advice here on the Forum and each question you ask is going to lead to several answers which will each lead to more questions and answers. The issue is going to be that most, if not all, of the advice will be very good. It is just that there are so many good alternatives to choose. Each of the modelers will have a preferred way of doing things and you will need to sort out which route is good for you.


Here are my suggestions:

1) Do as much planning as you can stand before you drive a screw. Play with as many track designs as possible. REMEMBER: Even if you use 3D software, problems will crop up with regard to what you can see and what you want to see when you start building.

2) Get as much advice as you can stand and ask as many questions as possible before you drive a screw. You have chosen a large layout size and that has its plusses and minuses. For a first layout, you are biting off quite a lot. Your investment in track and components, not to mention scenery will be considerable.

3) Go to train shows and have the folks demonstrate how they did things.

4) Watch Rich Battista's videos (of course) and buy the "How To" books on benchwork and wiring. Rich's videos are fantastic and it is very important to have pictures on site as you begin benchwork.

5) Make certain you plan spacing in your room BEFORE you drive a screw. Where are your lights? Your smoke detectors, your outlets? Will your room lighting and power be sufficient for what you want to do? FINISH the room first.

6) Decide on the most important parts of your layout BEFORE you design a track plan. Do you want a steam yard and roundhouse? Those items will EAT UP huge amounts of real estate and may leave you with radii that are a compromise. Putting a design element on a layout does not always give you the idea of spacing and radii. Other major areas of the layout will be impacted by your first choices. For example, a large steam yard will make it more difficult to make other large layout elements possible. If you have grades, decide on the elevations BEFORE you drive a screw. More than 3% grades will result in uncomfortable surprises when your favorite steamer cannot pull your passenger train to the station. KNOW what your locomotives can do BEFORE you build your grades !!!

7) Don't make mistakes bigger. If you make a major mistake, fix it properly so that it does not get compounded into another problem. For example, if you design a switch in a tunnel (Very bad idea), consider a re-design of your track plan BEFORE you build the tunnel !!!

8) Buy the best tools you can buy! A great chop saw is absolutely a requirement if you are going to do your own benchwork and finish before the year 2100. A good circular saw and jig saw and table saw. Don't have room in the house for those tools? You will probably want to consider pre-built benchwork.

9) The list goes on and on !!!!!

10) If you want to ask questions in real time, hit me with an e-mail and I'll give you a number where you can call me. At one time or another, we were all getting started. The OGR Forum helped me do everything you see below from the Munoz Lines.
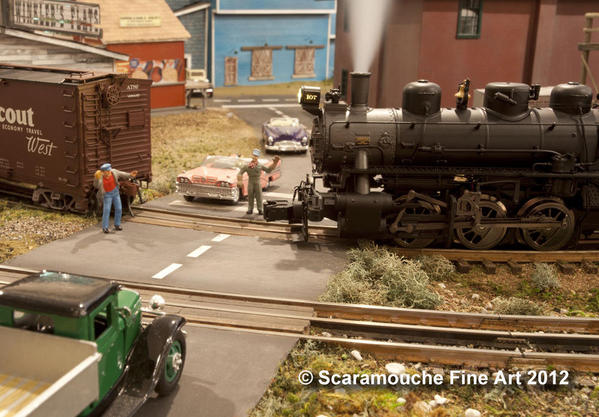
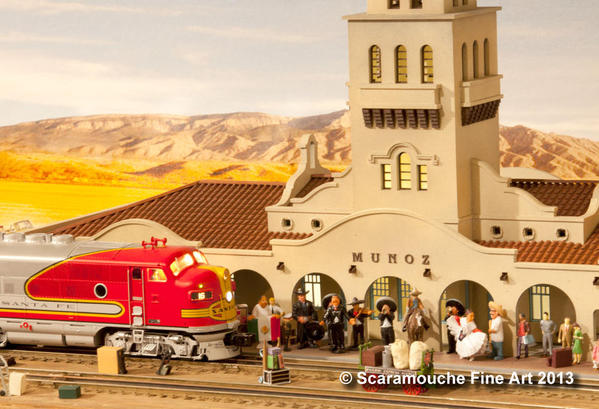


Careful At The Crossing

Chief at Munoz Station

Kayla's Railfan

Attachments

Images (3)
  • Careful At The Crossing
  • Chief at Munoz Station
  • Kayla's Railfan
Last edited by Scrapiron Scher

Like others mentioned start a small layout first and test the track system you plan to use. You mentioned about having a large layout, and you don't want to re-lay your track.

I have tried Fastrack and sold it off after using it, maybe you will like it maybe not. That's your decision.

A lot of experienced model train people in O gauge or scale O use Gargraves track and Ross switches for better operation.

From my experience don't use modern Lionel switches made within the last 20 years as they dud out over time, especially the 6-23010 & 23011 O gauge switches.

One comment on electrical, add in feeder or power supply wires every four or five sections of track regardless what brand of track you use.


Lee Fritz 

Ron


My tinplate layout is tubular track with 0-72 and 0-54 curves.  It is 12 x 28 around the room which lets me put the many accessories near the edge for easy maintenance.  The hi-rail layout I am building uses Gargraves track and Ross switches.  It is two level.  Scenery is more challenging.  What do you expect your approach to be?


A friend of mine does not do a lot of planning.  He has an idea about what he wants to do and then he lays out the track on the floor and keeps changing it until he likes the result. It works fine for him.


Last edited by Al Galli

Add Reply

Post
The Track Planning and Layout Design Forum is sponsored by

AN OGR FORUM CHARTER SPONSOR

OGR Publishing, Inc., 1310 Eastside Centre Ct, Suite 6, Mountain Home, AR 72653
800-980-OGRR (6477)
www.ogaugerr.com

×
×
×
×
Link copied to your clipboard.
×
×