I just picked up this set of Superliners to go with my other four, makes a nice sized passenger train.  I noticed the lights were much brighter in these than the other ones, these are the 1998 version, obviously made for conventional operation.  Since I am going to do LED's for all my stuff anyway, and I want to run these next week at the Oaks Modular show we're setting up for, I decided it was time to do the LED upgrade.

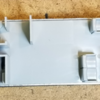
The chassis got two 2mm JST-PH connectors for the track pickups, and one side also goes to the lighting regulator.  To absolutely no one's surprise, I selected my very own regulator product.   The output of the regulator module goes to the spring pads (upper level lights) and to a Molex 2.5mm connector.

SuperLiner LED Upgrade N1

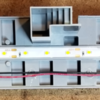
The middle piece, the upper level seats, has the actual LED strip for the lower level mounted on it.  I just soldered the Molex connector on one end of that strip and super-glued it to the top.  Also, you see the jumper that mates with the two JSB-PH connectors for track power, those connectors are also glued down and the wires are tacked down as well.  This construction allows me to completely and easily separate the pieces so the lower chassis can be worked on, and of course, populated with passengers, the next step.

SuperLiner LED Upgrade N2

The car shell has the full length strip along the top center-line, and I just used the existing wires from the spring contact wiring to connect to the upper LED strip.  This makes it a very easy affair to remove the shell, just take out the four screws and lift off!

SuperLiner LED Upgrade N3

As with any project, there always seems to be some "residue" left over when you're all done, seems you can't avoid it!

SuperLiner LED Upgrade N4 [leftovers)

Attachments

Images (4)
  • SuperLiner LED Upgrade N1
  • SuperLiner LED Upgrade N2
  • SuperLiner LED Upgrade N3
  • SuperLiner LED Upgrade N4 (leftovers)
Last edited by gunrunnerjohn
Original Post

Replies sorted oldest to newest

Yep, I have eight of these, and I'll be doing them all. 

Here's the before and after shots.

Before, 4 bulbs on top, two on the bottom.

SuperLiner LED Upgrade N5 [before)

After, 24 LED's on top, 15 on the bottom.  The lighting is very even all the way across.  I see one little thing I'd like to fix.  The stairway from the lower level isn't really lit, I'll have to stick an LED above it to illuminate it.  Should be a very easy fix.

SuperLiner LED Upgrade N5 [after)

Attachments

Images (2)
  • SuperLiner LED Upgrade N5 (before)
  • SuperLiner LED Upgrade N5 (after)

GRJ,  I did mine last year with your LED module regulators.   They truly reduced the voltage drop on my double tracked overhead layout.  I have four Superliners and six other Amtak passenger cars.  Also, I just installed four analog lights from those passenger cars in a Burger King model I'm working on for the table layout.

Hopefully, you can see that these modules can be adjusted for intensity.  The second pic may show this variation better.

20190103_193109[1]

20190103_193140[1]

The very far from finished Burger doodle, lit with those leftover Amtrak passenger car lights.

20190103_173238[1]

Jerry

Attachments

Images (3)
  • 20190103_193109[1]
  • 20190103_193140[1]
  • 20190103_173238[1]

Looking good, John.  I still have 5 UP passenger cars to convert yet. 3 of them are vista domes which take a little longer to do due to the 2 levels.  I also have 7 ARR passenger cars I would like to convert.   I’ll need to buy another roll of LEDs and a few more of the regulator modules.   I had put the recently purchased  2 ARR cars on the track to see if they had LED lighting.  They still had incandescent bulbs which produced an orange light.


Larry

Last edited by PSAP2010

Some of the dome cars are tricky, I end up using #30 wirewrap wire in either black, white, or clear to sneak up to the dome to drive the lights.  In extreme cases, I have at least four different small LED strip segments, all wired with the fine wire to get the job done.  As it happens, other than the fact that there's no place to run the track power under the floor, these SuperLiner cars are very easy.  I had a K-Line dome car with no place to put lights on the dome, so I did floor lighting on that one, it actually worked out really nice.

In all cases, I try to install the lighting so that you can completely separate the various parts of the car for maintenance, it really drives me nuts when I open a passenger car and I have spaghetti wiring stringing between the parts!  

I also get the same reaction when I open an upgraded locomotive and the shell is wired permanently to the chassis.  What in the world were the people thinking???

gunrunnerjohn posted:

Some cars are very easy, lots of the MTH Premier cars are really easy.  Others, like many K-Line cars, are a giant PITA.  However, once you've been around the block a few times, they tend to fall into place.   I find the MTH Railking cars to be more difficult than the Premier cars, many of the RK cars cut corners on how they were wired.

John,

I've 3-4 sets of the old Lionel 027-style passenger cars that I want to convert. To be exact, they are modern remakes in the conventional classics series. I pulled the roofs off and it looks like they should be fairly easy to do.

Btw, I am probably going to pick up a handful of your conversion kits from Henning's.  

John, Great Post of "How To" LED lighting, one comment, the 1st photo of the chassis in the upper right the (2) white connectors are laying on top of each other, which it took me a second zoomed in look to see clearly, if they were seperated in the picture may have been clearer separation. Also I know you have listed where to buy the MTH (2mm JST-PH) connectors male and female, and the Molex 2.5 connectors, I just can't seem to find where I stashed the info in my memory banks, could you post this info again

Thanks Dean 

So how's your wireless rolling stock project coming along?  

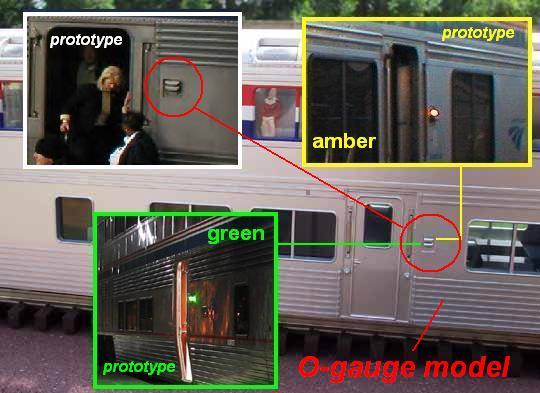
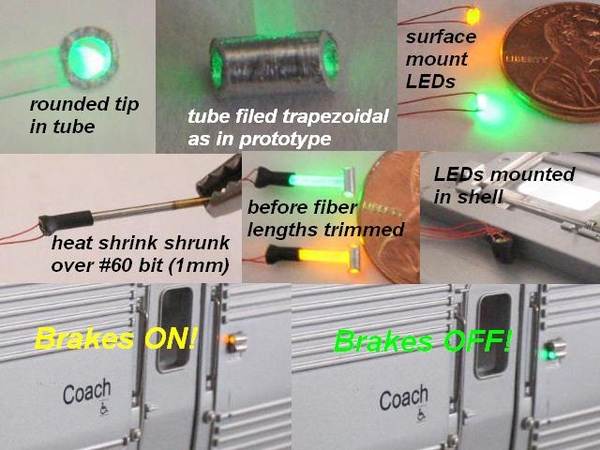
The idea being the passenger car lighting can be slaved to one of the engine's light circuits.  Then I could turn the Superliner door brake lights on and off under command control when the train reaches the station.  You don't want to open the doors unless the brakes are set!  Otherwise that's another lawsuit. 

superliner-3-door-lights-johnboysuperliner-brake-led2

I don't recommend trying this at home...but here's how it was done:

http://www.jcstudiosinc.com/Superliner-Marker-Lights

Attachments

Images (2)
  • superliner-3-door-lights-johnboy
  • superliner-brake-led2
Rigatoni Express Railroad posted:

Just to be clear before I start, is the pair of red/black wires on the bottom right of the first photo spliced to the track pickup roller and to the connector that mates with the mating connector shown in the second photo.?

A little hard to see clearly in photo 1.

You do know that you can zoom in by clicking on the picture, right? FWIW, the colors actually change on the opposite ends. Not cool I know, but I had a reason. I wanted the wire to lay flat so I could tack it down neatly. Truthfully, for the rest of them I'll probably use all black wire, no real reason for colors there.

Rigatoni Express Railroad posted:

I found the female connector at Allied Electronics. It's a Molex part no. 22-03-5025 at $0.06 each.  Can't seem to find the Molex male complementary connector though. Any help appreciated.   Joe

JST-PH, Header (male) 455-1704-ND, housing 455-1165-ND, Pins 455-2148-1-ND, all Digikey Numbers.  Molex header (male) WM18886-ND, housing WM18873-ND, Pins W9661CT-ND, all Digikey numbers.  I use the Engineer PA-09 crimp tool for all of the connectors.

stan2004 posted:

So how's your wireless rolling stock project coming along?  

The idea being the passenger car lighting can be slaved to one of the engine's light circuits.  Then I could turn the Superliner door brake lights on and off under command control when the train reaches the station.  You don't want to open the doors unless the brakes are set!  Otherwise that's another lawsuit. 

Super cool Stan, but I don't think that will happen on this iteration.   If I did that, I'd probably consider pickups on a wheel and just have it red unless you stopped for several seconds.  Dirt simple module, probably something like a retriggerable 555 circuit, and just let the wheel sensor trigger it.

The trick is, to have the door open when it goes green!

stan2004 posted:

So how's your wireless rolling stock project coming along?  

The idea being the passenger car lighting can be slaved to one of the engine's light circuits.  Then I could turn the Superliner door brake lights on and off under command control when the train reaches the station.  You don't want to open the doors unless the brakes are set!  Otherwise that's another lawsuit. 

superliner-3-door-lights-johnboysuperliner-brake-led2

I don't recommend trying this at home...but here's how it was done:

http://www.jcstudiosinc.com/Superliner-Marker-Lights

Stan, what size are the surface mount LED's you used; do you have a p/n; a vendor?

They look like they could be used for a variety of lighting applications in passenger cars.

Pingman posted:
 

Stan, what size are the surface mount LED's you used; do you have a p/n; a vendor?

Those look like 0603 (0.06" x 0.03") and they are lighting up 1mm (0.04") end-glow fiber cable.  These are available in all colors for pennies a piece on eBay - search "0603 amber LED" or "0603 green LED" for example.  You will need good eyesight and a steady hand to solder wires to the tiny pads/contacts.  30 gauge or smaller wires!  

It appears the additional search phrase "pre-wired" will pull up LEDs that have thin wires attached but the cost goes up substantially.

Engineer-Joe posted:

Stan, where do you get your fiber optic from? 

Mail order.  I don't remember exact source since I got my life-time supply many years ago.  Basically, you buy it by the foot in diameters 0.25mm, 0.5mm, 0.75mm, 1.0mm, 1.5mm, 2.0mm, etc..  I'm thinking like 10 cents/ft to 25 cents/ft depending on diameter but you may get stuck buying a 100 ft spool or whatever.  I just looked on eBay and it appears you can buy just 1 meter lengths in your choice of diameter.  For train lighting you typically want "end glow" fiber - so you drive one end of the fiber with an LED, and the light comes out the other end with minimal loss of brightness.  More popular for architectural or decorative purposes is "side glow" fiber where you drive one end of the fiber with an LED but the light comes out all along the length of the fiber.  You probably want the "end glow" type.

You might find a decorative lamp or light gadget that has bundled fiber with dozens or hundreds of strands of fiber that splay out to a "thousand points of light".  

If you don't need the flexibility/bend-a-bility of cable, you can usually find clear acrylic transparent rod at most hobby shops.  They usually come in 1 ft lengths in various diameters for maybe $1 or so.  These behave like end-glow fiber - so illuminate on one end and most of the light comes out the other end.

Sorry, yes, that's heatshrink, I don't use crappy electrical tape in my upgrades.   I spliced in the extra wires to go to the regulator module as the wires that were there go to the connectors to join the two pickups.  Other than the extra wire for the jumper between the two with the connectors, I didn't need any extra wire for the job, just used what was already in there.

I ran into an interesting issue with the dome car, the windows are wrap-around so you could see the side of the LED strip, I didn't like that look.  However, in looking at the spare parts, the obvious solution presented itself.  I just stripped everything out of one of the old bulb holders and cut away all the middle supports.  I screwed that back in, and it neatly covers the sides and still lets the LED's illuminate the interior of the car.

SuperLiner LED Upgrade N6

Attachments

Images (1)
  • SuperLiner LED Upgrade N6

Thanks again Stan!

 I bought some tiny surface mount LEDs that are so small I couldn't work with them. I actually lost a couple when I sneezed and I turned my head! I broke one because of the too stiff wire I was testing with. I bought a few supplies to retry and I quit trying after that anyways. I have too many other projects waiting.

 So I would also recommend the pre-wire ones to make life easier. Unless you have good soldering and handling skills with tiny components. Someday I want to add step lights to my scratch built diesels. I have done a few with bigger regular LEDs. I think the tiny ones might be better for scale details.

buck-boostsectionseparated

Right.  If you need a low-profile LED, this typically forces you to a surface-mount (SMD) style LED.

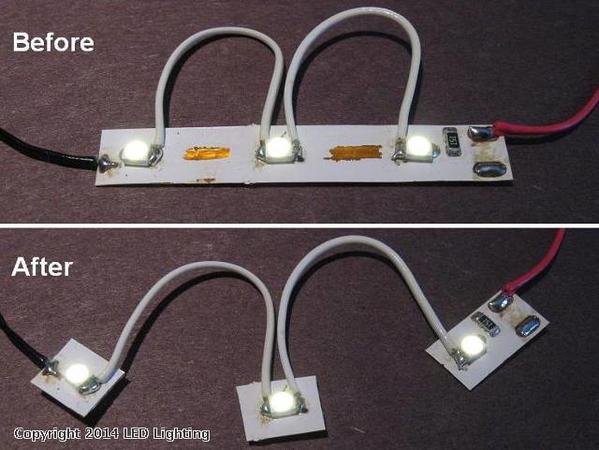
Working with the SMD LEDs can be tedious.  In addition to buying pre-wired SMD LEDs, here's another idea.  The cheap LED strips of course use SMD LEDs and are available in all colors.  The individual LEDs are of course pre-mounted on a flexible printed-wire strip.  Nothing says you can't cut up the strip into "individual" LEDs which might make soldering wires a little easier.  The photo above was from a different topic but kind of illustrates the concept.  As shown in the top photo you can typically also scrape off the surface to expose the copper printed wires (traces) which is another solder attachment point.

And if your application requires a resistor, note that on LED strips, each segment-of-3 typically has 1 resistor as shown on the right side.  The resistor value may not be correct for your particular application but this type of resistor goes for a couple pennies each and can be swapped.


Attachments

Images (1)
  • buck-boostsectionseparated

I have 5 K-line 21" Amtrak superliners.  On one of the cars the red marker lights on both sides of the car do not light. I have not yet investigated the problem.  They appear to be very small red colored bulbs.  If I convert the car to LED lighting, what size and shape LED might fit in the space now occupied by the bulbs.  Would I then be able to attach them to one of GRJ's lighting strip boards along with the white LED lighting strip?

Thank you,

Ron 

upguy posted:

...

If I convert the car to LED lighting, what size and shape LED might fit in the space now occupied by the bulbs.  Would I then be able to attach them to one of GRJ's lighting strip boards along with the white LED lighting strip?

I think you'll find a suitable LED no problem - as to the 2nd half of your question, the most common method of adding a pair of red marker LEDs to a lighting strip requires an external resistor.

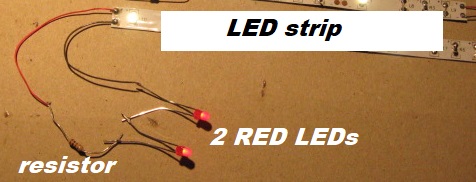
2 red leds plus a resistor

So as illustrated above, you'd run a pair of wires off the end of the powered LED strip (driven by GRJ's module) and insert an external resistor in series with the 2 red LEDs.  If this is the wiring approach you're considering, one of us can find the relevant OGR threads or do an Advanced Search using the relevant terms.  It's just that there are variations on adding external LEDs to a lighting strip which affect the desired resistor value...something around 1K Ohms.

It's just that if you're ordering LEDs from DigiKey, minds as well order a handful of 5-cent resistors too since shipping is $4-5.

Attachments

Images (1)
  • 2 red leds plus a resistor
Last edited by stan2004

Thanks guys for the good information you are posting here may try this in some of the 3 rail passenger trains.

I happened to see and pickup at a store, 6 feet of LED peel and stick white LED lights roll with a battery pack taking 4 AA batteries for $15. Can be cut and spliced. Runs for 60 hours on a new set of batteries. Going to try this in a set of my O scale 2 rail passenger cars and remove the power pickup wipers from the wheels that are giving me a lot of drag, hopefully will allow me to pull it with my O scale steamer that now slips with the cars with wipers. Battery pack should fit in tender will add a switch within easy reach. 

GRJ,  After upgrading my Kline, MTH and Lionel passenger cars with the OSH boards, I adapted one of the boards to run the tunnel lights in our mountain tunnel, it really helped having the ability to reduce the current with the trimmer pot, so these are very universal in running LED anywhere.

Last edited by Ron_S
Ron_S posted:

Stan, am I reading it right, that you use a 1k resistor from the led strip to the red led marker lights in series?

Ron, I "tune" that resistor, depending on how bright I want the lights.  1K is usually a decent starting point for the side markers on the passenger car with two red LED's.

Ron_S posted:

GRJ,  After upgrading my Kline, MTH and Lionel passenger cars with the OSH boards, I adapted one of the boards to run the tunnel lights in our mountain tunnel, it really helped having the ability to reduce the current with the trimmer pot, so these are very universal in running LED anywhere.

Yep, I had to have a way to adjust the intensity of the LEDs for upgrades, I learned that after doing a number of cars.  That was high on the list when I did the lighting modules.

As GRJ says, you'll probably need to "tune" the value of the resistor.  1K is simply a starting point to get you in the ballpark.  Note that adding the red marker LEDs plus resistor off the end of the LED strip will siphon current from the white strip LEDs.  So if you already had a desired brightness on the interior lights, you'll need adjust upwards the control on GRJ's board.

Most guys probably don't have a stash of resistors lying around to "tune" the marker brightness.  That is, you might just have purchased a pack of 10 or 100 1K resistors.  Note that for experimenting, you can simply put 2 1K resistors in series to get 2K (which will about half the marker brightness), or put 2 1K resistors in parallel to get 500 (which will about double the marker brightness).

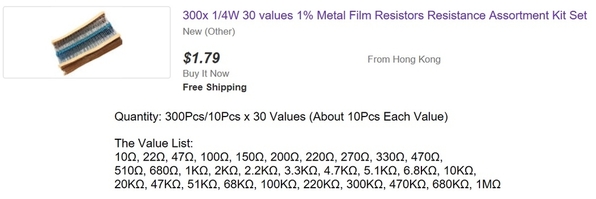
Or, if you see more DIY in your future, why not get a resistor assortment for less than a penny per resistor (free shipping from Asia) which includes 1K and other values - one of which will surely be suitable for the matter at hand.

resistor assortment less than a penny each

But back to the red LEDs.  

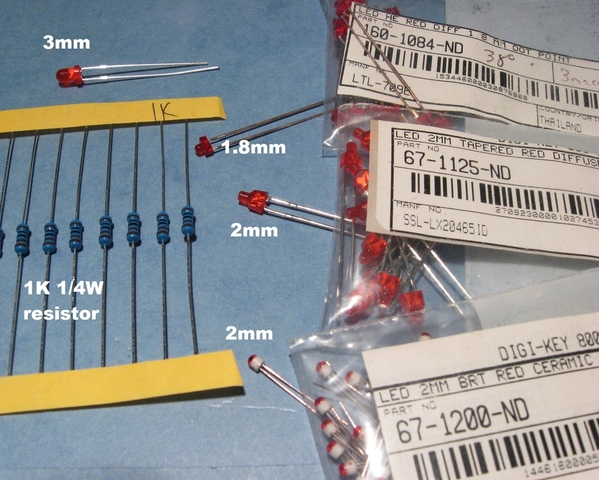
red leds for marker lights 

Another reason you'll need to tune the resistor is there is a substantial difference in brightness (for a given current) between red LEDs.  I've found the ceramic stem type (bottom of photo) that GRJ mentioned earlier is a good performer but kind of spendy (over $1 each?).  As the photo shows, there are options though hard to suggest a specific component without seeing the mounting or space constraints of the particular passenger car. 

I'd think some cars might even accommodate the widely-available 3mm style for less than a penny per LED

red 3mm less than a penny each


Attachments

Images (3)
  • resistor assortment less than a penny each
  • red leds for marker lights
  • red 3mm less than a penny each

I totally agree with Stan, the resistor assortment is very useful if you don't have a lot of parts around.  I actually bought the surface mount equivalent kit in several sizes for when I'm working on a new design and just need a specific resistor value.  I still have a huge bag of thru-hole resistors from years ago, so I have those covered.

I only use the ceramic LED's when nothing else will fit, many times I can use a 2mm post LED for those applications.  I keep plenty of these on hand in various colors, as well as bi-color and blinking styles.

Attachments

Images (2)
  • mceclip0
  • mceclip1
stan2004 posted:

But back to the red LEDs.  

red leds for marker lights 

Another reason you'll need to tune the resistor is there is a substantial difference in brightness (for a given current) between red LEDs.  I've found the ceramic stem type (bottom of photo) that GRJ mentioned earlier is a good performer but kind of spendy (over $1 each?).  As the photo shows, there are options though hard to suggest a specific component without seeing the mounting or space constraints of the particular passenger car. 

I'd think some cars might even accommodate the widely-available 3mm style for less than a penny per LED


Thanks for the item numbers, more items to add to my Digi-Key favorites list.

Ron_S posted:

...trying it without a resistor would light the red led but nothing on the led strip. 

Right.  Without a resistor, the marker LEDs would siphon ALL the current from GRJ's board and hence extinguish the LED strip.  Adding external resistance limits how much the marker LEDs steal from the strip.  Going the other way, if you add too much external resistance - say, 10K or more, the marker LEDs steal very little...but be unusably dim.

upguy posted:

A few years back you posted the circuit below using  the CL2N3 current limiter with the LED strip lighting instead of the LM317 circuit.  Are there any advantages/disadvantages of one circuit over the other?  Can the dimmer also be used with the CL2N3?

Ron, that was my original method of upgrading the cars, the CL2 puts out a fixed 20ma and is non-adjustable.  The lighting module was my way of rolling all the desirable attributes into one PCB, low power, flicker free operation, DCS compatibility, and intensity adjustment.

Add Reply

Post

OGR Publishing, Inc., 1310 Eastside Centre Ct, Suite 6, Mountain Home, AR 72653
800-980-OGRR (6477)
www.ogaugerr.com

×
×
×
×
Link copied to your clipboard.
×
×