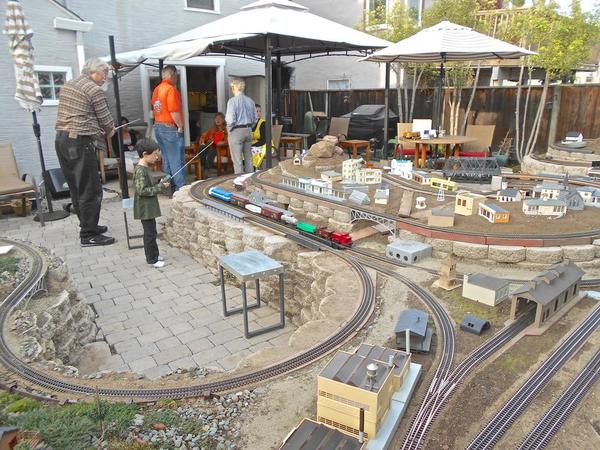
hey guys i have some questions about my layout that im putting outdoors. yes i know its asymmetrical thats part of the charm.

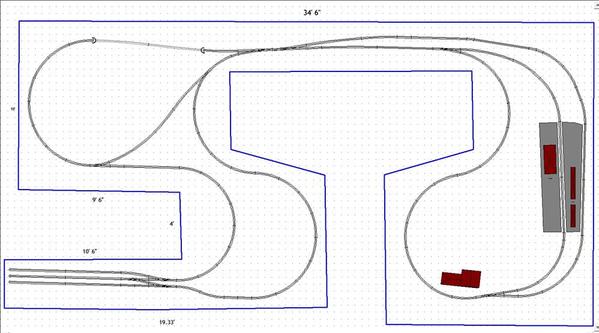
im using atlas 3 Rail Nickel Silver Track on the whole layout, min. curve O72, 35'x18' area, with 2 reverse loops and a yard, with a two Platform station on the north side, a tunnel, and the rest im just playing by ear. im planning on using mth trains in the future, and i plan to use the MRC Prodigy Pro Elite 10 Amp dcc System to run them (only two at a time) i need some recommendations for powering this big layout. if i need any more power, some uv treated/treatable buildings and accessories. do you guys have any suggestions on what i should do?. also if there are problems with my layout that you want to address to me other than the rails being too narrow for outdoors, or not to build outside, please let me know. :-)outdoor layout 2d
Attachments

Images (1)
  • outdoor layout 2d
Original Post

Replies sorted oldest to newest

I just looked at one of my Atlas O - 3 rail switches and the switch itself is all nickel-silver rail and UV rated plastic ties. Checked all the rails with a magnet and nothing stuck. My switches are all newer switches from after they started making the 21st Century track. Some I got used are older (not sure how old?), but most are new in the last 5 years or so. I don't know about anything before that?

The switch machines have steel springs, maybe some other steel parts and are electric so I don't think you will be using those? Probably will need manual throws? 

You said 3 rail, but also DCC, which is fine (I want to try that myself someday), but just in case I know very little about the Atlas 2 rail track? Some of that could have steel parts? 

I believe there are some other forum members here that are using Atlas track outside for their 3 rail layouts. They could certainly give more and better details about it's use outdoors. Hopefully they will see this thread and reply.

Shriker1, I had really wanted to do a 3 rail layout outdoors but all my research showed weather really hard on anything other than stainless rails (even nickel silver will rust) also the sun beating on the Atlas plastic ties renders them brittle after a couple years here in Las Vegas, probably similar in Utah.  I ended up switching to G Scale outdoors.  I have about 475ft of Sunset Valley Railroad code 250 Stainless Rail track with their UV plastic ties.  They make excellent all stainless switches to match, little pricey though, figure about $6.25 per foot for the rail/track combo.  They even make a combo G Scale/O scale (2 rail) track if you want to run both. You must bend each rail by hand but the rails come in 6ft lengths and are easy to bend with their inexpensive bender, stagger the joints and you can make some really cool sweeping curves.  If I had it to do over again I would have went with much cheaper aluminum track and battery power on board with RC control.  Power supply for Track Powered G Scale can be simple $ 55.00 24v DC computer power supply.   (by the way 12-24v DC Power is really easy and safe outdoors)  

Ping me if you want more info, have fun.

Chris Sheldon

Hi Shriker1, I can't speak for AC Power Outdoors but run my indoor 3 Rail layout with power connections every 6ft due to the crappy track section joints.  I run power connectors every 25ft on my DC Outdoor G layout which I get away with because I run Splitjaw Rail Clamps at every joint, makes for rock solid joints.  I only had a 1/2 volt drop over 70ft of run before I added additional power connections just to be safe.  Do some research on the pattern for power wiring as some Control Systems are sensitive to wiring layout.  I run Conventional DC Power Outdoors with RC Track Power Control so wiring is not a factor for me.  I run each of my loops on 24v 12amp DC power.  I don't have any idea how much AC power you might need, but there is a wealth of knowledge in this Forum, I'm sure someone can advise.

If yours goes well I might be picking your brain to add a O Gauge Outdoor loop. Go for it!

Chris Sheldon

One thing you should also consider is that your layout plan might be difficult to elevate.  My outdoor layout is only partially elevated because fully elevated track would limit access to areas of my yard.  Elevation of at least part of your layout will make it much, much easier to place rolling stock on the track.  Utah gets hot as does Las Vegas where I live, your track will get longer in the summer and shorter in the winter, joints will loosen if you don't solidly connect them together (like rail clamps).  I chose let my track float, with only roofing nails pinned into the gravel below to hold it.  It moves slightly with the temperature fluctuations nicely.  I have also found moving my rolling stock on and off the track to be a pain over time.  Although O Gauge is not as hearty outdoors as G Scale, you may still want to incorporate a Train Shed to protect your equipment during the nice weather while removing it during bad weather.  The size of your lashups may dictate a really big Train Shed, I am building mine right now 24ft long with 4 tracks side by side.  This takes up a bit of real estate.  Just giving you some insight from some of my mistakes.

Enjoy,

Chris Sheldon

Dennis, it works either way front or back just depends what need i have at the time but its probably gonna be mostly back, which if you think about it. is actually a shorter distance from that switch than the other one

Fireone, i am planning to elevate it but not much, maybe 30" max. and i was planning to take my trains in and out until i have a shed to put them in. thanks for the insight

This company may be able to help you -- http://www.railclamp.com/. They sell rail clamps and road bed. Their focus is #1 gauge, but can be applied to O gauge (I talked to them at a train show a few years back and they've been watching to see how many of us start going outdoors, hinting they might offer something in the future).

I talked to a guy who was using their "Code 250" clamps on Atlas O gauge track and they worked well. The key is to give the track room to expand/contract due to temperature. Lots of loosely-mounted curves will handle most of it. Also, from a wiring standpoint, if your track joints are secure, your blocks can be longer. Though some would disagree, a buss running the length of your layout with snubbers ("Deats Filters") at the ends and ONE feed pair per block should prevent signal feedback. To compensate for rail resistance, place the hot feed at one end of the block and the common feed at the other so no matter where the locomotive(s) are in the block the voltage drop is consistent (old 2-rail trick).

Shriker1 posted:

hey guys its me again. is it possible to power the layout at one point of the track or do i have to wire the whole thing? also, how much power do i need to power this layout?

You cannot rely on the track joints for power; from experience I know that within a few years the track joints will not conduct the power anymore. So you could solder a wire at each track joint and feed the track from a bus wire going around the whole layout.

I have no experience with railclamps, so this might be a solution.

Regards

Fred

You will have many electrical headaches because of faulty rail joiners, atlas joiners are not as robust as needed and over time will be dreadful outdoors,  soldering  jumpers at every connection  will be a huge undertaking!!.

If I were to do your RR  I'd  go dead rail and battery powered RC in locos ,very common in large scale and small enough for O (airwire makes a good system) 1 system in boxcar and power fed to locos will keep costs down.

Elevating tracks will help for maint. and construction.

Have been outside with large scale 5 years, Brass rail and split jaw clamps at every joint. I have had no electrical issues.

You may want to try to put clamps on atlas track  I found the center rail will be very tough to do.

Sun( UV )is tough on plastics...I went with minimal structures. Track will suffer over time as well.

Most O diesels have open gears on trucks ...lots of grime and grit outside to get stuck in gears

I'm in PA and found the weather really limits enjoyment on RR...rains on day off ...sunny on work days , I'm not a fan hot weather so more limits.

Not to kill your fun but keep O inside and build robust Large scale outside as even large scale trains appear much smaller outside!!     O might get lost!!!

If you want to try it start small and work out the kinks before making huge investments in track.

Good luck, Dave


Attachments

Images (2)
  • outdoor railroad 009
  • outdoor railroad 015

SHRIKER1,

You have a very workable plan for your outdoor O gauge railroad.

I am the Superintendent of the G&O garden railroad.  Our display is located in the SF Bay Area.  We have used Atlas track outdoors with very few problems.  We do not use the switch machines because the internal mechanism rusts.  All switches are hand thrown.  Our track has been in bright sun and pouring rain.

Since you are going to use the MRC system, I can't advise you on power.  You should probably get the most powerful DCC system that MRC makes because O gauge trains can draw around 4 amps during normal operations.

I am also uncertain how DCC will work with 3-rail track.  I believe that the MTH PS-3 system when it is in DCC mode is designed to pick up power from the outside rails instead of the center roller.  I have one MTH scale wheel PS-3 steam engine.  I took the center roller off and run this engine at a nearby O gauge 2-rail club using their NCE DCC system.  This engine has a 2/3 rail switch.  In the 3 rail mode it gets power from the center rail, in the 2 rail mode from the outside running rails.  

The G&O uses two MTH 4000s for power and Lionel's Legacy and MTH's DCS for command control.  We run up to eight O gauge trains at once so we need the Z4000s.  

This is a link to the G&O Story on this forum that may interest you:

https://ogrforum.ogaugerr.com/.../the-gandamp-o-story

I would also suggest that you raise your layout off the ground.  There is another modeler on this forum who has a series of Youtube videos of his O gauge outdoor layout and how he constructed it.  He uses Atlas 3-rail track.

NH Joe

Last edited by New Haven Joe
Dave Funk posted:

You will have many electrical headaches because of faulty rail joiners, atlas joiners are not as robust as needed and over time will be dreadful outdoors,  soldering  jumpers at every connection  will be a huge undertaking!!.

If I were to do your RR  I'd  go dead rail and battery powered RC in locos ,very common in large scale and small enough for O (airwire makes a good system) 1 system in boxcar and power fed to locos will keep costs down.

Elevating tracks will help for maint. and construction.

Have been outside with large scale 5 years, Brass rail and split jaw clamps at every joint. I have had no electrical issues.

You may want to try to put clamps on atlas track  I found the center rail will be very tough to do.

Sun( UV )is tough on plastics...I went with minimal structures. Track will suffer over time as well.

Most O diesels have open gears on trucks ...lots of grime and grit outside to get stuck in gears

I'm in PA and found the weather really limits enjoyment on RR...rains on day off ...sunny on work days , I'm not a fan hot weather so more limits.

Not to kill your fun but keep O inside and build robust Large scale outside as even large scale trains appear much smaller outside!!     O might get lost!!!

If you want to try it start small and work out the kinks before making huge investments in track.

Good luck, Dave


Wow! Dave, never thought of running dead rail for O Gauge Outdoors, funny as I now think it is the way to go for G Scale Outdoors, great idea.  You also eliminate all the AC Power issues outdoors (DC can be run in cheap 12ga outdoor yard lighting wire direct buried, but AC I believe should be in a conduit for safety).  You got me thinkin'.

Chris Sheldon

The G&O runs 24 volts AC from Z4000s using 12 gauge outdoor yard lighting wire without problems.  Most of the yard lighting wire is buried in the ground.  We did put some in conduit to protect it from shovels and to make it easier to pull additional wire.

 You are correct that you should not run 110 volt AC without conduit.  Building codes require that 110 volt AC be in conduit.  

NH Joe

Shriker1 posted:

hey guys its me again. is it possible to power the layout at one point of the track or do i have to wire the whole thing? also, how much power do i need to power this layout?

Theoretically, one power connection should work.  Like a 10amp transformer. The rail joints will be the issue - the company that makes De-Oxit has products to protect outdoor electrical connections - the ground connection for cell towers is very important and corrosion must absolutely be minimized or prevented.

Soldering Nickel Silver requires a special flux - so apply the proper paste for protection of the joints when assembling or practice and get good with the nickel-silver soldering technique.

Adding jumper wire across the joints may be simpler -using the "screw-it" method for Atlas rails. A small hole is drilled through the rail and a #1 screw is used to pinch a 16 awg wire fed  into the hole. This, too,  would require some type of protective paste.

Visit the large scale garden railroad sites and see what they have found that works.

hello again! here's the progress of my garden railroad: we are using cinder blocks as a base for the walls or if we want to we'll do it for the rest of the walls. then we are gonna fill the inside of the walls we the old gravel in the corner. dont worry we are going to level out the bricks once we laid them all out. at least as much as we can before we have to move the dirt. :-D


Attachments

Images (1)
  • File_000 (1)

An outdoor railroad, especially one that is track powered, needs to be pretty much bullet proof.   Over engineer the electrical connections, even if that means jumper wires.  Don't skimp, here.  I use battery/rc outdoors, so I'm not so worried about electrical connections, but mechanical connections are still important.   On my outdoor layout, I dropped a feeder wire to the track every 6 track connections, be it 6 one foot track pieces, or 6 of the three foot flex pieces.  The connections are what is important, not the length, as that is where voltage is lost.  Remember, bulletproof. 

Don't screw the track down to the benchwork, as we do indoors.  With sun, and shade, winter and summer, the track needs to be able to move, expand and contract with heat and cold.

Get a 1 gallon garden sprayer, and reserve it for spraying Armour All on the ties, Spring and fall.  Armor All, and it's less expensive knock off from Turtle Wax, has a plasticizer in it that will keep the plastic ties soft, and can be found in gallon refill sizes.  Plan on an ounce or so per foot.  Just spray it on and let it dry.  May need to clean the railhead after it drys. Atlas0 has UV resistant plastic, resistant is the operative word.

I run my stuff rain, snow or shine.  I don't leave it outdoors overnight.  A track that leads into the basement or garage is a plus.

I've been outdoors in 45mm gauge for 20 years.  Learned a few things that work in hot summer, cold, wet, snowy, frozen winters.  Your milage may vary.

any ideas buildings and lighting them? i was thinking of making a concrete base and as the cement is drying i stick some wires through it that will connect to a car light bulb, as seen in Mark Found's Garden Railway Series. and any prebuilt uv resistant buildings and structures for O scale out there or do i have to use uv resistant spray frequently to keep them safe? i also dont have the dexterity for for making kits so pre built would help a lot. i dont care about the windows fogging up either. thanks guys

Just a thought, but you might also take a look at the 5 meter LED lighting strips on ebay or Amazon, the waterproof type. They are 12 VDC as are the car light bulbs, but would use a lot less power than the incandescent car bulbs and much less heat as well. There are many, many sellers at both places and the strips are very reasonably priced.

Shriker1 posted:

any ideas buildings and lighting them? i was thinking of making a concrete base and as the cement is drying i stick some wires through it that will connect to a car light bulb, as seen in Mark Found's Garden Railway Series. and any prebuilt uv resistant buildings and structures for O scale out there or do i have to use uv resistant spray frequently to keep them safe? i also dont have the dexterity for for making kits so pre built would help a lot. i dont care about the windows fogging up either. thanks guys

I would suggest using LEDs for lights.  You don't need a concrete base.  It is a lot of trouble to make.  We use cement board for building bases on the G&O.  It is used to back up showers.  You can also plant your buildings in dirt or granite fines.

O gauge building are generally not made to be outdoors.  On the G&O we have found that painting them with latex house paint protects them from the sun.  Outdoor house paint works as well on model buildings as it does on real buildings.  Use a high gloss paint for the best protection.

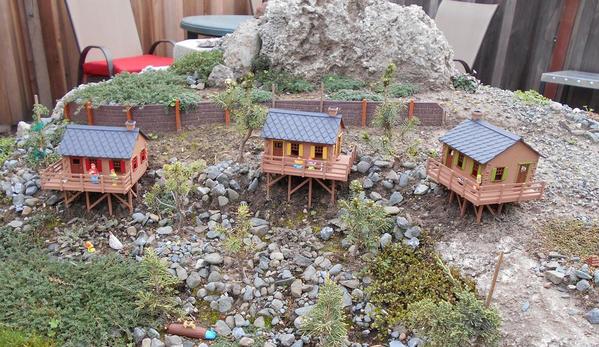
These are Plasticville buildings painted with outdoor house paint.

DSCN0245


NH Joe

Attachments

Images (1)
  • DSCN0245

Hi Shriker1, FireOne here,  zip ties should work to keep the ties together.  I think your ongoing problem will be keeping track continuity between track sections, otherwise trains will stall and possibly stop between sections.  Maybe you could temporarily lay out a big oval set up to test operation over a couple month period.  Worst case, you can follow Dave and a couple other guys suggestions and go dead rail and battery power if all else fails.

By the way, I use cheap LED garden and stair lights to light my whole layout, they come on automatically with my outdoor lighting on a cheap 24v lighting transformer with timer.  They use very little energy and you can run many dozen on a circuit.  Mine are about 1w each and make plenty of light.

Chris Sheldon

Hello, I thought I'd chime in on this topic. I've been running O scale trains outdoors for about 5 years. Using Atlas silver nickle track and switches with no adverse problems. I have a video series on the construction of my current outdoor layout. My road bed is a ladder line design which is very easy to construct and maintain. I also have some good ideas for running the layout electrical systems. I have a website in the works to show more of the layout. Is be glad to provide any input. My YouTube channel is https://www.youtube.com/user/sjbuff

An outdoor scale layout gives you a lot of option to enjoy model railroading.


The power/control system has been mentioned a few times.     First DCC does not care whether you use 3 rail or 2 rails.   It will work with either.   You just have to wire you locos to pick up from the rails you are using.

Second, 10 amps should be plenty to run 2 trains at a time.    My experience with O scale 2 rail models is the newer stuff does not draw much more than an amp for each loco.      Older stuff can draw much more.

Third, the rule of thumb many  model railroaders use for power is to run a power buss along where the track is located and put a connector drop in from EVERY piece of rail.    A lot of us cheat on that but it is the foolproof way.    One power connection will just not work for very long.    Rail joiners will fail to make contact.

So what"s the problem with an engine shed 

You can put doors on the tunnels  

  Seriously; claiming some square footage; like a 1'x8' length, with maybe a self to store one if the two trains exceed the 8'.; within the shed, and calling on your inner John Henry for an entrance/exit could save you a lot of hassle when you have to quickly "put your toys away". 

With locking Wifi/Bluetooth doggie doors if your into that stuff 

It sounds like you've got enough O already that it might be worth sticking out. For the experience if nothing else. G isn't going cost less, but will give you more poor weather options.

   The dollar store solar garden lights can be easily robbed of their innards and/or used  semi- remotely by removing the led and soldering wire "X" foot long in its place on the board and using it as a pigtail, soldered to the led in a building.. (the lenses do a great job spreading the downward pointing light 360° horizontally, incorporate them when you can)

The weak point of these is the mostly quality of the recarble battery. 

Each solar square on those is good to about 1.5v, maybe 3v for efficient ones, or larger squares. You can stack them to get the voltage you need for a recharge. Larger batteries? Look at fire exit & emercency light  batteries (go to a commercial building and look up at the box with the mini spotlights   )

Shriker1, if I had a shed in the middle of my layout, I would definitely be using it to protect my trains from the weather.  Cut a little door in each end and drive 'em through.  I must have over $ 600.00 in materials in my 24ft long 4 track train shed and I'm not done yet.  It's only about 20in high but if it gets much bigger I think I will need a building permit.  My neighbors think I'm building an Ark.

Chris Sheldon

Add Reply

Post
The Track Planning and Layout Design Forum is sponsored by

AN OGR FORUM CHARTER SPONSOR

OGR Publishing, Inc., 1310 Eastside Centre Ct, Suite 6, Mountain Home, AR 72653
800-980-OGRR (6477)
www.ogaugerr.com

×
×
×
×
Link copied to your clipboard.
×
×