rtr12 posted:
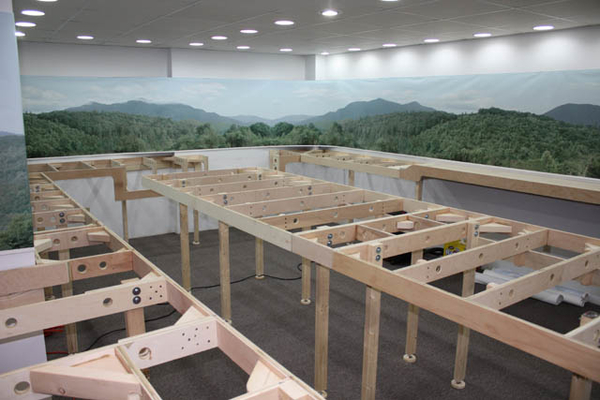
Also, I added a string of 5m LEDs (600 LEDs) down the center space which helps me find things down there. I put a switch in a cross brace for the top, right where I go in with my stool for convenience. That works very well. You would probably need a couple of strings or more for the size of yours, but it's really handy to have while you are down there. That would be easier to install with the top off as well. It was an after though for me, after the layout had a top and running trains. Just another thought here, but I imagine you have probably already thought of all that.

The legs and lower cross braces are also good places to mount little things like light power, term strips, etc. Below is also a good place to hide things, keeps the skillet and rolling pin away from the old noggin...

I like the idea of the LED lighting, I'll have to do that.  Let's see, 16 feet for each string.  Four or five should light it up pretty well.  FWIW, there are also high current LED's you can get in reels, I have them on my workbenches, they're great!  They are really bright, and light up the bench like daylight.  First picture with them on, next with them off.   You can see by how dark the 'scope is above the light strip that the camera adjusted the light level down because it was so bright.

Attachments

Images (2)
  • mceclip0
  • mceclip1

Very nice looking  John. I'm really happy to see it coming along. You will be running trains before you know it.

I think it's safe to say you have the classiest train room around.

But the look of that work shop is befitting the John we all know and admire.

Good luck and have fun. 

GRJ, the layout's legs may leave permanent damage to your wall to wall carpeting. Looks like you have about 32 legs that will be digging in. Your wife will have to replace the hole room if you get hit by that bus and she wants to take the layout down. Just a thought, but maybe before the layout starts getting too heavy, when you go to pick up your plywood, have them rip you two 4"x 8' strips that you can chop into 4"x 4" carpet pads. Two 8' strips will give you at least 46 carpet pads. I know you can't wait to get trains rolling and don't want to spend more time on things that will move that day farther away, but if you have a miter/chop saw and clamp down a block of wood 4" from the blade (as a stop), you can chop up those two strips in about 3 minutes.

saw stop

Attachments

Images (1)
  • saw stop
Dave Zucal posted:

GRJ, the layout's legs may leave permanent damage to your wall to wall carpeting. Looks like you have about 32 legs that will be digging in.

I've actually thought about that. I'm thinking of solutions, but I don't want big strips of wood under the legs. I was considering some of the furniture coasters to spread the load a bit.

mike g. posted:

Hi John, just a side question, do you use that solder iron on your bench for soldering track? I am looking for a good one to do my track!

I actually use my old Weller 100/140W gun for heavy soldering like track, brass, etc.  The Hakko is a 70W iron with temperature control, so it serves me well on the bench for wiring and PCB work.


John,  A simple sumptin' that can be very helpful in carpeted rooms would be a 3 1/2" X  3/4"  recessed puck with chair mat nipples fastened to the bottom of it.

IMG_9026

When in place with adjustable levelers they will provide several features.

1.-  carpet  protection

2.-  retain position of platform leg when some one kicks, taps or bumps into it.

3.-  provide overall stability to the layout so it will not be jarred.

4.-  When used for fingers of benchwork  over carpet it is equivalent to fastening the leg to the floor.  As below:

Joe, Summer '09 003

How many do you need?

Attachments

Images (2)
  • IMG_9026
  • Joe, Summer '09 003

Use a 3 1/2" hole saw to cut both the plywood and the chair mat.  If you want an even soft edge you can rotate the disk on a router table with a round over bit.   Use a Forstner bit the size of your adjustable foot  for a 1/8" +  recess.  Attach the chair mat face and you are done.

Or I can drop these off to you.


Clean router use on plywood follow the quality of the plywood.  Cheap plywood with voids can yield less than nice edges.   Any decent solid core plywood can router nicely.  Of course always sand the finished edges with a 100 grit. 

An inexpensive big box router table is OK for making disks.  

I have several routers each outfitted tips I most frequently use.  However, if I only could have one router my $100+/- Bosch trim router would be my choice.  One hand operation, easy to use on curves and small pieces in addition to long 8' runs.

I like to round over my wire management holes and the bottom edges of all modules for safe handling.

IMG_8680

For 3 1/2" hole saw cuts you will need a hi amp hand drill with a side handle or a drill press.  I have used both, but the drill press is admittingly easier.  Milwaukee hole saws last long.  Drill over a back up of solid wood.  Do not hit a concrete floor.  Your pilot drill needs to embed it's self into a subsequent body.  Sometimes it can be helpful to predrill the pilot hole.

To get the routed edges on a table I use a jig or a Phillips #2 screw driver shank and hold the disk against the bit and retard the disk from spinning too fast.  Bring the bit up in stages so as to not take a big bite.

The adjustable feet are available individually at Valley Hardware in CA.  Many other outlets for the feet but most others want minimum orders.  

For the mat nipples I just cut them from a chair mat with the same 3 1/2" hole saw.  You can buy any size mat for the amount you would need.

Nothing herein is an absolute, it's just the way I do it.

For scooting around under the benchwork this helps:

IMG_7801


IMG_7802IMG_7796

It's just a HD furniture dolly with a drop center mounted old plastic kitchen chair shell.

Attachments

Images (4)
  • IMG_7801
  • IMG_7802
  • IMG_7796
  • IMG_8680

Hey John, just wondering what your top-of-table height will be with the plywood installed? Not that it matters since we all have our preferred height. I assume Mianne may have two or more standard heights.

i like the led strip lighting for under the table, that's a great idea. Wish I had thought of something like that back in '98. That lighting on your bench looks great. Hard to beat the Weller 100/140 for track and heavy wire soldering.

Tom, really like your wire caddies. Nice size and easy to work with I would think. I also see you were smart and put up your backdrops BEFORE doing your benchwork! Another thing I wish I had done.

cheers, Rod

gunrunnerjohn posted:
Dave Zucal posted:

GRJ, the layout's legs may leave permanent damage to your wall to wall carpeting. Looks like you have about 32 legs that will be digging in.

I've actually thought about that. I'm thinking of solutions, but I don't want big strips of wood under the legs. I was considering some of the furniture coasters to spread the load a bit.

mike g. posted:

Hi John, just a side question, do you use that solder iron on your bench for soldering track? I am looking for a good one to do my track!

I actually use my old Weller 100/140W gun for heavy soldering like track, brass, etc.  The Hakko is a 70W iron with temperature control, so it serves me well on the bench for wiring and PCB work.


Thanks John, I have one of those wellers so it should work just fine!

gunrunnerjohn posted:
rtr12 posted:
Also, I added a string of 5m LEDs (600 LEDs) down the center space which helps me find things down there. I put a switch in a cross brace for the top, right where I go in with my stool for convenience. That works very well. You would probably need a couple of strings or more for the size of yours, but it's really handy to have while you are down there. That would be easier to install with the top off as well. It was an after though for me, after the layout had a top and running trains. Just another thought here, but I imagine you have probably already thought of all that.

The legs and lower cross braces are also good places to mount little things like light power, term strips, etc. Below is also a good place to hide things, keeps the skillet and rolling pin away from the old noggin...

I like the idea of the LED lighting, I'll have to do that.  Let's see, 16 feet for each string.  Four or five should light it up pretty well.  FWIW, there are also high current LED's you can get in reels, I have them on my workbenches, they're great!  They are really bright, and light up the bench like daylight.  First picture with them on, next with them off.   You can see by how dark the 'scope is above the light strip that the camera adjusted the light level down because it was so bright.

I like the workbench lighting idea. I hadn't thought of putting LEDs there? That would make a big difference in lighting and I have a shelf that would be perfect for those. I used a double, 600 LED reel of 5050s below the layout. I got two reels, but one down the middle was plenty. I will look around for the high current ones and take a look, for the work bench.

Edit (after looking around):  Yikes, prices on the 600 LED strips seem to have gone WAY up since I got the ones under my layout!

Last edited by rtr12
TrainHead posted:

How can you make more storage underneath the benchwork by removing the V-angled supports? I  thought that you need them to support the table?

Nope, the angle supports and the extra leg was just added by Tim because I had the parts and he was trying to use them.  In the original design. lots of sections had no angle brackets.  I asked Tim if I needed them, and he told me he was just using what I had.  Since I also had more 4 foot sections, I went with the same design as other parts of the layout to allow maximum storage.

A note of caution.  I had to do a lot of wiring under a layout where the owner had installed permanent shelving attached to the  legs.

That made the job go extra long and was very awkward /  painful  I would caution against leg attached shelving.    Working under the layout is hard enough.

Already having lots of shelving I mounted my shelving units on a series of furniture dollies.   A regular poster here uses a series of red Harbor Freight carts to roll out when ever needed and provide full access to the underneath area.

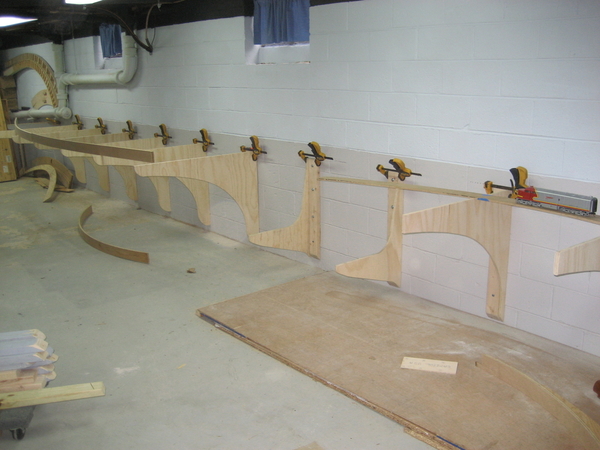
Legs can also be a pain.  I mounted knees on the wall and set the benchwork modules on top.  When we moved I took the modules with me.  The Mianne benchwork can be set on cantilevers the same way.  Floor clear wall to wall:

canterlevers ready to install 002

Attachments

Images (1)
  • canterlevers ready to install 002
Last edited by Tom Tee

For decking consider Advantech 4' X 8' X 3/4"sheets  @ $30.oo +/- each.  Available at 84 Lumber,  select Lowe's  and quality lumber yards.   HD had it for a while under their brand of Ameritech.

Very strong, extremely flat and smooth.  Non  responsive to moisture.  Certified for use in home construction to be good for four months open to weather.  Very affordable. 

 I have been  experimenting supporting it on 22" & 32" centers with no deflection in 7 years. 

Also, I just added a three rail upper level to my 2 rail layout.  Knowing  how loud three rail trains  are, as an experiment I used various deck materials. Because Advantech is so extremely dense it is the quietest structural decking material I have ever used.   You can hear the difference when the train travels from any thickness plywood  to Advantech.  As an aside, IMO, sound systems and slower speeds make three rail  wheel/track  sound much more bearable.

Advantech is great stuff!

Last edited by Tom Tee

Tom, my plans include storage that is NOT connected to the layout, I've certainly already learned that lesson!  I'm sure that even if I pre-wire, I'll spend lots of time down there, so I want to make sure it's as easy as possible.  With the open design under the benchwork I have now, that should be pretty easy.  I am planning on stringing the power wire and a few CAT5 cables around to have pre-wiring for most of the stuff.  I'll still have to be down there for the interconnects, but at least it'll be a start.

I agree, John.  I don’t like attached shelves either.  Even after built you never know when you may need to get under there.  Also, if the time comes when I can’t get under there myself, I won’t feel bad asking someone else to crawl, roll, etc into my concoction.   I like the roll out storage units some folks have shown on the Forum.

Last edited by Mark Boyce

Thanks guys, I'm really looking forward to completing this, even though I know it'll be a while. It's nice to actually be working on it now.

John D. posted:

@gunrunnerjohn, am I reading the plan correctly, basically nothing bigger than 2' x 2' squares inside legs spaced 4' x 4' ?

Correct, 2x2 is the largest open space, and the legs are a maximum of 4x4 apart.

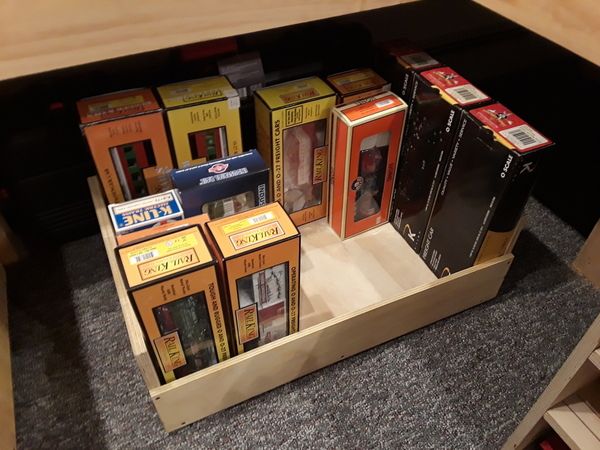
For under layout storage... a few thoughts:

Build a 1/2" plywood box the size you want with sides about 8" high

if you store cars in boxes, you can store a lot in a 2' x 3'  base box (and my layout is only about 27" off the floor!)

Don't use casters or rollers.. makes the box harder to move on carpet... Instead, buy the sets of furniture moving disks at HD (multiple sets of disks are cheaper than roller or casters!)  Then, drill a hole in the center and screw them into the bottom of the box in each corner....if you use a flathead screw, the plastic disk will squeeze up a but and the screw head won't snag the carpet at all!  In addition, you don't lose much height, because the gliders are only about 3/4" high - much lower than a roller or caster.

They GLIDE... smoooooothly

Works great for me!  (you might consider a set for an under-the-layout gliding seat too!)20181208_15431320181208_154344


... and now, back to our regularly scheduled discussion about GRJ's new layout! (Nice!)


Attachments

Images (2)
  • 20181208_154313
  • 20181208_154344
Last edited by eddiem
gunrunnerjohn posted:

Having all these tools makes it easier.  I think my hole saws top out at 2".  Do you do these in a drill press?  How does plywood do going at all angles on a router table?  I'd think it would splinter at certain angles.  I don't think I've ever tried plywood with the router.

You could always goto Harbor Freight and get the circular bores that fit your drill...


Plug removal from a one piece econo hole saw  used with a straight thru bore approach can be a bit rough.  

With the removable mandrel in a straight through pass, just unscrew the mandrel, remove it  then you can poke the plug out.

My approach is to bore the hole a tad over half way from both sides, that way you have the protruding end to grab onto to for removal.  This method provides a cleaner back face.

Last edited by Tom Tee

Add Reply

Post

OGR Publishing, Inc., 1310 Eastside Centre Ct, Suite 6, Mountain Home, AR 72653
800-980-OGRR (6477)
www.ogaugerr.com

×
×
×
×
Link copied to your clipboard.
×
×