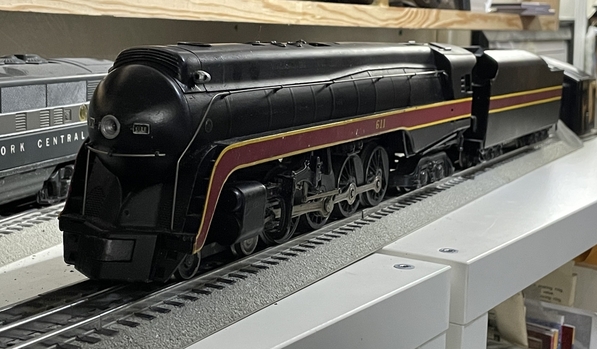
Does anyone have the original documentation for this engine? I just picked one up (being shipped now) and was specifically looking for and exploded diagram of how to take apart the shell so I can look into repainting.
Replies sorted oldest to newest
All of my Williams (and Weaver and 3rd Rail) brass locomotives have 3 screws holding the boiler shell onto the chassis. Two small screws are down low on the back of the cab and one long screw is underneath and goes up through the frame between the cylinders and into the bottom of the boiler shell. You'll need to remove the 4-wheel front truck to get to this screw.
Lift the shell off carefully and you'll need to unplug the wires that go to the headlight and smoke unit. The wire bundle (typically 3 wires) has the plug in the middle.
I really like the fact that brass steam locomotives are all put together the same way. This is not true at all with diecast steam locomotives.
Thanks so much Bob!
The engine came in today and was just as you explained.
It desperately needs a repaint as I think it was rattle canned and not evenly - but that will be down the road as I'm not a much of a painter. Plus overspray on all drivers and everything. I did spend a couple hours with a dental pick cleaning the drivers up and inspected inside the shell - all looks well and it runs quite well.
Question - How do you remove the running gear from the main drive wheel that doesnt have an obvious screw? I can take all the others out, but not that one. I plan to pull it all apart and degrease / clean / reassemble.
I also plan to update the electronics to 3rd rail Cruise Command and Railsounds to go with my legacy setup.
Here is how she sits currentlly:
Attachments
Man, that is too bad. The original paint was spectacular, and baked on. It would take a lot of abuse to damage it. Are you sure someone didn't try to "weather" it?
I think an Allen key will get the eccentric loose. Sometimes they are soldered on. Never heard rods called "running gear" before.
@bob2 posted:Man, that is too bad. The original paint was spectacular, and baked on. It would take a lot of abuse to damage it. Are you sure someone didn't try to "weather" it?
I think an Allen key will get the eccentric loose. Sometimes they are soldered on. Never heard rods called "running gear" before.
Turns out - the original owner painted it *blue*.... yeah... I know... Then the gent I purchased it from repainted it as it sits and had a friend of his install MTS electronics. So - Its had a hard life.
Forgive my terminology - Not sure the exact term for the connecting rods, etc on the drivers.
Although I don't see any way to use an allen key on it.
Attachments
I will take a look. Mine is at the airport. Why not try to remove the blue? Try a rag with acetone on it. What can you lose?
Tried cleaning some areas on the side - and endedup lightly polishing the paint (It was like a satin) so it was uneven... grrr... so I polished most of one side to match. It appears someone used dullcote on it after the last repaint...
I need to just have this thing repainted or its going to drive me crazy.
The rods are roller bearing rods. It has a hex bolt holding them on. Likely metric. You can get metric hex drivers that small. Don’t try using pliers or you will just damage the hex.
Pete
Mine is not in "new" condition, but the original paint is in pretty good shape as a reference of what it originally looked like.
Attachments
@Norton posted:The rods are roller bearing rods. It has a hex bolt holding them on. Likely metric. You can get metric hex drivers that small. Don’t try using pliers or you will just damage the hex.
Pete
Yep - three on each side are like that - and I have an appropriate nut driver for them.... but that other one - the second one from the front.... Mine have nothing... I'll snap a pic...
What do I do with this??


