I'd love to see how you guys customized Plasticville (Littletown, Marx and K-Line too) traditional O/S "scale" buildings for your layouts.
I'll post some pics of mine shortly


|
|
I'd love to see how you guys customized Plasticville (Littletown, Marx and K-Line too) traditional O/S "scale" buildings for your layouts.
I'll post some pics of mine shortly
Replies sorted oldest to newest
Hi John!
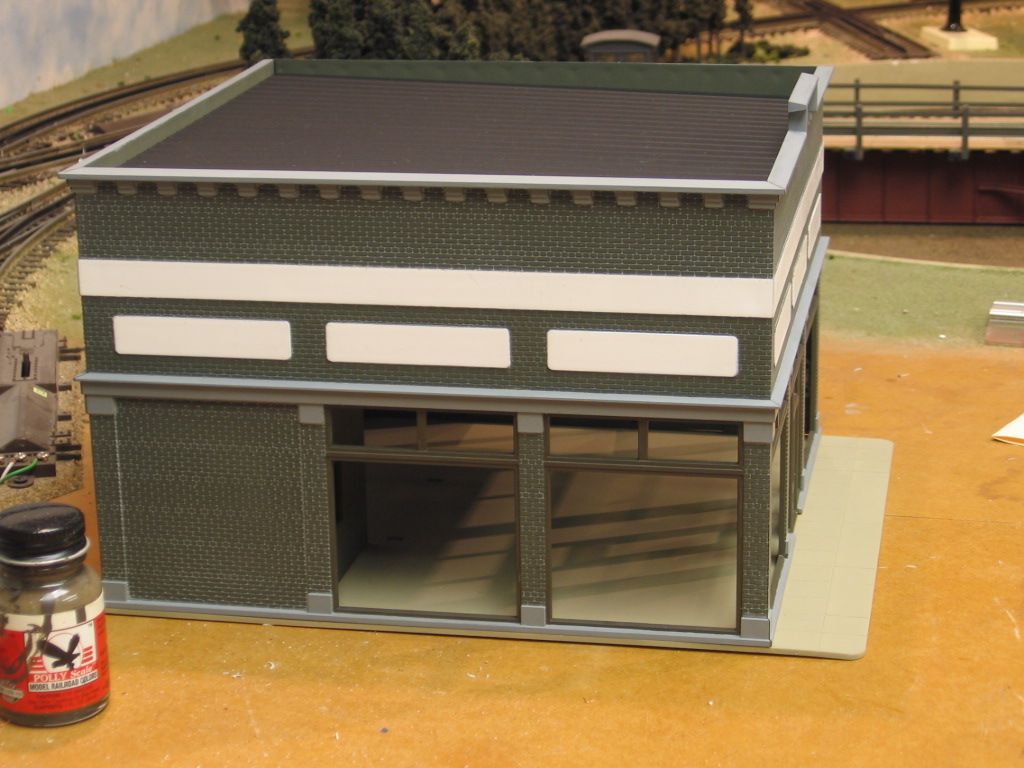
While these are not really "customized", I find many Plasticville buildings fit very well in to a "scale" setting. These buildings have been very lightly weathered with an airbrush and then received a coat of Testors Dullcote.


Working on the layout... I’m still figuring where I want to place items. All I did was thin down some Testors flat tan and rust colored paints and brush them on. It takes the “plasticyness” away from the barn, shack and water tower. 
Some background fronts. The Firehouse was not only split in half and both sides used to double its size, but so was the fire truck!


Storefront Church (oops, I didn't notice until after I looked at this pic,but it looks like a worshiper passed out from the heat - gotta get her up and well) and a typical urban area "apartments over stores" Main Street type building.


RosevilleRR is right, a little paint goes a long way with these plastic buildings. Here is a factory totally transformed with some primer rattle can spray.

I found a forlorn looking Plasticville chapel at a train meet, wrapped up in a plastic baggie, with yellow glue stains near the windows and magic marker writing on the roof, calling up to me, "Hey, Pat, I'm beat up, but I could look great someday on your layout." Yeah, $7.00 later, the chapel went home with me.
I ran an utility knife along the window and door edges to separate the windows and door from the chapel walls, then cleaned up the openings to remove old glue scraps. I also cleaned up the windows and doors in a similar manner. I washed the walls, door, windows, roof pieces and steeple pieces in some dish detergent, then rinsed and dried them. A few days later, I sprayed the walls and steeple pieces with Rustoleum's Stone Texture Spray Paint in a pink quartz color. I sprayed the roof pieces with Rustoleum's American Accents Stone Spray Paint in a slate color and the door with some brown paint I had on the workbench. The end result was a chapel that looked like it had pink stucco walls and steeple with a slate roof.

Here's how it looked on my last layout.


I customized a Plasticville or Bachman 7-11 store using light up vending machines inside, a Miller Engineering Mr. Peanuts sign and a "cannon" type of light on the store's rooftop sign. Like the customized Plasticville chapel, I placed the 7-11 on the back of the layout so the scale size would work with the other buildings. Here's how the 7-11 looked on my last layout.
Mr. Peanuts sign on side of building and the "cannon" light on roof to illuminate 7-11 sign helped to bring the building and scene to life.

Rooftop view showing how the LifeLike cannon light illuminated the 7-11 sign, although it tended to create "light pollution" behind the sign!

Front view with light up vending machines. Ooooh--I didn't notice that until just know that the wiring crept up in view over the years. My "counter" originally hid that mess! The small Cooper and the back of the layout location helped with the scale - perspective situation so the building didn't look tiny in relation to the other buildings and the trains on the layout.


I gotta get some of that stone textured spray for future junk box projects, Pat.
Looks great, a super save.
Sergeant Pat - I love the way you "redeemed" that old Chapel.
I'd have a hard time focusing on the sermon if I worshipped there!
I used to have one of those Chapels when I was young, glue stains and all. Thank goodness mine was white!!! ![]()
@Lionelski posted:I gotta get some of that stone textured spray for future junk box projects, Pat.
Looks great, a super save.
I’ve used that Rustoleum textured stone spray on retaining walls and bridge piers with great success.
Alan
Pat! “ Coral “church has been resurrected!
nice work with stone rust oleum.
Pat, the chapel has been reincarnated.
Coaling station converted to coal mine:


Jim


Plasticville church, painted and lights added (Evans Design). The statue of Mary was donated by my daughter.

Mountain cabin under construction.

Lionelski
Thanks for starting this topic. You know I love to modify and kitbash Plasticville kits and I love seeing what others have done with them.
Kitbashing the Plasticville Bachmann 1975 Coal Station
The Plasticville Bachmann Coal Station, number 1975, is a good kitbashing kit.

My first kit-bash was was to make a raised roof, (which had a conveyor to spread coal), on the the Coal Station to replace the 1975 flat roof. I always liked the looks of that style coal station. I used 1/8 inch tempered Masonite with one smooth side. The smooth sides were scored with a knife to look like siding. Windows were cut out and made and installed in the top section. The parts were glued with Elmer's glue. A sheet metal roof, obtained at a train show, was installed.
Finished Coaling Station

View of the under side of the new roof.

Charlie
Wife and I did these years ago....
A barn...


A couple gas stations...


A couple churches...


A car dealership...


A freight station


A library...

A couple motels...


A theater...


A gateman's elevated shanty...


...and others, all of which made good use of an accumulation of P-ville parts...which has continued to grow faster than creative time and energy can consume.
It was all fun....like everything else about this hobby.![]()
KD


John - sometimes it looks great right out of the box!

I have kitbashed the Coaling tower in two projects. The basic kit always struck ne as two modest for a railroad so i did a project to put two of these structures together to make a more substantial railroad coaling tower. This one hasn't quite found the perfect layout spot but these two photos gives you an idea of the modified structure.


The second project was more complex modifying these structures into a retail coal dealer. I followed an article written a while back by Art Curran who had a keen vision on kitbashing structures. This one turned out rather well i thought.

Here’s a few of my Plasticville bashes...
Made this houseboat out of a Plasticville trailer:

Made these two trailers more detailed, and gave them an interior:

 Added some lights to the coaling tower:
 These towers are some of the first buildings I’ve done:


This pool, with actual depth and a light:

Former Frosty Bar:
Skyscraper made from 8 Plasticville hospitals, plus the radio tower on top of the adjacent building:


Enhanced K-line 7-11:

@Former Member posted:Working on the layout... I’m still figuring where I want to place items. All I did was thin down some Testors flat tan and rust colored paints and brush them on. It takes the “plasticyness” away from the barn, shack and water tower.
I did a couple of additions... added some signage and fruit crates. I also sent the cows to slaughter. They were too big. I think they were from Life-Like. Those of you who are eagle-eyed might recognize that signage from the MTH Rail King fruit stand. Eventually I’ll add much more detail to this scene, rusty old tractors, etc. I’m starting to like Plasticville’s smaller size. The Rail King fruit stand I had took up too much room and didn’t have the charm. I also need to pull up that O22 switch and flip the motor to the opposite side to allow more room.

Double Plasticville Coal Tower.


Well, you can jam at Joe's Garage...

Or take the Last Train to Clarksville...

Mitch


A Plasticville depot re-imagined.

S. Islander
You win the Most Creative award KD. Thanks for sharing.
I'm now incentivized to go through my Plasticville parts stash, and the buildings already on Warrenville, and. following your leads, see what I can create.
Looks great S. Islander. I know that I have one of these on the layout that now needs dressing up following your lead
frizzinbee,
I guess that a 2nd Most Creative award has to go to you.
That houseboat - WOW, really thinking out of the box
Thanks for sharing. You certainly upped the ante in creating fantastic buildings from humble beginnings
LIRR steamer,
Another winner of the award!
Thanks for sharing
@Don Winslow posted:John - sometimes it looks great right out of the box!
I agree Don.
Mine was warped and beat up, so work it needed
Plasticville trailers, a little detail work, lights and you have a trailer park. Don


Dustin that's more fabulous kit bashing with Plasticville in addition to your skyscrapers. I really like the houseboat. What did you use for a hull? The pool is great too.
I was thinking of doing a lemonade stand using one of those Realemon squeeze bottles shaped like a lemon. You beat to it.
Mitch, what kind of time machine you got running down Main Street between the Monkeymobile and the Batmobile?
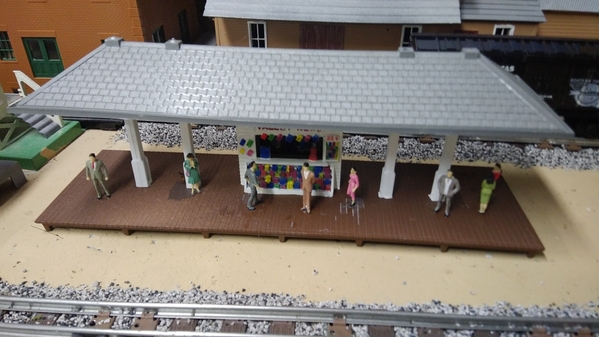
"Union Station" - one of my favorites and I have always wanted to treat it like a model and not a toy.
Hardly a "Union Station" in size, these buildings, however, make very plausible suburban stations or even prosperous-area rural stations. One thing in their favor is that the platforms and steps and doors and windows are 1:48 size. The doors and platforms in particular are quite O-gauge/O-scale friendly.
Good tooling, too. This model could be far more detailed and weathered than I have done.
This was simply painted with hardware-store spray paint, and the platforms arranged/attached for my space. It is of course glued together as well as painted; this is new production, not a "collectible".

Parking-lot entrance side (building has been relocated just for the photograph). Roof is glued-on "gravel".


frizzinbee's house boat. Oh, yeah.
Plus - it gives me an idea for a barge towboat - I don't have to actually build the superstructure!

John, Joe, D500,
Thanks! The houseboat is a personal favorite, and was one of the easier conversions to do.
Joe,
The hull is made from an O-scale barge kit I got off of ebay. Steering wheel/console is from a 1:38 VW bus, railing is Plastruct, steps are from a Tichy fire escape, and misc detail parts are from a PT boat kit.
Couple of mine .....


K-Liner, very unique approach-great idea.
K- liner that’s a cool idea. I saw a little raccoon on some web site would fit right in. I may have to borrow your idea.
Ok I bought this lot of Plasticville parts on eBay for $14. I had a roof I built for a sawmill that was way too big and just needed some walls to make a factory or something. I cut and glued 14 wall sections from this lot together sprayed it with some texture paint and I like it so far. Still working on it but here are the wall sections that I am starting to weather now.


@Jim Policastro posted:Coaling station converted to coal mine:
Jim
Gorgeous structures, scenery and Photos, Jim. The colors are stunning. Arnold
Here's the basic Lionel Barrel Shed Kit

...and here's what I did with it
Left Side

Right Side

...and Inside

I scratchbuilt the outside tool box and its lock, the railing, the stairs, the base with the ground cover and junk, and detailed the inside. The lights work, the calendar is for October, I made sure there was a lot of junk/garbage/etc. underneath the shed, and put "new" wooden planks on the stairs and the deck. The reason for the extra effort for detail is because this shed was planned to be right at the very front of a future layout. The layout never happened but the shed remains....
Painted red parts green and scratch built sign.

That’s a nice structure Postmaster. Like the ad use to say, “ Pass with care and buy Sinclair”.
Homemade Coal Mine and Coal Loading Station Operating Accessory
The project uses a Plasticville Bachmann Coal Station to make a Coal Mine and Coal Loading Station Operating Accessory. The kit was used to make the Coal Mine Entrance into the underground mine in the mountain.

A new “A” frame roof was built for the top out of 1/8 inch Masonite with a window in the end and the end was scored to be vertical siding. The roof was roofed with some of the kit roofing.

The Coal Loading Section was also made of Masonite. The outside walls were scored with a knife to be vertical siding. Windows were in the installed in the side and end walls.

A slide gate valve was made of plywood and held opened with a rubber band. A 12v solenoid (DC solenoid rectified to AC) was use to hold the slide valve closed and to return the solenoid plunger out to engage a notch in the arm of the slide gate valve to hold it closed. A coal storage funnel was made from card board stock.
The picture below is of the plunger return rubber band, slide gate with hole in center and notch for solenoid plunger, black solenoid and card board coal funnel. This rubber band holds the solenoid plunger in the notch in the arm of the gate and keep the hole closed, ready to hold and drop coal. See the wire in bottom of cone tied to the solenoid plunger which is operated to break up coal jams in cone. The black bridge rectifier can be seen that converts the DC solenoid to operate on AC.
This picture also shows the slide valve closed (hole in slide gate is not under the funnel hole and the solid part of the slide gate is blocking the funnel hole) and the solenoid arm is holding the slide gate closed.

This picture shows the slide gate open (the slide gate hole is now under the hole in the funnel).

Picture of slide gate return rubber band. This makes the slide gate valve stay normally open and pulls the slide gate to open when the solenoid is triggered. Both rubber bands are easy to replace as the are in open screw eyes and around posts and last a few years.

PS: Recently (9-4-2017) it was not dumping. Turns out a plot of piston stoke from the magnet shows the most pulling power is when the piston is 1/16 to 1/8 inch out. It was much more so I had to modify by adding about 1/16 inch wood to the sloped part to make the trigger pull when about 1/16 inch out. That fixed it.
Picture of Power graph for Radio Shack Solenoid I used. You can see the pull in oz is much higher at 1/8 inch or small stroke.

Picture below shows the 1/16 inch thick strips of wood I added to the notch (appear whiter) to make the piston get more into the magnet and shorten the stroke for more power.

The coal is dumped into a coal car when activated with a push button on the control panel. A flat roof for the Coal Loading Section was covered with sheet metal roofing. Two 12 volt mini Christmas bulbs were installer in the outside corners of the floor and floor was cut out to illuminate the track below and inside the Coal Loading Section.
Picture showing lights inside to light windows and cut through bottom to light coal car area below.

The picture is from the outside of coal mine loading station showing the lights working for inside the building and lighting the car below
Here is night shot of the coal mine showing the lights in action. The two 12v (or two 7v in series) mini Christmas bulbs are in two small holes cut in the floor illuminating the windows and the car below the loading section.

Like most active accessories, the coal mine/coal loader should be located for easy hand access by the operator. The coal must be hand loaded into the funnel and the slide gate valve must be hand closed. Lionel plastic coal is used which came with a Lionel coal dumping car from the 1980s.
This was a fun project, especially figuring out a working coal car loading system.
Charlie
I just finished this Plasticville junk box project:


John, That looks great. I love to see old junk parts brought back to life as an interesting piece like that. Nice work!
Set up a gas station.

Thanks Jerry - and those parts were really junk, covered with glue and sloppy paint.
I'm always up for a project when it is too cold to play outside
Jim,
Amazing what a couple small changes to a Plasticville building can make.
Super job
Fantastic Choo Choo Charlie - you took customizing Plasticville to an animation lever - love it
This guy just needed some paint and TLC
Before:

After:

While not Plasticville, this was made from the operator's shack from a derelict MPC Drawbridge. Waste not, want not.

This is a great thread! Thank you for sharing all. ![]()
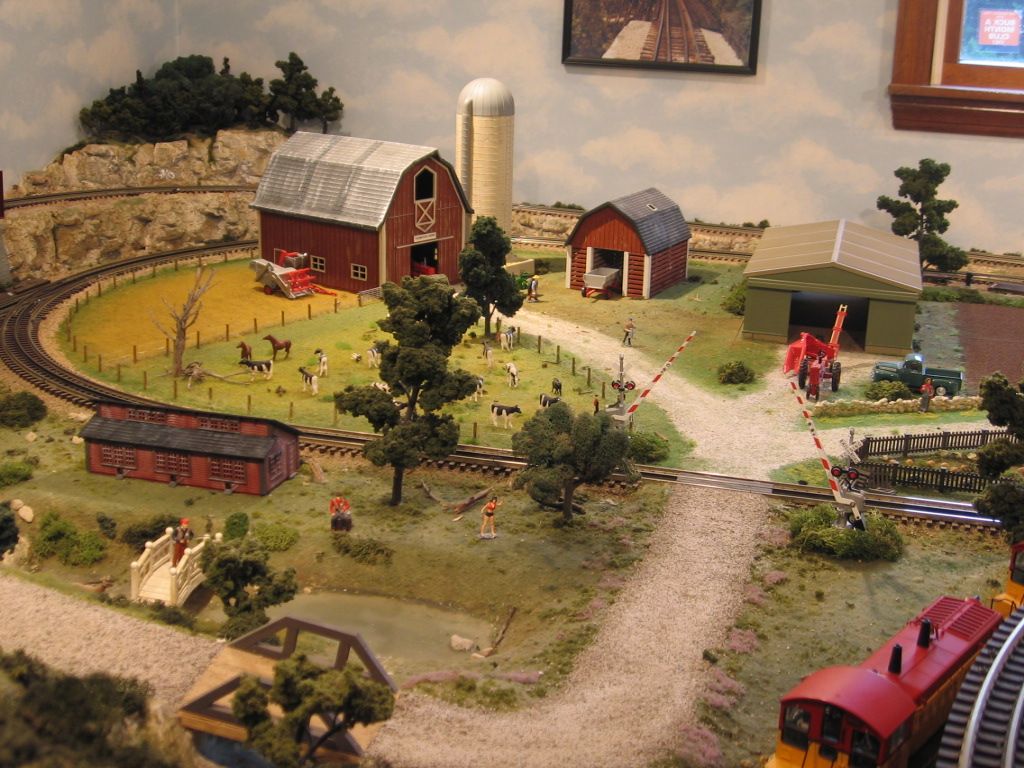
Ertl farm set. (With paint). Probably a better fit, S scale.
![IMG_8203[1]](https://ogrforum.ogaugerr.com/fileSendAction/fcType/0/fcOid/153463017137233172/filePointer/153463017562186230/fodoid/153463017562186226/imageType/LARGE/inlineImage/true/IMG_8203%255B1%255D.JPG "IMG_8203[1]")
Chicken coop, middle of picture is K-Line.
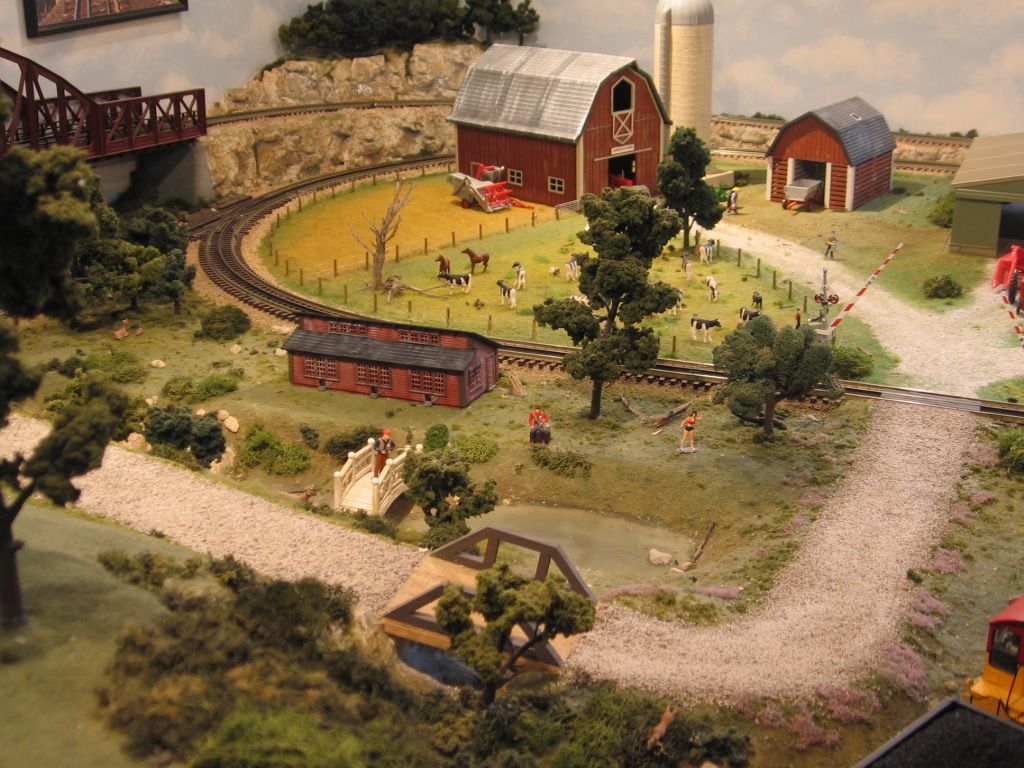
Machine shed, (green metal building, right in picture), required an addition of 1/2" foundation, before the 1/43 scale farm machinery, would fit.
![IMG_8203[1]](https://ogrforum.ogaugerr.com/fileSendAction/fcType/0/fcOid/153463017137233172/filePointer/153463017562186230/fodoid/153463017562186226/imageType/LARGE/inlineImage/true/IMG_8203%5B1%5D.JPG "IMG_8203[1]")
Just finished this guy today. The donor was covered in glue. The front and back were so warped that I had to break them apart and glue the pieces together straight (heat would not straighten them). Popsicle sticks used for bracing.
A brick pattern printed on the computer for the back wall, and some paint - on to the layout it went


Fantastic job and a great scene Mike CT.
Thanks for sharing.
John how did you get the glue off?
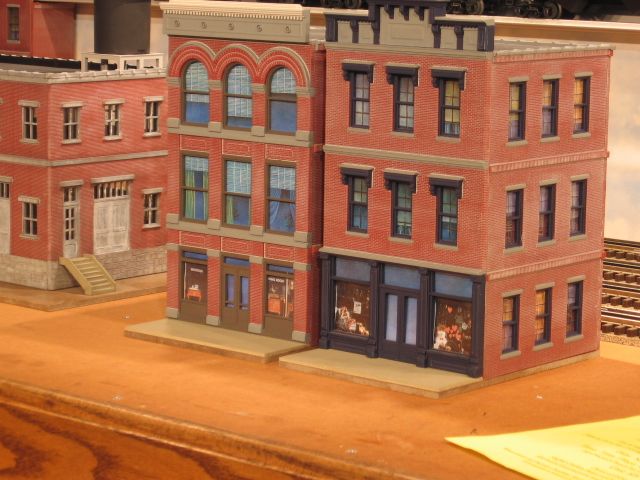
Another plastic building source was Walthers. There was an interesting double tab, assembly design that allowed for the sturctures to be dismantled, boxed for storage, based on model railroad was a seasonal experience. Feed and Grain store.
Automobile show room.
Double tab assembly, friction fit, could be done without glue.

Has that intergalactic quality to it! A back to the future Delorean perhaps? Lol.
@coach joe posted:John how did you get the glue off?
I didn't Coach Joe,
With some effort the glue used snapped free where the sides were glued together. On the surfaces I sanded the glue smooth, primed and painted over it.
@Leroof posted:Right coach Joe I will ask too, but Joe, isn’t that your garage?
Mitch, just what kind of machine is that between monkees mobile and Batmobile?
@Leroof posted:Has that intergalactic quality to it! A back to the future Delorean perhaps? Lol.
Technically, it's a GoBot named Psycho:
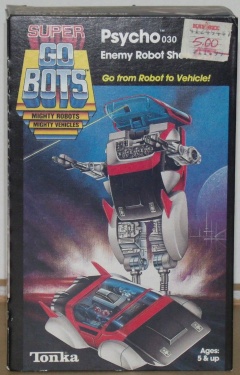
It started as the "Psychoroid" from the anime series "Space Adventure Cobra":
https://www.worthpoint.com/wor...ace-cobra-1778766547
Mitch
(also an anime fan since my "Speed Racer" and "Kimba" days in the 1960s)
Go speed racer go speed racer, go speed racer GO!
lol.
Yes Pierre it's my garage but that thing went by so fast I didn't see nor hear it until Mitch's picture stopped time.
Our Christmas layout...
https://chicagovalleyrailroad....layout-tour.html?m=1
...is almost all salvaged plasticville buildings. This was to be the year of repaints but by the time I finished various repair and lighting projects it was time to pack it away.
This thread is quite inspiring and I'll be looking at it again next year. Eventually I hope to repaint nearly all of them.
The one repaint I did a couple years ago was the rehabilitation and repaint of the Lionel "Freight Station" as described here:
https://chicagovalleyrailroad....ght-station.html?m=1
Looks much nicer now.

Thanks for the tour Eilif
@Lionelski posted:Thanks for the tour Eilif
You're Very Welcome.
Forgive me if I've asked this before, but is that any connection to Warrenville, IL? Just curious as I grew up there.
@Eilif posted:You're Very Welcome.
Forgive me if I've asked this before, but is that any connection to Warrenville, IL? Just curious as I grew up there.
Must be a great place, Eilif, but, no.
Just a takeoff from my last name
@Leroof posted:This epic subject is so much fun!
Pat Shediak, tell me, is that tower in the back to the right of the pink church a Lighthouse? Is it a kit bash from ?
Don't laugh too hard. That black lighthouse next to the 7-11 store was a tabletop lamp I found in a second hand store years ago. It had a 110V cord that went up the center with a "nightlight" bulb in it. I took that out and just stuck the lighthouse on the layout, chipped paint, a little ruse here and there on the metal, looking like a derelict structure. I never got around on the last layout to hanging some moss and other stuff on it to make it look more abandoned.
I had a Lionel lighthouse at the diagonally opposite corner of the layout that was fully operational with sound and lights. The layout was set in a beach town named Lighthouse Point. Yes, that's real rock I bought at a gravel yard for a dollar. I thought the larger rip rap matched some I saw in southwestern Massachusetts.


Plasticville Church was a good pickup. It looks great with some work. Only things left are the ivy and the sound board. Stained glass makes all the difference.


OGR buildings allow for a lot of paint brush practice.
Mark, how did you do the stained glass?
MikeCT, those ogr buildings look great. Did you paint the brick or is that the original plastic color with mortar applied?
@coach joe posted:Mark, how did you do the stained glass?
We just put two pieces of scotch tape together and painted. (Adhesive sides toward each other) Works well.
@romiller49 posted:MikeCT, those ogr buildings look great. Did you paint the brick or is that the original plastic color with mortar applied?
A grey latex paint, diluted to the consistency of milk. It takes a couple of wash applications.

 layout 4-04-20 (26)")
 layout 4-04-20 (25)")
Nice play on words Jerry.
Access to this requires an OGR Forum Supporting Membership


 layout 4-04-20 (25)")
 layout 4-04-20 (26)")

