I thought that I would add this update here rather than tack it on to the end of the related (and now very long) thread I started a while back on these excellent GGD dome cars: https://ogrforum.ogaugerr.com/...ateside-and-shipping

Fine as these cars are, the interiors kind of cry out for extra detailing - or at least if you are an SP passenger car history enthusiast. I said I was not going to be the first person to try to get at the interior of one of these cars, but - as nobody else has posted anything on that subject and I have managed to do it - here's what I found.

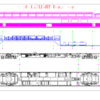
To begin with, Scott Mann (blessed be his name) posted this assembly or screw placement diagram in the earlier thread. However, it left me confused about what the interior assembly shown in blue was actually attached to and where:GGD_Assembly

I'm probably out of practice reading such things but in any case there are four screws located around each of the trucks that hold the frame to the body shell; most of them are shown in this image:

FrameMounts

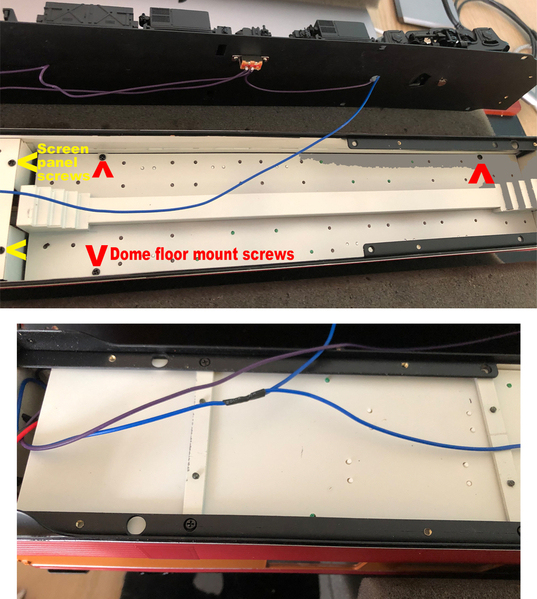
When the 8 screws are removed (one of them was very stubborn and I had to cut a slot in it to get it to turn), the frame simply drops down - no part of the interior assembly is attached to it rather than the body shell itself. Removing the frame reveals that the dome seating area and the lounge area are separate assemblies, with four screws inserted from below that hold each in place to tabs on the body shell:

FloorMounts

In between them is a separate assembly for the screen partition between the two areas, which I'll explain later.

I worked out that the long dome seating area assembly has to be removed first to take out the rest. It is attached to the tabs on the body shell shown below:

Mounting_Tabs

The screen partition between the dome and lounge is attached to the lounge seating assembly by two screws. Although much of the interior flooring is plastic, and the seating itself and the numerous "Smokador" ash and drinks stands appear to be resin 3D-printed, the two parts of the screen are brass, and at the top they fit into a slot in a prototypical frame between two sets of dome windows. They have a representation of the wood paneling lightly etched into them:

ScreenPartition

You might be able to see that the finish on these panels really isn't great, and as the original screen was one of the signature features at least of the first SP Dome car, it will eventually be getting "the treatment" when I come to work on the whole interior. Although some of this was posted on the earlier thread, you can get an idea of what I will try to do from images found here:

https://streamlinermemories.info/?p=1392

https://www.trainorders.com/di.../read.php?11,4572151

So, basically the interior assemblies can come out relatively easily when the frame is removed and it's pretty obvious how they are attached to the body shell, informed by the diagram Scott helpfully posted. To you dedicated 2rail scalers who work on passenger cars this may all seem very simple, but it is literally a world away from the Lionel, MTH and K-Line 3rail passenger cars I am used to working on.

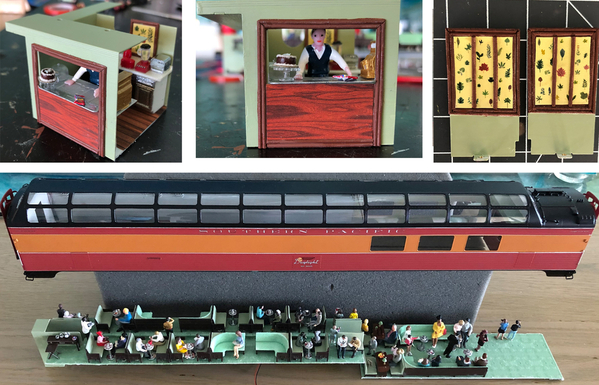
I have not yet taken out the bar/snack enclosure at the end of the lounge but have worked out how to do so. This shows the two main seating assemblies, for which I have big plans:

InteriorAssembliesjpg

I'll say nothing more until I get to the next stage . . .

Attachments

Images (6)
  • InteriorAssembliesjpg
  • GGD_Assembly
  • FrameMounts
  • FloorMounts
  • Mounting_Tabs
  • ScreenPartition
Last edited by Hancock52
Original Post

Replies sorted oldest to newest

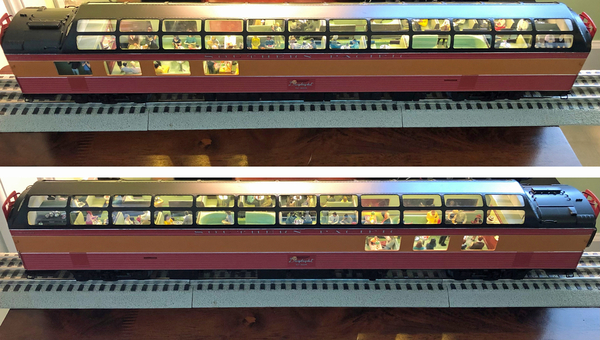
OK, and FWIW, having taken apart this car here's where this project has got to. It's near complete, but I have to re-assemble the car, which for me is always the most nerve-racking stage of any project.

My intention was to produce as near as possible a prototypical SP dome car interior, to go with Scott Mann's beautiful GGD car. Bear in mind that I am really a trespasser on this 3rail SCALE forum as I am a dedicated traditional O gauge modeller. Maybe unfortunately, that governed how the project progressed.

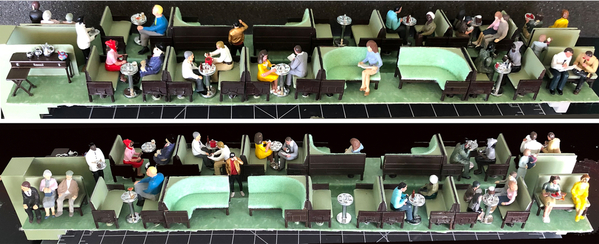
I posted above what the stock interior looked like when I extracted it from the body shell. Using some historical SP concept drawings and the few color photos of these cars that exist, I decided on a color scheme - even including a "carpet" (which is inkjet printed fabric). This is how the dome seating area assembly turned out after laboriously removing and re-installing all of the separately applied details, including the fine 3D printed "Smokadors" that came stock, which I "chromed" using a special ink product. The curved seating areas in both parts of the car also have an imitation fabric covering:

SP_Dome_Seating_Mods-1

I did this notwithstanding that a fellow who actually owned the first car in this series, SP #3600, told me that the decor was really fairly plain and was assembled out of very conventional building products of the time. Anyway, the signature features of this series of cars, at least based on my research, are the cathedral ceiling lounge area and the native northwest leaf screen that separated it from the dome seating. Again, I wanted a prototypical model of this area in particular but the small scale and my available material that I can actually work with (mainly plastic - I have no metalworking or 3D printing skills) limited what I could do. So, like most O scale passenger cars, this is really only a representation of the real thing:

SP_Dome_Refit-2

I like eye candy in terms of small details, and basically what you can get any more in terms of proportionate O scale figures is limited, so the lounge seating area has come out slightly whimsical, using two scales of figurines and some that are, uh, unorthodox. I mean in particular the contemporary Chinese girl taking a selfie and the conductor, whose gold watch that I fabricated from plastic tubing and a pinhead actually looks as big as a ship's compass (which might conceivably have been useful back in the day when these cars ran):

SP_Dome_Lounge-3

This is not quite finished as I have some other things to glue in place, and then some effort to get it all re-attached to the body shell. There is also a separate lighting circuit (for some Pullman table lamps just visible in one photo) to accommodate. But at the risk of offending purists, here it is.

Attachments

Images (3)
  • SP_Dome_Seating_Mods-1
  • SP_Dome_Refit-2
  • SP_Dome_Lounge-3
Last edited by Hancock52

Anyone know where I can get pics of the Amtrak interior of these cars?

I remember seeing some interior photos (which I saved but cannot now find) of a very late Amtrak interior furnishing of one of these cars, which was (a) mainly orange and (b) included padding over the top panes of all of the dome windows.  You would not want to duplicate this.

However, these and the other photos I have seen show that the basic fixed furniture scheme replicated in the GGD cars did not change and the soft stuff like carpets went from green to blue to coral.  I also remember seeing an Amtrak interior area on the Trainweb.org site e.g. http://www.trainweb.org/web_lurker/SP3603/. This site has several pages devoted to the history of the SP domes and into whose ownership they eventually came.

There are others but you really have to hunt around for decent images showing any part of these cars’ interiors. Not many of the ones I found are in color.

Last edited by Hancock52

I too am interested in this.

Anyone know where I can get pics of the Amtrak interior of these cars?

The late 1970s Amtrak orange scheme is described and shown in photos here: https://www.trainorders.com/di.../read.php?11,2041769. I think that you may need a membership to view them; I had to log in to do so. If the link doesn't lead you to it, the discussion is called "Nostalgia & History > Past & Past-er? Dome-volution?" dated 10/22/2009.

Last edited by Hancock52

I was lucky to ride this car on the Coast Starlight back in the 1970s.

Then you can tell me whether my attempted representation of it is accurate - I fear it isn't - but in any case I envy your experience. It's a shame that so few in service photos of the original #3600 10 window dome survive, and not many more do of the later 12 window dome versions. I'm still grateful to Scott Mann for making any of them.

Last edited by Hancock52

While I don't like super bright lights in my passenger cars, if I had put all that work into it, I would want to light it up to display it!

I see your point about super bright lighting and although my photos don’t quite capture this, neither the stock overhead LED lighting nor the two LED Pullman table lamps I added are hugely bright. They do however show a considerable addition of colors/color variety to the interior, compared with the plain/not completely prototypical stock parts, which is what I meant by the Christmas Tree effect.

P.S. GRJ it’s one of your passenger car lighting modules powering the additional lighting and actually I did not need to dial down the brightness from the default setting.

Last edited by Hancock52

Add Reply

Post

OGR Publishing, Inc., 1310 Eastside Centre Ct, Suite 6, Mountain Home, AR 72653
800-980-OGRR (6477)
www.ogaugerr.com

×
×
×
×
Link copied to your clipboard.
×
×