


That does look nice Bob. In fact, it looks like it just came out of the paint shop
DM&IR M-3 2-8-4-4 with smoking whistle leaving Hillyard:
https://www.youtube.com/watch?v=Z6vsll_D44s
C&O M-1 turbine freight drag leaving Hillyard:
@chris a posted:Had a good day working on the warehouse. Got all the windows & doors installed, added a second floor for the office area, then painted the lower 4 feet of the warehouse walls medium gray. Will need to start working on roof drains/downspouts, add some vent pipes and other small details, then start building some crates and freight loads to fill the warehouse floor.


Nice job Chris ![]()
Chris @chris a- the warehouse scene looks great. The RS-1 was a semi-impulse purchase. When Trainworld announced the line of LIRR RS-1's and 3's, it was just when MTH announced they were closing. I thought, how could I pass up my hometown line and one of MTH's last production runs. The rest is history.
(full disclosure- It doesn't take much to push me over the edge ![]() )
)
Paul @Apples55 - I've actually considered putting a couple lengths of track and a few switches on top of a long low bookcase in my office. A short switching pike would be a good stress reducer. LOOK! ![]() 072 switches!
072 switches! ![]()

Bill @Bill Webb- glad to hear you are on the mend. Good way to pass the time updating your files.
Mark and Jay @Mark Boyce @Tranquil Hollow RR- Thanks. The LIRR has had many schemes over the years. This one is a bit unique.
Rain incoming today. Looks like layout time is in my future. ![]()
Bob
Attachments
Images (1)

@RSJB18 posted:
(full disclosure- It doesn't take much to push me over the edge)
Bob
Yup .........🎼🎵🎶 IT'S SO EASY TO FALL IN LOVE 🎶
Trying to be frugal is really difficult when we now even have a veiw of selections of trains right at our kitchen tables ......and .......the POWER to easily purchase them. ![]()
( I wonder how many young ones we have sent off to receive degrees in advertising 🙃 )
Two new diesels arrived last evening after a journey from Master Creator Harry Hieke. We caught them just as they were getting ready to ascend to Roanoke Shops 4 diesel service building for their first evaluation and maintenance.
They created quite a stir among some of our veterans who remember the glory days when the Virginian was a leading innovator in the industry.


Attachments
Images (2)


Got major track repair work completed on TPRR. Now its on to re-zero the Z-4000 to remove the "fault" so I can run some trains. More photos on TPRR

Attachments
Images (1)
RJ my better half is talking about a trestle about which I know very little. Exactly what are we looking at? It looks neat but how does it work?
Is it all scratch built?
Jeff that is quite a busy place. I looked at your video but it is difficult to tell what you did (yeah, how could I possibly miss it). So what did you do? Also, what does re-zeroing the Z4000 mean?
Sorry, it is 81 outside and my mind is on fishing prospects.
@Bill Webb I've posted on this problem before. The Z4000 has a potentiometer for each handle which needs to be at zero when the transformer is turned on. If not, the fault light will show and there will be no output track power. The "pot" has a small gear on it which is supposed to make contact with a larger gear associated with the handle. The gear mesh is rather sloppy, so if anything slips, the pot will not return to zero voltage - viola nothing works. There is a screw adjustment which helps tighten things up, but even with that its too sloppy IMO, The screw may have loosened up, I'll have to take the cover off to check.

Hello everyone. Got the will to go down stairs to my train room today. It was painful to know my train partner was no longer with me, but I was able to get some work done. I continued to work on the mountain today and I am aptly name it Riese ridge. The weight of it started to sag so I got a scrap 1x2 and made a support. I also, added a short lower tunnel to give a bit of depth. Overall, I think it is turning out nice in this stage.


Attachments
Images (4)
Trainmaster 04. Will this ridge fasten to the wall at the top or have some other support along that top edge?
Don
@Don McErlean posted:Trainmaster 04. Will this ridge fasten to the wall at the top or have some other support along that top edge?
Don
It will be a false back. I will curve the ridge and have it be supported by 2x4s or something similar. To hide the false back, I will make the scenery cover any remnants of there being one. I will also purchase some black cloth to fill this space so that light does not shine through the tunnels. I am doing this so I do not have to deal with the pain of creating unseen scenery.
I fixed an issue with my upper level. A couple of the track sections had warped and were causing the trains to lean to the outside of the curve. I replaced two pieces of track and also super elevated the outside of the curve.


Ran trains too.....
Attachments
Images (2)
Videos (2)


@RSJB18 posted:
(full disclosure- It doesn't take much to push me over the edgePaul @Apples55 - I've actually considered putting a couple lengths of track and a few switches on top of a long low bookcase in my office. A short switching pike would be a good stress reducer. LOOK!
072 switches!
Bob
First, you went over the edge so long ago, Bob, I highly doubt if you remember what it looks like ![]() (need I mention the alleged D&H Sharks???)
(need I mention the alleged D&H Sharks???)
As for the proposed bookcase layout, now THAT’S what I’m talking about - O72!!! IMHO, however, I think you need a third track and some industrial sidings. You may need to add some additional/deeper bookcases, but I’m sure you can pass those off as a legitimate work requirement ![]()
![]()
@RSJB18 posted:I fixed an issue with my upper level. A couple of the track sections had warped and were causing the upper loop sag. I replaced two pieces of track and also super elevated the outside of the curve.
Ran trains too.....
Smart idea about super elevating that outside rail Bob.
I noticed some heavy steamers leaning to the outside slightly on two of my long sweeping elevated curves. I'll have to get some work done.
Thanks for sharing this one.
Bob, don’t you just hate it when some older areas start to sag? Super elevation was another excellent idea.
I just finished this, painted off my own fictional Army Railway Operating Battalion insignia:

I'll wait for the paint to dry, will do whatever touchup is needed, then hit it with some dull coat. I'm not sure how I'll hang it. Maybe Velcro as it doesn't weight much as it's a piece of Masonite around ten inches tall.
Attachments
Images (1)
@Bill Webb posted:RJ my better half is talking about a trestle about which I know very little. Exactly what are we looking at? It looks neat but how does it work?
Is it all scratch built?
Jeff that is quite a busy place. I looked at your video but it is difficult to tell what you did (yeah, how could I possibly miss it). So what did you do? Also, what does re-zeroing the Z4000 mean?
Sorry, it is 81 outside and my mind is on fishing prospects.
Bill, yes this will be completely scratch built. I am using a few parts from my past trestle bridge build. Not sure how easy it is to see the main frame boards. They are made out of Bass board. I soaked them in hot water for 6 hours and then bent them to shape. Glued the smaller boards to the top of them. Once I am satisfied with this platform I'll start adding the caps underneath and the poles down from there. After that I'll be gluing in the brace boards connecting the poles. Not sure if this is the proper way or not but I'm building from the tracks down.
I know I could have put the track directly on the framework but I think it will be easier putting the tracks on the smaller boards.
One thing I'm trying to figure out is how tall to make this trestle bridge? Do I have the poles go the complete height or split them? I plan to build in the open area underneath the bridge to the surrounding framework. That way you won't see my pvc pipe and other clutter hiding under the layout! ![]()
Trains down the center of a town in Kentucky.
@samparfitt posted:Trains down the center of a town in Kentucky.
Great camera location on Virtual Railfan. Some entertaining moments when cars meet trains......
Wow! That’s pretty impressive so many container cars running down seemingly quite little town. Near my home McMinnville Oregon has a track running through Main Street. But I don’t know if it is active.
What a great scene for someone to model.
I wonder if those cars were full of autos from the close by GM or BMW plants.
Did anyone count the number of cars in that consist? I was expecting a pusher engine at the end
Hi guys, I didn't do anything this weekend, but did pick up some cool to me stuff that I will post in buy anything cool lately.
@RSJB18 Bob, Nice looking RS1~ I hope you got it running smoothly on your layout! Also nice work on the super elevation! Looks like a nice easy fix!
@chris a Chris, the warehouse looks Outstanding!
@samparfitt Sam, Wonderful videos and I really love the trestle's!
@Bill Webb Bill glad your feeling better! Sure got some sharp looking engines!
@RJ Shier You have a great start on an Amazing under taking!
@ScoutingDad Jeff Nice work on the track! I hope you have as good luck with the Z4000!
@Ross Looks great, no flickering! I need to get some of those boards from John someday!
@Trainmaster04 Great name for the name for your mountain ridge! I love the work your doing and the tribute to your train room friend!
P51, Lee the Railway Operating Battalion would be proud of you! Looks Outstanding!
I hope you all had a great weekend and from the looks of it you did! Nothing wrong with having a little fun with your layout and trains!
Trains down the center of a town in Kentucky.
https://www.youtube.com/watch?v=wUX9kr4D1Xg
Thanks for posting this samparfitt: This place is amazing. I lived 15 minutes from there in 2008 & 2009 and watched numerous trains come through. Brings back fond memories. I didn't realize there was a live Cam.
Great engine Bob. I have one downstairs. Sharp too.
Nice work on the warehouse Chris, I’m enjoying everything you’re doing. This project sounds like an article to me…
Andy
Building crates !, Really, I should schedule an appointment with a therapist. Anyway, after the first two, like every other new project, they started going faster... Built about 12 today, along with 3 Mahogany Desks. The desks are 30" high (5/8"), 84 inches long (1 3/4"), and 36 inches deep (3/4")
Fortunately had a Ah hah ! moment this morning and realized cutting some good quality plywood for the crate box blanks would take care of simulating the individual board detail on 4 of the 5 sides, then I would only have to laminate new wood strips on the 5th side, and brace the corners/ends. That actually worked out really well. Managed to cut strips of wood on the table saw that were pretty consistently 0.036" thick (around 2 inches in 1/4" scale) but thin enough to do the job.
In the last photo one of the crates isn't done, (sitting next to the desks), so you can see what it looks like before all the bracing is applied on the ends and corners.


Attachments
Images (3)

@chris a Hey Chris the crates look Outstanding! But one has to ask, what kind of table saw are you using? If I tried that on my table say the piece would just drop down where the blade comes out or I would end up running my finger threw the blade! LOL But then again it wouldn't be the first time!![]()
Mike, Thanks, Pretty decent quality Cast Iron Belt Drive 10 inch Craftsman Table saw I bought 25 years ago. The very thin Kerf 7 1/4 inch 60 tooth Freud Blade, and then a Zero Clearance insert for the blade. It's made out of 5/16" Baltic Birch plywood, I just raised the blade through it and never tilt the blade on this side so that I always have zero clearance. I put a safety sacrificial fence clamped to the aluminum fence, more to eliminate the gap at the bottom and also to protect the aluminum, and then you need to cut up some custom pusher/ holder blocks to help keep the wood from moving while you're feeding it. You can always make up the plywood blocks and just buy the super thin pre-cut wood stocks.
Just to be clear, I don't recommend this if you haven't had many year's of experience running table saws and power tools, but I do this for a living and have been doing finish carpentry work for over 40 years. Always wear safety glasses !!!


Attachments
Images (2)
@chris a posted:Building crates !, Really, I should schedule an appointment with a therapist. Anyway, after the first two, like every other new project, they started going faster... Built about 12 today, along with 3 Mahogany Desks. The desks are 30" high (5/8"), 84 inches long (1 3/4"), and 36 inches deep (3/4")
Fortunately had a Ah hah ! moment this morning and realized cutting some good quality plywood for the crate box blanks would take care of simulating the individual board detail on 4 of the 5 sides, then I would only have to laminate new wood strips on the 5th side, and brace the corners/ends. That actually worked out really well. Managed to cut strips of wood on the table saw that were pretty consistently 0.036" thick (around 2 inches in 1/4" scale) but thin enough to do the job.
In the last photo one of the crates isn't done, (sitting next to the desks), so you can see what it looks like before all the bracing is applied on the ends and corners.
Fantastic work, Chris!
Peter
Since my Mianne Benchwork is about 4 weeks away, I'm going to start on my collection of kits.....1st up is the TrainWorx Rock Island Freight House kit......
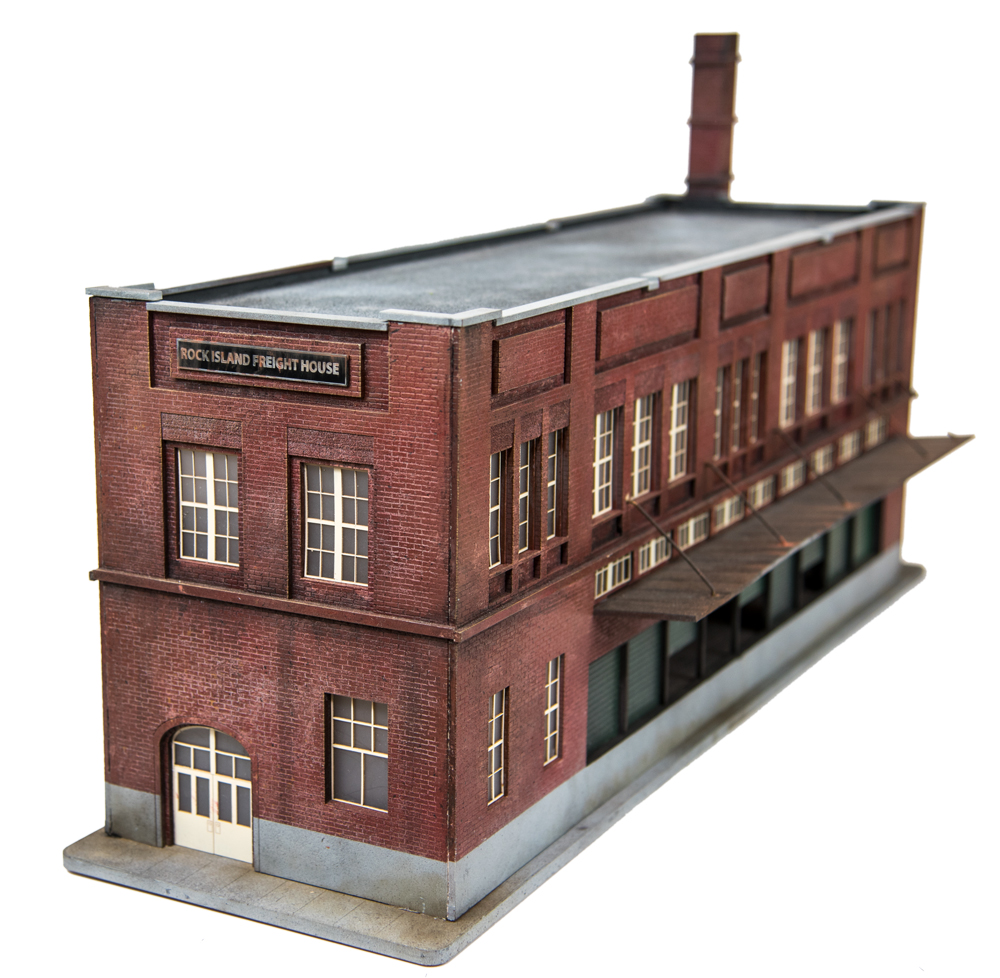
Mike Regan does an absolutely spectacular video on building/painting. For my 1st TrainWorx kit project, I'll be going :"by the book".
I can't seem to publish the You Tube link......just search You Tube for TrainWorx Rock Island painting video
Peter
Peter,
I always have liked this building a lot. I was working on a layout and the gentleman ordered one of these and it looks great. They offer a "flat" version of this that I have went back and forth with getting. Anyways keep us posted on the build.
Nothing overly exciting but I just constructed a guardrail for an area on my layout I hope to finish up with today.
Dave

Attachments
Images (1)
@chris a posted:Q
Fortunately had a Ah hah ! moment this morning and realized cutting some good quality plywood for the crate box blanks would take care of simulating the individual board detail on 4 of the 5 sides, then I would only have to laminate new wood strips on the 5th side, and brace the corners/ends. That actually worked out really well. Managed to cut strips of wood on the table saw that were pretty consistently 0.036" thick (around 2 inches in 1/4" scale) but thin enough to do the job.
Wow......great idea Chris ![]()
What is the average timeline on each crate ?
Nice photos and info on the table saw ![]()
@chris a posted:Building crates !, Really, I should schedule an appointment with a therapist. Anyway, after the first two, like every other new project, they started going faster... Built about 12 today, along with 3 Mahogany Desks. The desks are 30" high (5/8"), 84 inches long (1 3/4"), and 36 inches deep (3/4")
Fortunately had a Ah hah ! moment this morning and realized cutting some good quality plywood for the crate box blanks would take care of simulating the individual board detail on 4 of the 5 sides, then I would only have to laminate new wood strips on the 5th side, and brace the corners/ends. That actually worked out really well. Managed to cut strips of wood on the table saw that were pretty consistently 0.036" thick (around 2 inches in 1/4" scale) but thin enough to do the job.
In the last photo one of the crates isn't done, (sitting next to the desks), so you can see what it looks like before all the bracing is applied on the ends and corners.
Great idea for the crates Chris. I've done some creative things with a table saw too. It's actually a very versatile tool. I like the desks too.
@Steamfan77- Thanks Andy.
@Putnam Division- 4 WEEKS TO MIANNE! whoohoo!
Bob
Dallas, I probably worked like 4 hours, to cut all the stock and assemble the 12 crates & 3 desks, but I cut about 5 times the amount of stock I'll need. I am going to chop up some of the extra 036" stock to make fencing. This morning now that I have everything set up, I made 4 more crates in about 1.5 hours. I bought a NW Chopper, that little tool is great for this kind of project as I can set the stop, and feed like 4 to 6 boards in at once and chop them to the correct lengths.
Yesterday I was thinking I was "nuts", but by the end of the night, I realized it was good practice working on these and the skills will be useful on other scratch-build and kit-bash projects.
@chris a posted:Mike, Thanks, Pretty decent quality Cast Iron Belt Drive 10 inch Craftsman Table saw I bought 25 years ago. The very thin Kerf 7 1/4 inch 60 tooth Freud Blade, and then a Zero Clearance insert for the blade. It's made out of 5/16" Baltic Birch plywood, I just raised the blade through it and never tilt the blade on this side so that I always have zero clearance. I put a safety sacrificial fence clamped to the aluminum fence, more to eliminate the gap at the bottom and also to protect the aluminum, and then you need to cut up some custom pusher/ holder blocks to help keep the wood from moving while you're feeding it. You can always make up the plywood blocks and just buy the super thin pre-cut wood stocks.
Just to be clear, I don't recommend this if you haven't had many year's of experience running table saws and power tools, but I do this for a living and have been doing finish carpentry work for over 40 years. Always wear safety glasses !!!
As an alternative, one can pick up a bag of a couple hundred of these at Hobby Lobby like I did - just a couple bucks, 3/32 in width:

I love your crates Chris and will copy your idea using these - Thanks
Attachments
Images (1)
@Lionelski posted:Never liked the way an area on the layout looked, the area just in front of the plateau and behind an elevated cross track known as T-bone crossing. Why? It is a dangerous place if you are not careful - the mainline crosses the upper level here.
Over 20 years, part of the plateau under the rails sunk about 1/4 inch resulting in me having to shim about 10 inches of track. This also needed a more permanent fix.
I expanded the plateau and tunnel underneath it about a square foot - the crossing is no longer "floating" now and the tracks are a lot more stable (stabler?).
Oh yeah, the dip! I repaired that by pouring a loose plaster mix in it., it was in the area under the track and between the light green, brownish/orange and red bushes to the right of the cross track in the above pic, level and strong now.
FWIW, I just took this overall pic of the updated plateau on the upper level mainline.

Attachments
Images (1)
John thanks for chiming in..... Absolutely, there are good alternatives to trying to make super small stock for the corner braces at home. There's also basswood and balsa wood stock that can be picked up at local train shows, local hobby shops and easily glued onto the Plywood crate cores....
I keep all my scraps from work, many of which are already thin strips of wood in different species so I have an endless supply of oak, mahogany, pine, poplar etc.
Add Reply
Sign In To Reply
