Lets see your work bench hint and tips.  I will start with a real simple one

Paint Holder

I have had to do a lot of painting using those small Testor's paint jars.  When mixing two or three colors to custom make a new color I have three jars open, often with a small screw drive sticking out of the tops to stir and make drops to a add color to mixing board.  This has caused me to knock over one or more jars of paint, spilling and making a mess and wasting 25 year old paint.  I have some model airplane dope that is unopened and over 50 years old.  I store most of my paint up side down.  I store the small Testor's bottled in Christmas card boxes and them in a couple of shoe boxes.

I finally made a jar holder to stop the spilling.  I drilled some holes in a scrape of plywood with a spade drill bit, and glued a piece of card board on the bottom, simple enough and easy and quick.

Charlie

IMG_3981

Attachments

Images (1)
  • IMG_3981
Last edited by Choo Choo Charlie
Original Post

Replies sorted oldest to newest

Here's a few simple ones -

1. Small tools, brushes, etc. - buy a desktop organizer (Staples, Amazon, Ebay or make your own) to keep them neat, well organized and not as accessible to the grandkids - don't want a 2 year old grabbing an Exacto knife off the desk.

2. Small parts - buy a parts tray or bin to keep those small parts in and label the compartments with a label maker.

3. Soldering Iron - after drinking the "good" water, re-fill and keep a small plastic bottle of tap water on your workbench to soak your sponge. I hate having to go up and down stairs at my age just to get the sponge wet.

@Richie C. posted:
3. Soldering Iron - after drinking the "good" water, re-fill and keep a small plastic bottle of tap water on your workbench to soak your sponge. I hate having to go up and down stairs at my age just to get the sponge wet.

Lose the sponge and use the brass mesh tip cleaner.  Does a great job on the tip, doesn't require you to be a water boy, and doesn't cool the tip as much as water.

Attachments

Images (1)
  • mceclip0

..use the brass mesh tip cleaner.

John, thanks for the tip... Looking at the product page for the brass pad cleaner you showed, it also mentions flux (in the pad). Do these pads come with flux embedded in them, or would it be applied separately?  If the flux is user applied, is this something you do with your tip cleaner?

Soldering Tip Cleaner pad

Attachments

Images (1)
  • Soldering Tip Cleaner pad

I've used these for years, I've never put flux on them.  My replacements don't mention flux, but you never know.  I do occasionally use a tip tinning compound, especially when they start to look a little "grungy".  This stuff works great for cleaning the tip.  It's noteworthy that many popular soldering stations have this built-in.  My Hakko has a place for the sponge and the brass tip cleaner.  I have no idea where the spare sponges are, it's been years since I used one.

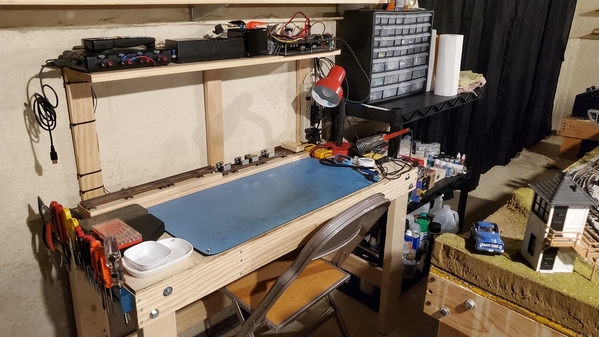
I have a shelf unit in front of my work bench.  On the right side there are 6 small shelves that hold plugged in solder guns, electric drills with different bits, several Dremel Moto tools with different bits, etc, and hot glue gun.  The top shelf has a sabre saw which I usually use standing up.  The outlets below can plug in 12 plugs.  It is on the right since I am right handed and it easy to just grab the one I need, ready to go.

The peg board on the left rear holds over 80 pliers, 100 screw drivers, Crescent wenches, socket wrenches, etc. all handy.

I also have lights with hinged arms and shades on the sides to allow getting light were I need it.

The opening to the left bottom contains boxes with files, sharping stones, etc. in them.  I made the  openings for drawers but do not make drawers as they are bothersome to open and close and I can not see in the drawers above eye level sitting or standing.

I usually clean my soldering gun tip with a paper towel which you can see on the bottom of the picture.

IMG_1641

Charlie

Attachments

Images (1)
  • IMG_1641
Last edited by Choo Choo Charlie

WISH ITEM-Please invent a large magnetic sheet about 4ft x 4ft I can put on the floor. I drop a screw - it bounces and lands 15ft away and usually underneath something. Nick

At least you’ve found them,…..I’ve surrendered trying,…..I’m convinced some 3rd dimension voodoo goes on once the screws leave the bench,…..the laws of physics and gravity seem to be abolished when the black screws are removed…..😳……

Pat

Well now I feel like an idiot because I dumped my old 1980s childhood Testors paint a few years back assuming it wouldn’t be any good anymore. Sounds like at least some of it would have been okay.

I’m a big pegboard guy. And baby wipes for cleaning stuff. And I do believe I’m undefeated at finding stuff I drop (except for the stuff I’ve dropped over car engines that doesn’t actually make it to the ground).  

Thanks for the info on cleaning the soldering iron!

@harmonyards posted:

At least you’ve found them,…..I’ve surrendered trying,…..I’m convinced some 3rd dimension voodoo goes on once the screws leave the bench,…..the laws of physics and gravity seem to be abolished when the black screws are removed…..😳……

Pat

The screws are with the socks that disappear in the dryer. 🤪

What's most frustrating is knowing you dont want to drop a screw and it happens anyway.

Last edited by RSJB18

Lets see your work bench hint and tips.  I will start with a real simple one

Paint Holder

I have had to do a lot of painting using those small Testors paint jars.  When mixing two or three colors to custom make a new color I have three jars open, often with a small screw drive sticking out of the tops to stir and make drops to a add color to mixing board.  This has caused me to knock over one or more jars of paint, spilling and making a mess and wasting 25 year old paint.

I finally make a jar holder to stop the spilling.  I drilled some holes in a scrape of plywood with a spade drill bit, and glued a piece of card board on the bottom, simple enough and easy and quick.

Charlie

IMG_3981

Great idea - I might have to try that!

@Craftech posted:

I love that workbench lamp John.

Where did you get it?

John

I got it on Amazon, it's great.  It has good magnification and a ring of LED lights.  Us old guys need stuff like that to work on anything!   First thing I did was rip that stupid flapper off the top, that was always in the way!  I can clean the lens if it gets dirty.  The lens is real glass as well, so it doesn't scratch when you clean it.

Brightech LightView PRO - LED Magnifying Glass Desk Lamp - Bright 2.25x Magnifier Lighted Lens

Attachments

Images (1)
  • mceclip0

I got it on Amazon, it's great.  It has good magnification and a ring of LED lights.  Us old guys need stuff like that to work on anything!   First thing I did was rip that stupid flapper off the top, that was always in the way!  I can clean the lens if it gets dirty.  The lens is real glass as well, so it doesn't scratch when you clean it.

Brightech LightView PRO - LED Magnifying Glass Desk Lamp - Bright 2.25x Magnifier Lighted Lens

Thanks John

John

One of the most useful tools on my hobby/electronics workbench is the PanaVice.  I have two.  One with nylon jaw inserts that I use most of the time to work on small parts or for point to point soldering. The other PanaVice has wide opening jaws and ribbed rubber pads for gently and securely gripping circuit boards and other delicate parts.

Workbench

Attachments

Images (1)
  • Workbench
Last edited by SteveH

Lots of good ideas.  SteveH, I have a small vacuum held down vise that is very handy.

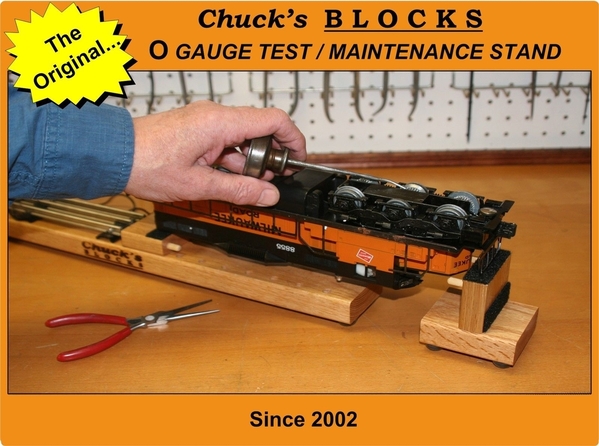
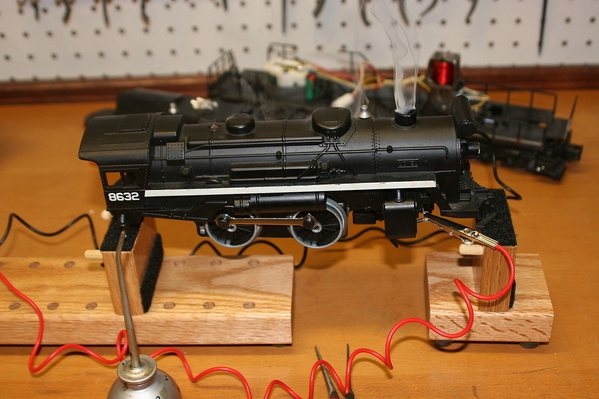
Here are photos from the internet that show a Chuck's Block O Gauge Test Maintenance Stand that has been sold on www.worthpoint.com.  I have had the photos on my computer since 2016 and just stumbled on them looking for pictures of a jig I have made in the past.   It looks like a easily homemade project to help on working on O gauge engines.  I think I might make one from scrap wood laying around.

s-l1600 1

s-l1600 2

s-l1600 3

s-l1600 4

s-l1600 6

s-l1600 7

Then again I may just set up a piece of track on a board and make a wooden cradle and add a tough of old blue jeans to cradle my post war engines as they are void of delicate breakable details like newer engines.  But the Chuck's Block system probably will work better with the engine up right.

Charlie

Attachments

Images (6)
  • s-l1600 1
  • s-l1600 2
  • s-l1600 3
  • s-l1600 4
  • s-l1600 6
  • s-l1600 7

18" magnetic bars on my left and right to hold the small tools used most frequently.

Free standing pegboard along the back edge, plus I used the back of the pegboard for peg hooks on it's reverse side for supplies.

Pigeon hole shelving to my left.

Spring hinged arm illuminated magnified work light

Hanging Dremels left and right

3' test track with rollers.

Parts drawers to my right.  (Actually parts drawers everywhere)

Eight 4' tubes of T-5 high CRI & Kevin  ceiling lights.

8' test track with HO and  N going off on one side.

Soldering tools immediately behind me.

Under counter shop vac.

Stacked roll out drawers on the floor.

Trash can.

AC and DC clip on power supplies.

A swivel stool to access everything w/o standing up.  I prefer a wrap around work area layout where I simply insert myself.

And the most important feature,  GRJ's phone number!!

Edit:  The actual work  bench is a 3'  X 6' 8"  solid core big box door blank which I rounded the corners and round over routed the sharp edges, coated with 3 applications of poly urethane then mounted on cabinets.  There is also a same build wing off to one side for drawers of couplers, drill press & vise.

Solid core Birch door blanks make great computer desk units when placed on a pair of commercial two drawer cabinets.  We have a total of five of these for different purposes.

Last edited by Tom Tee

I have been building out my model work shop over the past couple years.  Lots of good ideas here to incorporate.
I also added a wall mount vacuum cleaner which is great to clean up model-sized messes.  Also a small folding step stool from HD lets me store more in higher shelves.  Less often used items like paint I have stored in higher wall mounted shelves.

IMG_6047IMG_6048IMG_6049

Attachments

Images (3)
  • IMG_6047
  • IMG_6048
  • IMG_6049

I left a little real estate for the stuff I'm working on.

I've noticed this in this thread and past ones; folks seem to have lots of tools, and assorted gee-gaws and gadgets, but  at the end actually do not have very much actual work space left on the bench to do any work.

I keep 4 work spaces available working on 24"x30" (or larger) glass for various projects; flat surface that is easy to clean & even if you glue something to it, you can pop it free. All the tools sit in their various racks back from the glass or on the walls.

Last edited by mwb
@Craftech posted:

You can make a "test stand" by sticking something non-metallic under the loco chassis to raise it up so only the center rollers touch the center rail.  Then use a jumper wire from the chassis to the outside rail.

John

Rollers work much better with a 30" long scale steam locomotive. Plus I can run it at speed without worrying about it tipping over.

I have an ancient PanaVise that I use every day, mine is the one Steve shows with the large weighted base.  Although I have the large span top for it he show, I rarely ever dig that out, I use the standard vise top with the plastic lined jaws virtually all the time.  I also have a PCB holder head for the vice that I used to use when I was working on the 5 x 10 video PCB's almost 50 years ago, my PanaVise has had a long and distinguished career.

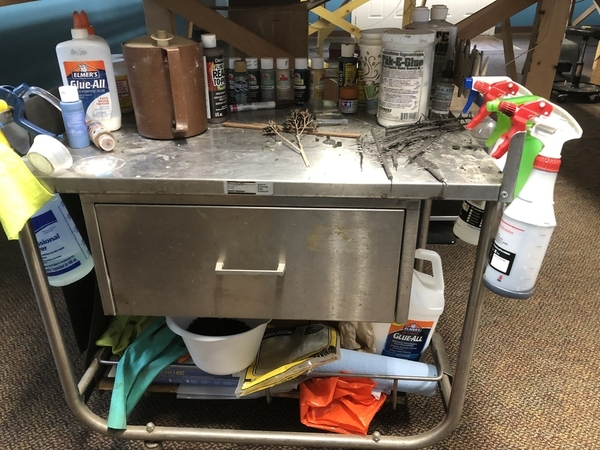
19ECDE08-4EB3-4C48-97E4-7C76F90ABD8B8F4CC528-D4B7-49B6-80BA-4932CD27AF5C93ADC621-4693-4F1F-A40E-66272D60FC30I have my grandfather’s desk with a stove pad on the work portion. Magnetic trays don’t move, solder doesn’t stick, and my third hand has magnets glued to it so it doesn’t move. I have led strips on the cabinet, and a 600 led/m strip on the magnifier arm. I also have a scenery cart with a cutting mat on top with scenery supplies and parts cases underneath. I use a smaller stainless cart for painting.

Attachments

Images (3)
  • 19ECDE08-4EB3-4C48-97E4-7C76F90ABD8B
  • 8F4CC528-D4B7-49B6-80BA-4932CD27AF5C
  • 93ADC621-4693-4F1F-A40E-66272D60FC30

I have an ancient PanaVise that I use every day, mine is the one Steve shows with the large weighted base.  Although I have the large span top for it he show, I rarely ever dig that out, I use the standard vise top with the plastic lined jaws virtually all the time.  I also have a PCB holder head for the vice that I used to use when I was working on the 5 x 10 video PCB's almost 50 years ago, my PanaVise has had a long and distinguished career.

Ah, if that Panavise only had recording capability, imagine the stories it would tell *lol*.

This from Weller .....

"Cleaning Your Tips

cleaning soldering tips

To care for your equipment, you need to know how to clean soldering iron tips. Keeping your tips clean is crucial to ensuring that they perform properly, and it can also extend their life. You should clean them before, during and after use. You can tell your tip is clean when it appears bright and shiny.

Before soldering, use alcohol and a clean cloth to remove contaminants such as grease, corrosion and oxidation from the surface to be soldered.

To clean your tips, use either brass or stainless steel wool. Brass wool is softer and less abrasive, while the harder stainless steel wool has a longer life.

Metal wool effectively removes dirt and other contaminants and avoids issues associated with using a damp sponge to clean soldering tips. Using a wet sponge will reduce the heat of the tip. Frequent wiping with a damp sponge causes repeated changes in temperature, causing the tip to expand and contract repeatedly. This cycle causes metal fatigue and eventually the failure of the tip.

Cleaning wool will not reduce the temperature of the tip. To remove small amounts of contaminants from your tips using metal wool, gently dab them into the wool. For more stubborn residue, hold the iron more firmly and apply more pressure when rubbing it against the wool. Vary the strokes, so you remove contaminants from all sides and edges of the tip.

After cleaning, immediately wet the tip with fresh solder to prevent oxidation.

For heavier-duty cleaning, you can occasionally use a Weller WPB1 cold-tip polishing bar. Only use this device when the tip is cold, as using it with a hot tip can damage the tip.

If a tip does become oxidized, flush it several times with a rosin-activated, flux-cored solder. That should remove the oxides unless you have allowed the oxidation to build up excessively. After cleaning, cover the tip surface with a thick coating of solder."

Of course, contrary to the above advice, my relatively new and pricey Weller WE1010 Digital Soldering Station came with a built-in sponge holder and sponge ! 

Add Reply

Post

OGR Publishing, Inc., 1310 Eastside Centre Ct, Suite 6, Mountain Home, AR 72653
800-980-OGRR (6477)
www.ogaugerr.com

×
×
×
×
Link copied to your clipboard.
×
×