mikeb posted:
Wonderful work there Mike! Show time and effort.
|


|
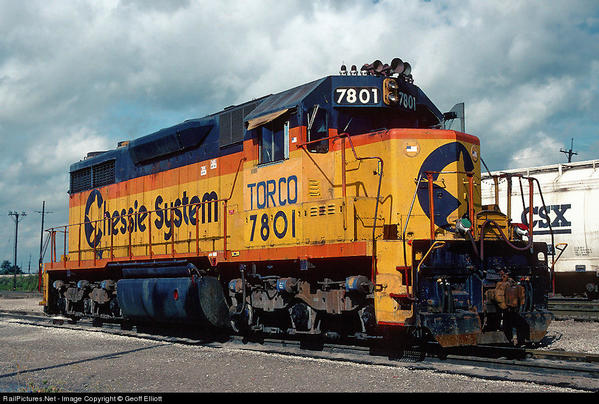
Didn't really get much done on the layout..kept looking at the micro engineering code 148 track I had laid and weathered...man those two rails look good before the 3rd gets spiked down...went on YouTube for awhile looking at 2 rail layouts....sighed...And bought a Atlas Chessie System SD35 in 2 rail to turn into a model of TORCO 7801
Guess that means I am joining the dark side.....
TJ, don't take it to hard, I started on the dark side. But now I am free and happy to do as I please! LOL
Today I finished up the ballast work,for now. Now onto some scenic work. Pictures to come.
Got cork roadbed under about 2/3 of the track. Only the left side loops remain.
Anyone else have an issue with their Midwest cork not being cut right? One side ends up with a ledge hanging off and thus no nice bevel. Fortunately, I only needed half the case to finish (I think). I wrote a letter to them. I'm sure I could shave it off but then I'll have a floor full of cork crumbles.
Once the cork is down, I'm going to either block the trolley loop or the middle loop with a siding. I think I'm going to pack up my two Berk's and let the little switchers run on the middle loop...one with all the Long Island cars and one with some new Beth Steel cars (slag or hot metal?).
ran trains and enjoyed the afternoon and playing with the mth wifi
Some great scenery pictures! Samparfitt, love your trees! I need to study your examples and learn how to do that. I can't afford to buy all the trees I need ready made.
Mike, your rocks and scenery look great. Very inspiring to me.
I am currently working on a new area on my layout. My son, Jim, needs to have me get all my track finalized so he can install my new control panels when he gets them done. He came over on Saturday and helped me redo the siding that I had and replace it with two sidings that will service my new flour mill. I had an 072 left-hand switch left over that I wanted to use, but it made more sense to use a right-hand one. So we worked through all the possible configurations using the left-hand and the Atlas short curve pieces I had left, and then bent the Atlas flex to make the rest work. (Atlas flex track is a bit of a misnomer, particularly if it has been painted. We made it work, but it wasn't easy.)
I plan to build a flour mill here and I needed to have two tracks: one to receive grain and one to load out finished flour. My grand plan for this industry is to have local grain elevators receive grain from the farms, it is then sent to a large regional elevator, next it is sent to the flour mill, and then the flour is sent to my Wonder Bread Bakery. Having spent 33 years in the baking industry, this is a natural for me.
(I feel that you can never have too many grain elevators on a model railroad layout.)
Art
Thanks, Chugman,
I revised the tree making for the deciduous trees.
See following post for update:
https://ogrforum.ogaugerr.com/t...15#70974704598398415
Got 29 deciduous trees made and 'planted'.
I unboxed my new Atlas O Amtrak passenger cars to run them as I wait for my new Atlas O ABA engines #102, 105 and 153 to arrive. One of the ten cars has a sparking rear truck, and my 3001199-1 "Silver Dove" 6-5 Sleeper caught fire, shorting out my new ZW-L transformer. The green LED board burned and melted the roof of the passenger car. The Preiser figures inside the car are all covered in a light brown residue. Now the entire house smells of burning plastic.
Disguising a 24 tap MTH Expansion board. I originally was going to mount this board under the table. It's bad enough to run all the wires under the table, but connecting them to an expansion board while under the table on your back is no fun. I'll let you know how this works out. I have half of a Rico Station that I use as a warehouse for my Morrison Doors Company. The space under the building will house one of these boards.
Now I'm ready to run the wires out to all the buildings and only have to del with wire nuts under the table or possibly inside each building if there is room.
John, that was terrible. The only good thing was it did not turn onto a larger fire with more damage. Were they new issue cars. Will you be able to recoup your money or get replacements for all that was damaged, The transformer was undamaged with it only tripping out, correct. Was it bad wiring inside the car or the electronics in them................Paul
Today I spent time looking for replacement tires for an engine to be able to get it to run. No luck so I called a friend in the train group to see if he might have any extras. He was out of them but may have more in a couple of days. So I went down to the basement and added some more shelving under the larger tables so I can got more things off the table top so I can start to lay out some kind of track plan............Paul
Paul, Thank you for your concern. The Atlas O 3001199-1 was a new released (1st release of 6-5 sleeper) in 2016. It is not from the four-packs that Atlas O recently made. The failure of board appears to be the problem. I have not removed the light strip so Bill S. at Atlas O can see exactly how it was assembled. Since this car has no dome in the roof, I never had a reason to remove the light bar. I added Preiser figures that are now covered in a light brown residue. The car failed instantly, popping the breaker in my new ZW-L transformer. Any burning that occurred was driven by the burning of the materials used to make the light board. Enough heat was generated to melt the plastic roof, causing the plastic to drop inward toward the board suspended under the roof. My house still smells of the burning board materials, hopefully not cancerous.
The event has reinforced the warning to not only turn off your trains, but even unplug all toy trains to prevent fires in the case of a power spike or lightning strike. Whatever material Atlas O used in the manufacture of the boards had some excellerating, heat generating compounds in it.
I am waiting for a return call from Atlas O, but they are preparing for a weekend show. Word from the west coast is that the F7 engines just shipped today, Monday, January 23, 2017, not last Tuesday as I had been previously told by Atlas O service. I was putting my new Amtrak cars on the layout for when the Amtrak ABA F7 engines I paid for arrive from High Country Hobbies.
If that was my new car i would be little irritated. Metal ones don't burn.
I was slightly sidetracked the last couple days. Still working in the train room, but not on the actual layout. I got all three of my doors trimmed out.
This door is the main entrance to the train room from the inside of the house. That is a bearing wall made from 2x6's, so the jamb needed extensions, since the door is made for a standard wall.
This is the door to the utility room. It was the easy one, just simple trim.
This was the most difficult one, with a slightly irregular opening made from pressure treated lumber. The door has oversized self closing hinges, because it goes out to my garage workshop. I had to notch the left extension to accommodate them since it was already up against the treated wood frame.
When Patrick and I did the backdrop in this corner a couple years ago, I figured out exactly where the trim was going to come out to.
Top and side trim were right on the money.
There's just a little drywall sanding left to do in the dispatcher's corner, then the walls and the doors are ready for priming and painting.
I'll probably switch gears again tomorrow, and go back to working on the bluff.
Man of many moods.![]()
![]()
Just took delivery of a Rail King K-4 Pacific. My, but the little indefinite smogs up the place! I am now convinced that fan driven smoke units are the bee's knees.
Yanno, for a trolley guy, I sure am picking up a lotta steamers these days... ![]()
Mitch
Ran trains twice today. Much fun was had with two long freight trains!!
 Took delivery for 2 used MTH houses I got on ebay to place streetside. A little too colorful and although the doors appear to be scale the windows definitely are not. But I just don't have an interest in kitbash in them or weathering just now. Anyone bash these railking bldgs to scale windows?
Big_Boy_4005 posted:I was slightly sidetracked the last couple days. Still working in the train room, but not on the actual layout. I got all three of my doors trimmed out.
This door is the main entrance to the train room from the inside of the house. That is a bearing wall made from 2x6's, so the jamb needed extensions, since the door is made for a standard wall.
This is the door to the utility room. It was the easy one, just simple trim.
This was the most difficult one, with a slightly irregular opening made from pressure treated lumber. The door has oversized self closing hinges, because it goes out to my garage workshop. I had to notch the left extension to accommodate them since it was already up against the treated wood frame.
When Patrick and I did the backdrop in this corner a couple years ago, I figured out exactly where the trim was going to come out to.
Top and side trim were right on the money.
There's just a little drywall sanding left to do in the dispatcher's corner, then the walls and the doors are ready for priming and painting.
I'll probably switch gears again tomorrow, and go back to working on the bluff.
Man of many moods.
Looks good Elliot, the doors turned out looking great, I bet it is nice to have that done and marked off your list of things to do!
We finished the grade realignment on the Cabin Lake Sub last night; three weeks of work to get the 140' to a ruling grade of 2.08% ... now on to the roadbed, then track painting and laying (a case of Gargraves), and then the wiring ... whew.
Targeting having it operational by May.
Thanks Mike, and it is nice having it done. All part of the plan moving toward the NMRA division layout tour at the end of April, and the national narrow gauge convention Labor Day weekend in 2018. I'll push hard on the layout over the next 19 weeks. Stay tuned.![]()
WOW sounds like a lot of work! I will be here waiting and watching that's for sure!
I down loaded SCARM two days ago and thought I would try it out. Still looking to build an elevated loop. This stuff is all new to me.
This is as close as I can get to what I have today. It is all there just some curves are a bit off because I have a mix of K-Line R72" in there.

This is a first shot at what I want to build for the elevated reverse loop to put on top.

Here it is with the upper level laid over the top.

More on my lighting project.
Added a pilot light to the MTH expansion Board. It doubles as lighting for the inside of the warehouse. The Holy Grail Pub is in an old decommissioned Catholic Church in Epping NH, so I took some liberties using the MTH grain building. Lighting in the Nicholas Smith Lionel Train Shop looks good and there is a workman using a jack hammer in the cut near the water tower. 15 buildings to go! When that's done, I plan on painting the warehouse and putting panes in all the windows. Rico Station just keeps on giving!
I know this might not go over so well here, but my layout will be in two competitor hobby magazines soon.
I have confirmed my layout will be in the On30 Annual for 2017! It's the "Tweetsie Inspired" layout mentioned in this pre-order form I decided on the annual as it's far better geared for On30 in general, though I agonized over more readily-found, less expensive and widespread magazines such as OGR...
Also, the online Model Railroad Hobbyist magazine will be running one of my photos of the layout in an upcoming issue. Their editor contacted me on that.
p51 posted:I know this might not go over so well here, but my layout will be in two competitor hobby magazines soon.
I have confirmed my layout will be in the On30 Annual for 2017! It's the "Tweetsie Inspired" layout mentioned in this pre-order form I decided on the annual as it's far better geared for On30 in general, though I agonized over more readily-found, less expensive and widespread magazines such as OGR...
Also, the online Model Railroad Hobbyist magazine will be running one of my photos of the layout in an upcoming issue. Their editor contacted me on that.
Congrats Lee! GOOD for you, you should be honored!
p51 posted:I know this might not go over so well here, but my layout will be in two competitor hobby magazines soon.
I have confirmed my layout will be in the On30 Annual for 2017! It's the "Tweetsie Inspired" layout mentioned in this pre-order form I decided on the annual as it's far better geared for On30 in general, though I agonized over more readily-found, less expensive and widespread magazines such as OGR...
Also, the online Model Railroad Hobbyist magazine will be running one of my photos of the layout in an upcoming issue. Their editor contacted me on that.
Congrats. Your layout is both unique and beautiful. It deserves to be recognized for the work you put into it.
Nothing directly on the layout so far but the night is young. I may clean some more track. Today on the way back from an appointment, I saw a Menards store that will open Jan 31 here in KC northland area. So, I guess I will open myself up to temptation next week. I want to look for a couple of outdoor light fixtures as well. So it's not always about trains?
Congratulations, Lee! Well deserved.
Art
RSJB18 posted:p51 posted:I know this might not go over so well here, but my layout will be in two competitor hobby magazines soon.
Congrats. Your layout is both unique and beautiful. It deserves to be recognized for the work you put into it.
Thanks, and to Mike and Art, too!
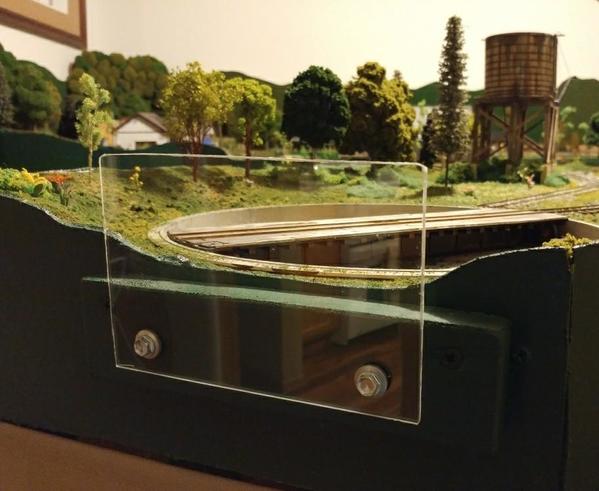
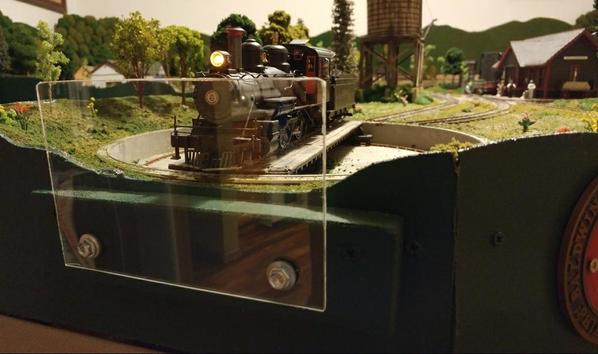
I added a Plexi piece at the edge of the turntable, to keep my locomotives from doing half-gainers to the floor. The Plexi was cut, drilled, and the mounts pre drilled and ready to go for quite a while. I just waited to mount them in place until after I took the other photos for my upcoming magazine article.

Got a few things done on the layout today.
I started with bluff construction. I trimmed the ends of section 2, then glued and braced sections 4 and 5.
Section 6 is going to be tricky, because the camera is in the mix, not to mention that the backdrop starts to curve just beyond to the left.
You might remember that I had been searching for a dead short in the Roseville power district. I found it a couple weeks ago, but not before cutting a bunch of wires. Today I put everything back together with the blue and red butt splices.
This was the actual problem, and it was all my fault.![]() I used a black feeder wire when it was supposed to be red. So when Joe did all the connections, he did them just the way he was supposed to, resulting in a dead short.
I used a black feeder wire when it was supposed to be red. So when Joe did all the connections, he did them just the way he was supposed to, resulting in a dead short.
Once that was resolved, I was able to take some Masonite, and cover up all the wires and supports. It looks much cleaner.
I'm still not sure what I'm going to cover the Masonite with. Plenty of time to think about it.
Of course after I got the Masonite up, I realized that I still had to install and wire uncoupler magnets. I have a back up plan, I'll just run them over the surface and cover them with industries.
Looking good, Elliot!
Art
Elliot you are moving pretty quickly with your projects. Fun to watch.
Elliot,
That will be and awesome scene. I really enjoy your work and updates.
Thanks guys! I've been trying get a few hours in down there every day now. If I have to miss a day, I have a little trouble regaining momentum. I've got visitors coming in the morning, then forum member Chester7 (Chad) in a little over two weeks.
I want to get those walls finished and the TV's hung, so that when the counter tops come I can get them in, before he gets here.
Staying motivated!![]()
Congratulations Lee on your inclusion in the two magazines. ![]()
Lee, That is terrific you are going to have articles in those magazines! Very deserving, and it will be good to show your skill and passion to a wider audience! Congratulations!
Looking good Elliot, bet that was a lot more fun then doors and dry wall! LOL, I know it all has to be done and from the pictures your the man to GETER DONE!
Access to this requires an OGR Forum Supporting Membership
