here's what I did today. started the mountain tunnel in the rear of the layout and cleaned up the train room.


|
|
FINISHED MY BENCHWORK!
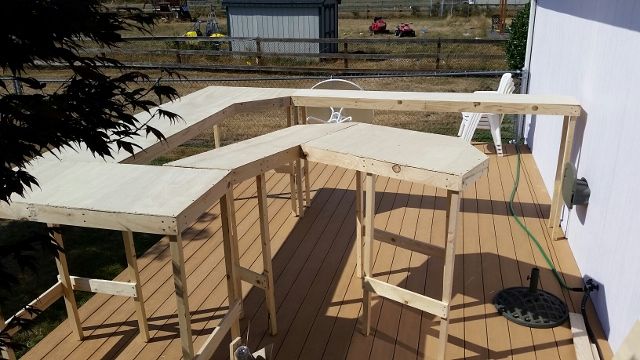
And, by jiminy, it worked.
We painted the legs tonight, just needs to drill some holes to run carriage bolts between each gap to keep the sections joined together, installed into the toy room, then track laying and wiring can finally start.
Today I finished pinstriping my White Pass and Yukon Route fantasy gp-40.

That is some great work! I wish my hands were steady enough to get results like that.


Bravissimo! Nicely resprayed. :-D
Mitch
Today I finished pinstriping my White Pass and Yukon Route fantasy gp-40.
FINISHED MY BENCHWORK!
And, by jiminy, it worked.
We painted the legs tonight, just needs to drill some holes to run carriage bolts between each gap to keep the sections joined together, installed into the toy room, then track laying and wiring can finally start.
Lee,
I'm glad to see you got your problems worked out with the center section. Looks like you have made great progress. I may have missed this, but what are your reasons for setting it up outside? Did you do your construction outside to keep down dust? I just wondered because I have never done that, but may for my future layout. However, in we have had a lot of rainy days in Western Pennsylvania this summer.
Nothing spectacular. Started detailing my Atlas SP C-30-6 Bayside window caboose from steam era to diesel. Next upgrade will be adding the frog eyes, radio antenna, and painting the bay window rear/front panel orange per 1961 SP safety upgrade.( I still have to make the frog eyes). Simple project. Hopefully I can have my CB&Q waycar project finished this week.


it's real simple 1/2 MDF and t w trainworks elevated system
it's real simple 1/2 MDF and t w trainworks elevated system
I guess what I should of asked was what was used for the bridge sides and where did you find it?
Matt and Jon came over today. As promised, here are pictures...
Here Matt is converting a Railking switcher to TMCC. He also did a second engine, but still needs to test it.
While he was doing that, Jon and I got a bunch of the track lighting hung.
The lighting in this aisle is now 100% complete. The track fixtures may look a little goofy, but they are a perfect fit, allowing the lights to hang down just below the soffit.
It's fun bending conduit.
This aisle would be finished too, except we ran out of light bulbs. These are the Cree daylight, 60W equivalent, dim-able LED's. They only use 9W each and give off very little heat. The only drawback is they are kind of pricey. In the end, the whole lighting system will cost a little more than the VL Big Boy, but I'm happy with my choice to do this instead.
Here is part of what I was working on the last couple days. The mainline track centers are now done all the way around the next curve at the far end of the peninsula.
I would say we are about half way through the track lighting. The remainder should go fairly quickly. BTW, all the track and fixtures are recycled from enterTRAINment, 21 years ago.![]()
Dont let all that open real estate on the work bench fool you, it didnt look anything like that until I started working there
Dont let all that open real estate on the work bench fool you, it didnt look anything like that until I started working there
Yes, well now that you've had your moment in the sun, I'm taking it back!![]() I need to repair all those switches, and I'd like to get that second set of Williams Superliners converted to LED's. That'll help clear the decks.
I need to repair all those switches, and I'd like to get that second set of Williams Superliners converted to LED's. That'll help clear the decks.![]()
Dont go messing up my workbench there PigPen, I'm gonna need open space to work magic
Today I finished pinstriping my White Pass and Yukon Route fantasy gp-40.
Thanks! I used 1/16 in. 3m auto pinstriping tape. I bought it straight off the 3m website. I got the idea from Lee Willis I think.
FINISHED MY BENCHWORK!
Lee,
I'm glad to see you got your problems worked out with the center section. Looks like you have made great progress. I may have missed this, but what are your reasons for setting it up outside? Did you do your construction outside to keep down dust? I just wondered because I have never done that, but may for my future layout. However, in we have had a lot of rainy days in Western Pennsylvania this summer.
My layout will be in a finished room with my collection of WW2 and RR stuff. It's not an empty space you can haul lumber and saws into. It's also a relatively smaller room, about 10X11 feet. The layout will be On30. Most of the structures, almost all the rolling stock and boxes of detail components have long been built and are just waiting to be placed into where they were intended.
I built the layout in 4 sections. They'll be bolted together betwene sections with two carriage bolts at each seam, after they're placed into the room. Then, track will be laid over top of that, and scenery placed over that as it's it's one large structure. The wiring with have plugs at each seam.
Why, you may ask? This is just in case we ever have to move. All I'd have to do would be to cut through the scenery with a knife or saw, snip the rails, yank out the bolts and unplug the wiring to take it out of the room. Even the legs are held into their sockets with bolts. I pretyt much built it as a module display that never moves.
I've seen too many heartbroken people having to destroy their layouts when they've moved. While I don't anticipate that happening (at least for 5-10 years the way things are going for my employer), I don't want to risk it. Sure, I could still destroy it if I wanna start over, but I'd rather have the option. It was built with 1X4 and thin plywood (the blue point switch machines will be anchored with thicker wood under the points as needed). The scenery forms will be using a new technique I've read about in MR magazine last year using towels impregnated with caulk and formed into shapes. It'll be sturdy, durable, but light.
if you click my link below, you'll see more on the concept and progress...
Yes Lee, that makes sense. The reason I asked was that your scenario was another I had in mind. I may have to do the same thing. I haven't had a layout for a few years, and we live in a small house. I often have to cary things out onto the patio and set them up on the picnic table or sawhorses to work on them.
I agree with the modular build. My last layout was modular, and I moved it twice until a growing family made it expendable for the next move. While I have no desire to move again, I will build modular, because one never knows.
Thank you for your comments, and have a good time with your layout!!
I put about 40lbs of Strucolite on my bench. I covered a little more then half. It takes a few days for it to dry in a cool basement. The train room is right next to the furnace and A/C unit so the basement stays cool. So far I like the results. I was able to fill in a few gaps and taper a few other areas. The part that is dry is rock hard. I put the mesh down on the rest of the bench and made some final adjustments to the area where the double bridges will go. I still have to make the abutments for both bridges. I have two more areas that I have to make adjustments, but will need the track back on the bench for the final fitting. I'll post photo's as soon as I find the camera cord.
The new rebuild has finally begun... wood cut and the first table for roundhouse and turntable has been constructed.
FINISHED MY BENCHWORK!
And, by jiminy, it worked.
We painted the legs tonight, just needs to drill some holes to run carriage bolts between each gap to keep the sections joined together, installed into the toy room, then track laying and wiring can finally start.
Learned something new and thought Id share.
Ive always hated carriage bolts. Often, starting a nut without pushing back on an unsupported head, causes the head to unseat, and the bolt to turn with the nut, swearing begins. Especially annoying if the head is hidden from your reach. Ive seen small finishing/tack nails, e-clips on threads, and glue, all used to keep the head seated. Yesterday I saw another solution. While dismantling an old couch into 4 pieces, so it could fit into the gigantic garbage cans our city uses, I saw 3"x3" squares of thin cardboard stapled over the head, to hold the bolts in place.
My son Chris and I did some work on the upper level engine servicing facility. We cover it the bare wood with white paper in preparation for laying a snow blanket.
I drilled a hole in the top of my new Lionel tank car and poured in some BBs until it reached NMRA standard. After repairing and painting the hole I oiled the wheels and couplers. It rolls really nice.
.....
Dennis
Nothing. I am away from home and suffering withdrawal symptoms. ![]()
Me either Lee. My half is killing me with honey do's. I almost wish winter would hurry up and get here. I'm lucky just to get to read the forums for a half hour.
My half is killing me with honey do's. I almost wish winter would hurry up and get here. I'm lucky just to get to read the forums for a half hour.
My wife hit me with a substantial list of chores as well, even though I told her over the winter that this was going to be my time for a project (in 14 years of marriage, it's always been her projects, I've never taken on anything like this before). I even blew off the majority of every other annual event with my other hobbies to get my benchwork built and installed and get the layout finally going. That didn't stop her from, say, breaking out the pressure washer and annoucing that the entire side of the house needed to be pressure washed (in anticipation for painting... NEXT YEAR) after I'd broken out all my tools and was already cutting lunber. And yes, that meant me. Things got a little tense there.
As for where I am, I was having to move a short book case over about 2" to allow space for legs for one end of a long yard section to fit into place (all the sections are out in the shed, ready to install once I drill connecting holes to run bolts through to keep the sections tighly together once they're in place). That moves eveything over 2 inches, and that blocked the space for legs at the other end of the same section. So I'm going to have to toss out one book case (no problem, it was a cheap wal mart book case I'd cut down with a radial saw to fit under the bench work, something I was gonna replace anyway). But that's where all the finished structures for the layout were sitting. I've move four massive containers of stuff out of that room into the room where our computer and guest bed are. Thankfully, my wife was okay with that until I can get the bench work in place. She's become far more realistic once she's seen the benchwork 90% done and realized the true scope of what I'm doing.
I also need to buy some more containers for other stuff that needs to move out of that room as well. i hope one trip to wal mart or home depot for containers and one more cheap short book case will resolve these issues.
Once that is done, the benchwork can finally be installed. Then, track laying and wiring begins! A local pal of mine has volunteered to assist me in the track and wiring, and I'm happy for the help. I'm useless with electricity.
I tested my R-17 subway Proto 2 and another PCC proto 2 trolley NJ transit in my garage on a spare test table. I have HOney do's also. Kitchen cabinet refacing, tiling backsplash and re-paint. yikes! then Ill tackle finishing my basement and put up a layout in November. I hope!
Chris
Did some inventory of hobos on my layout (there are males and females) there are 35 at last count! Don't want them multiplying! LOL! This is a family friendly layout!
Mike Maurice
Did some inventory of hobos on my layout (there are males and females) there are 35 at last count! Don't want them multiplying! LOL! This is a family friendly layout!
Someone recently gave me a set of... not family friendly female figures, let's just say. No way those are going onto the layout. I know of a big layout locally that has a house of ill repute and the owner sometimes turns on the lights on the top floor. The shades are pulled back and you can see, well, a very R rated scene.
Yeah, that's not my bag. I don't want to have to worry about what lights I flipped on when someone comes over for an op session or my wife decides to take a look around (I'd never be able to explain that to her as she was born whimsy-impaired).
slowly working on the upper level tunnel. also picked up 5 ameritown 3 story buildings and the furniture factory. still waiting for my bumpers to show up so I can finish wiring the sidings off of the transfer table. didn't want to run power to the sidings and have a train try to jump to the floor.


Tree's... tree's and more tree's... I have been making tree's ..
It's good to hear somebody else enthusiastic about trees on layouts. I feel they add immeasurably to the overall effect. Perhaps, you will agree with me on how I have used them and find some ideas here, Nateao, among these shots of my layout, Moon Township.


Thanks Moonson for posting up these great pictures! Your right... the tree's totally make a Great layout that much better! Those tree's are awesome! Great Job!
slowly working on the upper level tunnel...
Take your time, Jhanier. I am convinced the creative process is a very large part of our enjoyment of our hobby, maybe even equal to finding and buying the trains we want, running them, sitting back and enjoying possessing the whole shebang, and schmoozing with friends about all our train-related shenanigans.
You may even be sorry - though you may not be able to see or feel that just now - when the whole layout is finished (another theory I have which says the layout never is totally done but always ready for a li'l tweaking here and there, now and then.)
Enjoy.![]()
FrankM
Tree's... tree's and more tree's... I have been making tree's ..
It's good to hear somebody else enthusiastic about trees on layouts. I feel they add immeasurably to the overall effect. Perhaps, you will agree with me on how I have used them and find some ideas here, Nateao, among these shots of my layout, Moon Township....
Thanks Moonson for posting up these great pictures! Your right... the tree's totally make a Great layout that much better! Those tree's are awesome! Great Job!
Thanks, Nateao. It's good to hear from you. ![]() As you make those trees, you won't forget about the underbrush, too, will ya' .
As you make those trees, you won't forget about the underbrush, too, will ya' .![]()
FrankM/Moonson
Tree's... tree's and more tree's... I have been making tree's ..
It's good to hear somebody else enthusiastic about trees on layouts. I feel they add immeasurably to the overall effect. Perhaps, you will agree with me on how I have used them and find some ideas here, Nateao, among these shots of my layout, Moon Township.
Thanks Moonson for posting up these great pictures! Your right... the tree's totally make a Great layout that much better! Those tree's are awesome! Great Job!
I agree wholeheartedly with Nate! First, if you are modeling the East or anywhere else that has trees, a modeler can't have enough trees. Second, I agree your trees are fantastic, Moonson!
Nate, I see you were able to reply with the photos as you asked me in the e-mail. I will get back to you on that, but don't have time right now. I have to turn my attention to what my employer wants me to do today. Forty years of the boss's desires getting in the way of what I want to do. What a bummer. ![]() Oh well I get a few dollars a month to pay for trains.
Oh well I get a few dollars a month to pay for trains. ![]() See you later on the e-mail, Nate!
See you later on the e-mail, Nate!
Work continues on my on my CB&Q Way Car project. Crews primed and finished body work. Way Car temporally pulled out of the shop while waiting for parts and orange paint..


Received a shipment of Ross 072 curve track today and the Ross WYE switch is due tomorrow.
Time to get to work!!! ![]()
Ive been working on my Korber power plant kit this week. Waiting on some MTH smoke units to get here to put in the smoke stacks. Its been almost 20 years since I built a kit and I have to say it is really quite relaxing and satisfying.


Access to this requires an OGR Forum Supporting Membership


