
Replies sorted oldest to newest

Ray, have you already got them out of the engine, they appeared to be easy to break.


When I repainted my Legacy GP9 I was able to pullout/reuse the numberboard/light assembly.  It was fairly tough getting out, I used a couple of Xacto knives to wiggle them loose after removing the screw.  I didn't break mine, but I can see it would be easy to do.  Some paint had hold of both of them.


Have you removed the circuit board for the lights yet?  If so, can you leave the lens on the body while you remove the paint?  That may make it loosen enough to pop out.


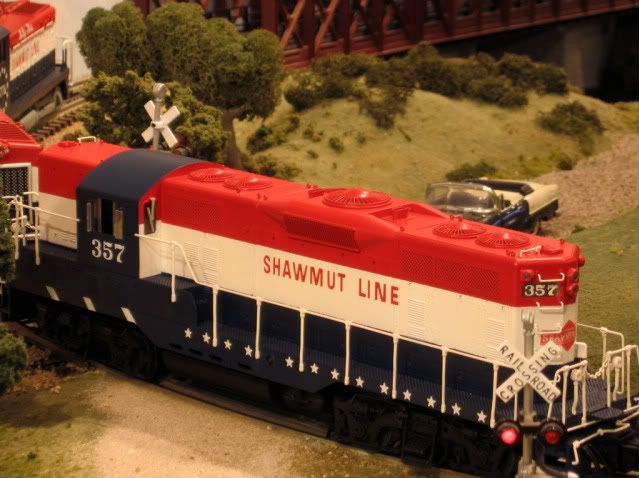
Here's mine repainted in SAL Jolly Green Giant colors:


1912 004


When I printed new numbers on my printer, I forgot to change the setting to make the black background as opaque as possible, that's why the light seems to shine thru the numbers in this photo.  I have since redone them.


1912 was the only SAL GP9 to get this paint scheme.  Other than the repaint, the only other changes I made were to replace the horn and remove the winterization hatch.  The trucks used by SAL had one set of roller-bearings on one axle and n EMD journal box on the other:


emd-journalbox-hyatt

Attachments

Images (3)
  • 1912 004
  • emd-journalbox-hyatt
  • emd-journalbox-hyatt
Last edited by Bob Delbridge

Bob This looks promising; I will contact them today.


John Unfortunately Lionel does not have a number for me that will work after looking at their GP roster. I have had luck before in getting a replacement for a lost board so that will be an option also.


Bob Can you tell me your process for clearing and relabeling the boards? I have had succes in removing boards previously.


Thank you all


Ray Marion

Ray,


I used 91% Isopropyl alcohol on an applicator (Q-tip) to remove the existing printing, didn't harm the plastic.


I use a program called Adobe PhotoDeluxe Home Edition (no longer offered) and used a font called Abadi MT Condensed Extra Bold.  This program allows me to change the background/foreground/text colors.  Not sure if the font is at all accurate for a GP9 but it was the only one I had that looked close.


Once I had it looking like what I wanted I printed out a sheet of them on white decal paper from BelDecal.  In the photo I used clear decal paper and that's why the light shines thru, switched to white paper and all is well.


Hope this helps!

Ray,


I slid them on just like regular decals, from the outside.  Afterwards I used some Microsol/Microset to snug them down.  I guess it could be done with the plastic housing out of the body as well, but having it already back in seemed to give me a better "hold" on things.


Send me an email with the numbers and perhaps a photo of the engine/railroad you want to do and I'll see what I can do (email in profile).  The number boards should be the same size as on my GP9 so if they'll fit mine they should fit yours!


Using the BelDecal paper, once I print out what I want I spray over the paper with Gloss clearcoat.


That Legacy GP9 is a smooth running engine, even used with DCS

Ray, I just measured my Lionel GP9 against my Atlas GP9:


Lionel opening measured 9/16"x7/32", the lens is inset on my GP9


Atlas opening measured 5/8"x15/64", the lens is flush on the Atlas model


Here's a closeup of the Atlas GP9:


0013


And Here's my Lionel GP9:


1912 001


They're both very close.


Here's the part numbers for the Atlas GP9:


http://www.atlaso.com/partspdf...0body%20complete.pdf

Attachments

Images (2)
  • 0013
  • 1912 001

Bob, Zett, Alan, Mike


     Atlas only sells clear lenses. That would be ok if a broken one is needed. Bob, your solution seems to work. I cut one decal out and trimmed it a little. After dampening a little I placed it on the engine temporarily for evaluation. I think it will be fine after a little better fitting and placement. My plan will be to place the decal over a cleaned lens. When the new engine body is ready I will post some more pics.


Ray Marion

Original

Temp Decal

Attachments

Images (2)
  • Original
  • Temp Decal

I removed the boards without breaking anything and cleaned them up. 91% Alcohol oddly did nothing to these boards. Mineral spirits worked with a little help. i will gloss before decalling. The pictures show my efforts. I put a temporary number on and trimmed a little to fit. Some touchup may be required. Lokks ok to me so far. Now the engine needs to be painted. I want to fix the front pilot and add kadees but there doesn't seem much to work with. Looking for ideas from anyone.


Ray Marion

Attachments

Images (3)
  • DSCF1104
  • DSCF1106
  • DSCF1107
Post

OGR Publishing, Inc., 1310 Eastside Centre Ct, Suite 6, Mountain Home, AR 72653
800-980-OGRR (6477)
www.ogaugerr.com

×
×
×
×
Link copied to your clipboard.
×
×