
So, older TMCC loco. 8010.

I did search threads, the net, and found some insight as to the bottom screw. Just that one, the collector/roller is held by an above screw.

Work on my postwar stuff but, and modern steam... first time into this one.

Bought it recently and though it’d been run somewhat dry, it’s like new and behaves well. I’ll go through it.

Photo showed it with all its steps,…missing five though when it got here.

Bought a new pilot, no NYC available, so I raided it for steps and mu’s, painted ‘em up and they’re ready to add on.

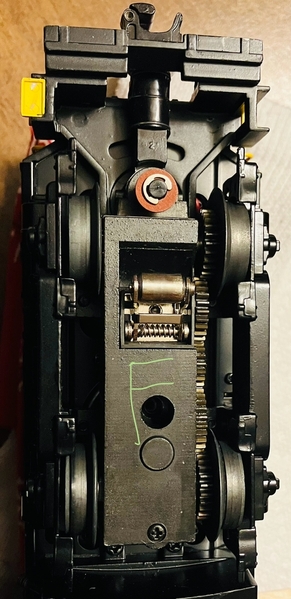
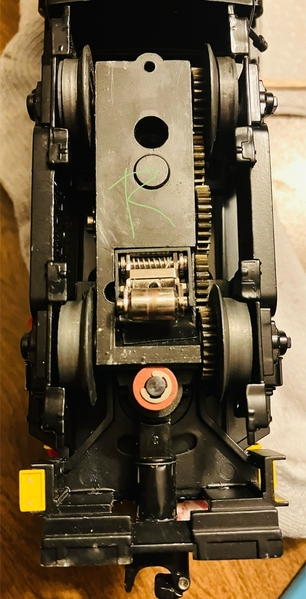
So, happens of course that both pilots are a little bit ‘loose’, so I need to drop the trucks to access the pilot mount screws.

In the exploded diagram the trucks have just that one screw in the bottom that goes up to the piece the motor mounts the other side on top of. I have probably used about 98% of the force needed to pull the trucks, right?...I read they’re tough to pull off but they go back pretty easily. Not wanting to damage anything I guess I mighta stopped short.

Any insight or tricks or approach?


And it drags on,…wanting a look at the battery…loosened the six screws that hold the body shell to the frame and it seems ‘stuck’….as though it were one.

I’ve opened my GP-9’s from the same era without a problem..

Thanks,

Have fun runnin’,

Paul

Original Post

Replies sorted oldest to newest

You have encountered what I like to call Lionel's puzzle trucks.   You have to drop the bottom plate to get to the motor mount screws to remove the truck.  Your clue is they show the HELICAL GEAR ASSEMBLY as a separate part, the only way you get to that is to crack the truck.

You have to remove the collector and a couple other exposed screws on the bottom to split the truck.  Once it's opened, you can remove the motor.  Also, that gear assembly has to go back in exactly right, it has flats on the bushings that have to be correctly positioned or the truck wheel rotation will be frozen.

Attachments

Images (2)
  • mceclip0
  • mceclip0
Last edited by gunrunnerjohn

John, Thanks, right about the puzzle.

If they made it, we can fix it.

My collectors though are retained in their pocket in the bottom of the truck by a screw which comes down through the truck, head up top.

And if I remember right, at the fuel tank ends of the trucks the screws that hold the upper and lower halves together.. one goes up, the other down- one anchors in the top half, other truck into the lower half..

I’ll make sure when I can sit with it later.

I’m wondering if I can pop the e-clip on the spurred shaft and slide it over, have the truck lift away from the worm.  I’ll look at the ipb again too.

I understand the bushing orientation, seen that in my 2353’s…

Thank You,

Well, I stopped short of showing the Lionel ipb’s,…Thanks though for the links that were posted to the three searchable files.

The two trucks aren’t totally alike.

Front truck:

They both have the collector secured into the pocket on the truck bottom half by a screw coming from and only accessible from atop. You can make out the screw in the stamped roller frame on each truck.

There is of course the ‘pivot’ truck securing screw and one at the fuel tank end of the truck- which looks to let it all come away from the intermediate block at the motor.

IMG_3584.jpeg


The Rear truck:
(need to finish polishing that roller)

Same deal anchoring the collector from atop through…but the fuel tank end screw comes from the top and draws on the lower half of the truck.

IMG_3585.jpeg

Also different is the gear train center spur shaft goes through the truck body and is kept by an E-clip. Popping it to slide the gear/shaft gains you nothing in movement of the truck vertically, and sliding doesn’t clear the mesh.

I guess I’ll have to clear enough space to dedicate as ground zero and better cradle it while this all expands for a little while.

Thanks for looking,

Paul

Attachments

Images (2)
  • blobid1
  • blobid0

Well I got the front truck off by eeking an x-acto blade then screwdriver blade between that small square boss on the upper truck body and the motor mount, and gently rocked em apart. Thinking maybe a bit of draft on the castings and they nest really tight when the screw socks down.

Whole truck does come off.

Not a lot of wire to gain real easy access to the pilot screw, but tightened it all I could. A Phillips already buggered....and it’s either bottoming or the head is bottoming against the truck-through the countersunk hole in the pilot. It’s down snug with no up and down but it can deflect some, not the end of the world.

I ran it and it’s good.

Then I did get the rear truck loose the same way. But no time to drop it this evening.

I’ll get that dang shell off, gain myself wire or unplugging, then get the trucks away, go through then lube, lock the pilots down with the new steps added and button her up. I’ll report.

I worked on EMD’s, but Alco’s idled by on the river branch next to our home and backyard at least twice a day growing up.

Love that sound.


Thanks

Back at it after some Holiday stuff and some work in the shop. And reading threads and watching layout videos.

The ipb doesn’t show the rear truck collector screw path going through both the motor mount and the lower truck body…but, the screw actually does.

Accessible through a slot in the frame so gotta get the body off..that seems in addition to the six screws there’s been some two sided foam tape laid between the frame and shell, like along under the walkways..I really hope I’m wrong.

Thought about turning that hole in the mount into a slot with the mill, but should maybe keep the integrity..will see…hopefully after going thru everything totally I won’t be back inside, so maybe just leave this be, stock.

I’ll let you know.

Off to search for that thread about lift rings

Last edited by ‘23Alco

I see, very thin foam tape along the sills and frame. It’d been open before.

Collector screw out, dropped the truck.

Tightened the pilot, cleaned things up of dead grease, lubed, checked other hardware, oriented wiring, and put the truck back up, minding the bushing orientation-flats. Thank You.

Lubed the axle bushings and gearing.

Put a battery in it and ran it a bit, ran fine.

Will put a bit of tlc to the stanchions, some a bit deflected/bent at the sills. I’ll add my five new steps to the pilots. Get some eye pins and see, sorry, and see if I replace one that’s gone or do that group, then button it up and see what’s on deck.

Thanks for looking helping,

Paul

Last edited by ‘23Alco

Add me to the club. First a shout out to @gunrunnerjohn and @'23Alco for the background provided on these trucks.

I have 3 Lionel RS-11's and had to wrestle with one of them yesterday. This one is D&H #5001. I put it on the layout yesterday after doing a quick cleaning but it was stalling on my switches. Unusual for a larger engine. So a more thorough cleaning followed but with the same results. Some testing revealed that I wasn't getting power from the front truck.

Started dissecting the engine and found that I must have a broken wire from the pick up. Pulled apart the wiring and went to drop the truck. After removing the typical mounting screw from the bottom of the truck, I couldn't get it to budge.

2024-02-17 14.54.47

Then I remembered saving this thread in my bookmarks..........

Tried the methods described above but I didn't see any way to get to the screw on the top of the truck to split it. I was able to get to the pick up screw at least through the slot for the wires. I had to remove the smoke unit and motor driver board to make room to work.......more on that below.

Some surgery on the pick up wiring and I found a break at the ring terminal at the truck. Replaced the wire and put it back on the truck, tested and it's all good. Looks like someone had been in this engine before me, the wires around this truck were not "factory fresh".

2024-02-17 14.58.102024-02-17 15.17.512024-02-17 15.22.14

Back to the motor driver board....
Needed to find a way to get the screw back in from the bottom of the frame and hold it in place while simultaneously holding the board bracket, and placing a 2mm washer and nut on the screw. First trick was to glue the screw in place. A drop of CA glue did the job. Then I had to get the nut on the screw.
I have a set of jeweler screw drivers that I bought years ago from a guy selling tools out of his car on the construction site I was on. The set included some small metric wrenches and sockets. After placing and loosing the washer a few times with a pair of tweezers....I put a piece of tape on the wrench and stuck the nut to the tape. Placed it on the screw and I got it to catch the threads on the first try!

Don't know how the factory did these in mass numbers but then again, this thread is about the split trucks.....

2024-02-17 16.17.48

The aforementioned wrench and tweezers.

2024-02-17 16.18.26

Buttoned up the wiring with a couple of tie wraps and put the shell back on....poured myself a large drink and ran the engine.

2024-02-17 16.35.33

2024-02-17 16.47.07

Not exactly how I had planned to spend a Saturday afternoon but the outcome was successful.......still don't know how I'd ever drop that truck tho......

Bob

Attachments

Images (8)
  • 2024-02-17 14.54.47
  • 2024-02-17 14.58.10
  • 2024-02-17 15.17.51
  • 2024-02-17 15.22.14
  • 2024-02-17 16.17.48
  • 2024-02-17 16.18.26
  • 2024-02-17 16.47.07
  • 2024-02-17 16.35.33

Add Reply

Post
This forum is sponsored by Lionel, LLC

OGR Publishing, Inc., 1310 Eastside Centre Ct, Suite 6, Mountain Home, AR 72653
800-980-OGRR (6477)
www.ogaugerr.com

×
×
×
×
Link copied to your clipboard.
×
×