Update 10-21-14 see below


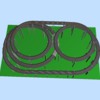
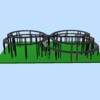
Finished the final mockup for this years Christmas display; A Graduated double helix for the Polar Express. O36 and O48 Fastrack inside a 98” X 56” space. Could have squeezed it into 8’ X 5’ but wanted to allow for a future isolated section to knock down the voltage on the decline later without having to customize track pieces. Tried to keep the grades around 5% but at some points to allow for clearances  they do reach nearly 10% with the average being somewhere between 6 & 7 %. I don’t think you’d be running any postwar engines on this route but modern engines without extreme freewheeling characteristics manage it fine. I definitely built it exclusively for our LionChief engines.


Here are some videos of the LionChief Polar Express with out cruise control and the LionChief Plus NYC Hudson with cruise control running the Helix in both directions.


 Added this picture 8/25 am to show where the track section where I'd like to automatically drop the voltage for the declining run.

Last edited by Matthew B.
Original Post

Replies sorted oldest to newest

There’s approximately 2” of space between the two upper loops that run parallel at the same elevation. So by replacing a 10” straight piece with two 4 ½” pieces and eliminating a 1 3/8” piece at the top and bottom straight sections you could cut the length down to from 98” to 96” or 8’. Since it’s not likely you’ll run two trains on the route at the same time butting the two loops against each other shouldn’t be an issue. The width remains at 56” which is 4” shy of 5’.


Originally Posted by Rail Reading:
Originally Posted by Matthew B.:
inside a 98” X 56” space. Could have squeezed it into 8’ X 5’


Did you mean 98" X 66" here?


I can't seem to upload the exported bitmap file from the scarm software so this is the best I can do for a track plan sorry.


The SCARM software doesn't appear too good at accounting for the lineal compression when you elevate the track over several levels, so I never got the two ends to meet. starting from 7" the elevations reach 15 5/16" where the two upper loops begin to run parallel and then continues to a height of 21 3/4 inches.
 
Originally Posted by towdog:

Awesome.  It's amazing that you can fit that in such a small space.  If you have a track plan for that, I'd love to see it.  Did you have to cut any Fastrack?


Matt,

Just attach the SCARM file with the S icon to a reply. I use the snipping tool to grab screenshots of the track plan and 3D view and save as .jpg.


Elevation tip in SCARM: Connect all of the track at 0 elevation for fitment, that select the track to be elevated and raise the top. Start at the zero point for the track selection.


It has a really good presentation. It didn't appear that the two trains would catch up to another for some time. They don't look bad coming down quickly. I'll bet it makes you feel like they will launch off!

Great creation!

That's such a great idea Dale, I just spent the last hour and a halve modifying the fastrack on the downhill run so the outside rails are isolated from each other. Checked it all for continuity and no continuity and it all checks out. Didn't have my dramel with me so I still have to cut the track.
 
I'm really excited to be able to operate this with a post war ZW. Nothing looks better under a Christmas Tree.
 
Originally Posted by Dale H:

I would try using a relay to slow things downhill


Dale H


Ok I'll try this one more time.
 
Originally Posted by Moonman:

Matt,

Just attach the SCARM file with the S icon to a reply. I use the snipping tool to grab screenshots of the track plan and 3D view and save as .jpg.


Elevation tip in SCARM: Connect all of the track at 0 elevation for fitment, that select the track to be elevated and raise the top. Start at the zero point for the track selection.


It has a really good presentation. It didn't appear that the two trains would catch up to another for some time. They don't look bad coming down quickly. I'll bet it makes you feel like they will launch off!

Great creation!


Attachments

Images (3)
  • DHfrontview
  • DHoverheadview
  • DHbackview
Files (1)
Dennis I haven't really put the Tree into the equation yet. I believe I will be dropping the center pole for the 6' tree in the center of the fast downhill run, (in the video the left side but it's the right side in the track plan. I think that would give between 28" and 30" to the wall. I will place the branches starting about 20" above the table, which will be approximately 30" high from the floor. I'm pretty flexible about the tree I've got four of different sizes up in our attic and that doesn't include the ones I wrap around our Palm Tree in front of the house.
 
Last year the last thing I decided on was where to place the tree.
 
Originally Posted by PRR2818:

The image files came down ok, but the scarm file of the layout isn't recognized as a layout file by scarm, just opens it as a text file?


Matt, what is the approx. room for the Christmas Trees?


Moonman,
Technically you are right this is a double spiral and it is a little more difficult to figure out.
Something I picked up on while working out the design is to cut the circles into four pieces  (+) and only change track diameters at those 90 degree points. It's much easier to get the straight runs to line up this way and things look more symetricle. If your using the same diameter track at different levels you can use 4 1/2" or 5"  track sections (depending on the clearances you want) at the 90 degree points to push the lower level out from the level above it. When doing that on the short span of your baseline compensating at some point on opposing spiral will make it easier to get the straight runs to meet.  
 
Originally Posted by Moonman:

Plus, these are actually spirals, not a helix, which is much more work than stacked circles.


Matthew,

I had an 060 section on the left bottom because it looked that way in the funky picture that you posted. Thanks for posting yours. Really nice work. I see your thought process now. The final is a lot cleaner and the grades are very manageable.


I did some 3D work.


I really want to see it when finished for the holiday.


Attachments

Images (2)
  • Matthew B Final 3D front
  • Matthew B Final 3D rear
Moonman you get a lot better luck rendering the 3d view with landscaping than I do. I've kind of given up on that function. I just tried it again after playing with the software for over a month and finally got a decent rendering. When selecting tunnel placement it seems you have to select the opposite track of where you want to cut through the obstacle. That's a PITA when the tunnel only cuts through with two track sections.
 
Originally Posted by Moonman:

Matthew,

I had an 060 section on the left bottom because it looked that way in the funky picture that you posted. Thanks for posting yours. Really nice work. I see your thought process now. The final is a lot cleaner and the grades are very manageable.


I did some 3D work.


I really want to see it when finished for the holiday.


Attachments

Images (1)
  • DHLS frontview

This display is being mocked up in a vacant property and will be moved to our house Thanksgiving.


Still a work in progress, we've have pretty much gone as far as we need to with the front of the display until it's time to set it up. It will face out towards the room and depict a more traditional Christmas display. The back facing out the sliding glass doors will try to be more of an example of the movie. Dale did a great job helping me out with the isolated section using a relay to knock the voltage down on the decline.  So now its a set it and forget it display with the voltage is set at 18 going up and 12 down. The train can actually go a lot faster downhill than what's shown in the video only because I don't want any risk of having to repair a laminate wood floor. After it's moved to our house sitting over a vinyl floor the voltage will be knocked up to 15.


Here it is at night with the northern lights reflecting of the mountains.


Last edited by Matthew B.

Okay Matt, here is my proposition.  I will offer you a complete, two week stay, here in wintry, cold, gray, dismal Pittsburgh, and you can get away from that sunny, humid, mosquito ridden state of Florida, and build me a double helix.  If it takes longer, that's okay.  I'll provide room and board (heck, I've got McDonalds, Wendy's, burger King, Pizza Hut, Arby's and Subway all nearby).  I'll supply all the necessary materials and tools and support.  Pick out any two weeks you like, and we'll be ready for you.  Sound like a good deal?  Let me know.    

Add Reply

Post

OGR Publishing, Inc., 1310 Eastside Centre Ct, Suite 6, Mountain Home, AR 72653
800-980-OGRR (6477)
www.ogaugerr.com

×
×
×
×
Link copied to your clipboard.
×
×