
1.Painted the coil springs to bring out the detail and same with brake hangers.

2. Mechanically lowered the loco a little bit.

3Added a fixed cab step, which I will modify to be more scale.

Fixed scratch built pilot as discussed in another thread.


You can see in a coupled picture with a B unit the lowering and the difference the paint detail makes on the trucks. 

alco low 1

alco low 2

alco low 3

alco low 4

Attachments

Images (4)
  • alco low 1
  • alco low 2
  • alco low 3
  • alco low 4
Original Post

Replies sorted oldest to newest

Originally Posted by Ron H:

1.Painted the coil springs to bring out the detail and same with brake hangers.

2. Mechanically lowered the loco a little bit.

3Added a fixed cab step, which I will modify to be more scale.

Fixed scratch built pilot as discussed in another thread.


You can see in a coupled picture with a B unit the lowering and the difference the paint detail makes on the trucks. 

alco low 1

alco low 2

alco low 3

alco low 4

Great job Ron, it really looks great

Originally Posted by Laidoffsick:
Thanks Ron, thats what I did with an E7 B unit but had to modify the shell as well, to get it low enough to match the E6's. That PA looks great!

I assume it makes it through your curves without issue with the body mounted steps.

Doug,


I believe it will. 0/120 curve the sharpest. Will try tomorrow. Will post video.


Ron

Originally Posted by Ron H:
Originally Posted by leikec:

Which Lionel PA part # is this? It looks well proportioned.


Jeff C


Jeff and Jim the Alco steps are 61045720 84 and 94 left and right rear steps respectively.

Guys,


These parts are going FAST.  I just finished ordering mine.  I needed 6 of each, but had to settle for 8 of #84's and 4 of the #94's.  I will modify to fit as needed.  Once Lionel exhaust their inventory I have no idea how long it takes them to re-stock.  I suspect that the above two parts were slow movers until yesterday, now they are almost GONE.


Thanks again Ron for supplying the part numbers. 

Originally Posted by leikec:

Sorry, Ron, I didn't post clearly--I was talking about the engine itself. Some of the Lionel PA models have an odd nose profile, but yours looks very nice.


Jeff C

Jeff, it's the scale legacy model. Probably one of the most accurate shells in the industry.


Ron's correct but it should be noted that Lionel used that same shell starting with Alco PA's listed in their Classic Trains Vol. 2 2003.  Before that, the Alco PA shells were based on the shells Lionel created along with MTH in the 90's 

Interesting Bob.  I do know a couple of detail oriented scale (2R) modelers that prefer Lionel shells.  I haven't had a Key PA in my hands yet, but the Santa Fe specific details on the Lionel (after 2003) were better than the MTH PA(90's).  


I still have both a Lionel PA and an MTH PA.  Off the top, the number boards on the side have the correct width for 2 numbers.  The MTH number boards were more generic and were wide enough to accommodate the four numbers used on D&RGW PA's.


If I have time I will do a side by side and everybody can judge for themselves.  Regarding MTH, I haven't seen anything since their 90 PA, so I can't comment.  

Last edited by marker

No - I know nothing about Santa Fe specific.  My concerns as a scale modeler are size and contour - the nose and windshield are important to me, and I change the number boards to suit me before the plastic goes into the investment.


Quite a few of my train buddies do not care one whit about shape, dimension, etc., so long as the handrails go in the correct places and the headlight is the right shape.  That is up to them - not my plan.

Originally Posted by Laidoffsick:
Thanks Ron, thats what I did with an E7 B unit but had to modify the shell as well, to get it low enough to match the E6's. That PA looks great!

I assume it makes it through your curves without issue with the body mounted steps.

Doug, It goes through my curves and # six turnouts with no interference.

I tried to lower the powered B unit today mechanically and it essentially did nothing. So I made a marking tool to saw off 1/16th on the posts. It dropped to very scale ride height with a shadow over the center of the trucks just like the Santa Fe prototypes.


Tomorrow I'll reinstall the pieces I took off the A unit and saw off the posts.


If you look at this photo one can see the B unit on the left rides at a better height than the modified A unit


alco low B unit 1

Attachments

Images (1)
  • alco low B unit 1
Originally Posted by leavingtracks:

Well Ron....now you have me making these changes to mine too!!...thanks..


Alan

Alan, the lowering on a powered model is tricky. My first try with the powered B unit had the dual motors stalling against the roof and I had to shim the body up to clear. The body is now the same height as the first A unit I've been working on. It's lower, but not as much as I would've preferred.


Good luck with your efforts.


Ron

Something new. After adding spring and brake detail I decided to paint solid silver leaf springs so they look correct instead of a solid piece. Additionally the middle steps looked stupid having no depth. So... I painted them so as to add highlight. I did not want to build tanks from scratch or grind out the steps. When these are weathered I think it will turnout satisfactory.


Ron

alco b steps 1

alco b step 2

Attachments

Images (2)
  • alco b steps 1
  • alco b step 2

The job the author of this thread is doing on that PA1 is really quite nice. I think when one decides to modify a locomotive or car to add realism, it takes great patience and skill. Many do not posses the skills or patience to venture off into this aspect of the hobby.


My compliments to this gentleman.

Originally Posted by 86TA355SR:

 Great to see somebody doing some 'modeling' for a change.  One of the great aspects of this hobby is building, modifying, and operating something you can't buy that everyone else owns.


Great job!

Yes!  Really nicely done and showing just what can be done with a bit of applied effort.

Thanks for sharing!

As I was completing the truck detail on the B unit I noticed an unprotypical casting extension on the trucks at the outer brakes. Now grinding these off.


In this picture the upper truck frame has the extraneous pieces outside of the far end brake ends. On the bottom truck frame it has been ground off.

alco casting remove

Attachments

Images (1)
  • alco casting remove
Originally Posted by Ron H:

As I was completing the truck detail on the B unit I noticed an unprotypical casting extension on the trucks at the outer brakes. Now grinding these off.


In this picture the upper truck frame has the extraneous pieces outside of the far end brake ends. On the bottom truck frame it has been ground off.

alco casting remove

Looks to me like it should really be there. Looks to be part of the truck frame. Oh well, too late now. 

Zoom in


alcoaunit

Attachments

Images (1)
  • alcoaunit
Last edited by Big Jim


Yes, it is in the photos if you look at right photo. Finding a pure side photo is hard to find, but, there are a couple. Yes, it is in the shadows, but, if can zoom in on the front of the front truck and the rear of the rear truck you can see it.


What you took off is a part of the frame that is in what I believe is an oxbow type shape. In other words, from the side of the frame it curves ninety degrees inward, then ninety degrees down, then curving ninety degrees inward again. The plan that I provided is I believe from a "Locomotive Cyclopedia", so it is there.


ATSF PA

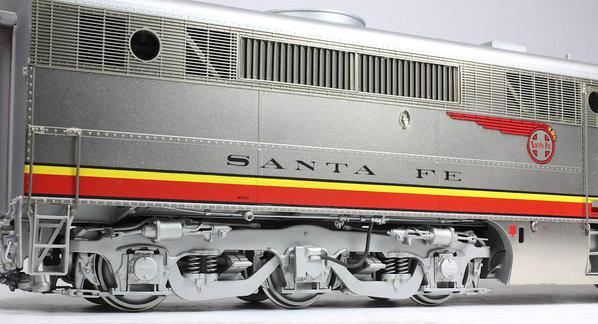
 Maybe these two will convince you.


PA1

PA2


PA1

PA2

 Look very closely at this photo posted earlier, just behind the stirrup, and you can see how the frame "esses" and goes across toward the other side.


Let me add this,

The cast on part that you took off is clearly not a good representation of the way the frame is actually shaped. Since you have done so much detailing already, I am sure that you can make a new part that more closely represents the "S" shape of the frame . 

Attachments

Images (5)
  • ATSF PA
  • PA1
  • PA2
  • PA1
  • PA2
Last edited by Big Jim

Jim. You are correct.


I know exactly what you're speaking of. I have the drawings. These are the front and rear frame pieces of this truck. Your right, the Lionel casting just jumps out while this piece is deeper in the truck. I've considered modelling this , but later. I'm more concerned about the visible frame pieces at the ends of the units and the end plates of the units where the air hoses are mounted.


I'm at the point where the B unit is almost done and I can start on the powered A unit and its' pilot. There is going to be a stopping point soon.


I've got two more projects I really really want to get to next. Installing ERR cruise and sound for my Pecos River ATSF Hudson and ERR cruise and sound for a 3 rail conversion of my Westside ATSF 2 rail Mikado.


Thanks Big Jim for the tips.


Ron

Not intending to detract from the excellent work displayed in this thread, but one factory-applied detail that could use some work is the windshield wiper.  It's in the wrong place and the blade is canted in relation to the arm.


The original Alco-GE PA1 windshield wiper had the arm and the blade parallel and they were located further inboard, at the bottom edge of the windshield.  The original wiper motor was a Trico-Folberth rack and pinion air pressure motor with a 140-degree sweep.


(Later, several owners -- including Santa Fe -- got tired of getting under the dashboard to repair or replace windshield wiper motors, and mounted them above the windshield.  Alco-GE got the message, and, beginning with the PA2, used the same Sprague Air-Push 100-degree wiper motor used by EMD, mounted above the windshield).


Too much information, probably, but the Lionel PA1 windshield wiper has always been a burr under my saddle.

Last edited by Number 90

Add Reply

Post

OGR Publishing, Inc., 1310 Eastside Centre Ct, Suite 6, Mountain Home, AR 72653
800-980-OGRR (6477)
www.ogaugerr.com

×
×
×
×
Link copied to your clipboard.
×
×