


|
|
That’s clearly a Postwar chassis....I’d wait and see if BMORAN4 has a suggestion, that shell might have some warpage, .......and it looks like overall the piece is in very good condition.....hopefully he’ll shed some forethought on a remedy....
Pat
from the evidence based photos and films I conclude that the shell is somewhat a tiny bit concave or warped.
so questions still unanswered about whether the shell is original PW Lionel , refinished or even MPC redone.
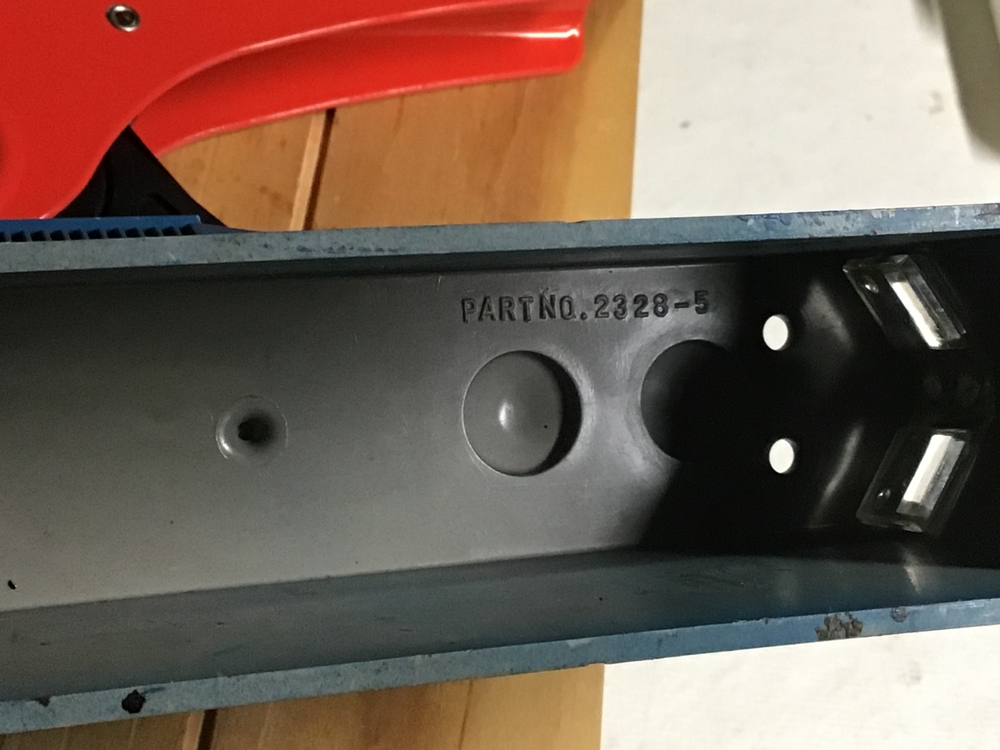
the part number in the shell 2823-5 says Lionel.
I can’t identify if the printing is silkscreened or not. There is no decal film under magnification. It is amazing clean for 1961 to 1962.
as far as a solution to warped shell? If not the real deal I may Just say good enough. There is a lot of stress through the misaligned hole.
luckily, the shell fits Really tight on the chassis despite the space discovered. Maybe I will forgo the screws as I don’t want to crack the hole in any event.
what do you folks think about my investigation? Lol.
always an adventure.
Leroof
A big thank you for all the participation thus far!
I agree that we appear to have postwar Lionel components here. As for the shell not sitting flat on the aluminum, I looked back at your pictures of the underside and saw some obstructions:
With out the shell in my hands it is hard to tell if a razor blade would scrape it off, or if a cotton swap with some dish soap and water would clean it up. Whatever you do, take care.
If that doesn't do enough here are the options I see:
The "Expensive option": Find another shell and see if the holes align better - realistically, this is find another locomotive. However, if you do have another GP shell (even a different road name), it would be interesting to see how it sits on your frame and compare the holes to your existing shell.
The "most factory correct repair": Obtain a pair of new 2328-47 lamp sockets and 530-40 rivets. Compare the replacement sockets to see if the holes have potential for better hole alignment and install if so.
The "correctable farmers fix": Oval out the lamp socket hole(s). Use a normal machine screw through the shell and through the hole and into a matching nut. This keeps the shell original and allows for the more factory correct repair to be carried out at a future date.
The "I'm impatient fix": You can file away at the shell as suggested above, but with the shell being in the great condition it is, I think you would be better off with one of the other options. This is not reversible or correctable.
Bmoran4, very interesting possibilities. I will temporarily fit another shell and see How it sits.
I guess even a slight irregularity could rock the shell. A bit of investigative cleaning and light debris removal may work.
i think the shell is probably the real deal. I won’t alter it.
I will consider your noninvasive potential management ideas. Thank you so much.
Bmoran4, Update, The following shells: 2338 Milwaukee, 2328 Burlington, 2337 Wabash, 2365 C&O were not happy/rough to place on B&M 2359 chassis vertical supports. The screw pathways on all of them were not Well lined up either! My other GEEPS just fit on their chassis with No resistance. The screws on them are flush with the exception 2337 which is at a bit of an angle.
Which leads me to believe that the problem we have been discussing may be multifactorial. Wrapping in B&M shell, and overly tight misplaced chassis vertical mounts. i have had PW B&M 2359 once before and that shell just dropped on the chassis to the support columns, screws went in like butter. Hmmm, something just perplexing about this!
happy to run the current one!
getting the coupler droop handled with new spring ordered. In the meantime running long hood out front. Going to get a D cell Battery tomorrow.
thanks again everyone, have a great weekend.
@bmoran4 posted:
The "correctable farmers fix": Oval out the lamp socket hole(s). Use a normal machine screw through the shell and through the hole and into a matching nut.
I don't understand... How is he going to hold the nut in place while tightening the screw with the shell on? I wouldn't try to modify the lamp sockets, because if you get it wrong replacing them will be difficult; they are riveted in place. Same consideration with installing new ones. Mr. Moran, not everyone has your skills, arbor press, tools, etc.
The shell isn't really in that great of condition, especially if it's warped. Even if this piece were 100% original it's table-grade excellent at best, and only the rarest Postwar is really valuable at this point. My guess would be that he's dealing with a Postwar shell on a late MPC or Williams frame that's been repainted.
I do agree that with the shell off , he should tighten the screws more of the way into the lamp sockets. This will open the holes a little and force back some of the sharp-edged flashing visible around the hole in one of the photos. Don't overdo it, because you still want the screw to have some bite when you put the shell on. Good luck, whatever you decide!
@Ted S posted:I don't understand... How is he going to hold the nut in place while tightening the screw with the shell on?
CA Glue - I should have clarified
@Ted S posted:My guess would be that he's dealing with a Postwar shell on a late MPC or Williams frame that's been repainted.
I am not aware of an MPC or Williams frame that has the horn relay mounts and/or the battery cutout.
@Ted S posted:I wouldn't try to modify the lamp sockets, because if you get it wrong replacing them will be difficult; they are riveted in place. Same consideration with installing new ones. Mr. Moran, not everyone has your skills, arbor press, tools, etc.
These rivets are extremely easy to replace and do not require an arbor press or super duper expensive tools. Sure, they can help get pretty results, but Brakeman's Riveter could easily do this, or even a hammer and punch.
@Ted S posted:The shell isn't really in that great of condition, especially if it's warped. Even if this piece were 100% original it's table-grade excellent at best, and only the rarest Postwar is really valuable at this point. My guess would be that he's dealing with a Postwar shell on a late MPC or Williams frame that's been repainted.
Sure, it isn't mint in original box and going to fetch thousands of dollars, but goodness, I think it is easily worth the $10 for parts to do a better job here...
Leroof did you try the shell on another frame ? I think who ever did the repaint bent the lamp brackets when they riveted them back on.
MPC and Williams did not have the cutout for the battery. That is a repainted post war frame ( and I think that it had battery damage that was repaired ) looking at the picture. Compare the shape of the negative battery contact of the frame with a different frame.
I do not think your horn will work if you put a battery it. The negative battery contact is painted, you have to sand the paint off first.
@Lionel Parts posted:I think who ever did the repaint bent the lamp brackets when they riveted them back on.
That's my point. It's not an easy job, especially if you don't have the proper tools. If you're going to open up the holes in the brackets and glue nuts behind them to accept a machine screw, it will take precision to achieve a good result. It would be easier to do this with the brackets off of the train. I guess you could do one at a time and stand the loco on end until the glue dries. But if you're not careful you could end up with glue all over everything, or right back in the same place with holes that don't line up.
Interesting post.
I've restored hundreds of B & M's as well as many other post-war GP's, over the years, and, for what it's worth, here's my take:
They're all the same. Except for the paint job, and a few minor production anomalies such as the color of the coil & armature windings, use of metal coupler "T"s [early production] to the change-over to plastic ones [later production] there's really no structural difference. Therefore, parts of all post-war GP's are completely interchangeable. Re-painting any part, or all of it should not affect the mechanical assembly whatsoever..
Your shell and fame are 100% original Lionel post war parts. From the pix, as best as I can see, your shell still holds it's original paint; the frame may be repainted- But I can't tell with absolute certainty without examining it closer. The riveting job of both the lamp sockets and the battery bracket look they were factory done, or, a pro job using LIONEL factory service tools. Note that the solder lug is still attached to the rear bracket and the rivet roll over on all of them is clean. But in any event, re-painting would not affect or cause the misaligned screw hole.
Most likely your problem is caused by one of two things:
1. When either assembled at the factory, or, even when later repaired, someone cross-threaded the lamp socket's screw thread, forcing the sheet-metal mounting screw in at an angle.
2. The dirt/ or clump pictured in one of your photos may be causing the 'rocking' motion of your shell. Try removing that - carefully- to see if your shell lays flat. Or, the shell really is warped. Could have come from the factory, or stored improperly. It's over 60 years old - so anything's possible!
I don't recommend any major surgery, such as removing the lamp socket and replacing it without proper service tools OR experience. If the frame's paint is still original, and you slip, scratching or damaging it, you've also just lowered the unit's value.
If the shell fits tightly without tightening the screw- leave it. Tighten the screw too much and you'll crack the shell. I've done it, and it's a very expensive lesson.
Good luck to you. If you have further questions, and you'd like to call me, I'll be happy to help you out if I can.
PS: No charge for consultations! LOL!
Len Carparelli
L & L Model Train Restoration Co.
Whoops.
Sorry - third paragraph should read, 'Your shell and frame" - not "your shell and fame".
Just a typo.
Lenny
Greetings Lionelparts, TedS, and Len Carparelli, my most appreciated thanks for your insights and observations. I plan on doing the least invasive things mentioned as this is an original Postwar piece. I am very glad to hear that.
yes Lenmy, I thought this topic would bring out the collective talent. Learned a lot as always. Thanks for offering phone consultations.
btw, I am full of admiration for your renowned work.
have a great weekend everyone.
My consultation is always open to all LIONEL fans- pre-war and post war - only because I know very little about later Lionel manufacture, or other brands' production methods & history.
No charge ever. Visit my web page. Check out our 'frequently asked questions' [FAQs]- you'll find a lot of great info there
Also free..
Len Carparelli
L & L Model Train Restoration Co.
@Leroof posted:
2328-5 part #?
did I get a MPC or Williams shell?
Is it too pretty to be PW ?
You definitely have a genuine PW shell there. "Part no. 2328 is the correct # used for the first full-fledged Burlington Geep in '55. I believe the only other GP7 out that year was a #2028 Pennsy with an altered shell and frame - no horn or battery cover (fuel cover), lights or thin railing going thru the cab, etc. The #2328 cab was in use for years, used for GP7s and GP9s, although the model GP9 was simply the same GP7 with a plastic exhaust cover.
Access to this requires an OGR Forum Supporting Membership


 2328-5 part #?