Tuesday was a shop day. 


I got into working on the site in earnest. All of the roadways and walks are 4-ply Bristol Board. Before cutting any, I'm making cardboard or paper templates to be sure what I doing works. One wrinkle is the slight elevation of the buildings which are sitting on the 1/8" cork base. I had to raise the sidewalk in a gradual slope to bring the walk up to the building's height.


To hold the roadways down, I've given up on the 3M 77 spray glue and gone to their 3M 99 high strength adhesive. I was very unhappy about how the 77 worked on holding the roads down on the foam substrate in the town. I've gotten good feedback on using 99 on holding fiberglass skins onto scale model RC aircraft. If it works in that installation it will work on mine.


Before attaching the roads I had to prepare the foam core for the curb cuts. They're bigger and differently shaped than the cast ones I made a long time ago, so I'm going to custom make them in place using Sculpty clay or plaster. I needed to raise the base and reinforce the foam core. I cut the top layer and all the foam away and then made a ply insert that I glued in with Aleen's reinforced with a little CA.


IMG_4324I masked the entire area around the front roadway so the spray adhesive was only where it was needed. I didn't want sticky stuff all over the site substrate.


IMG_4325


I sprayed both sides to be glued and waited for one classic rock song on my ever-playing iPod which was sufficient time for the glue to set up. It holds like crazy.


I used some thin cardboard to pattern the sidewalk. I actually worked those curves with a drafting compass. It was a long time since I had to use that.


IMG_4326


I traced this pattern onto the Bristol Board and cut it out with a #11 blade and straight edge.


I then realized that the building is elevated 1/8" on the cork and I had to raise part of the sidewalk to reach it. It required raising at the main building's side door and the kitchen door. Stacks of increasingly smaller pieces of Bristol board (5 pieces) to build up the slope.


IMG_4329

IMG_4328


Before gluing in place, I scribed the expansion grooves into the walk. I then glued it with Aleen's.


The last thing I did was make the pattern for the rear drive. I used heavy paper for this one.


IMG_4332


This will be transferred to the Bristol as before, and it will also need up-sloping to match the loading doors' height. I'll then mask the roads and walks in prep for landscaping and topo. The building will get the Press-n-Seal treatment so I can plaster right up to the foundation.

Attachments

Images (6)
  • IMG_4324
  • IMG_4325
  • IMG_4326
  • IMG_4329
  • IMG_4328
  • IMG_4332

Thanks. It's fascinating to me and I'm the one building it. Go figure.


After a day off yesterday, I'm back working on the Distillery site. After talking to my friend, Ashe Rawls, he suggested another way to make the roads, by actually paving them. I had just done a tile replacement job and had to buy a tub of pre-mixed white tile grout. By tinting it with black acrylic paint (the grout was also acrylic-based, it might make a believable rough asphalt like this road could be. 


Before getting started, I had glued all the paving basing and sidewalk onto the substrate.


Sidewalk Install


This shows the height adjustment to bring the back road up to the building level.

Back Road Height Adjust


I removed the building from the base and sprayed the base with Grumbacher Final Fixative to help give some water resistance to the Bristol Board and foam core since I was going to be using water-baed materials going forward. I then wrapped the undersides of the structures with Press-n-Seal to keep the various mineral products off the brick work. I also made the hole in the substrate for the LED power cable AND drilled a hole in my work table so the wire wouldn't bunch up underneath. The hole won't be a problem and it let the building sit nice and flat.


I wanted to have the shed ready to go so I cleaned up the resin castings, used a carbide burr on the Dremel to remove that unwanted bump inside them, and then air brushed Tamiya medium gray. It's a warm grey that does look like concrete. (sort of). I stick things like this to cardboard with a piece of 3M blue tape folded back on itself.


Painted Shed Footings


I fit them on the shed posts and worked them over on a piece of sandpaper taped flat to level them out a bit. I then tried them in position.

 Shed Footings Installed

I mixed in enough black to get the grout to a medium gray color. It produces a nice old, faded blacktop. I generously applied the grout to the road surface and using wide and narrow putty knives, smoothed the material to the road edges. I also "paved" the curb cuts instead of trying to make them concrete constructions. If it doesn't work, I can always go back and change it. I removed the shed to lay down the grout and then placed in in position with weight on the roof so it stayed put while the grout cured.


Here's paving the back road. It gives a good idea of how it proceeds. 


Grout Road Paving 1


And here it is sort of finished. Ashe suggested to leave the road rough and not perfect since it adds more character.


Grout Road Paving 2


I painted the sidewalk the same grey color as the footings using a wide artists brush. The expansion seams show up, but I wish they were a little deeper. I might go over them with a sharp pencil to highlight them.


Just before quitting for the day, I remembered that the silos also needed to have their place set out so they sit into the terrain when they're built, so I made some ply templates, covered with Press-n-seal, and held down with Blue Tac so I can landscape up to them and leave a socket for the actual silos when they're finished. I'm doing the same thing for the boiler house. This way, I can put the completed distillery on the layout even if the silos and boiler house aren't yet finished.


Silo Place Holders


Saturday's tomorrow so no more work for the weekend. On Monday I start laying in the terrain. I haven't yet decided whether it's going to be hand-troweled Gypsolite plaster, paper towel soaked with Gypsolite or with Scultamold (or a combination thereof). I also have Hydrocal and Plaster of Paris. I will experiment to see which one works the best. Any ideas? I'm open to suggestions. The terrain is basically flat with the slightest rise up to the building's edge.

Attachments

Images (7)
  • Sidewalk Install
  • Back Road Height Adjust
  • Painted Shed Footings
  • Shed Footings Installed
  • Grout Road Paving 1
  • Grout Road Paving 2
  • Silo Place Holders
Last edited by Trainman2001

When my wife travel Back East about 4 times a year, we're singing that song all the time.


I felt that the grout paving was just a bit too rough for O'scale, so I took some light weight spackle, tinted it darker than before and applied it as a finish coat. Without any sanding, it looks better to me.


Paving Overcoat

Paving Overcoat 2


While all this was drying, I started working on the curbing that flanks the front drive. The German foam core is about a .429". I used some German ply to form the upper part of the curb and some 0.030" styrene sheet to form the front that extends down to the foam core's bottom. All of the raw foam edges will need to be faced with styrene.


I didn't have any stock long enough to cover the full length so it became a much more involved project. I had nothing better to do so I just kept plugging at it. Not having a small table saw (I should probably get one of those) I ripped off three pieces of the ply and made a 45° scarf joint between each piece (stronger and easier to hide). I measured the height from the top of the curb piece to the bottom of the foam with the digital caliper and then used it as an marking gauge to scribe the cut line. I then used the Duplicutter to produce 5 equal pieces. I used medium CA to hold the pieces together. After much fussing it fits and will work. I'll paint it off the site pad and install it after I finish up the asphalt work.


In the first pic you can see the scarf joint before I glued on the facing.


Curbing 2

This pic shows the entire curb turned upside down lying in front.


Curbing 1


Here's the curb lying in its final position. I'll probably scribe some faux expansion joints before painting.

Curbing 3


Tomorrow, I'm going to finish up the asphalt work and then get on with the rest of the terrain. I'm sort of procrastinating about that since I'm still not convinced of what the best approach will be. I'll jump into it and see what happens. The nice thing about coloring the spackle and grout is that it's that color throughout. If it's chipped it's still dark gray. I think I'll mix up a batch of medium density Gypsolite and pour it thicker near the foundation walls and taper it out to the road surfaces. I'll need it to be thick enough to hold its shape and not self-level to much. The site is not going to be level.

Attachments

Images (5)
  • Paving Overcoat
  • Paving Overcoat 2
  • Curbing 1
  • Curbing 2
  • Curbing 3

Have you any ideas on why on some construction projects they do the site work first, then move the building construction trucks in on paved roads.  Yet other times they build nearly the whole building in a mud hole, then grade and put in roads and sidewalks near the end.


For some reason this part of your project reminded me of that question I have wondered before.


Your roads are right on!

From my home building experience with Toll Bros. they usually cut the subdivision roads as soon as possible. It facilitates getting trucks and crews in and also lets future home buyers to choose their lots on the actual lots. When I left in 2009 they were introducing a new application that let sales people walk the lot with a smartphone and actually show the future homeowner exactly where their house would be on the lot and what the exposures were going to be. I was another way to avoid nasty surprises.


I bit the bullet today and applied the Gypsolite directly onto the site foam core board. It was a bit messy, hard to control and really gave me fits attempting to keep the roads clean. I mixed it fairly thick and added W-S Earth tint to the mix to give it more color. It is not self-leveling, which on one hand is good... it stayed where you put it. But, on the other hand it went on very lumpy. After it set up a bit, I attempted to smooth out the high spots.


IMG_4347


I could have/should have applied masking to the sidewalk and drives. I didn't. I figured I could do what was needed to remove any excess. Besides it will make the whole affair look much more organic. That sounds good, but probably the real reason was I didn't want to take the time to mask all those curves.


This picture shows the lumpiness of the Gypsolite. Ashe Rawls uses this produce on his terrain work around buildings and he does great buildings. I went back with damp paper towels to remove as much of the splotches as I could.


I also went back with the road paving material which, by keeping covered overnight, was still usable. 


IMG_4348I kept going until I covered all the bare foam core. The silo placeholders are working well I will attempt to lift the building out of its socket tomorrow when the Gypsolite sets up. The nice thing about this product is its very long setting time. Unlike Hydrocal or Plaster of Paris, it has a long working time. I was able to go back and smooth it some more after dinner. 


IMG_4350

IMG_4349


When it's dry, I'll see how the landscaping goes on. If it doesn't look right, I will go back with some smoother plaster, also colored the same, and fill in some of the irregularities. It's all a learning experience. Kind of looks like it was paved with natural peanut butter... The Press-n-Seal is doing its job keeping the terrain off the building. At least I got that part right.

Attachments

Images (4)
  • IMG_4347
  • IMG_4348
  • IMG_4350
  • IMG_4349

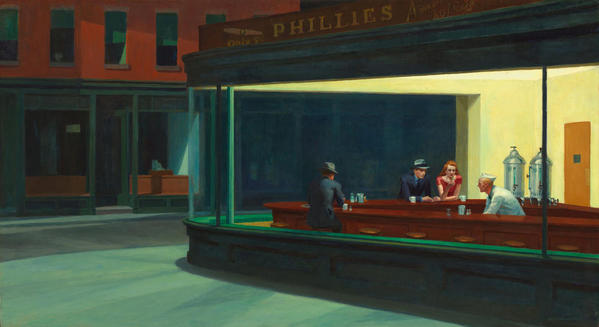
While working on the distillery I've been working on SketchUp designing the Nighthawks Cafe structure. If you remember, this was a Victorian corner bar that was a scratch-build article in a mid 1950s Model Railroader Magazine. I cut this article out and had it in my "future builds" folder for years. Edward Hopper's masterpieces, "Night Hawks" is one of my favorite paintings and I was fortunate to see it hanging in the Art Institute of Chicago. I wanted to build this building and decided to add the Hopper Night Hawks interior. 


I've written about this earlier, but I've now finished the rendering and am ready to finalize the drawings. Like the distillery, it's a brick building and will benefit from being laser-cut. Hopper's painting is American Impressionism and as such is not a photographic depicting of the cafe's interior. It is distorted. The building appears to have a square corner, but the bar is sort of triangular. It enabled him to stage the players as he wanted. Since I'm shoehorning this interior into a real structure, I've squared the triangle and it will appear somewhat different than the painting. If he can take artistic license, so can I.


Just as a refresher, here's the painting.


nighthawks_by_edward_hopper_1942


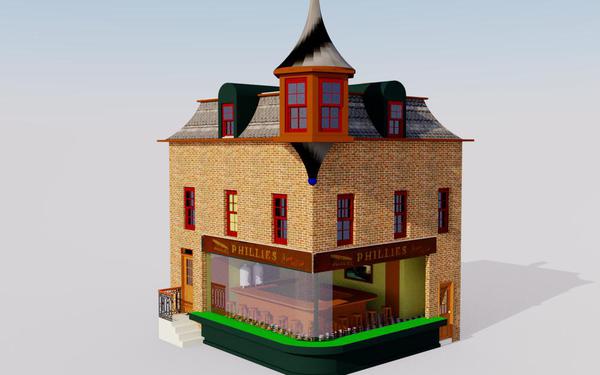
Here's the exterior as I'm planning it.


NH Status Shot 60021


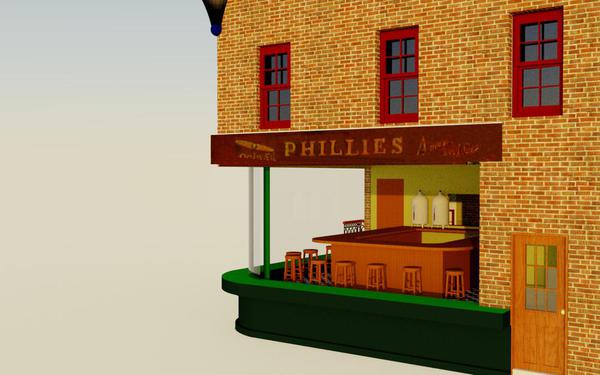
And here's the interior from a similar point of view as the painting.


NH Status Shot 50020


I already have the coffee urns... resin castings from Westport Model Works. I've delineated a full interior including kitchen, rest room, stairs to the 2nd floor including four rooms in the apartment. I've got most of the production drawings done, but I will go back and review now that the 3D structure is fully formed. Some of the structure should be changed based on what I know now. Funny, I just noticed that the trim ABOVE the main windows is not present. I will have to add that. The second floor windows are too low and will have to raised to enable the window work to be included. Oh well... back to the drawing board.

Attachments

Images (3)
  • nighthawks_by_edward_hopper_1942
  • NH Status Shot 60021
  • NH Status Shot 50020

Myles,

What a great project! It's going to be fun to follow your progress. The design gives a lot of possibilities when it comes to detailing the interior. I agree the upper floor windows look to low. They would have to go down to the floor because the first floor ceiling is just below the bottom sill. 

Thanks guys!


Part of the problem I'm facing by inserting Nighthawks into an existing building is the building itself. By having a basement, and therefore a first floor that starts 3 steps above street level, while making a more interesting structure, changes how the front window design works. In the painting you can barely see the stool tops since they're hidden by the very prominent green window sill. In my rendition, the stools are quite exposed since the floor is much higher, but the window sill sits are street level. 


Hopper's building appears to not have a 2nd floor. That's a bit strange since all the buildings on the opposite side of the street are two-story row houses with businesses on the 1st floor.


Brian Scaice has John Allen's original model on his layout. John chose to make a one-story building to more closely describe Nighthawks. 


So here's what I'll do. I will leave the window sill as it is since it would look weird to have it start 2 feet above the street. I'll raise the second floor windows high enough to give room for the upper window treatment. The rest of the differences will have to remain since the building's really neat in its own right and people will (hopefully) see the connection.


That's great rubble next to the diner. I'm not sure that a working industrial site would have that kind of ground cover, but it gives me hope.


As for stools. I scratch-built some furniture when I did Saulena's. I made bentwood chairs out of brass wire, and made the stools from dowel slices and tooth pick legs.


IMG_0760

IMG_0753

IMG_0749


The stool legs are much too thick. I would find a better way to build that. I also could possibly make something that could be resin cast... maybe... The bar, on the other hand, came out nicely in scale. I soldered those chairs before I had the resistance unit. That would have made it much easier.

Attachments

Images (3)
  • IMG_0760
  • IMG_0753
  • IMG_0749

Myles,

I love your logic in planning the Nighthawks project.  Yes, Hopper's painting looks to be one story, but I agree one would think there would be a two story there.  I think I mentioned earlier about having the privilege in visiting John Armstrong's layout at least 25 years ago.  He had a one story building on a basement.  Just out of sight of the painting, he had the sidewalk end and put up a railing,  This is where there was a severe dropoff to the basement level.  He had tracks below, and if I'm not mistaken, the tracks entered a tunnel in that general area and under his street area.  In other words, he too stayed as true as he could to the painting, but then the surrounding scenery was not what I would have expected having seen a photo of both Hopper's painting and Armstrong's model cropped just where the painting was.  What is not seen in the paining is totally up to modeler's license.  I know you will do another great job!!

I may be onto something on building roads, but I'm sure not onto something regarding terrain. I checked the Gypsolite and a) it's still not fully dry and b) the whole deal looks like the Bonneville Salt Flats.


Bonneville Salt Flats


I mean... look at that! It's great if I want to simulate a dry lake bed. But I'm not. I will have to overcoat it with something else to level it out a bit. I should have paved it all with Sculptamold. 


I'm going to let it dry a long time since we're heading back East for an 11 day vacation. I haven't received my copies of RMC yet. The substation article appears in the November issue. It'll be here when I get back. If any of you gets it before I do, please note this on the thread.


I moved the Nighthawks' windows up a foot and a half (scale of course) and am working to create the upper molding for the curved front window. Getting that wonderful curved window to work will be one of the bigger challenges in building the Nighthawks Cafe.


Here's a picture of John Armstrong's Version. 


hopper-1

hopper-3


What makes the scene is the people. Allen is using incandescent lighting (that's all he had when he built it.). Hopper seems to be using florescent lighting. It's very even and bright, and slightly cool. Getting the people is the other big challenge. As I noted, I have coffee urns and even if I didn't, they're something I could make. Sculpting people is one of my worst talents. I'm going to be at York on Friday and see if Artista has anything I could use, or... if he could customize some for me.


What's neat about the Allen version is how he also modeled the street scene to be somewhat like the painting. My buildings across the street aren't going to look like that. Notice that the door behind the coffee urns is blocked. You can't get to it. I've put the door in a more logical place to actually provide access to the room.

Attachments

Images (3)
  • Bonneville Salt Flats
  • hopper-1
  • hopper-3
Last edited by Trainman2001

Back from an 11 day trip back East. First stop was York. Didn't have much time, but had the opportunity to meet Andre Garcia of River Leaf. It was an important meeting since we've spoken many times, but didn't really know what each other looked like. I didn't buy much, just a couple of construction equipment pieces from DHS diecast models. 


In the time that I was gone my November issue of RMC was in the mailbox and starting on page 60 is the Substation Article entitled "Woodbourne Substation...". If you get a chance to see it, let me know what you think.


Starting tomorrow I'll be back at work figuring out what to do with the "dry gulch" landscaping that I've created on the distillery base.

You wrote John Allen instead of John Armstrong in your post.


Also, I'm not so sure that the interior is distorted as you say. Most believe the building was on a wedge shaped intersection which would have made the structure more triangular than square. The wide swath of sidewalk on the corner also lends itself to it being a less than 90 degree intersection.


Last edited by DennisB

I thought I corrected that Armstrong error...

Because of a dental emergency (root canal evaluation) I didn't get into the shop yet. I did inquire at the LHS about what to do about the cracking Gypsolite. I'm thinking about using some thin sparkling as a skin coat. The root canal activity will take place on Friday morning. What fun! I can hardly wait!


Meanwhile, here're the two construction machines I bought at York from DHS. The Grove 4115 is missing the side mirrors so I'll probably scratch-build a set when I have a few free moments. They had it for an even $100 which is way under normal pricing for TWH diecast models. No box. The dozer was new in the box.


IMG_4356


It's got great detail. All the telescoping booms do, the cab tilts up, and all eight wheels steer. I always wondered how these multi-axle beasts get around corners. All hydraulic lines are correct in number and location. I'll have to come up with something cool as a vignette to display the earth movers.

Attachments

Images (1)
  • IMG_4356

Thanks, it takes place at 11:45 tomorrow.


I applied light spackle to the cracked Gypsolite and it has worked to both close the cracks and level the surface some. I pre-colored the spackle with W-S Earth tinting liquid. It was a sloppy job, but I think it will work well once the ground cover is applied.


It was good that I use tile grout for the street paving. I've had to scrub it repeatedly to remove unwanted "dirt" from it. It's tough and can handle learning well. If it was just painted Bristol Board I would have worn through the paint. Therefore, my recommendation of using pre-mixed acrylic grout is a good one for paving roads realistically.


IMG_4359


IMG_4358


IMG_4360


IMG_4361


Since tomorrow's "Root Canal Day", I probably won't get back into the shop until Monday. When I do, I'll get into ground cover and landscaping. I'm also going to start getting the drawings prepared for the boiler house. Andre Garcia and I discussed the advantages of cutting from 1/4" MDF instead of the .155" Masonite. It's cheaper, smooth on both sides and is wide enough that you don't need tabs to hold square corners. I'm all for less expensive and simpler construction.

Attachments

Images (4)
  • IMG_4359
  • IMG_4358
  • IMG_4360
  • IMG_4361

Root canal was successful (I hope). The Dentist saw some infection lying in the crotch of the three molar roots which is hard to reach, so he prescribed an antibiotic. It could go away by itself due to the dead nerves being removed, but he didn't want to take any chances.


That being said, I did get a couple of hours in the shop to lay down the ground cover. An alcohol/India Ink wash on the roadways really cleaned up all the color discrepancies. 


IMG_4362


I don't do this scientifically. I painted the plaster with tan Behr latex paint. While wet I threw four different shades of W-S coarse ground cover and then fine green ground cover. I pushed it down to ensure that it was sticking to the paint, then vacuumed up the excess.


IMG_4364


After I finished, I sprayed the whole deal with water/alcohol mix to break surface tension and then sprayed it with W-S scenic cement. I wiped the excess cement off the sidewalks and roadways. Notice the square hole in the distillery's base. It's where the power cable passes through.


On Monday, I'll get the picket fence painted and installed. I'll then work one some more nuances in the ground cover. I think the area around the silos and between the boiler house and main building should be gravel, not grass. Also there should be weeds growing in the more inaccessible places. Lastly, I'm going to put a couple of trees in. These will go in permanently when the base plate is put on the layout since I want their mounting holes to go through the base plate to the layout's substrate. I still have to pave the concrete walkway between the main building and boiler house. Then the front curb goes on and smooth edging around the exposed portions of the base.


Once on the layout, I will use Sculptamold to tie the base plate into the rest of the topography.

Attachments

Images (2)
  • IMG_4362
  • IMG_4364
Last edited by Trainman2001

I placed the building back on the site to show the grandsons. I see some areas around the foundation where the plaster didn't penetrate deep enough. I can either add more plaster or just do some creative landscaping to hide the gaps. I shot one pic in sort of the same perspective as the 1870 pic. Grandson number 2 has a great photographic sense and will be involved in the shot we're going to take after it finished. He wants to duplicate the 1870 pic as closely as possible.


Site Check 2


I hate that crooked tall stack. I used CA and it set with that slant. I don't want to risk messing anything up to straighten it. I'm going to add some guy wires, but they're going to be EZ-Line so they won't exert much force to bring it back to plumb. It does add some character... if you're into character.


Site Check 1It's Sunday so no work in the shop. I will tomorrow.

Attachments

Images (2)
  • Site Check 2
  • Site Check 1

Thanks all! I really like to inspire others and I'm glad it's working.


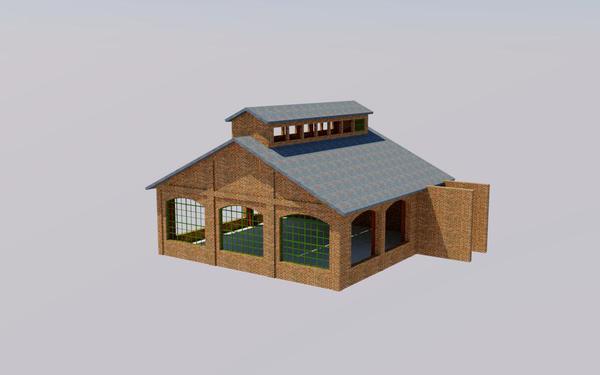
Here's the latest design drawing for the boiler house. 


Boiler House Render 10023


The footprint will be exactly 10" X 10". The enclosed corridor walls butt up against the main building. I'm designing this one with 1/4" MDF walls to reduce cost and make it easier for Andre. The windows will be cut from .024" laser board as will the brick layers.


This is a simple building with the only complication being the clerestory truss design. I'm looking at building my own boilers to go inside since the windows are so big, you'll see everything inside.


Between exercise day and going to the dentist to have the root canal finalized, I didn't get any shop time today. I did stop at Roundhouse Train Shop to show them the article in RMC. They were duly impressed. I bought some more fine mixed turf and scenic cement. 

Attachments

Images (1)
  • Boiler House Render 10023

Being unhappy with the gaps around the foundation in some spots, I masked the trouble areas and applied Sculptamold tinted with W-S color to the edges that were under-filled. 


Foundation Repair 1


After this application, I lifted the building and added some more plaster. I then replaced the building let in squish down the plaster.


Foundation Repair 2


You can see the areas where the plaster oozed under the building. I then trimmed the excess to make a clean edge for the building to nest into.


Foundation Repair 3


Once ground cover is on this new plaster it will be invisible.


While this was drying I added a gravel walk between the pavement and the silo area. I would have liked it if the gravel wasn't quite so large. I scraped off the grass in that area, smeared on some W-S scenic cement and sprinkled the gravel. After vacuuming the excess, I wetted it with Alcohol/water, sprayed on more thinner cement and then toned it all down with an India Ink wash.


Gravel Walk to Silos


Lastly, I started to weather the roofs. I think I went a little overboard with the powders. I'm not sure what to do to fix it if, by your comments, I decide that it doesn't work.


Roof Weathering 1I also fixed the shed roof, and that I think came out spectacularly. I added some soot and rust under the stacks. Tomorrow, I do some more work on it.

Attachments

Images (5)
  • Foundation Repair 1
  • Foundation Repair 2
  • Foundation Repair 3
  • Gravel Walk to Silos
  • Roof Weathering 1

Today got some stuff done. The main distillery building is effectively FINISHED! I aged all the roofs, cleaned up errant plaster that got onto the bricks, and added the guy wires to the tall stack. On the base, I added the ground cover on the repaired areas, touched up the paint, installed the big curbing and added edges to cover the other exposed foam core. Lastly I started preparing the Rusty Stumps laser-cut picket fencing that will grace the front of the lawn.


The guy wires are heavy gauge E-Z Line. It glues instantly with thin CA. The eyebolts are wooden ship model detail parts. I'm using Doc Brown's weathering powders available from MicroMark. I like the "Mildew Green" color for the areas that would receive water flows and drips. 

Roof Aging Complete 2


Even though I may have overdone it a bit, the weathering has some logic to it.

Roof Aging Complete 1


After adding the missing ground cover I took the entire site back to the layout to see how it fit especially with the newly added curbing. I used a bunch of different adhesives including MicroMark PSA, 3M99 spray, Loctite Go2 Glue, and medium viscosity CA. If anything appeared not sticking I used the CA. 


Site test 2

Site test 1


There's a large drop off at the site's back. I was going to reshape the whole thing using Sculptamold, but then woke up the other day thinking about making a retaining wall out of railroad ties. I have a bunch of Ross ties left over from an order I received and thought I could make a nice looking wall. I experimented with them and noted that 5 high would work in the right side and 3 high on the left. I estimated I'll need about 150 ties and I have 78 so I'm ordering more from Ross.


Retaining wall 1


The left area in this pic would be plastered up to the level of the site since it wouldn't be too drastic a transition.

Retaining wall 2


There will still be some plaster work to do such as leveling the base for the ties and filling in any gaps between the ties and the site, but it will be cosmetic and minimal.


I started to prepare the laser-cut picket fence. It needs some 1/16" sq. wood added to the back to attach the fence to the landscape. I'm also adding the square stock to the horizontal members to stiffen the fence and make it look more real. In reality, the slats would sit proud of the braces, but you can't have everything. I'll paint this tomorrow and install it. With that the base could be installed on the layout. My only reason to pause is the fitting of the boiler house and silos. It may be better to not put anything in permanently until those pieces are finished. 

 Picket Fence Prep


Tomorrow I'll finish up the picket fence and start installing the site for good. Meanwhile, I'm going to finish up the detailed drawings for the boiler house and get them off to River Leaf since there's now a big hole in the site that needs filling.

Attachments

Images (7)
  • Roof Aging Complete 2
  • Roof Aging Complete 1
  • Site test 2
  • Site test 1
  • Retaining wall 1
  • Retaining wall 2
  • Picket Fence Prep
Last edited by Trainman2001

Thanks Mark!


I added another pic as an edit showing the beginnings of the picket fence. Bourbon facilities do have a black fungus that grows on the outsides of the aging warehouses. It's due to the fungus living on the alcohol vapors that escape from the aging barrels. In 20 years the liquid in the barrels is reduced by 50% since the oak breathes. It's what makes the old Bourbons so darn good.

Last edited by Trainman2001

I have enjoyed this thread and am in awe of your modeling talent.  I hope someday the buildings on my layout will look as nice.


I did have one question about the distillery.  You have weathered the building wonderfully and it looks like it has been there for ages...my question is why isn't the lettering on the side of the building weathered as well.  Just curious what your thinking behind that.


Thanks,

Bill

You took my punchline. Good Bourbon goes with lots of things. Heaven Hill's two big brands are Evan Williams and Elijah Craig. I like the old stuff.


Regarding the Bernheim sign, it's really not that new looking when you look close. I can always explain it they recently had the sign repainted.


I got the fence painted and installed and started landscaping. I made some bushes out of sisal twine and some W-S ground covers. It looks like broccoli...


IMG_4389


But installed it doesn't look too bad. The picket fence almost got wrecked when I replaced the building. The front brick extension whacked the fence which was too close to the building's edge.


IMG_4390


I reinforced the bent joint with a couple of pieces of 0.020" brass wire. 


Here's the landscaping on the kitchen side. I'm reluctant to add landscaping to the boiler house side since I haven't decided all the details yet and it would get disturbed. Not having the silos and boiler house does delay me from installing the site to the layout.


IMG_4393

IMG_4391


And one last look.


IMG_4392


I really want to get this one the layout and may just go ahead and put it on, letting the boiler house be installed when it's on the layout. Landscaping on the model serves the same purpose as it does in 1:1 scale; covering the ugly ground-to-foundation line.

Attachments

Images (5)
  • IMG_4389
  • IMG_4390
  • IMG_4393
  • IMG_4391
  • IMG_4392

Add Reply

Post

OGR Publishing, Inc., 1310 Eastside Centre Ct, Suite 6, Mountain Home, AR 72653
800-980-OGRR (6477)
www.ogaugerr.com

×
×
×
×
Link copied to your clipboard.
×
×