I cast the first piece on Saturday. De-molded part needs a bit of clean up, but it's nothing compared to making them all from scratch. Here's the as-cast part after pulling from mold. Feeding the resin from the bottom up corrected all the air pocket problems I was have with the vents molding. In fact, I'm going to modify that mold to bottom feed also. 

Light Fixture 1st Molding

Mold closes very tightly and there's no flash around the part. After a quick clean up, I tried it on the one pole that I had completed. It will work.

Resin Light Fixture no 1

The nice thing about casting resin parts is you mix up a little batch, pour it, and then go back to doing other stuff. A half hour later you de-mold and start the process again. The actual quantity of resin in this little mold is just a couple of CCs. The first one I did was mixed in 8 ounce plastic drinking cups and I wasted tons of expensive resin. Then I switched to those small graduated medicine measuring cups. Again, I mixed up 10ccs of each part (A and B) and still have lots of left over. I'm now mixing 5 + 5, with some left over, but it ensure I'm getting a good mix.

I finished soldering LEDs to the remaining three poles that I'm putting on the distillery property. In this case I drilled the little hole on the bottom end first to accept the ground wire, and then soldered it. I formed the LED, soldered the positive lead and added the shrink tubing. I inserted the wire down the pole and then, using the RSU, solder the ground lead on the LED to the pole's top. I individually tested each one after assembly. I don't know if you can see it, but it takes a very small quantity of solder to make a quality joint. In fact, excess solder hides if the joint is sound. The RSU enabled me to clamp that ground lead to the pole's top, apply just the right amount of solder, and then hold everything in place until it cooled. With an iron that's very difficult unless you have three hands. It's a sweet way to make O'scale light poles. Using LEDs complicates the assembly a bit since grain-of-wheat bulbs have insulated leads and both would fit down the tube, but these are much brighter, use almost no power and will never need replacement (at least as long as I'm alive).

Light Poles w LEDs

By the time I finished all the soldering work, the other three light fixture heads were done. Clean up takes a couple of minutes on each one.

Resin Light Fixtures complete

Tomorrow, I'll do some final finishing and prime both parts in preparation for final painting and assembly. Before I do that I need to finalize how I'm going to attach the lights to the various places. I think two will go on top, and the others at ground level. I may cast a couple of concrete foot pads using the mold I made for the shed roof's footings. It's nice to have these molds.

Attachments

Images (4)
  • Light Fixture 1st Molding
  • Resin Light Fixture no 1
  • Light Poles w LEDs
  • Resin Light Fixtures complete

 I needed to make some footings for the lampposts and was hoping to use the same mold I made for the shed roof footings, but I forgot that this mold already had provision for the square shed posts.

Old Footing Mold

So I bit the bullet and prepared another master that will have a drilled hole to accept the post. I first was attempting to build a hollow tapered object out of 0.040" styrene, but the more parts I was attempting to produce, the more I realized that this was folly. I then took a piece of 1/4" square styrene, glued 0.040" pieces all around, and then tapered the top back to the 1/4" leaving the bottom wider all around. This took about 1/3 the time that it was taking to make a hollow, glued up object.

Lamppost footing master

It took a bit of filler (Testers and some CA), but it will work. I made a starter hole in top that will serve as a locator for the drill press which will be done to the resin castings. The thought was to drill it through, but I imagined this would make a delicate and possibly compromised mold.

I cut a medicine measuring cup in width-wise to form a mold for the silicone which follows, and glued it to a piece of plate glass with some hot melt adhesive. This is the method of choice with a lot of resin casting folks.

Footing mold container

New Footing Mold curing

Here's when I pulled the master, which just popped out.

New Footing 1st Casting

I used a shot of mold release so the silicone broke away easily from the master, and the plate glass. In two hours it was fully cured. I quickly took it downstairs and mixed up a tiny bit of resin, .5 CC of each part. I used a suggestion of my wife's; use plastic pipettes to add resin parts A & B in tiny quantities. Pouring from the jugs was terribly inaccurate for these small quantities and it was making a mess.

New Footing Pour

And here's the first resin cast. Since this was an open mold, there is a bulge of resin that I'll have to sand off. This is easier than creating a two-part mold. I'd like to use the pipette method to fill the mold with mixed resin, but this would leave a hardening substance in the pipette that would quickly limit it to low uses. I poured from the medicine cup onto a stirring stick to control flow. If I'm a bit more careful on the pour, I can control the excess bulge that I'll need to sand off.

New Footing 1st Resin Cast

As you can probably tell, I'm pretty excited about being able to resin cast these small parts. I held off doing this for a long time, but the Smooth-On products are pretty easy to use since they're 1:1 mix ratios by volume for both the silicone mold material and the resin part A and B. It doesn't need vacuum de-airing either so it's pretty fool proof. Be sure to use the mold release. Making one nice part and casting the rest is much easier than making a bunch of identical parts by hand. The resin paints well and is not affected by lacquer or acetone-based paints.

Attachments

Images (7)
  • Old Footing Mold
  • Lamppost footing master
  • Footing mold container
  • New Footing Mold curing
  • New Footing Pour
  • New Footing 1st Casting
  • New Footing 1st Resin Cast

Because of the pyramidal shape of the lamppost footing, I needed to come up with a small fixture to hold the base parallel to the top so I could sand off the excess resin. Since the base is just about 0.040" wider on each side than the top, I needed to hold the top 0.040" proud of the Sander's base place and the same distance from the fence. By gluing some 0.040" styrene to a piece of 1/4" square stock it did the trick.

Lamp Base Sanding Jig

With that problem solved next I had to devise a way to hold the footing in place while I drilled the center hole. When I first just tried to hold it will pliers on the drill press table, the hole entered in the center, but exited off-center. I needed something a bit more creative. This is what I came up with, and it works.

Lamp Base Drilling Jig

I insert the piece from the bottom and the styrene pieces (glued) grab the taper. I also use pliers to stabilize it and have a drill press clamp to hold the fixture in place on the drill press table.

While waiting for some more resin to cure I decided I'd make another lamppost. I'm going to install two on the silo tops, and the remaining three at ground level. Therefore; I need 3 good footings for the ground. For the silo mount, I forgot to add a base plate that would keep the poles from going in too deeply. I cut and shaped them out of thin brass and soldered them to the post with the RSU. On one I needed to reposition the plate a bit and the excess heat started to melt the insulation on the positive lead. This would not do and could create a short, so I de-soldered the LED from the pole, pulled the red lead out and put a piece of shrink tubing over the damaged area and then reassembled and re-soldered the LED.

Lamp Insulation Challenge

With that done, I steel wooled the poles, then scratched them with a wire brush to provide a good surface for paint that follows. I primed them with the Krylon after masking the LEDs and a small spot at the top.

Lamppost Primer

I wanted to have raw metal to which to glue the resin lamp housings. I poured another footing and lamp housing during all of this. 

Lamppost masking

Tomorrow I will assemble them, mask the LED once more, and air brush the lampposts with Tamiya flat aluminum. 

Attachments

Images (5)
  • Lamp Base Sanding Jig
  • Lamp Base Drilling Jig
  • Lamp Insulation Challenge
  • Lamppost masking
  • Lamppost Primer

A very nice and detailed tutorial, and a nice job on the light posts. Just a thought, but what about using plastic sandwich baggies to pour into the mold, Snip the corner with scissors while it's over the mold, similar to a pastry nag. The baggie could be used twice, since it has two corners.

Don

Didn't get into the shop today, but the boiler house cuttings came from River Leaf. I could immediately tell that my "designing-for-laser-cutting" skills are improving. I was able to design the brick work so the rows align perfectly at the corners in the trim pieces. In this case I also changed the way I'm doing the fancy brickwork around the windows. On the main building I made them as separate appliqués that stand proud of the surface. In this case, I drew the lintel design directly into the wall brick work. This is actually more prototypical since most brick lintels are flush with the walls in which they sit. This reduces parts count, simplifies construction a bit, and, most importantly, makes it easier to apply the grouting—less probing and scraping with my dentil tools. I'm still making the sills separate since they do protrude from the walls in most cases.

Boiler House Kit

You'll notice plastic bags with parts. Andre and I had a problem with the way I was leaving line gaps to keep the parts attached to their respective frets, so all the parts were cut free. This is actually a benefit for the builder since there's no little tabs that need sanding off. It will make painting the windows a little more work since I'll have to fasten them to a piece of cardboard using the tape-curled-back-on-itself method so I can air brush them en masse. If I intend to offer any of this as commercial kits, makes it harder to identify parts since you don't have the fret upon which to add parts names and instructions. The main windows look terrific and fit their openings perfectly.

BH Window Example

These consist of two parts, the outer frame and the mullion frame. They align perfectly. I'm going to mount the window midway in the 1/4" wall thickness. To ensure that they align there and glue well I'm going to glue some strip wood behind the window's mounting location to act as a backstop and glue spot. 

I still need to do something for the interior, since, unlike the main building, the big windows here will give a pretty open view of the interior. I will either make my own boilers or get them from another vendor. To make a couple of industrial boilers shouldn't be too challenging (famous last words). And I need to get the smoke stack. I'm leaning to the Altoona Model Works offering. It's a real nice brick stack that's proportional for what I'm trying to do. If I can find a properly shaped (inexpensive) tapered dowel of the right length, Andre has offered to try and engrave the bricks on it. 

It's one thing to engrave on a cylinder, and quite another to do it on a tapered shape. I'm not sure what kind of file image the laser cutter needs to engrave bricks on such an object. Rolled out flat, the brick pattern is a conical array. AMW is asking $75.00 for their offering, and frankly, it's quite justified.

I can't even buy the tapered dowel and wrap it with brick paper since the lines wouldn't meet properly. I'd have to custom draw and print out the brick patten in Illustrator to make my own brick paper. Does anyone have any experience with this?

I could go with a steel or iron chimney, which would be a straight cylinder with some guy wires. That would not be too difficult to scratch build.

Attachments

Images (2)
  • Boiler House Kit
  • BH Window Example
Last edited by Trainman2001

I recall a thread that Dave Minaric had a while ago about a tapered smoke stack he had done for a facility he was creating. A lot of furniture legs are tapered, but I'm not sure how well they could be carved. A drill mounted horizontally could be a good substitute for a mini lathe for the coursing, but the vertical, or head joints would be a real pain to carve individually. Brick paper would have to be custom printed on a conical sheet. 

The building looks great so far, and hopefully you'll be able to figure out the tapered stack. Andre is very talented, and I think he's up to the challenge.

https://www.facebook.com/photo...411725228&type=3

This is a link to a mock up photo of a switching shanty Andre is working on from photos and measurements I gave him a few months ago. It's from a prototype I'm restoring. 

Don

AZroads posted:

I have been lurking on this build for months and am amazed at what Trainman has done. I too want to build a smokestack and look forward to the solution.


The link to facebook did not work for me?


You probably have to have a facebook account. I'll see if I can get Andre to post the photo here, I don't remember if he did or not?

Don

It is Altoona Model Works. I realized my mistake and then went back and edited the post last night. I'm still not sure about the stack. I may try and draw the projection of the the conical bricks to see if i can do it. I first have to re-learn how to do mechanical projection. The last time I did this was my senior year in high school. And folks, that was a long time ago.

Today saw the completion of the Distillery lighting project. I painted the poles Tamiya flat aluminum and then soldered in a 1/4 watt 470 ohm resistor in each black (negative) lead as a current limiter for a single 3 v LED being fed by a 12 VDC power supply. I painted the footing Model Tech concrete color.

Lampposts Painted

The first poles that I installed were in the silo tops. The tops (as I mentioned before) are 1/8" ply so they represented a substantial base to support the poles. One of the silos, due to the repair of a dent in the mailing tube, has a plastic plug pushed up inside. This complicated feeding the wire through the silo. I had to use a steel rod fish with the leads taped on one at a time to thread through the top, a half inch gap and then through the plastic disk.

To facilitate feeding the wires through the various layers of materials on the distillery's base, I used a soda straw as a conduit. They're conveniently 1/4" o.d. and I didn't even have to glue them in.

Soda Straw Conduit

For the ground level posts, I did't have the luxury of using the straws since the holes had to support the poles and had to be 1/8", so in this case I went back to using a fish to guide the thin leads through all the layers of plaster, foam and Masonite. Once all the posts were inserted and all those wires were under the layout—which was a literal pain in the butt since I had to be up on top and down below as I fed through all 6 leads of the remaining poles—I decided to combine all the +s and all the -s to make it easier to use crimp ferrules. This thin stranded wire was purchased at Conrad Electronics in Düsseldorf, Germany in 1999. It's a metric size that's somewhere between 24 and 26 AWG. Being so thin, to use my red and black ferrules, which are really for 18 AWG, I have to fold the wires over on themselves up to three times so the ferrule crimp has something to hold onto. I was going to put the connectors on each wire under the table., but I realized that combining all five leads together made the wiring simpler AND gives these big ferrules something to grip. Because their forming a parallel network the 470 ohm resistors are still correct.

Lamppost Wiring

So all I had to do was run some two-conductor cable from one of my DC distribution blocks to a two conductor Euro-style terminal block and everything was ready to go. That's easier to write about then do since I was on my scooter under the layout with an LED headlamp and my magnifying visor to see what the heck I was doing. When working overhead under the layout, my Varilux bifocals are in the wrong position so I need the magnifying head piece to see anything. I will be a tad sore tomorrow for all the up and down work. But it's worth it to see this...

Bernheim Lighting at Night 1Berheim Lighting Installed

The LEDs are quite bright, maybe too much so for a model railroad, but they're so cool (figuratively and literally). They last a lifetime, use practically no power, have no heat, don't melt plastic, won't catch anything on fire, etc. And they're really cheap now.

After all this I test fit some boiler house walls to see if my original calculations were right when I made the plaster place holder. Much to my delight, the building fits its socket perfectly and the side corridor lines up nicely with the floor that I built into the distillery base.

BH Fit Check

With the lampposts done, it was time once again, to put all the tools away, sweep the shop floor and make the place a little less disgusting. Andre is cutting one more wall for me, and when it arrives I will start the boiler house.

Attachments

Images (6)
  • Lampposts Painted
  • Soda Straw Conduit
  • Lamppost Wiring
  • Bernheim Lighting at Night 1
  • Berheim Lighting Installed
  • BH Fit Check

First of all, Pat, here's a closer up shot of the lampposts on the silo tops. I hope it shows what you wanted to see.

Silo Lighting cu

I would've like have used smaller diameter tubing for the poles, but couldn't get the leads down them.

Today, I started to work on the boiler house. I'm still waiting for a back wall, but was able to get a lot done. I also noted some of my usual mistakes. Non of them are terminal, and I can proceed without delay. I will have to make some mods if I want to offer the boiler house as a separate kits. The level of complexity is much less than the main building and will go together much faster also. 

Before getting started I wanted to check the fit of the corridor pieces over the little pavement that I put down. I wanted to make sure it was in the right place, which it was, but I quickly found out that the pavement raised the ground level at that spot and made the corridor pieces too high. It was a good time to find out about this and I removed about 1/8" from both pieces and you can see the correct fit in this picture.


Corridor relief cut

Construction started with mounting the front and one side in a miter clamp. Using the 1/4" stock means you don't have to include lots of corner bracing. I did dress the edges of the sides since the laser leaves a very slight angle on cut edges. I wanted to maximize the gluing area and did this with the NWSL Precision Sander. I used Titebond glue for these joints, and then added some thin CA to further strengthen the joint and enable me to unclamp a little sooner, since the CA would hold the joint while the Titebond fully cures.

Using thicker stock also meant no tabs were needed for the floor to wall joints. This eliminated a lot of work that I had hand scribing bricks into Masonite end grain. The floor fit like a glove and needed very little clamping to hold it in place to set.

BH Installing floor

This material is MDF, so it's smooth on both sides unlike the 3/16" Masonite I used on the main building. This will make it easier to do the interior (as will not have lots of reinforcement pieces around). While this was drying I built the clerestory roof using the same technique as I did with the main building small roofs. I added a couple of scratch built supports to hold it together which off the building. I did design a laser cut mid support which I will add later. The inner and outer roof edges were beveled to the correct angle on the belt sander.

BH Clerestory roof

When the floor dried I glued in the truss supports. This can all be done without the back wall. After trying the trusses and roof on, I again found that the trusses were sitting too high in their notches. The simple fix was to just notch the truss ends to lower them the required amount. The long term will be to have those notches laser cut.

BH Truss Relief

Since I wanted to mount the windows more or less in the center of the wall thickness, I needed to add a "window-stop" to hold the windows square in the opening. I used some 1/16" square bass wood, cut to length in the Chopper II. Aleen's Super Tacky Glue is holding them. To make sure they were square to the frame I backed them up with a steel angle block so they were glued flush with the back edge. I put stops on three sides, but not the top since it's curved.

BH Corridor Roof Install

The above also shows adding the corridor walls and roof. I neglected to draw a roof so I glued some 1/16" sq. stock one scale foot below the top edge and custom cut a piece of 1/16" ply to make a roof and glued it on. I tried the window with the stops and it works as planned.

BH Window Fit test

The last thing I did was glue some of the Laser Board trim pieces in place. Going from 1/16" to laser board works really well and works great on covering the end grain at the corners.

BH Front Trim Install

Looks nice even without the painting. While waiting for the back wall to arrive I'll paint and build the windows, build any necessary roof trim, and start working on the interior which is easier without the trusses in place. I want to build a boiler or two. The ceiling clearance to the truss bottom is 12 scale feet (3") so there's enough room for a small horizontal boiler. There's also room for some other steam powered stuff if I want to add it.


Attachments

Images (8)
  • Silo Lighting cu
  • Corridor relief cut
  • BH Installing floor
  • BH Clerestory roof
  • BH Truss Relief
  • BH Corridor Roof Install
  • BH Window Fit test
  • BH Front Trim Install
Trainman2001 posted:


I would've like have used smaller diameter tubing for the poles, but couldn't get the leads down them.

Just keeps getting more amazing!

One thought:  I often use enamel-covered magnet wire when I need to get wires through tight spaces or when visible wires need to be unobtrusive.  You can get it in very tiny gauges. I have used down to 30AWG for short distances without issue. Certainly it won't matter for an LED.

Of course, you would have to solder the leads inside the luminaire, but at your skill level...

Don, that's exactly the way I did it. It's the shrink tubing that causes the problem, not the + lead itself. If you're using grain of wheat bulbs you don't have those bare exposed leads coming out of the LED to contend with. I have Liquid Electrical Tape which can be used in tricky situations. I may have to try and use that.

Today, while I wasn't planning on working the basement since I was going to spend some more time designing the stationary boilers to go into the boiler house, I went downstairs and started working anyway. I did some more work on the clerestory roof, and then got more deeply involved with windows.

First, I traced the big window frame onto a piece of 4-ply Bristol Board to make a template to cut the clear styrene. I hardened the curved edge with some thin CA so the Xacto wouldn't keep shaving the paper off. I needed 8 pieces of glazing.

BH Main Window Glazing

I'm going to glue all the inner and outer frames together, then paint, glaze and install after all the brick treatment is done.

Next up was preparing the clerestory walls to accept their windows. I wanted these windows to install closer to the outer edge so they too needed some windows stops installed. In this case I used some 0.010" X 0.080" styrene strip mounted flush with the wall's back. I used medium CA to hold this. My dentist gave me another tool yesterday when I went for my checkup, and this one is an excellent precision glue applier. It's one of the those probes that they use to measure the depth of pockets that form in your gums. It's graduation in 3mm steps (3,6,9), but the 3mm step was broken off so to him it was junk, but to me it's an excellent hobby tool. I've said this before, make friends with your dentist and have him provide you with broken instruments.  You can regrind them to do all sorts of different things.

Clerestory Window Stops

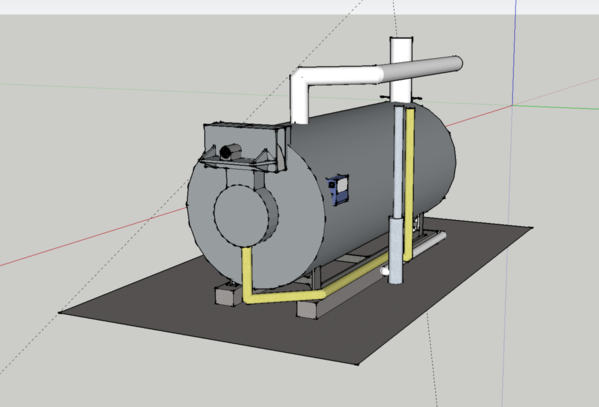
 I used the digital caliper to transfer the window space's measurements to the Chopper. I set a stop to the width and quickly produced all the pieces needed. I got one side completed and half of the other before dinner. I'm going to build my own boilers and found a good design in SketchUps 3D Warehouse. I scaled it so it's about 8 feet in diameter and fits well under the 13 scale feet ceiling height.

Stationary Boiler for BH

With an 8 scale foot barrel (2"), I can easily make it with a piece of PVC pipe. Plastruct tubing products would pipe it. I don't know if I'm going to have one or two of these. Plus there will have to be some ancillary equipment around the room: pumps, tanks, etc. I'm also going to make a tile floor. I don't know what colors to paint the walls, either a gray or sea foam green probably.


Attachments

Images (3)
  • BH Main Window Glazing
  • Clerestory Window Stops
  • Stationary Boiler for BH

For some reason, my entry was duplicated. I just removed the redundant post. Before I talk about the boiler house, I have to share a ironic and annoying event. We have a hand made ceramic vase that we bought several years ago at the huge St. James Art Fair here in Louisville. Two years ago, I knocked it over and it just chipped the curly edge of the vase's top. I was able to reassemble and repaint the defect so it was effectively invisible. Fast forward to last week. My wife, while vacuuming, bumped the table the vase was sitting on and it fell to the floor. I didn't disintegrate. It just bumped that top edge again and broke away a different spot. This time, the fragments were basically dust. I'm very good at restoring china... I said that I could fix it, or at least try.

I thought that I could place tape under the lip and create a mold to reform the shape. I mixed 30 minute epoxy with micro balloons, and just filled the area.

Vase Repair

I wasn't sure if this would reshape it correct, but it was worth the effort. And then...

I bumped it while it was on the workbench and it toppled over to the concrete floor and this time it disintegrated, EXCEPT FOR THE NECK AND TOP. That of course is the irony. So I decided to see if my idea worked anyway. Unfortunately, it DID. I could have restored that delicate edge and it would have been invisible. I'm good at matching color and providing a gloss surface. My wife wasn't very happy since it wouldn't have hurt as much if I couldn't have fixed it. Here's the remains of the vase with my excellent repair in progress. If you look closely you can see my previous repair which didn't break either. Go figure.

Vase Repair DOH

Now back to the boiler house. The nice thing about SketchUp is this. You can go from perspective projection to parallel projection and then choose specific views (top, front, side) which I then take screen prints of and voila, instant orthographic projection drawings that can be imported directly into Adobe Illustrator (or other vector drawing program) to create working drawings. Yesterday I showed the boiler I chose to populate the boiler house. Today I made the projections and put them into Illustrator and scaled them to 1:48 from which I can produce a real model.

Screen Shot 2016-02-17 at 6.36.23 PM

I printed them out and took them to the shop. The boiler is exactly 2" o.d., the length is almost 20 scale feet, or 5 inches in 1:48. I put a view of the boiler inside a took a picture through the windows to get an idea of how it will look in the building.

Boiler Design Thru Windows

I'll start building this after we return from an emergency trip back East. Our very closest friend has been diagnosed with pancreatic cancer and is doing very poorly.

I'm still waiting for the back wall, but it's been shipped. Meanwhile, I assembled the main and clerestory windows, and cut the clerestory glazing. When I come back I'll paint the windows. Here are 8 assembled windows. I glued the inner mullion frame to the outer using Formula 560 Canopy Glue. It's got good stick, not too viscous, and dries clear.

Main Windows glued

Next I clued the outer clerestory frame to the inner mullion frame. Again using canopy glue and applying it with my newly acquired dental probe. It's a perfect glue applicator and has nice balance. My dentist buys good American-made dentil instruments. What MicroMark sells is usually of Pakistani manufacture. It didn't take much glue to hold the frame together. I didn't want to a lot of cleanup. After gluing them together, I put a weight on top to cure them flat, and then used the Xacto to scrape the tiny amounts of glue that oozed out of the joint.

Clerestory window Glue

Just to see how they looked, I placed all the windows into their openings. Note how the stops hold the window face flush with the brick.

Clerestory Windows test

Laser cutting using laser board produces some beautifully thin mullions. I don't know how I could have created them this well any other way.

Lastly I cut all the mullions out of the scrap left over from cutting the main windows out of clear styrene sheet. I put these away safely until they're going to be installed... last. I sized the windows so they would fit inside the window stops because I didn't want the glazing thickness to push the windows further out of the opening. 

Clerestory Glazing Cut

The opening was measured with the digital caliper and that measurement was transferred to the Duplicutter. As I noted above, work will stop for about a week while we're away.

Attachments

Images (8)
  • Vase Repair
  • Vase Repair DOH
  • Screen Shot 2016-02-17 at 6.36.23 PM
  • Boiler Design Thru Windows
  • Main Windows glued
  • Clerestory window Glue
  • Clerestory Windows test
  • Clerestory Glazing Cut
Last edited by Trainman2001

Thanks gents! Well... we got back to L'ville on Friday. That 700 mile drive is a trek. We were glad to be able to be with our friend as he begins an arduous journey in trying to get ahead of pancreatic cancer. The prognosis is not very good.

The rear wall came from Andre while I was away and I glued it onto the building very quickly. I then started getting into more detail work building the clerestory, refitting the trusses, fitting the main roofs, making a floor covering worthy of a boiler house and starting to build the boilers themselves.

After gluing up the clerestory with their roof, and test fitting it to the model, I found that the intermediate trussed needed modification. I should have seen this in the drawing, but missed it. It didn't take too much work to make them fit correctly. You can see how, if they would have continued to a point, they would interfere with the clerestory walls. 

BH Truss Mod reason

Intermediate legs were cut out of the same Masonite that the boiler house is made of, and after gluing with medium CA, the king post and the truss top was removed. A new cross member holds everything together.

BH Truss Mod

The roof fit was decent so I added some 1/4" square styrene pieces as roof stops so the roof wouldn't slide downwards since the clerestory prevents the roof from being glued together as I did with the main building. I would like the roof to be removable to get into the innards since there will be a lot going on in there. 

BH Main Roof Fitting

I had designed some ledges to glue to the clerestory walls to support a couple of small clerestory trusses, but they weren't necessary since I worked backwards by gluing the small trusses into the roof first. Gluing the wall pieces into the roof and small trusses was sufficient to hold them. The end pieces finished it off.

I placed the boiler house back on the layout just to get a look.

BH Trial Fit 3

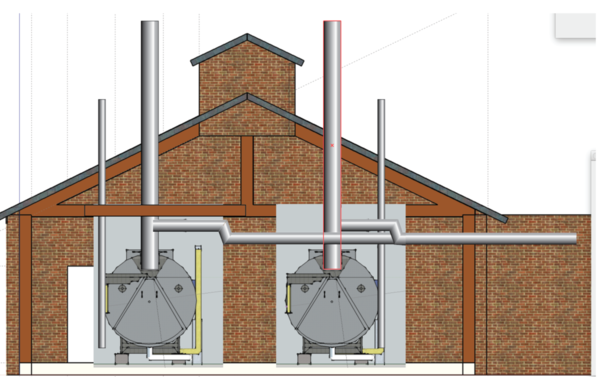
Instead of going with the large brick stack and to save some money, I'm going to use straight metal stacks up from each boiler. As it is, I'm assuming that they will be natural gas fired as the current Heaven Hill Distillery boilers are fired. They don't need a big flue. I'm designing the piping in Illustrator and have downloaded drawings of industrial boiler installations to use as guidance. Here's how the flues and steam lines will run. I'm going to pretend that the steam lines run though the corridor into the main building.

Boiler flue layout

The flooring was a pattern that I designed for Saulena's Tavern was put to good use again. I stretched the image and tile printed it so it would fit the 9.5" X 9.5" floor. I had to notch out the edges to clear the truss support timbers.

BH Floor Cover trim

The edges between the floor segments were trimmed with an Xacto and straight edge, and then butted together and taped underneath. In these pics, the floor is not glue down. It won't be until the interior walls are painted.

BH Floor Cover fit

It was time to get to work on the boilers themselves. I bought a nice piece of 1.5" PVC pipe at Lowe's for a little over 2 bucks. It's about 1.9" o.d. and this works fine for my 2" diameter plan. While I would have liked to have been able to cut the pipe with a machine tool so it would have been perfectly square, I managed to get it close by cutting with a hack saw and then scribing the length with a surface gauge, roughing off the material to the line with the belt sander, and then finish sanding with a piece of medium grit sandpaper on my plate glass work surface.

Boiler Tube Measure

Using dividers, I scribed circles on 0.040" styrene sheet and cut rough circles that were CA'd to the PVC. CA really holds well to PVC. I again used the belt sander to remove the bulk of the excess and then used sanding sticks to bring the end plates in line with the tube. A couple of little spots needed to be filled with CA.

Boiler Tube Comp

I placed both boilers in the building just to get an idea about fit.

I did a trial to see about making the boiler bases using a curve cut lined with thin styrene. This is kind of how I'm going to build the bases. I have lots of design choices based on my research. o get a perfect fit, I already had the tube's radius on my dividers. All that was needed was to add 0.013" inches representing the thin styrene's thickness. 

Boiler Support Trial

Here's a boiler pic that seems to be how mine will be detailed. It's funny... (Not ha,ha, but peculiar). The PVC tube cost 2 bucks, but I just ordered $85 worth of Plastruct fittings to make it all work together. It's going to be a lot of fun building and installing these boilers. (sort of like the substation project).

Screen Shot 2016-02-29 at 8.07.15 PM

The last thing I did today was start the retainer wall project. This will run concurrently with the boiler house project and will finally fill up that gaping space between the high line and surface tracks in the layout's back. I'm using the same "Concrete Retaining Wall" scheme as done by Bob Bartizek using Masonite with 3D buttresses to add interest. Again, material costs were very inexpensive. For a 20 foot retaining wall, 5.75" high cost $7 and some change at Lowe's and the fellow was nice enough to rip all the pieces I needed so I don't have to do that using my circular saw. The high line is on a grade for the left third and then levels off. The 5.75" is the railhead height. I'm still debating whether or not to taper the retaining wall. I could keep it level and let the train rise out of it. I also posted this on a thread about concrete retaining walls.

Retaining Wall Start 2Retaining Wall Start


Attachments

Images (14)
  • BH Truss Mod reason
  • BH Truss Mod
  • BH Main Roof Fitting
  • BH Trial Fit 3
  • BH Floor Cover trim
  • BH Floor Cover fit
  • Boiler Tube Measure
  • Boiler Tube Comp
  • BH Boiler Placement trial
  • Boiler Support Trial
  • Boiler flue layout
  • Screen Shot 2016-02-29 at 8.07.15 PM
  • Retaining Wall Start 2
  • Retaining Wall Start

Thanks all! Although today was an exercise day, I did get some quality time to work on the boilers. I built the bases and started building the boiler supports. I spent almost 3 hours on this and don't have too much to show for it because it's finicky work AND I was designing on the work bench instead of drawing up detailed plans, printing them out, and accurately cutting parts from this drawing.

I conveniently found some Plastruct ABS I-beam that was left over from the bridge project so this became the base frame. I thought I had some brass channel that I was going to use, but I had used it all up and the Plastruct would work fine. A few years ago I bought a magnetic building plate and magnets to hold stuff together just for this kind of job. Sometimes I forget that I have it, but it worked great today. When I build the bridges, all the structural shapes were coped out so they nested correctly. In this case, and after attempting to do it on this small stock, I just cut the ends square and glued them in place with solvent cement.

Boiler Frame Build

After it set up a bit I glues some small gusset plates to each joint to strengthen the assembly. I then started designing and cutting the supports. I roughed out a single piece, held the boiler over the frame with a 1/4" spacer and got the length and angle so the boiler would be supported in the center. The supports consist of two side pieces with a piece of 0.188" square stock glued between. To put the proper radius on the mounting surface, I used some of my adhesive -backed sand paper (fine and medium) fastened to the same diameter PVC pipe as is the boiler. By carefully sanding the parts on this surface, I was able to impart a perfectly matching surface on the mounts.

Sanding Boiler Supports

I needed 8 mounts so that was 16 sides, and 8 centers. Here's all of them in progress of being finished.

Boiler Supports in Progress

I tried them on for fit and was pleased with the result. Nothing's glued here yet so it was a bit of a balancing act to get everything to behave for the pictures.

Boiler Support Fitting 2Boiler Support Fitting

These should work well. Solvent cement has no effect on PVC so the joint will have to be CA. The lower joint will be held with solvent and CA. On another thread tonight I see someone was asking about turn of the Century stationary boilers. One of the responders posted some excellent pictures of stationary boiler mounting. If I was to backdate my effort, it would have made a great source. Even though my distillery building is based on a 19th Century structure, my railroad is 1950s and newer so putting a newer gas-fired boiler inside the boiler house doesn't upset me too much. Besides, I have good reference material on more modern equipment.

Attachments

Images (5)
  • Boiler Frame Build
  • Sanding Boiler Supports
  • Boiler Supports in Progress
  • Boiler Support Fitting 2
  • Boiler Support Fitting

Thanks Mark! Once I finally figured out that I can scratch build stuff, it seems that I can scratch build just about anything (within reason... I don't think I can build a fusion reactor...yet).

Did errands today, so only got a half hour in the shop (bought more styrene), but I did get an important step done.

IMG_4670

I got the first frame's mounting pads glued in. I used solvent cement and medium CA. My pictures showed the feet at the extremis of the boiler so that's where I put them. To ensure a good, straight fit of the boiler on the feet I again used the sandpaper-on-PVC-pipe and line-sanded all four feet in place. Since the sand paper was on the same radius as the boiler shell, the feet trued up for a perfect fit. In the picture, the boiler is not glued down. It is centered which was a bit of a worry since I was eyeballing the angles in this case. Again, I still wonder why I didn't do my usual design on computer activity and just went and built the feet on the fly. I was ultimately more difficult and there was a lot more piece-to-piece variation than I'm used to.

Tomorrow, I do the other frame's feet and then get onto the detailing. I can't do any piping until the Plastruct parts arrive, and I can't paint the exterior until the weather warms up a bit. There are a lot of bits that go onto this boiler that aren't pipes. I'll get those done, plus I can start building the retaining walls.

Attachments

Images (1)
  • IMG_4670
Last edited by Trainman2001

Boiler progress was made today. The second foundation has its feet. I started to build the front end detailing. This involved a sequence of round disks applied to the boiler front, and then constructing a series of drums that held the burners and air heating units. Here's both boilers sitting on their frames, neither is glued.

Boilers fit on Stands

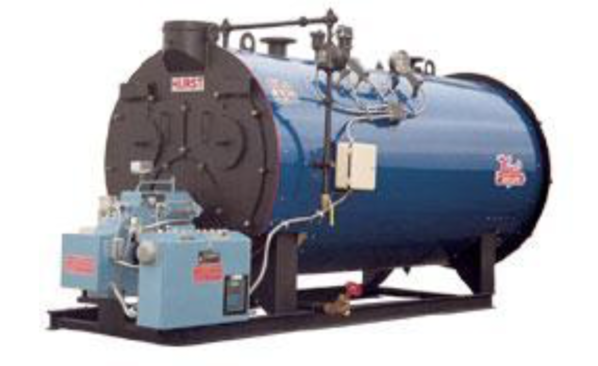
Here's the best image I found showing this level of detail.

Horizontal Boiler installation

There's a ton of detail to add including lifting lugs, hand holds, clamp-down bolts, and lots of bolt and nut details. To make the round pieces out of 0.010" styrene I use my homemade circle cutting dividers. I had a second set of machinist dividers that I ground on needle point to a chisel point so it can scribe styrene sheet and make precision circles.

Dividers Circle Cutter

While it works great, I have to be careful to apply very light pressure as I rotate the point. If I press too hard, the chisel point starts to track inwards and distorts the circle. About three rotations are sufficient to produce scribes that are deep enough to snap the styrene. I'm using thin material. If you're doing this with heavier stock, then you'd have to do rotate it more times.

There's a large plate that represents the removal front plate. Before installation, I used a center-finder on my machinists square and found the center. I then laid the boiler on a pair of v-blocks and using the square on a piece of plate glass, drew a center line. I did the same thing on the plate. After placing the centerlines together, I applied solvent cement around the edges. Below this goes another disk that represents the burner location. I estimated that this was about 1/2 the diameter of the boiler. This was convenient because the only large tubing I had besides the 2" pipe, was some left over 1" PVC pipe which made nice drum material.

Boiler Face plates

On this goes some reinforcing ribs which I made out of 0.080" Evergreen Styrene angle. I laid out the lines with a machinist's protractor. First I needed to scribe a horizontal datum line across the center of the smaller disk. Then I laid out four lines; 2 at 30° and 2 more at 75°. The angle was glue with solvent cement.

Boiler Face with Ribs

The outer drum has a rim around the face. I simulated this by using a smaller disk and a rib of 0.020" X 0.080" strip stock. The ends were held with CA, the rest with solvent cement.

Boiler Drum flange

Behind this large drum is another one. Between them is the burner assembly and is also flanged. In this case, I didn't have a piece of round stock so I'm turning one out of aluminum. If I had more tubing choices, I would have made the  tube and attached a disk on the end to simulate the flange, but I didn't so machining was the way. To cut the drums squarely, I first scribed the length using a surface gauge. Then using a coarse toothed razor saw, carefully cut on the line a bit, rotated the tube, cut a little more, and so on until I was able to cut through squarely. A little touch up on the belt sander and then on some medium grit sand paper on the glass plate and I have flat and square ends.

Here's the four drums completed with their respective end caps CA'd on.

Boiler Front-end Drums

And here's the stock in the lathe. Notice I'm working on both ends. The end in the chuck already was turned down to the diameter I wanted (0.650"). I drilled through the whole piece with a 1/4" drill which will support the 1/4" tube that's going to align an hold the three pieces together. In this picture, I'm in the middle of parting off the first piece. Instead of turning the piece around and parting off the other, I'm going to leave it in the chuck and just face the remaining stock off until I have a thin flange. I'm doing it this way because, I won't be able to get close enough to the piece with the cutoff tool and still have enough material in the chuck for safety. I may reverse the piece being cut off and face its flange down so it's even thinner.

Boiler Burner Part being machined

Weekend's here so work will begin again on Monday... that is unless I get to work when my grandsons are here. No 1 grandson has a couple of projects in the basement that he could/should be finishing. If he wants to work there, then I get a chance to work too. Otherwise, see y'all Monday.

Attachments

Images (8)
  • Horizontal Boiler installation
  • Dividers Circle Cutter
  • Boiler Face plates
  • Boiler Face with Ribs
  • Boiler Drum flange
  • Boiler Front-end Drums
  • Boiler Burner Part being machined
  • Boilers fit on Stands

As is yours, my friend.

Unlike when I was working and Mondays were a bummer, being retired and looking forward working in the shop, I really like Mondays now. Today I finished the burner housings and started cobbling together the feed water tanks for the two boilers. All of the Plastruct fittings arrived and I realized that I don't have a pipe size large enough for the flues. I was planning on using the only large brass tube I had (11/32"), but I'm reconsidering that. I now have enough material for all the smaller piping.

After cutting off the flanges, I put them back in the lathe chuck and scribed the bolt-circle that would represent the bolts holding the flange to the part next to the boiler. I drilled all the other drums with the 1/4" bit and used a piece of 1/4" wood dowel to act as an axle to hold everything in line.

Boiler Burner Components

The bolt holes were made with a 0.031" small drill in the Dremel handpiece. I then threaded it together with first drum and fitted the Tichy Group NBWs. All was held together with CA. If you look closely you'll see that I'm using square nuts on the bolts would be very un-protypical for a machine assembly, but I am 100% certain that after they're in the building with roof on and residing 6 ft from the viewer, I'd be lucky even if they knew there were boilers in there.

NBWs on Burner Flange

Here's the string put together.

Boiler Burner Components Together

I made a boo-boo by drilling all the thorough the front drum with the 1/4" and had to go back and more plastic disks to cover the hole. This turned out to be a blessing in disguise. The thicker front will give more meat into which the grab irons will be able to attach. It also made the front flange a little less deep which also works better. I then CA'd the whole deal together and to the front of the boiler (after drilling a 1/4" hole in the boiler front).

One of the pieces that arrived are the elliptical tank ends. They measure 1.25" across. I had thought they'd work with the smaller PVC pipe, but it was way too small. I had a cardboard tube that was somewhat bigger (just over an inch) that I could press into service if I could make it about 0.20" bigger. My plan was to wrap plain inkjet paper around enough times to build out the diameter. I first cut up some strips on the paper cutter and started by taping the first one to the tube, and adding additional layers by taping them to the previous layer. With the PVC pipe I was wrapping way too many. With the cardboard tube, I was able to reach the diameter with three pieces of 11" X 4" strips. To make the layers tighter, I taped all three pieces together with a butt joint using Scotch Magic Tape to hold it.

Butt-Taping FW Tank Wrapper

After tightly wrapping the tube, I taped the end down and then hardened the end with thin CA. The paper and cardboard absorbed the CA quickly and cured almost instantly. So fast that it created those awful fumes that CA can do when curing too fast. The hardened end enabled me to sand the end on the belt sander and then flat medium grit paper on plate glass to give a very smooth square end. With a true, square end I could use the surface gauge to scribe off a 3" length just as I did when cutting the boiler's PVC tubing. Before cutting with the razor saw, I soaked the scribed area with thin CA to harden that area also and make cutting with a saw less like trying to saw paper. Then I sawed around the line and got a nicely square cut. The cut end was again soaked thoroughly with thin CA so that end too could be sanded true.

Paper Drum Process

After sanding I CA'd the tank ends on, and cleaned up the joints and had two tanks completed and ready to build bases and pipe up with pumps and valves. I probably will have to primer the paper so the paint will work properly with it.

Completed Feedwater Tank

I then puy all the completed pieces back in the boiler house for another status shot. Nothing's glued...

Boiler Room Status 2

I may use cheap copper tubing for the flue pipes or bite the bullet and buy some more Plastruct pieces. The larger sizes get pricey quickly. Tomorrow's weather might be conducive to spraying outside. Today was warm enough, but the wind was too high. If it's good enough, I'm going to paint all the brick work. At some point, I'll have to paint all the mechanicals some primer gray which may also be an outside spray job if I choose to use Krylon rattle can paint.

Attachments

Images (7)
  • Boiler Burner Components
  • NBWs on Burner Flange
  • Boiler Burner Components Together
  • Boiler Room Status 2
  • Butt-Taping FW Tank Wrapper
  • Paper Drum Process
  • Completed Feedwater Tank

The weather today was perfect for outdoor spraying; 72°, sunny and a slight breeze all blowing from one direction. So the first thing I did was spray Rust-o-leum Red Primer. I did both the main building and the clerestory assembly. 

BH Painting 2

It took about 2.5 coats. The first was light, then I went back at different angles to ensure good coverage and especially in the window cutouts. Even though it dried quickly, I won't do any mortar work until tomorrow. I then build the stands for the feed water tanks. I did this using the sheet styrene with thin styrene edging method. I took the diameter measurement using the digital caliper, divided it in half and then added the thickness of the liner I'm installing so the inner diameter would ultimately match the tank's curvature.

FW Stands 1

The left stand has a piece of styrene glued on that will be tried like the one of the right once the cement sets. I fastened adhesive sand paper to the remnants of the paper-wound mailing tube to finish the inner curve so it perfectly matched the tanks. Here are the two tanks sitting on their stands. I took off the Scotch Tape holding the paper wrapping and replaced it with thin CA. The seam will face downwards and won't ever be seen.

FW Tanks on Stands

I'll put an NBW on each foot pad. The least thing I did was add a piece of Plastruct I-beam to space the two legs apart and hold them there. I used solvent cement and thin CA to reinforce the joint. I took a picture through the boiler house windows which shows the FW tanks on their stands with the I-beam in place. You can't really see them...

BH Status 4

To lay out all the piping I took a vertical shot of the arrangement and will import that into Illustrator and lay out the piping on the MAC. I think this will be a wise way to approach it so I don't waste materials. I only bought one feed water pump so I'm going to resin cast some copies. I had momentarily forgotten that I have the resin casting skills now.

This building is simpler than the main building and lacks that fancy brickwork, so doing the grouting tomorrow should be a fast job (famous last words). I will also air brush all the window frames tomorrow. Then I'll get back to building boiler room equipment. I also need to paint the boiler house interior. I still need to get bigger flue piping. The larges tubes I have are 1/4" (one scale foot). I think I need to go up to 3/8".

Attachments

Images (4)
  • BH Painting 2
  • FW Stands 1
  • FW Tanks on Stands
  • BH Status 4

Quick note: after researching boiler house configuration, I found two things that will change my design. 1) a single feed tank and condensate recovery tank can serve both boilers. 2) Feedtanks are mounted elevated to ensure good head pressure at the boiler feed pump and the condensate recovery tank is mounted vertically, not horizontally. I'm glad I found this out before I glued the footings to the auxiliary tanks. I also found how the steam lines from the two boilers will converge. More to come...

I added legs to one of the Feedwater tanks to elevate it high enough to give head pressure to the feed water pump. I used 1/8" round styrene rod, cut on the Chopper and ends trued on the Precision Sander. I then added some triangular styrene braces to make the legs a little sturdier. I had to ensure that the tank would fit under the 13 foot truss clearance. I didn't destroy the existing supports, just added to them.

FW Tank Bracing

The stand is not really prototypical, but it is workable. I think that I-beam is overkill. In fact, it may interfere with the bottom output line. I may remove it.

FW Tank Clearance

The blow down vessel is mounted vertically to allow sediment to go to the bottom. Instead of making ANOTHER tank, I simply put angle "iron" on the other tank and will use it. It's probably oversized. I think I'd like to get a tour of Heaven Hill's actual steam plant to see what's really there instead of the "fiction" that I'm creating.

I'm putting the place holder piece of hardboard to good use. I've delineated the actual boiler house floor area and will mock up all the plumbing with the hardware temporarily mounted there. This will be easier than building all the plumbing with the walls around. I'm know it will all fit. Here is all the stuff sitting on the mockup board.

BH Floor Plan

Here's the equipment in its new locations in the boiler house. As noted in my last little post, one feed water system can feed both boilers.

BH New Arrangement

I bought some 1/2" CPVC tubing at The Home Depot to use as the flue pipe and stack. It's a little large, but it will work internally since these pipes are often wrapped with insulating blankets. To glue the mitered joints, I had to spring for the 2-part solvent adhesive system. The tubes cost 2 bucks, but the adhesive system cost 8. Bummer.

With the red primer dry, it was time to get back to the building itself and get started on the mortar. I'm getting better and faster at this, and, as predicted, the building is much simpler to grout than the main building. I'm using a single-edged razor to scrape off the excess and it seems much faster than using the dental tools. It's also better at clearing out the excess in the transition areas. 

BH Mortar 1

This pic was before the final wipe down with a damp paper towel. I was able to do two sides in about 45 minutes. I like how the window lintels worked out by having them engraved flush with the rest of the brick. I viewing prototype buildings with ornate brick work most have the lintels flush with the surrounding brick. Tomorrow I'll finish mortar work, and get back to boiler making. I won't put the wash on until all the joint compound is thoroughly set.

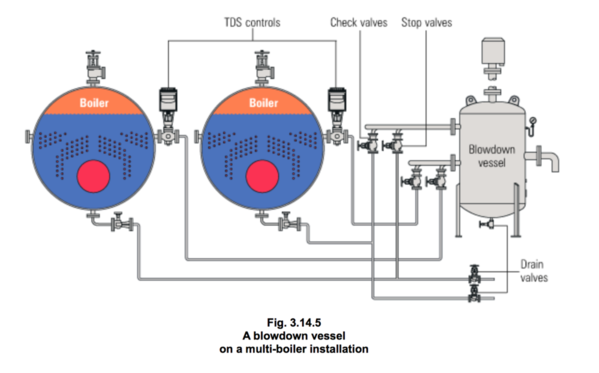
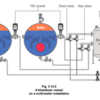
I located an excellent source of boiler room schematics in a U.K. website. Here's an example of what I'm using. This is where I got the idea that the blow down vessel was mounted vertically. Notice, this is a two-boiler installation like I'm modeling and it all feeds into one vessel. TDS stands for Total Dissolved Solids so blow down is controlled by the water conditions with the boilers automatically. Blow down on locomotive boilers was often done continuously, or by the fireman's control. I don't believe it was an automatically controlled process as shown here.

Screen Shot 2016-03-09 at 10.48.41 AM


Attachments

Images (6)
  • FW Tank Bracing
  • FW Tank Clearance
  • BH Floor Plan
  • BH New Arrangement
  • BH Mortar 1
  • Screen Shot 2016-03-09 at 10.48.41 AM

Add Reply

Post

OGR Publishing, Inc., 1310 Eastside Centre Ct, Suite 6, Mountain Home, AR 72653
800-980-OGRR (6477)
www.ogaugerr.com

×
×
×
×
Link copied to your clipboard.
×
×