That was a bit abrupt, but you said be honest! of course do what you want, but I agree with your wife. Let the detail show with a simple paint scheme and weather it gracefully.
"Abrupt" doesn't bother me, although it does depend on the person being "abrupt" if you get my drift.
I'll play it cool and won't paint it any color that I'll regret later.
I've also decided on a different location that will enable viewers to look at the front door. I'm going to move the Gravely Building from its present location to the space in the front of the town. You will look at the Gravely rear, but that's okay. This new site will be sufficient in size and will give a full frontal view of the building. It will also leave the space open for the Rick House which has been planned for some time. It's just another reason to NEVER permanently fasten buildings down to the platform.
It's a wedge-shaped site which has its challenges, but I think it may work. The views show what you'll see from various points of view. I held the iPhone high when taking most of these shots. Eye level is lower. Gravely will either go across the street or in the open space in front of the town. The only problem is the Gravely back… it's dull! Other than the billboard graphic, there's noting going on, not even a back door. That can be rectified since I have a nice Tichy fire escape kit that I haven't used yet. I could added some windows and put the escape and it would be something to look at. I'm literally brainstorming this as I write. I suppose accessories would also add some interest.
My original plan had this little town over top of the railroad which would have given more square footage, but it created so many operating complications, I chose to bring it down to track level. I do wish there was more room. Someone suggested that I also model Hopper's "Sunday Morning" street scene. That could also go across the street.
There is sufficient space behind except the Chocolate Shoppe does encored a bit. I will have to climb onto the platform—which I am not happy to do—so I can actually remove Gravely and test fit the building into the space. I think there's sufficient width. There is good space across the street, but you'd be viewing the back and that's not where the interest is.
It's funny… when I bought and built Gravely, I thought it was a great building with a lot of interest. I liked the multi-level, multi-color lower facade. But since I've been constructing buildings of my own design, it's kind of ho-hum.
Off topic: I'm using the same Chootch rock wall foundation stone for the House as I did for the Appliance Store, but i'm going to paint it completely differently so it won't look the same.
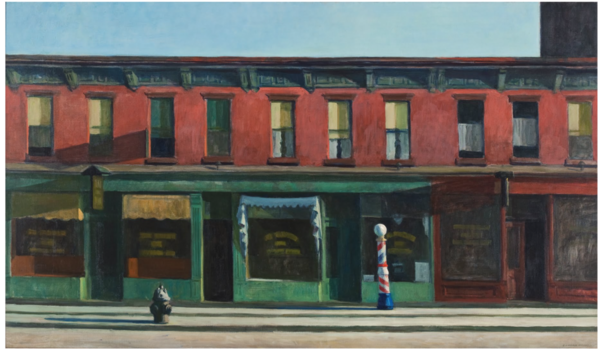
Here's Edward Hopper's "Sunday Morning". I couldn't fit in the entire block, but could fit maybe three of them. I would need a good estimate of the width of each store front. Advice?
Attachments
As far as the Sunday Morning building goes, I think three of them is a good number. To me, there is too much repetition in that painting. But, who am I to judge it. Hopper knew what he was doing.
The high angle views are good to show what spaces are open and how to move things around. You are so right to never attach a buiding to the layout. You never know when you want to move it, make repairs, or make additions.
Space is always a premium on our 1\4 scale world. My train club has been in existence for over 30 years. We have selected sections of scenery to re-layout or redesign on a number of occasions. Always improving.
I went on Google and did some more reading about the painting. When you really dig into you find a lot of variety. None of the apartment windows are the same. The barber pole is slightly tilted. One of the store's door is open. The color of the brick with the long early morning sunlight. The long shadows cast by the fireplug and barber pole, and on and on. I had the name wrong. The title is actually, "Early Sunday Morning".
Here's a picture of the actual street in NYC that he used for the painting. He left off all the shutters among other things. He's classified as a "realist", but I think of him more as an American Impressionist. A true realist would have actually lettered the text in all the store windows and would have been much more technical on the cornices and corbels. Instead, he just approximates these details. That's impressionism to me. In this photo, it looks like some of the stores are single-wide, not double-wide as it appears in the painting. Barber shop for example. More confusion...
Attachments
Yes, I do see the differences in both the photograph and the painting now. Thank you, Myles.
Myles:
Thank you for sharing. I LOVE urban architecture and you do a great job bringing it to life in your modeling.
Thank you! There seems to be a bias in our hobby for rustic, rural, weather-beaten structures. Entire companies exist producing them (Bar Mills, Fine Scale Miniatures, etc.). Doing urban and especially more unusual structures are left up to us hardy souls that want to make our own. In the old days of our hobby, everyone made stuff on their own. Now, we are in a very small minority.
I'm stating that the chandelier is a success (so far... haven't hung it yet). Got the rest of the paint on it and finally blocked all the light. After this picture I found a few other spots that I brush painted to finally block it all. This was just a whim thinking I could simulate light bulbs on the end of fiber optic filament. I didn't know if it would work. It does! It won't light the room, but it will throw some light on the ceiling.
I now drive all my LED lighting with CL2N3 LED drivers. They're terrific and solve the problem of finding the right current limiting resistor. You put anything from 5-90vdc in and out comes 20ma which LEDs love. The higher the imput voltage the more LEDs you can power in series sicne they each drop about 3VDC. They're not happy driving parallel circuits so after you've reached the series limit, you feed another CL2 and run another string.
The rest of today was spent in painting various things. The first thing I painted was the inside attic walls. I used a creamy yellow color craft paint which I had chosen way back when I was doing the drawings. It took two coats and I may add more. I will also be painting the inside of the Mansard windows the same shade, but in that case, I'll match the craft paint with a Tamiya mix so I can airbrush it. Craft paint doesn't airbrush very well. I added another coat on the floor just because it needed it.
I painted the inside of the cupola and the upper turret with the same color. I did two coats, but the cupola, with its black base color, will need one more coat. I also cut some Bristol Board ceilings for both of these spaces. They will be lit, which is why I'm going to the trouble of painting their insides. I don't want them lit too brightly, so I will attenuate the LED by painting it. This image shows the turret assembly upside down.
I cut and installed the checkerboard "tile" floor using PSA. (not glued yet in this image)
While this was going on I was re-printing the baseboards and crown moldings. I drew them both about 30% larger. I think they work better this way. I threw out the old crown molding, but kept the smaller baseboard to use as casing trim around windows, etc.
Here are two images to show the comparison.
The new crown completely covers that blank spot in the wallpaper. It was fortuitous that I was short on the wallpaper.
As I'm cleaning all this molding up, I'm sticking it to some cardboard in preparation of airbrushing it all at once.
The last thing I did was the most difficult; painting the main stair. I airbrushed it with Tamiya Flat White, then coated that with DullCoat so the white wouldn't bleed when I brush painted the dark brown details. Newel posts and handrails aren't too hard to paint. Stair treads are a different thing altogether. Of course I'm an idiot wanting to have contrasting stair treads. I could have left the whole thing white.
I was using my tiny makeup brushes for the edging and tight spots, but needed to add an extender so I could reach the top steps in the long run. Some of the defects will need to be back painted, but others are going to be hidden by the stair runners that I printed.
I began by painting the first flight newels, handrails and the tread front edges. I then when back and painted the full treads and then the landings. Before I ended today I got the rest of the newels painted. I would have been much easier if it wasn't all glued together. But it is what it is.
I'm good at back-painting and after a couple of iterations the demarcation lines wil be acceptable. They're not in this picture.
After all the painting is done, I have to apply wallpaper and baseboards and then the aforementioned tread runner. Any defects in the middle of the tread will be well hidden.
Attachments
Myles, The images aren't showing up. Also do you have a circuit diagram for the cl2n3 driver?
Steve
Myles: Still watching your work after so many years. Super modeling. What a detailed project!
@Trainman2001 posted:Thank you! There seems to be a bias in our hobby for rustic, rural, weather-beaten structures. Entire companies exist producing them (Bar Mills, Fine Scale Miniatures, etc.). Doing urban and especially more unusual structures are left up to us hardy souls that want to make our own. In the old days of our hobby, everyone made stuff on their own. Now, we are in a very small minority.
Hello Myles,
Just a brief note to let you know that your images are not being displayed.
Same here. No pics.
Try it again. I finished the entire post, then watched some British crime dramas on Acorn TV, and the %(@(^ site timed out. The pictures still show up on my screen, but the index goes away and I missed it. DOH!
I see the pictures now, Myles. Good progress. It is coming along nicely.
Everything looks great!!
Glad the pics were there.
I decided it was an exercise in futility to paint the main staircase treads brown and attempt to leave the risers white (like the steps are in my house). Some of the long runs were very hard to reach into to do the painting. I added a long extension to my makeup brush to reach in, and it let me hold the brush with two hands and control my normal shakes. I realized too that it's also okay to have the treads and the rises as natual wood. This greatly simplified the painting challenge. That's not to say it was easy. It wasn't, but it wasn't impossible either.
This image was taken yesterday so I hadn't done any final touch up yet.
This was taken today with the touch up complete. I went over all the blemishes with some brush painted Dullcoat so the brown wouldn't bleed into the white. Old Tamiya paint will dissolve in new Tamiya paint regardless of how long it sets up. It doesn't polymerize like some other acrylics do.
The stairs are now ready for wallpaper and tread capeting. We're getting there.
I also added the parquet flooring to the living and dining rooms and got baseboards and crown molding installed. I put the ceilign on to show how it looked. Ceiling will be white also.
The wider baseboards and crown molding work. I first tried to install them using the 3M transfer adhesive tape, but it was just too hard to handle in the thin strips needed for the molding. It is strong, but difficult. I then resort to the PSA which seems to be working, but we'll see how it holds up over time. The molding is all warped so to get it to lie flat puts pressure on the ends. Over time, this stress will probably releases the PSA. I may have to go back and hit it with some CA. This picture shows that warp.
I got some PSA on the photo-printed parquet flooring and found that Goo Gone was able to remove it without screwing up the surface. I was worried, but it was a false alarm. A whole lot of effort's going into an interior that may or not ever been seen. But hey... we all know it's there.
Attachments
Myles, Agree, we appreciate the time and effort you put into your projects and seeing the results.
The staircase and walls look great!
Thank you!
I was in and out of the shop today so, while I got some stuff done, it could even have been more. The stair case for all intents and purposes is complete. I also finished up the first floor trim including baseboards and crown molding. The stairs needed some carpentry to fill out the area over the foyer closet. I then did the wall papering and started getting the tread runners in place. Almost got them finished when it was dinner time. The moldings were breaking away which I suspected due to the warp. I ended up reinforcing it with strategically applied thin CA. This worked. For the stair trim I avoided the PSA entirely and went right to the CA. As I noted before printed resin parts seem to set CA very quickly. It doesn't give you much repositioning time.
I installed the stair for this image. Looks pretty real. I even attempted miter joints in the crown molding. Nuts! They could be a bit better... practice makes perfect, and I'm not getting enough reps. The iPhone flash is a little harsh. Shows up a lot of defects.
The wallpaper on the stairs had its challenges due to the stair trim that I needed to cut around. I cut it to length and glued it to the part of the wall where it was going to end up. I then used a burnisher and a strategic fingernail to press the paper against the stair trim to guide the #11 blade.
Once the paper was on, the staircase looked finished. I got the tread runner on the main run, and don't know if I'll put it on the treads that will be facing away from the viewer. You really won't be able to see it unless you 1.5" tall and decided to walk up them. I also need to case in the underside of the stairs that are open in this picture. Easy job to do that. I had to raise the top of the foyer closet a little less than two MDF thicknesses. I needed to shave just a bit off the double layer to get the second floor to sit flat over the entire partition.
Another thing I did was break off the turret top floor walls from the cupola floor and reposition it. It was badly off-center and I didn't want it to be that way. It's the center piece of the building and it would be noticeable. I wasn't quite sure how it came out wrong. When getting into the fixing I realized that I had cut a hole in the Masonite piece that I had to scratch-build. My hole was rough and not measured carefully. When I went to glue the turret walls to this part, I was constrained by gluing it to the edges of the hole, otherwise, I would be gluing into thin air. With the hole being off-center, the resultant glue job was off-center also.
I fixed it by adding some filler pieces of MDF and moving the glue location to the actual centered position. I use Aleen's and added a heavy weight to it while it dried. It now looks much better.
Here is the filler that I needed to insert so the wall would have something solid upon which to glue. It was two layers of 1/8" MDF. Generally, if it just structural, you can almost fix anything.
And now for something completely different… I may have shared this with y'all years ago, but it's worth a reprise based on the work I'm currently doing.
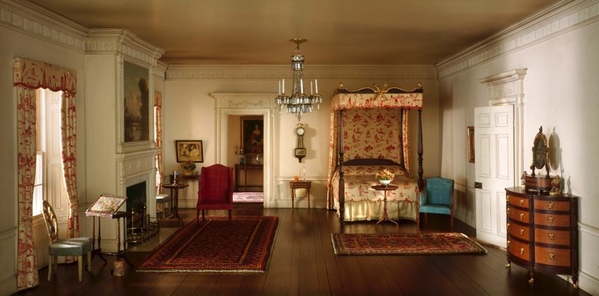
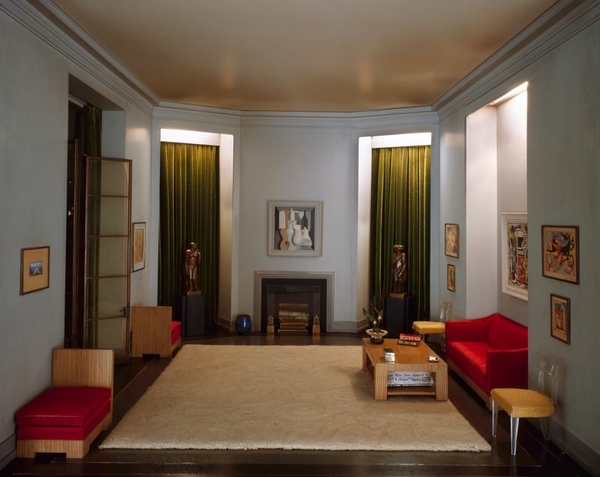
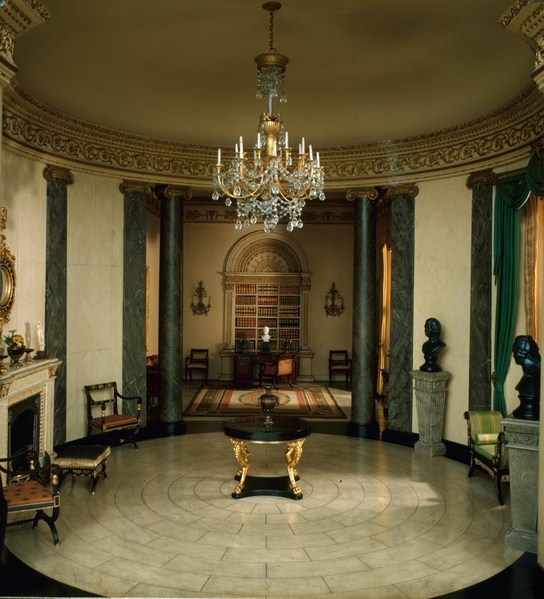
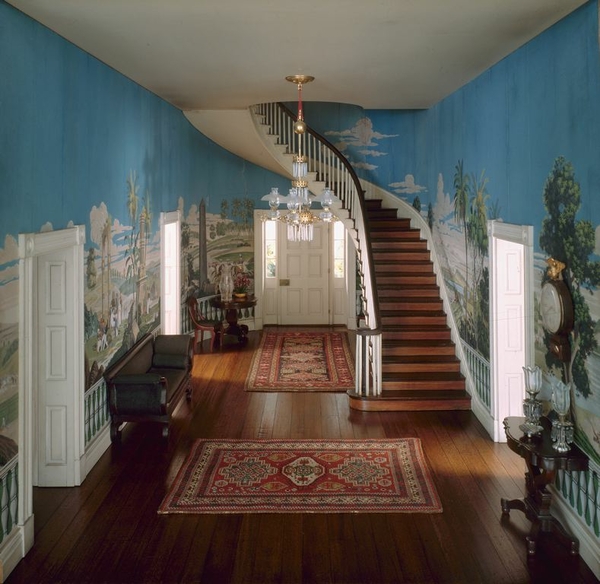
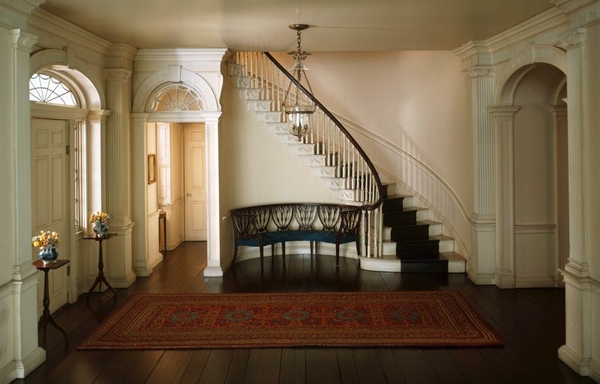
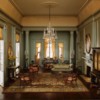
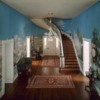
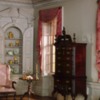
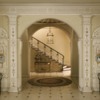
There's model making and then there's MODEL MAKING. In the 1930s, during the Depression, the heiress to the Domino Sugar fortune was sad that people weren't able to see really fine things especially in the area of decor and furniture. Her name was Thorne. She commissioned the finest miniaturists in the world to re-create famous rooms and furniture in the United States and the world in 1:12 scale. These masters were stupendous and the miniature rooms they created must be seen to be believed. Of the 68 rooms, many are on display in a basement exhibition hall in the Art Institute of Chicago. There are other rooms scattered around the country, but the bulk of them are in Chicago. I've seen them twice. If you dig model making, these rooms are Mecca.
The rooms are displayed in a curved hall of shadow boxes. The lighting is very realistic and makes for great picture taking. These were pictures I took. To see more go to: https://www.artic.edu/highligh...orne-miniature-rooms
You keep staring at them, but you can't find any cues that what you're seeing is actually miniature.
Art Deco Space...
Rotunda. Look at that chandelier!
English Apartment. Looks like some Duncan Phyfe there.
Now that's a staircase.
Philadelphia Chippendale Highboy
You want to walk into the room and go into that hall to see what's going on.
Another stunning staircase.
There's a display of how these masters went about the job. They had to invent tools to do it. They wove tapestries and material for scale drapes, carpets and upholstery.
Whenever I think I'm good, I look at this work and it brings me down to earth. This was 90 years ago and they didn't have 3D printers. Obviously, you can do more in 1:12 than you can in 1:48. Regardless, this stuff is awesome in the literal sense of the word. It inspires awe. The rooms toured the country and people did get to see it.
It's Friday already. That means two days of no model building. As said this before, I'm weird. Most people look forward to weekends so they don't have to work. For me weekends mean I'm not doing what I really want to do. This is especially acute now when you can't really go anywhere.
So have a nice, safe, healthy weekend. And wear you **** mask!
Attachments
Beautiful job of on that staircase, Myles. Those museum rooms are unbelievable. Thanks for sharing them.
Myles,
Instead of trying to make miter joints with your cove molding why not 3D print both inside and outside corners. Make the sides long so y ou;ll only have todo one butt joint along each wall.
Jan
The staircase looks great. Other than the mitre joints in the crown molding, it looks wonderful to me.
That modeling in 1:12 is fantastic! I agree, those curved staircases and the chandelier are fantastic!
I always wear my mask when out, though I don't have to go out and about very much. My wife and mother-in-law are both high risk. I don't want to bring it home and give it to them. At 64 I am on the edge so to speak, I don't have any other high risk factors.
Myles, the professional models are spectacular, but your work is also very impressive!!!
George
Thanks gents! Printing the corners? Hmmm. Never thought of that. Might work, but there's not a lot of corners to worry about and no-one's going to see them. But it's worth to think about in the future. Meanwhile I just created a Federalist convex wall mirror for one of the downstairs rooms. Found a nice prototype on Google and traced it. Then had to add contours. I shaped the roundel part and the shell at the bottom, but chose to just profile the upper decorations and not sculpt them. I also left off the drop since it would probably break off just getting it off the build plate. It's going to be really small and if the parts print too thin they'll fall apart. I could do it as a post op. I'm printing four different sizes working up from scale to a bit larger. You can clone and scale objects right in the slicer which is a nice feature.
SU has a FREEHAND LINE TOOL that let me trace around the top details. You do have to go back and clean up any stray lines and to make sure it's all connected. You can't extrude any depth unless it is a fully connected surface.
Here's the slicer arrangement. I'm printing directly on the plate to avoid any supports. I will use Bare Metal Foil or the Molotow Chrome pen to make the mirror look right. The printer will reproduce all those details. Print time will be about 26 minutes. I used the "FOLLOW ME" SU tool to create the convex and concave shapes. They didn't close completely and I had to draw in the connectors to make them solids.
Attachments
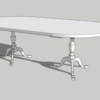
Work continues (even on a weekend) on more stuff for the insides. I took a picture of our dining table's pedestal and duplicated it in SU. I now am going to print it. I will sit under the chandelier. The table was an easy job. After measuring the 1:1 size of the pedestal I was able to trace half a profile, work out the kinks and then use FOLLOW ME to lathe it to a circular design. I didn't round out the cabriole legs since it greatly complicated the drawing AND won't be seen. The table is a Kittinger Queen Anne that an aunt gave us many, many years ago. They had a house of wonderful high-end furniture, but her only daughter and my sister chose to not accept the offer. We jumped at it. It was just what we wanted, and at the time, we couldn't afford a Kittinger ashtray. The pedestal height from the floor was 26" and the legs extended 13".
Armed with that I drew this.
Here's the print scheme. I'm doing two sets of legs; one with supports and one directly on the plate. The slicer indicated there were trouble spots under those legs. We'll see who wins. I put some heaving reinforcements under the table to resist warpage. Table's surface will be flat but not very smooth since the plate has some texture. I can polish it or not bother. Let's just hope it all prints well. The legs many be self-supporting which is why I'm chancing growing them directly on the plate. Remember: this stuff grows upside down from this image. The supports are in a place where removal shouldn't do too much damage.
Print time is estimate at something over 2 hours. The table top would print in about 15 minutes if I was printing them alone. I will print this and the mirrors tomorrow.
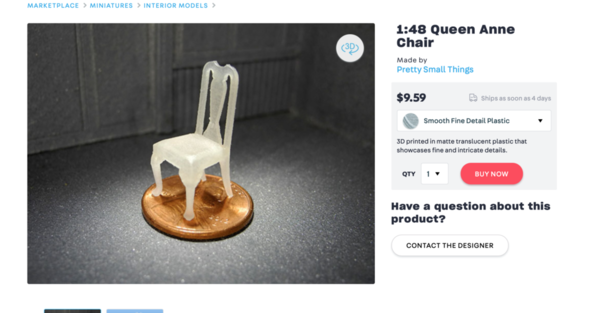
The table was the easy part. The Chairs are a totally different thing. If I wanted to part with some $$ I believe Shapeways has 1:48 dining chairs, but I want to experiment. Here's what I'm talking about from Shapeways. They use high-end laser printers and don't need the supports. At $10 per chair, that's $60 for six. It would take about $1.00 worth of resin to print all six. I'm thinking that I could do this if I built them in pieces. At that rate, it wold cost about $1,000 to furnish the whole house, and that ain't gonna happen.
Attachments
If I wanted to part with some $$ I believe Shapeways has 1:48 dining chairs, but I want to experiment.
Besides, this is your hobby. It's what you like to do. What's the rush?
Very well said, Pat!
Pat, you sound just like my wife. I do feel time pressure. At 75, I know I don't have infinite time to finish up everything I want to do. I have friends at my age who are in much worse shape than I am and from a simple fall your whole life can change. Since I wasn't an athlete in my youth, my big joints haven't worn out like most of my post-jock friends. I do have a tricky lower back which goes with walking on two legs. I have a ruptured biceps tendon, but you can live fine without one of them. I suspect there's about three more years of work before the railroad is as finished as I want it to be. My fears may be unfounded. I could keep doing this stuff well into my 80s, but no one knows. So I keep the pressure on myself so I don't get complacent. Meanwhile, I'm still trying to learn new stuff on the guitar. I'm now firmly in the 1970s trying to learn some Steely Dan pieces. Their works are monumental and very difficult to master.
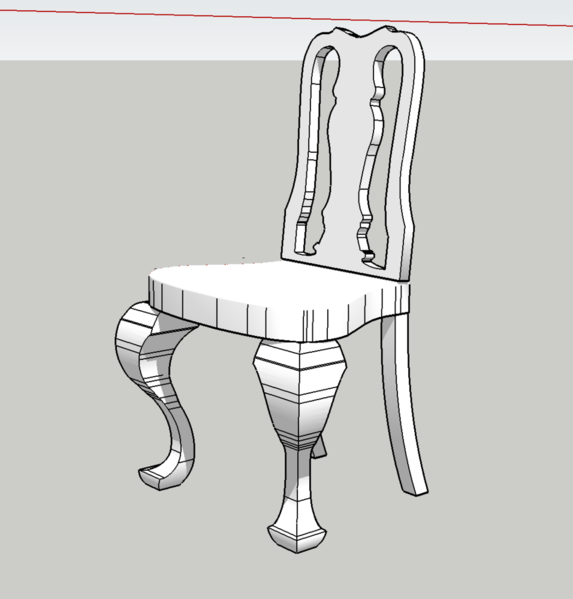
I pushed that envelope some more and designed a Queen Anne Chair to go with the table. I modeled this after the ones in our dining room.
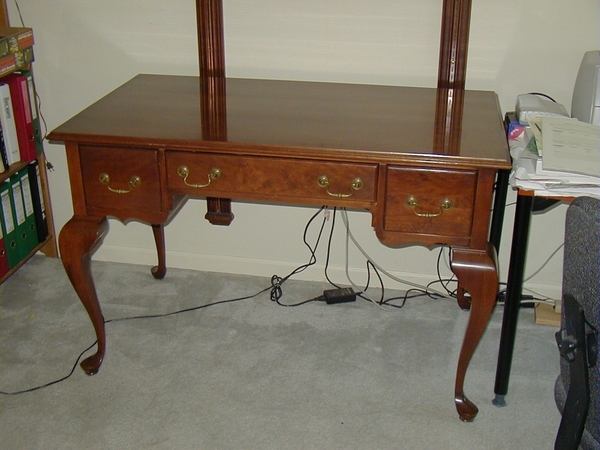
The challenge was the Cabriole Leg. When I was a shop teacher I made myself a Queen Anne Writing Table Desk modeled after a Henkel-Harris product.
To make a cabriole leg you take a piece of glued up stock about 4" on a side and draw the profile on the two adjacent front corners. You take it over to the band saw and cut off the profile in one direction trying to keep your cuts as continuous as possible. You then nail all the cut off pieces back onto the stock and turn it 90°. You then cut out the other profile. All the scrap falls away and Voila, there's a cabriole leg. Because of nailing back on the scrap is why you try to limit the number of intial saw cuts.
I basically did the same thing in SU. I drew a rectangle the overall size of the leg on which I drew the profile. I used PUSH-PULL to extrude that profile into the total leg depth. I then copied it. I moved the copy off the leg and rotated it 90° and then shoved it back into the leg so the corners coincided. It took two trys to get it right since the first time I didn't have it coinciding perfectly.
I then used the INTERSECT FACES function to delineate everywhere they touched. All I then had to do was carefully erase all the extraneous lines that WERE NOT a cabriole leg. It's a bit tedious and you have to keep enlarging the image to pick out all the lines that have to go. This image is a WIP showing the extraneous lines that I was removing. If you're lucky enough to have the SU Pro version, you have tools that would do the intersecting for you. You would simply tell it for the sum of the two objects and what was left would be the leg. It would save about 1/2 hour's time, but the Pro version is $800.00. Nuff said.
After you've erased everything you go back and double check to make sure that it's an entire solid. There were a couple of faces that I had to replace. You don't erase the faces. You remove the bounding lines and the faces disappear. A face has to have 3 or more contiguous edges. Remove one and the face is gone. You can see one of the missing faces on the knee area of the left side. I know it's missing becasue I can see inside the leg.
For the back, I took a picture of our Hickory Chair back and drew over that like I did on the table pedestal. I edited the image to make it B&W so it would be easier to trace. I also changed the seat to the fiddle seat like that of our chairs.
After tracing with the freehand tool, I went back with arc and line tools to clean up all the curves. I will print the backs separatedly and flat on the plate. I'm also printing the seat and legs as one part. And again, I'm printing it two ways to see which one works best. The amount of resin consumed is minimal.
I need six and printing seven. Time to print is a little over an hour. I could have all these print jobs today if all goes well. That, of course, is a big IF.
I've photographed our china cabinet and a very nice South Carolina mahagony server reporoduction for more dining room furniture. At least I can get the dining room furnished.
Attachments
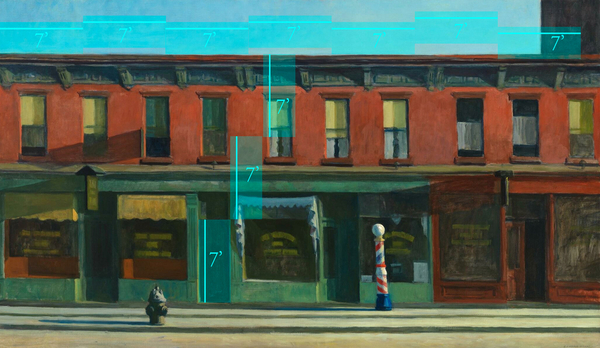
Hi Myles. You certainly are having fun detailing the inside of that house! It's going to be a showpiece! I brought "Early Sunday Morning" into Photoshop. If we take the standard door height as 7' back then, it scales out to 21' tall and about 51' wide. Pretty small, actually. Here's a video as well about the inspiration. If these are the buildings he used, he took great liberties with the scale.
Attachments
Why would you ever want to finish a layout? ![]()
Myles, That is very interesting how you make the full size legs out of wood and also on the computer. The furniture you made years ago looks great!
Will that is an interesting video about the Early Sunday Morning painting and the real building.
Thanks Mark! I was a metal shop teacher (and power tech) and was very envious of the wood shop teacher building great furniture for his home. His class also made some beautiful projects even including grandfather clocks. I designed and built the desk after school. When I left public school teaching that Spring I brought the desk home incomplete and finished assembling it in my garage. I couldn't see myself putting a superior finish. I ended up having it finished professionally. I also installed Ball and Ball brass hardware. They were (are) the premiere founder of classic furniture hardware located in Exton, PA. I don't know if they're still in business. I just checked… they're still in business. They are the best.
The best compliment I received was from the furniture finisher to whom I gave the desk. He was the finisher that worked for a classic fine furniture retailer in Philly. He asked me, "Did you strip it yourself?" He thought it was an antique piece of furniture that I just wanted refinished. He was blown away when I told him I built it.
Two posts in one day... don't get used to it. But the printing was so successful and I had a full afternoon of work so there's progress on all fronts.
First, here's the Federalist-style convex wall mirror. All four prints were successful. The one I chose was the 2nd largest. It seemed right. I first applied the aluminum foil bright side out, with Microscale Foil Adhesive. I burnished it down with a burnishing tool and then a Q-tip. I painted the frame with Tamiya gold. It's really a tiny cool thing. This close up is too close.
With that done I started the printer to do the dining table. While that was printing I finished up the stairs for good. I added the tread runners all the way up, even those flights that were facing away from the viewer. I did that just because I could. I then added a piece of Bristol Board to cover the underside of the top flight which you can sort of see. I also finshed the first floor inner-walls wallpaper and moldings, and painted the doorknobs.
I got all the floors done on the second floor and got 2/3 of the inner walls wallpapered. This is the 2nd floor hall.
And here's the front left bedroom.
In the stairs pic you may have noticed the dining table. The experiment showed that the direct print pedestals printed perfectly and required almost no cleanup. The pedestals on which I put supports printed okay, but I broke off a foot in attempting to remove the first support. That is exactly what I was afraid of. These were the "light" supports.
The tables printed witout warp thanks to the beefier ribs below. I glued the legs on with Bondic and put it back in the UV chamber to harden the glue and further cure the assembly. I inadvertantly added some resin that contain Sariya Tennacious, a more flexible resin. In this case that was a good mistake since it added some more resiliance to the tiny legs.
Here's the good legs. The Xacto knife shows scale. They're very tiny, fragile and look fantastic.
Here's the leg with the support struture. The supports overwhelm the part.
And here's the assembled table being displayed in the future dining room.
I couldn't be more pleased with how those pedestals came out. They exceeded my expectations.
The chairs finished printing at 5:14 so I was right. I was able to print all the new stuff today. Again, the chairs stuck directly to the plate printed perfectly. The chairs with supports were a bust. Three of them separated from their supports completely. That means I have to clean out the vat next session since some cured resin's going to be floating around in there. I broke the foot off one chair leg with the razor scraper I used to pry the objects off the plate. With my pre-coating routine, they stick like crazy. I don't get adhesion failures very much anymore. I do get support breakage as seen in this picture. This is right off the machine after alcohol wash. I scrape them off directly into the ultra-sonic cleaner so I'm handling them as minimally as possible.
I'm glad I printed 7 of each when I only need six, but even if I break more, in 1:15 I can have another batch. I scapped all the support seats.
I just took them out of the ultrasonic and put them in the curing chamber. I think I lost another foot on one of the leg sets. I may reprint a bunch just for spares. When they're hardened they'll be more handleable. I still have to glue the backs to the seats. More on this next time.
Attachments
All excellent parts!! The variety of wallpapers is great!!
I understand how you feel, Myles. I was looking at the hobby as the joy of the trip. You are looking towards the destination. Both views are fine. Your life, your railroad,your choice.
That furniture looks fantastic.
Thanks Mark!
Pat, I sort of see it both ways. Of course the journey is fun. I'm compelled to build stuff. But journeying forever without reaching a destination becomes tedium. Working on an assembly line and never seeing the finished product is a good analogy. I get tired of seeing the bare spots on the layout especially since, in my mind's eye, I can see what I want there. A lot of the folks in our hobby have help in building large railroads while I've been doing it pretty much solo especially since the grandkids are now moving on with their lives. The oldest is a sophomore at U of IL and the youngest gets his driver's license in two months. Perhaps they'll rediscover their love of building things in the next phase, or maybe they won't. Remember: I've been actually building this railroad for 21 years. It started in 1999 in Germany. It's still the same railroad underneath… literally. Half the wood in the support structure is German.
So… while being a miniaturist (sounds more sophisticated that a guy who builds models) is my passion, I always like to finish stuff. Whenever I get near a project's end I start cutting corners because, "I want it done… NOW!" While the railroad as a whole is in its 22nd year, the individual projects have beginnings and ends and that's the way I like it. And then there's that inevitable question, "What the **** are my heirs going to do with this monster when I'm gone?" My son in law is always asking , "Is there a market for any of this stuff?"
We can assure your son-in-law there is a market for this stuff! But maybe the grandsons will come around by then and want it.
I suppose you're right. My oldest grandson even said he'd buy the house so the trains could stay. So I'm not worrying about it.
Getting the bedrooms finished. Here's the first bedroom with paper and trim.
And here's bedroom #2. By the time I finish these I'll finally be able to do the crown molding. Notice I even got the paper pattern matched in the corner.
And then there's the dining room set. I made three chairs from the first print. Here's the first chair.
Here are three chairs.
I ran the second print. I put a very thin pre-coat layer seeing if that would be better and not leave as much of the pre-coat on the finished part. It was a partial bust. I got five out of 10 bottoms with legs printed (I needed three), but all but one of the seat backs stuck to the FEP requiring a vat emptying and clean out. I had three successful backs left over from the first run, so that gave me seven complete chairs. And here they are. It's pretty neat that I drew all four legs to be equal length and reach the ground and they printed exactly the same way.
I really didn't think this gambit would work, but indeed it did. It's harder to do this level of fineness with an LCD printer because of those pesky supports, but I was able to print all of the good stuff directly on the build plate and avoid any supports. Now I have to paint it all without damaging it. The Tenacious blend did impart more flexibility to the legs so they bent instead of fracturing if I bumped them... which I frequently did. Notice the carpeting is laid in the dining room.
Using Bondic to glue the seat back to seat worked excellently. I put as small bead on the seat back edge, held it as steady as I could with a tweezers at the correct angle and then hit it with the light. The Bondic actually starts setting almost instantly. I was able to let go of the tweezers as soon as it would stop moving on its own. I then kept the UV light on it for another five to 10 seconds and it was solid. As I've noted many times before since Bondic is exactly the same chemical composition as the resin of which the part is grown, the joint is a true weld. I had sanded a slight bevel to the bottom of the seat back so it would glue to a slightly inclined angle like the prototype.
I have a few more pieces of trim on the second floor and that will be done.
My daughter, after seeing all this cool interior stuff, thinks I need to be able to display the insides like a doll house. It makes me want to hinge one of the sides so it can be opened up. I'll give it some thought. Unless the building is just a few inches off the edge of the layout, you won't be able to visualize the interior. I know this from experience. I detailed the inside of the boiler house, the switch tower, the Victorian RR Station, Woodbourne Gallery, the Newtown Chocolateria, and Nighthawks. Only the Chocolate Shoppe, Woodbourne and Nighthawks can easily be seen. The House will NOT be in a location that will be easy to see the interior.
Attachments
It’s all fabulous! I had thought about a doll house somewhere after you had printed wallpaper and floor coverings.
We spent a lot of time building our girls’ dollhouses years ago. They were good projects to do together. Once the had their dollhouses, they never lost interest in them. Our older daughter took hers with her, and we are storing our younger daughter’s until she has more room.
Great work on the interiors and the furniture looks fantastic. It is a shame the interiors won't be as visible when the house is completed.
@Trainman2001 posted:I'll give it some thought. Unless the building is just a few inches off the edge of the layout, you won't be able to visualize the interior.
Sounds like this house needs some security cameras! ![]()


