
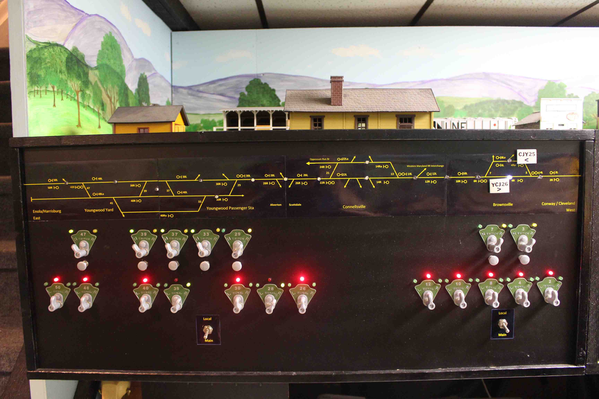
I'm a relative newbie to this with tables for a 10'x14' layout almost done.  Once tables are done I think I can begin to lay track but I have a control question.  Background is I have acquired, but have no experience with, DCS and Legacy systems ("L" TIU/remote/AIU, 990 system with Z4000 transformer). 

So, how advanced of a switch panel should I develop as I'm just starting out?  How did you all start... what do you have now?  I have mostly post-war/early modern but a scant few PS2 and TMCC (I'm a newbie remember).  Will buy more PS2/3/Legacy in the future but not looking for the newest and best, at least at this time (I got kids so will have to keep the good stuff under lock and key... an upper shelf doesn't work anymore as they now know how to climb!).

If I want to run the gamut of post-war to current MTH Premier/Legacy you still want a panel of some sort... right... right?

So I'd love to see what you all have and learn what your thinking was in progressing from conventional to the current state-of-the-art control systems.  Responses should cater to us newbies who, while they may be technical proficient, are new to model train control.  

Kirk R

Last edited by Kirk R
Original Post

Replies sorted oldest to newest

I tippy-toed out to the edge of the high board a couple times but have not made the plunge.

When I decide to jump, it will be for the latest version available. It makes no sense to me to buy a mid-stream version of control and then be looking for ways to upgrade it.

Right now I have conventional and TMCC locos that I run with a CW80. The latest Legacy (cab-2 and 1.6)  will run my stuff and any Legacy locos I might acquire. I have no MTH but the same would hold true, buy the latest. A bargain is not always a bargain.

There are two basic functions of control panels. Before you can really address those functions, you'll need a graphic representation of the track plan.

The two functions are: switch control, and power control. If you go all command control and NO conventional, you can get rid of the power control, and your panel will just have your switch controls.

Power control for conventional running is a little more complicated. You'll want to divide your layout up into electrical blocks.

Before I go any further, it would be helpful to see your track plan.

Personally, I gave up conventional running, and run 100% TMCC, so my control panels only have switch controls on them. They are very simple. Eventually, I plan to throw most of them away in  favor of computer controls with the track plan displayed on a large monitor.

This is just one of many local control panels scattered around my layout. Eventually, it will be removed.

IMG_8402

Attachments

Images (1)
  • IMG_8402
Last edited by Big_Boy_4005

There is a minor addition to what Elliot explained.  You can also install lights that indicate which way a switch is thrown and indicate if a block is on or off.

A block is a section of track that is electrically isolated and controlled independently of other tracks.  Simple example is a siding.  A siding can be electrically isolated from the mainline be removing one center pin.  That way the siding can be turned on and off independently thus allowing a train to be parked powered down on the siding while another train is run on the main line.  You need to run a power wire to each block.

Traditionally, control panels have a drawing of the layout with the switches mounted on the drawing in such a way that you can quickly visually see what switches you need to throw.  This gets tricky if you are new to building layouts and might want to change the layout after using it for a while. 

Control panels are somewhat out of fashion with command only operators.  Personally I love them.  I run command and conventional and the panel is appropriate in that case.  There are a lot of past threads about this. Do a forum search on "control panel".  Some people have done some beautiful ones.

Bill

Very simple, small Tortoise switched round-the wall layout. Toggle handle indicates the switch throw--"out" or "through". Auto striping tape on shelf liner. Ultra simple with only  two power districts: outer loop is one and inner loop plus Yard is the second. The PowerGuards are a holdover from two dismantled layouts  taken down in '08 and '09. Built this as my final one and due to age (86) and health issues it turned out to be. Shortly after getting it wired and trains running in Feb 2010 i hit the wall healthwise and very little O-gauging has occurred since. The Power Guards are very expensive Voltage spike arresters from back in the day that turned out less effective than 50 cent TVS.  I leave them up because of the pretty flashing lights when trains cross the switches.

IMG_1782

Two power districts set up to run ommand or Conventional. Red and black wire code with white common. Small wire s go up to PowerGuards. Red, black and white Railpower wires connect to and through, the AC meters enroute to the T-strips multiple soldered track connections. Voltmeters  are wired across the line (in parallel) Amp meters inline (in series) . Heavy green wire is a layout power bus for lighting and accessories if any. Down below is a photo from an old layout showing wiring on the rear of a three district meter panel. Back to meters above , ones with Green trim around the front are DC for Tortoise circuit.  VAC meters are reading 18 volts and VDC meter 12 volts, my Tortoise max.

IMG_1579


Below:

Three district code: Green,Red and Black plus White common. Note that the heavy wires connect inline through the ammeters (bottom row) whereas the Voltmeters require only small wires across the line(each color connected across to common). Short jumpers from ammeters up to Voltmeters are simply to supply power. The full load of the District is recorded by the Ammeters thus heavy wire.

Image


Attachments

Images (3)
  • IMG_1782
  • IMG_1579
  • Image
Last edited by Dewey Trogdon

So I've added a picture of my layout.  3 loops, a yard for storage/operating accessories and two back and forth trolley runs.  I've isolated track as best I can from what I've garnered from books.  All loops are broken up into 2-3 blocks (making a power district... correct terminology?), each block can be turned on or off (SPST), and sometimes changed from conventional to command control or adjacent loop power (for transitions).  An LED near that switch will signify if a block is powered (lighted bumpers on dead end sidings serve the same purpose).  Small control wires from the switches will go to banks of relays for nearby distribution from track power busses.  For track switches, powered by a separate buss, I'm considering on-off-on momentary SPDT switches and think that I should be able to attach a bi-color red/green LED to that switch to signify track switch position, but I'm not clear how that works just yet.  Don't know where uncouplers will be switched, probably through an AIU.  Will also use the AIU for operating accessories.

As a panel this'll be a bear to wire, will likely split it up into 2 panels in different areas.  Having it on a computer monitor is way in the future.

Comments and critiques are welcome.

Attachments

Images (1)
  • KR layout, V3.4, 3 loop+, O31-O72

Photo 1 is for my main lines on the lower section.   Photo 2 is for my upper section.  Photo 3 is for my 40 track turntable.  Photo 4 is for my 23 track coach yord.  Photo 5 is for my electric engine yard.  All are covered with shinny black Formica and have full LED routing.  All panels tilt out towards the operator for ease of working on the panels.  The layout has Legacy, DCS, and TMCC.   WiFi from MTH and Lionel is also present.   The layout was started 36 years ago this July 2.  You can see it on the LOTS tour this summer.

Panels039Panels020Panels001Panels043Panels028

Attachments

Images (5)
  • Panels039
  • Panels020
  • Panels001
  • Panels043
  • Panels028
Last edited by Marty Fitzhenry

Kirk- I'm running all conventional for now. I had a basic idea of what I wanted the panel to look like when I started it. One mistake was not leaving room for expansion. I used auto pinstripe tape for the track plan. Everything is block controlled with isolating fiber pins in the track.

One day I will move to digital control but for now I'm happy with what I have. This pic was from a few years back. Things have changed since but the basic plan is the same.

2016-03-01 17.51.08


Attachments

Images (1)
  • 2016-03-01 17.51.08

I built and installed two relatively small pull-out shelves then mounted them underneath my train layout platform for convenient access to controls; they can be pushed back out-of-the-way when not in use. Shelf A (shown here) is for switches, track power control for three trolley lines, block control of four sidings, and horn/bell controls buttons. Adjacent pull-out Shelf B (not shown) is for power supplies and Lionel TMCC gear.

Mike M.  (ritrainguy)

Attachments

Images (1)
  • Switch Controller Panel: One of two pull-out shelves for control gear.

Unfortunately I have a layout that can't be operated in one place, its all in the remote, I just select the number of the switch.  Control panels with diagrams do work better. So my diagrams are on the wall in several places. I was hoping the DCS wifi would be my walk around panel, but no such luck, and when the list comes up there is no keyboard.Also the printing is way to small.  So my remote will work for now


IMG_7175IMG_7176 

Attachments

Images (2)
  • IMG_7175
  • IMG_7176

My layout was built many years ago before we ever heard of TMCC or DCS.    All switching and routing was done by throwing switches.  Today, I use all the modern items we use to run a railroad.   I still have the switches as a back up.  If a switch in an AIU does not work  and a toggle on the panel will still throw that switch, troubleshooting is reduced.   Being a conventional layout from day one, I had to get creative when command control showed up.  I have DPDT center off switches that are powered from the transformers.  If I throw the switch one way, the layout will run conventional.  If the switch is thrown in the other direction, power is routed into my TIUs.  

My layout was the test layout that Lionel used for TMCC and the first article in OGR on TMCC came from my layout.   The layout was the test bed for DCS for the first OGR article.   I had DCS  doing testing for over a year before DCS got released.   Early on, the DCS remote was not made yet.  We had a picture of the remote on a lap top.   Mike wanted to see what sort of wiring would support DCS.  He had the star pattern as his standard.  My layout is buss wired.  One night, I found the fix with the light bulb and the rest is history.  

I admire some of the great work that is done today with the modern control panel.   We will see some great things down the road.  Remember, when you build a panel make it so you can work on it as you get older.  The layout  and you may go the distance.  When I started my layout I was 38 years old.  Today I am 73 years old.  Make all items so you can get at them as you get older.  When I started my layout I never would guess that the layout and myself would still be in working condition this many years later.  All my TMCC, Legacy, and DCS equipment is at track level.  All my WiFi equipment is also the same.   This is key also for communications.

Last edited by Marty Fitzhenry

KirkR -

Thanks for the compliment.  Those wires are factory installed in the Z-Stuff DZ-1002 Remote PB switch, which is included with the DZ1000 switch machine.  They dress out of the switch from the bottom, so I drilled a hole in the panel and let them pass through to the other side, where they get wired to a terminal block that also ties them in to the AIU so that I can switch them remotely with the DCS hand held controller. 

The black wire is common ground, and the green and white wires provide the current to the switch machine to change direction when the silver buttons are depressed on the top of the DZ-1002.

Sorry it took so long to answer your question.

Mike 

Here are photos of the two newest panels on my layout.     The main panel that the guys call the dispatcher board, is supposed represent 3-4 towers along the line in addition to dispatcher telling the operators at each one what to do.    Of course one person does this on the model.  

The top row is the switch machines and the bottom row is the signals.    Signals are even numbered and switches are odd numbered west to east.    the control knob covers  and label panels behind them are Rix Rax.    this panel was rebuilt from another so I stayed with the black coloring even though I like dark green better for this.    LEDS light to indicate how the control is set.    The toggle switches allow the DS to turn local control over to a local panel when a train is switching in that area.

The panel is laid out as linear schematic.    Only switches on the main are powered, industrial sidings and yard tracks are manual.    The white LEDs on the schematic are detection.    The detectors pick up a "load" in the track segment that can be the loco motor or a resistor.    I have put resistors on the cabooses but not the freight cars, too many of them.    Yard and industrial tracks are not detected.

the signals "clear left" or "clear right" based on the schematic.     The switch controls are "normal' or "Reversed" per prototype references for switches.     All signals and switches are shown on the schematic (called a model board) with their respective ID numbers.

The second panel is a separate "tower" for the town of Connelsville on the layout.    You notice the gap between signals 12 and 26.   these are on the other panel and the "DS" communicates via phone with the other operator to handle signals and switches there.      This panel is logically the same as the main and was actually built first.    It was entirely new and I found a nice olive green paint for it.  

Note I was told by an "expert" that the controls are not scaled to distances but set on 2 inch centers on a real panel,    Again switches on the  top row, signals on the bottom etc.   

Attachments

Images (2)
  • mceclip0
  • mceclip1

While I use my Legacy controller for all train running, I also build a mini-control panel to control the switch tracks, un-couplers and power toggles in my eight track yard. Attaching the panel with a hinge made it easier to manage if wiring changes are needed. I wired the panel on my workbench using terminal strips for all connections:

IMG_1498IMG_1500IMG_1501IMG_1853IMG_1613

Attachments

Images (5)
  • IMG_1498
  • IMG_1500
  • IMG_1501
  • IMG_1613
  • IMG_1853

My club's control panels are set up for block control. We are in the process of adding DCS. The panel is painted plexiglass. The whole panel was painted yellow. 1/4" masking tape was added to make the track plan. The panel was then painted green and when dry, the tape was removed, exposing the track plan. I use miniature DPDT switches to power the tortoise switch machines. Red & green LEDs indicate which way the switch is thrown with Green indicating the main line. Switched are given a letter designation. The large double throw/center off toggle switches are block control. The left/right position of the switch indicates left or right throttle on the Z4000 transformer. Blocks are given numerical designation. Our earlier panels opened toward the operator. I found this caused problems since to work on the panel, you have to lean over the panel. I changed the design so the panel is hinged on the side. This is much easier to work on. That small relay circuit card in the rear of the panel is used to select yard tracks. We have three switches to enter one of four yard tracks. By using the relay, I was able to use a rotary switch to select the track and have the right combination of switches thrown.

GOPR0001GOPR0002GOPR0003GOPR0004GOPR0005GOPR0006

Attachments

Images (6)
  • GOPR0001
  • GOPR0002
  • GOPR0003
  • GOPR0004
  • GOPR0005
  • GOPR0006

I have a 13x24 sheet of aluminum for my control panel. We are not anywhere near finished on it yet, but I will post pictures. Frames out with 1x2s, and wired with all terminal blocks for input and output DCC. The green switch was from an older panel so that’s why it isn’t used yet and it has a random number order on it.0CB5BC9C-43EC-4197-B26D-4CCCE3F2A9AE

Attachments

Images (1)
  • 0CB5BC9C-43EC-4197-B26D-4CCCE3F2A9AE

Control panel for accessory and yard layout

Hinged access to terminal strips and transformers.  8' long x 6" wide, painted masonite 20180524_151004

Close up of a 3' section 

20180524_150932

19 accessories,   4 lightning blocks, 12 yard tracks,  2  gargrave uncoupler/activator track & 2 mainline track blocks. 

The accessory controls are placed across from the accessory,  some on/off, some momentary, some factory. On/off have power indicator lights.


Attachments

Images (2)
  • 20180524_151004
  • 20180524_150932

I am going to be the anti technology guy here.  My control panel consists of 5 toggle switches (39 cents each from Home Depot) in a plastic box labeled for the track I wish to activate.  My turnout control consists of caboose industries ground throws except for that one I cannot easily reach.  I get to follow my train around since the layout is designed for a single operator routing it as I see fit as a follow along.  No complex wiring, no wizard of oz back room just plane fun running the train via that obsolete TMCC system.  How I survive solidly entrenched in the 90's is a mystery.

Add Reply

Post
The Track Planning and Layout Design Forum is sponsored by

AN OGR FORUM CHARTER SPONSOR

OGR Publishing, Inc., 1310 Eastside Centre Ct, Suite 6, Mountain Home, AR 72653
800-980-OGRR (6477)
www.ogaugerr.com

×
×
×
×
Link copied to your clipboard.
×
×