
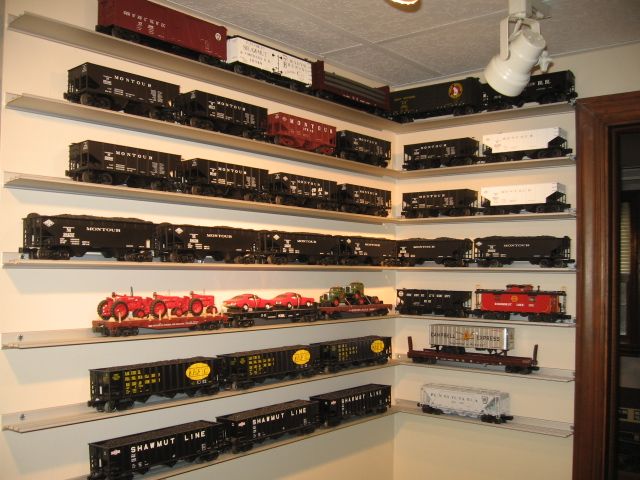
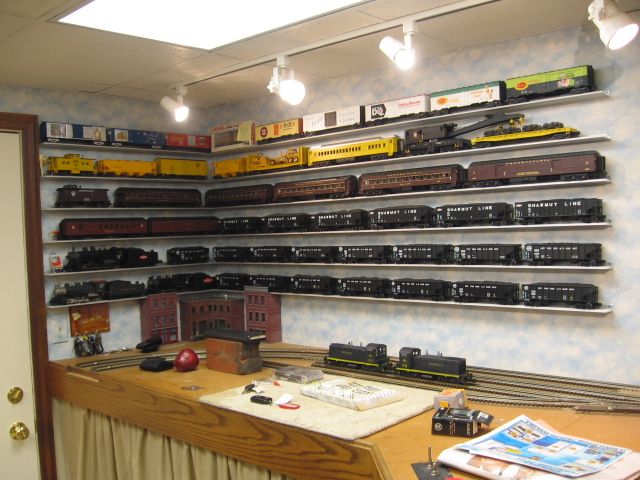
Does anyone that has the Glenn Snyder Shelving have closeup pictures of their connecting pins in use joining two sections?  I'd like to see how the shelving looks joined together, and amazing as it seems, the Glenn Snyder website has no pictures of those at all.  I have long runs, and I don't want it to look "pieced together".  I figured before I buy I should maybe see what they look like in use.

Original Post

Replies sorted oldest to newest

I'm not worried about getting the pins, I'm wanting to know what they look like in use.  I'm a bit surprised that they don't have such pictures on the website!  Truthfully, their website is a bit "thin", very little information.  I realize this is a simple product, but at least some examples of all the pieces would be useful.  I've never seen the connecting pins in use, though I know a few people with the shelves.

gunrunnerjohn posted:

I'm not worried about getting the pins, I'm wanting to know what they look like in use.  I'm a bit surprised that they don't have such pictures on the website!  Truthfully, their website is a bit "thin", very little information.  I realize this is a simple product, but at least some examples of all the pieces would be useful.  I've never seen the connecting pins in use, though I know a few people with the shelves.

When I get home I will take some pictures and show them to you.

John, one of the advantages of the GS shelving was the order could be pre-cut.  Worked well for me.  Shorter shelves, I didn't use any link pins. Note some of the corner shelf combinations.   Slide show.   Takes at least (3) #10 X 2" sheet metal screws, into 2" X 4" wall framing, per 6 ft section, more if possible.

Best wishes with your project. 

Last edited by Mike CT

John

Re; Snyder shelving.

This afternoon I will see if I can get a photo of a joint on one of my walls. But, first on America's typically uneven drywalls I used fender washers as needed at stud fastening positions to shim at spots and keep the shelves straight. Second, on joints I connected ends evenly by using very small mending plates recessed in one of the wide slots on top at the front edge, drilling matching holes and fastening with tiny machine screws. I was able to keep the wall side of the joints even when I installed the 1-1/2" fastening screws and then installed the little mending plates at the front edge. If one does not shim for uneven stud walls the shelves will tend to pull up when screwed at a recessed stud and cause a wavy track. "Ask me how I know".

 Most of my joints were 6' +2' on  8' walls and 6'+6' on 12' runs. 

Last edited by Dewey Trogdon

Hey John.

Here are some quick shots I just took of mine.

Sorry for the poor quality.

However, the pins work great. I have 7 shelves, 18'-0" long. That is a total of 21 6' sections. These shelfs are now in their second location since I bought them years ago. 

The pins go together a little hard, I used a hammer and block of wood to tighten all the sections together. That being said, after I took them down from the old layout room, they re-assembled just fine as the pics show.

Any other questions please ask.

I personally plan to buy a bunch more in October at York and also get a few custom cut for one area that I need shorter ones.

Oh….and it is a (2) man or woman operation for installation!!!

Donald

IMG_9567IMG_9568IMG_9569IMG_9570IMG_9571

Attachments

Images (5)
  • IMG_9567
  • IMG_9568
  • IMG_9569
  • IMG_9570
  • IMG_9571
Last edited by 3rail
3rail 2 posted:

Hey John.

Here are some quick shots I just took of mine.

Sorry for the poor quality.

However, the pins work great. I have 7 shelves, 18'-0" long. That is a total of 21 6' sections. These shelfs are now in their second location since I bought them years ago. 

The pins go together a little hard, I used a hammer and block of wood to tighten all the sections together. That being said, after I took them down from the old layout room, they re-assembled just fine as the pics show.

Any other questions please ask.

I personally plan to buy a bunch more in October at York and also get a few custom cut for one area that I need shorter ones.

Oh….and it is a (2) man or woman operation for installation!!!

Donald

IMG_9567IMG_9568IMG_9569IMG_9570IMG_9571I use the pins, but not how you do. I use it only on the center rail so that it won't affect items rolling across the shelves.

Great, thanks guys!  It looks like it's a winner, so I think I'll check on ordering.  I'll have to evaluate whether I want to wait until York or get some shelves up now, I guess that depends on exactly how much shipping is.  I'd really like to start unpacking some stuff, and I need lots of space to put around 100 locomotives and who knows how much rolling stock.  I'm going to start with the locomotives in a couple of spots that I've picked out...

IMG_1749


John

This very old fuzzy photo shows joints to add 2'sections to 6' sections with the small mending plate bolted to the bottom. I never got around to cutting the extensions off of the small machine screws. i used simple painted 1x4s from floor to ceiling to close off the ends of my shelves. The ell brackets you see in the corner are used to fasten the 1x4 to a stud.

Attachments

Images (1)
  • IMG_1749
Last edited by Dewey Trogdon

Hi John: Closeup of the rolled pins / Sent from my iPhone

1 Synder Shelfing2 Syyder Shelving3 Snyder Shelving

These pins can be removed when you are all done. (if you have a whole drilled at the matching ends to the wall)  They are just used for hanging procedures.

Glenn Snyder's daughter runs the company.  They only take a personal check or money order, no credit cards.  There main business is Commercial Printing.

Hope this helps: Gary


Attachments

Images (3)
  • 1 Synder Shelfing
  • 2 Syyder Shelving
  • 3 Snyder Shelving
3rail 2 posted:


Oh….and it is a (2) man or woman operation for installation!!!

Donald

Donald;

I would respectfully disagree. While two people would make the job easier/quicker, I did mine by myself. At the time, the layout wasn’t built yet, so I could get right up to the wall which helped a lot. I love the shelving and like Rich suggested, the plastic end caps give a nice finished look.

FA146640-C887-4B27-BDD7-94443FFD0026

Attachments

Images (1)
  • FA146640-C887-4B27-BDD7-94443FFD0026
Dewey Trogdon posted:

IMG_1749


John

This very old fuzzy photo shows joints to add 2'sections to 6' sections with the small mending plate bolted to the bottom. I never got around to cutting the extensions off of the small machine screws. i used simple painted 1x4s from floor to ceiling to close off the ends of my shelves. The ell brackets you see in the corner are used to fasten the 1x4 to a stud.

You need just one more Ps-4. But you can't have my Weaver Tennessean.

As the others have said, the walls these days are terribly wavy and uneven. Like horizontal washboards! Our new house (new about 5 years ago anyway) is worse than the 50+ year old house we moved from! Lumber isn't as good as it used to be either. Shims of some type will most definitely be needed. That may be the worst part of installing the shelves! Might be a good reason to start using metal studs in new home construction?

Also, I hope the aluminum tariffs don't do too much damage to your shelf pricing. I like the Glenn Snyder end caps too, and I think he may have wheel chocks or something to keep cars from rolling around, very nice system he has there. I am contemplating some myself someday.

John,

Attached find three pictures of Glen Snyder shelving.  First picture shows joint from about 1 foot out, second is from about 5 inches out, 3rd is from across the room.

Important hints:  Take the roller pin and increase the diameter of the opening a bit, use a dremel tool.  Hold one end in a vice grip and swap ends to complete.  Also - bevel the opening on the roller pin to a 30-45 degree angle - easier to get the roller pin on.  Attach the first shelf to wall studs using star head T20 or T25  wood screws  8-1-1/2" .  Phillips head screws are too soft and you destroy the head installing them.  Attach the first shelf to the wall, then install the roller pins using a small hammer.  Next - attach the second section of shelving using a small wooden block on the end of the shelf  you hit with a hammer.  That prevents damage to the shelf end.  I learned this after installing several sections.

Good quality shelving.

bruce

IMG_5466

IMG_5467IMG_5468

Attachments

Images (3)
  • IMG_5466
  • IMG_5467
  • IMG_5468
Last edited by bruce benzie

Please be aware at York they do not bring a huge amount and what they have is sold fast. Three hours after opening on Thursday I went back to add to my order and they were sold out at the April Show. SO GO THERE FIRST AND ORDER ALL YOU NEED OR WANT WITH EXTRA! I love it and have purchased  over 30 pieces between April 2017 and April 2018. Saved on shipping that way. Love the stuff.Be aware you need to spread the pins slightly to get them started onto the shelving.

CurtisH posted:

Please be aware at York they do not bring a huge amount and what they have is sold fast. Three hours after opening on Thursday I went back to add to my order and they were sold out at the April Show. SO GO THERE FIRST AND ORDER ALL YOU NEED OR WANT WITH EXTRA! I love it and have purchased  over 30 pieces between April 2017 and April 2018. Saved on shipping that way. Love the stuff.Be aware you need to spread the pins slightly to get them started onto the shelving.

Being a vendor, I'm in the Orange Hall several hours before opening, so I think I can beat the rush.

bruce benzie posted:

John,

Attached find three pictures of Glen Snyder shelving.  First picture shows joint from about 1 foot out, second is from about 5 inches out, 3rd is from across the room.

Important hints:  Take the roller pin and increase the diameter of the opening a bit, use a dremel tool.  Hold one end in a vice grip and swap ends to complete.  Also - bevel the opening on the roller pin to a 30-45 degree angle - easier to get the roller pin on.  Attach the first shelf to wall studs using star head T20 or T25  wood screws  8-1-1/2" .  Phillips head screws are too soft and you destroy the head installing them.  Attach the first shelf to the wall, then install the roller pins using a small hammer.  Next - attach the second section of shelving using a small wooden block on the end of the shelf  you hit with a hammer.  That prevents damage to the shelf end.  I learned this after installing several sections.

Good quality shelving.

bruce

IMG_5466

IMG_5467IMG_5468

Bruce is right about opening the front of the Pins!!  They are made of very hard steel, and otherwise very hard to get on !!!  Another idea is to use Stainless Screws! They seem to be made of good metal  & blend in with the shelf !!! I had three walls of the shelving & loved it !!!

romiller49 posted:

Place your order before York and they will bring the order to York. At April York one person bought a very large amount on Thursday morning wiping out all the Ogauge shelving for the rest of the meet.

I apologize as that was most likely me. I never thought about calling ahead. I purchased as soon as I got there in April 17 and 18. I will honestly TRY real hard to pre order next time. Sorry for the inconvenience I caused.

Add Reply

Post

OGR Publishing, Inc., 1310 Eastside Centre Ct, Suite 6, Mountain Home, AR 72653
800-980-OGRR (6477)
www.ogaugerr.com

×
×
×
×
Link copied to your clipboard.
×
×