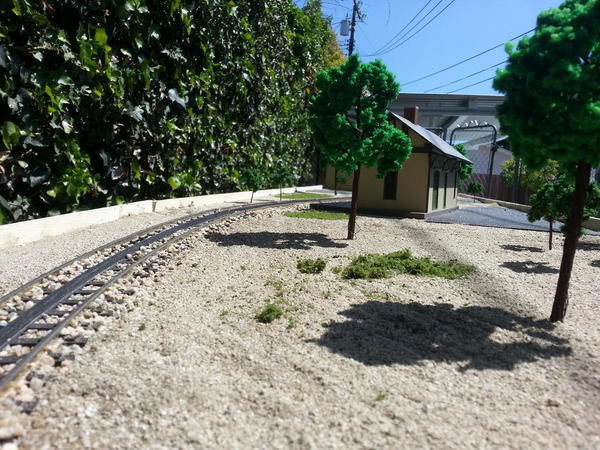
I spread some diluted glue and sprinkled dirt but the middle and top aren't holding. How do you do it?
Replies sorted oldest to newest
Here is the secret, but it takes patience. I have used this method on my layout without failure.
Put the dirt/grass down first where you want it. Then mix Elmers white glue 50/50 with water and add two or three drops of dish washing liquid soap to the mixture. From a cup, use an eyedropper and dribble the solution onto the dirt doing a small section at a time. Another secret I learned is, using a spray bottle of water with a fine spray, just dampen the area you are working on prior to using the eye dropper. This helps spread the glue solution better.
Others will have easier ways of doing it but this is how I learned from the pros.
Steve, Lady and Tex
Works every time Tex.
Paint the area with white glue, like Elmers. Apply an even, thin coat. Apply the dirt to a paper towel,in a 1" x 1" patch. Push the paper towel into the dirt. The dirtwill be stuck. Wait for the glue to dry. The benefit of this method is the glue wicks up from the bottom, thus preventing that "wet dirt" look
I have heard many ways to use real dirt. do peple microwave it first put it in a blender also what is the step by step . I did see a video somewhere on how to do it. by a forum member I just remember he's a joker about his wife name excapes me at the moment. I also saw a video where an older gentleman was using leaves and such out of his yard put it in a blender and then mixed up a goop of something and spread it over the layout then used real tree branches to model a fall type scenery where the trees have no leaves but can't seem to find that video either. so what is the step by step for using real dirt. since I have a need for a lot and have a lot in my yard ![]()
I've done it John's way which works well (also a good technique for gluing foam to plywood.
I've also painted the surface with 50/50 white glue/water mix and shake the dirt straight on using a flour sifter. This puts the dirt on in a light layer which does get "wet" but it's also sticky which allows additional dirt to stick without discoloration. The key is light layers.
Here's the location on the old Redlands Loop where I got the dirt.
Here's the dirt glued in place on the micro layout.
Attachments
Be careful when you do microwave the stuff, daggum dish gets very, very
HOT !! The dirt retains the heat !!
Here is the secret, but it takes patience. I have used this method on my layout without failure.
Put the dirt/grass down first where you want it. Then mix Elmers white glue 50/50 with water and add two or three drops of dish washing liquid soap to the mixture. From a cup, use an eyedropper and dribble the solution onto the dirt doing a small section at a time. Another secret I learned is, using a spray bottle of water with a fine spray, just dampen the area you are working on prior to using the eye dropper. This helps spread the glue solution better.
Others will have easier ways of doing it but this is how I learned from the pros.
Steve, Lady and Tex
Here's Joey's video from Trackside Scenery:
Gandy
When using real dirt my first step was to bake it for a couple of hours to make sure pretty much everything was dead*. Then I took the baked dirt, ran it through a blender and then screened it to remove larger clumps (some of which were also saved for scenery purposes). This left me with a fine powder which was great for most model RR purposes.
Like John Sethian I painted the area where the dirt was going with glue and then applied dirt and ground foam. Since the dirt was almost free I applied it liberally. Then I waited for everything to dry and vacuumed up the excess. On those rare occasions where the vacuuming left spots uncovered, I simply redid those spots. You do want to go heavy on the dirt and light on the ground foam, because ground foam added to dirt will look better than dirt put on top of ground foam.
One advantage to this is that the dirt color doesn't change from the glue.
* Very Important: If you are married and hope to stay that way, do this when your wife will be gone for an extended period. Use a dedicated blender and a dedicated cookie sheet or aluminum pan.
I'm going to have to try this here in Ga I wonder if I can get the red clay look out on the layout. I live on a hill with woods behind me and when it rains my yard washes down to a creek (a lot of dirt there) just pick some up and blend and bake and glue it down sounds fun ![]()
send wife out to get nails done while I do that it's a plan ![]()
Get her the works! Mani-Pedi! Takes longer to do all 20 digits! If you need more time throw in a massage and have her hair done also!
If you go the baking route, use dedicated equipment and take into account that the baking dirt will smell. You really would need time to do it, clean up and get rid of any lingering smells.
I have baked and not baked. I am now a non-baker. I have never had any trouble from glued down un-baked dirt. The key is to sift it. Now that I have tried the glue approach I prefer that look to dirt that was not glued. I am finding variations in color depending on how much glue was used and whether I sprinkle on a light dry layer on top while wet. The variations are making it more real looking. A great source of dirt for sifting is tube sand used for weight in trucks.
Always check with a magnet before adding anything to a layout. If there is iron in your product you could have problems later.


