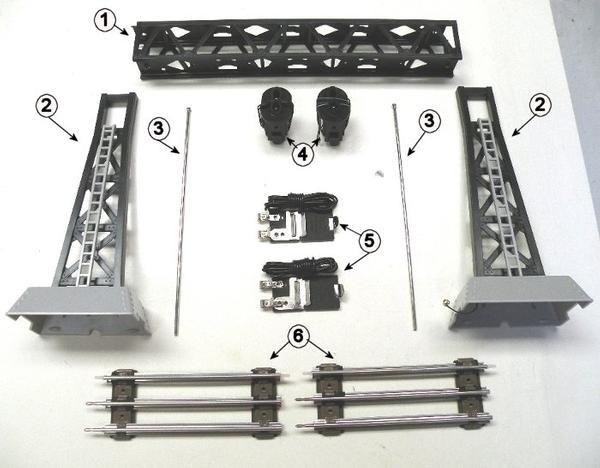
Picked up a couple of these signals the other day, thinking that they were basically new versions of the Lionel 450. Much to my surprise, these LED units include electronics to properly control the LEDs from an insulated rail with no need for relays or 153C contactors. Tiny SMD circuit board inside the target, will trace it out one of these days.

Were any other Lionel or MTH signals designed like this? If not, why not? Sure saves a whole lot of fuss!

Original Post

Replies sorted oldest to newest

I don't know about other products like this, but my guess on "why not" is cost.   Can you post a photo of the board?  I was looking at the Lionel site for replacement parts for 6-22329 - is it in the signal heads item "4" themselves?  Depending on how its assembled/wired might be useful purchased individually to convert incandescent signal heads to LED.

622329

Attachments

Images (1)
  • 622329

If it's convenient to get shots of both sides of the board I think I might be able to trace out the circuit for you - many hands make light the work!  Since you have it wired up, does it have protection (i.e., a capacitor) so that red and green don't flicker when a consist enters or leaves the insulated section (and only a few dirty axle wheels short rails)?.

So it actually does turn on the red LED and turn off the green LED simultaneously when the train hits the insulated rail?  If so that would be quite an improvement from the “pure” Lionel versions.  Also is the green LED on top like real railroads or on the bottom like the Lionel versions?  If not are the bulbs individually wired so you can reverse the orientation of the bulbs and still have them work correctly?

Also does it have a separate set of contacts to control the power to each track?  

I see it was only on the market from 2008 through 2010.  I guess when Lionel lost the marketing rights apparently no one else picked it up.

BTW to minimize the flickering of lights you can always use longer insulated rails (multiple track sections). 

Bill

Last edited by WftTrains
stan2004 posted:

If it's convenient to get shots of both sides of the board I think I might be able to trace out the circuit for you - many hands make light the work!  Since you have it wired up, does it have protection (i.e., a capacitor) so that red and green don't flicker when a consist enters or leaves the insulated section (and only a few dirty axle wheels short rails)?.

Hi Stan-

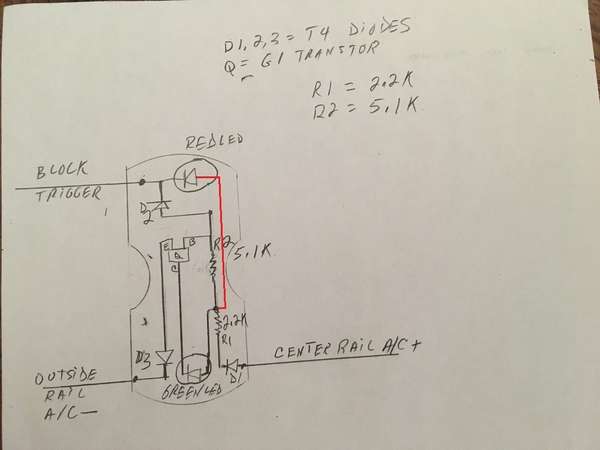
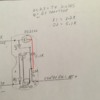
I killed some time tracing this out, 95% confidence in the results. Was unable to identify the transistors, however, they say "BHD J7" or "BHD J?" I assumed NPN bipolar, seems to make sense in the circuit. Unsure about connection of one capacitor, will need to do some continuity checks later. A pain to trace, most of the plated-through holes are covered with solder globs or components on one side or the other.

Unit works nicely, no blinking with PW stuff on Fastrack Accessory Activator Pack, which is basically a 20 inch insulated rail. Circuit is interesting, signal is normally green, but goes to red when the control rail is tied to EITHER common or hot! And, to reply to WFTTRAINS, the green light is indeed on top, but it appears you could change it if you wanted to.

Oops, just checked sketch, obviously one set of rectifiers was backwards. Revised sketch attached.

Attachments

Images (4)
  • IMG_1141
  • IMG_1142
  • IMG_1143
  • IMG_1145
Files (1)
Last edited by PLCProf
WftTrains posted:

So it actually does turn on the red LED and turn off the green LED simultaneously when the train hits the insulated rail?  If so that would be quite an improvement from the “pure” Lionel versions.  Also is the green LED on top like real railroads or on the bottom like the Lionel versions?  If not are the bulbs individually wired so you can reverse the orientation of the bulbs and still have them work correctly?

Also does it have a separate set of contacts to control the power to each track?  

I see it was only on the market from 2008 through 2010.  I guess when Lionel lost the marketing rights apparently no one else picked it up.

BTW to minimize the flickering of lights you can always use longer insulated rails (multiple track sections). 

Bill

Green light is on top and is normally lit, hitting the control rail turns green light off and red light on. Two sides are independent except for the common outer rail connection, but each side has its own hot and control rail connections.

PLCProf posted:
I killed some time tracing this out...

Now that's some nice investigative journalism!

That's serendipitious you checked what would happen if triggered by the Hot rail.  So they did provide input cap(s) to smooth the half-wave triggered insulated-rail signal as well as provide some hold time for intermittent wheel contact. 

I wonder why they didn't locate the board in the base where it appears there's more volume to work.  It looks like they had to manually file/grind down one edge of the circuit board to cram it into the signal head housing  .  So I'd think you can't just flip the board to put green on top or on bottom depending on your whim.  If board was in base, the red/green LEDs in the head could be easily placed in either orientation.

Well, it's a lot more circuit than I think most guys would undertake for a DIY.  And it appears it might be hard to find assembled:

Untitled

I initially thought it would be an option for guys using track with raised beds since the surface mount board ought to fit in a cavity without the bulky relay that would have to be mounted under the layout.


Attachments

Images (1)
  • Untitled
PLCProf posted:
WftTrains posted:

Also does it have a separate set of contacts to control the power to each track?  

Bill

Green light is on top and is normally lit, hitting the control rail turns green light off and red light on. Two sides are independent except for the common outer rail connection, but each side has its own hot and control rail connections.

PLCPROF:

Thanks for the response.  But the reason for my question above about the separate set of contacts was to determine if it can also control a subsequent track block so that the power to the center rail in that block goes off when the insulated rail is energized. 

If YES, then that signal would be fantastic as it would completely eliminate the need for relays in a complete block system for multi-train (per track) applications. 

If NO, then you would still need relays on each side to control the subsequent track block in a multi-train application.  However in a single-train application in which all you want to do is change which LED is “lighted” based on the location of a single train, then this signal appears to definitely be an improvement by eliminating the need for relays thereby reducing the complexity of the control circuitry and the amount of wiring required. 

Bill

stan2004 posted:
PLCProf posted:
I killed some time tracing this out...


I wonder why they didn't locate the board in the base where it appears there's more volume to work.  It looks like they had to manually file/grind down one edge of the circuit board to cram it into the signal head housing  .  So I'd think you can't just flip the board to put green on top or on bottom depending on your whim.  If board was in base, the red/green LEDs in the head could be easily placed in either orientation.


Actually, it looks like it was designed for "red on top," as it is built the end with the big curve (red end) fits against the flat end of the target, so it "feels backwards" when you put it together. I tried to reverse it, it can be done by changing the lead dress. 

My guess is that this was intended to be a universal design that would also work with the 353, 163 etc. but never got to that point. Some of the component choices look like efforts to use up old inventory.... Would be a nice aftermarket product for one of the control vendors.

I've got to do some calculations; I was wondering what would happen if I hooked the control lead to the yellow wire on a Fastrack switch, the one that changes polarity to change the lights in the remote controller.  Lots of interest in changing signals in response to Fastrack switch position too. Might be able to make a "simple fudge" with this thing.

WftTrains posted:
PLCProf posted:
WftTrains posted:

Also does it have a separate set of contacts to control the power to each track?  

Bill

Green light is on top and is normally lit, hitting the control rail turns green light off and red light on. Two sides are independent except for the common outer rail connection, but each side has its own hot and control rail connections.

PLCPROF:

Thanks for the response.  But the reason for my question above about the separate set of contacts was to determine if it can also control a subsequent track block so that the power to the center rail in that block goes off when the insulated rail is energized. 

If YES, then that signal would be fantastic as it would completely eliminate the need for relays in a complete block system for multi-train (per track) applications. 

If NO, then you would still need relays on each side to control the subsequent track block in a multi-train application.  However in a single-train application in which all you want to do is change which LED is “lighted” based on the location of a single train, then this signal appears to definitely be an improvement by eliminating the need for relays thereby reducing the complexity of the control circuitry and the amount of wiring required. 

Bill

Nope, no relay contacts at all. Would indeed be nice, even if it had a nice clean "de-chattered" output to run the coil of an external relay.

Just a follow-up here, after using these on the layout for a few days.

They work fine, a little less chatter than would be expected.  One curiosity though, these units require so little current to activate that laying my hand across the track causes both lights to glow. If my hand is sweaty, however, it activates the signal fully. That is probably why the chattering is suppressed; even a poor connection though dirty wheels is good enough!

This is the picture of the led signal bridge for lionel 6-22329 one transistor(G1 =  Characteristics of the KST5551 bipolar transistor. Type - NPN ... pin diagram of the this transistor. Pinout of KST5551 smd sot-23 transistor, smd marking code G1 ...)  Two diodes T4=Diodes Incorporated. 1N4148WS / BAV16WS. SURFACE MOUNT FAST SWITCHING DIODE. Features ... SOD323. XX = Product Type Marking Code, T4.) and resistors .

Has anybody seen this type of PCB before?  I have parts coming to replace the transistors and diodes. I replaced the blown leds, still doesn't work like it should both sides had burnt out leds , which leeds me to believe that there was an over voltage problem on that track, both fed from a Z4000  transformer. I may have to put a limiting resistor in series with track supply voltage too limit the current to leds . Although it was made for a 18 a/c supply, but a z4000 can put out 22volts.  I'll advise how the repair turns out. Fred B

Attachments

Images (1)
  • lionel signal bridge PCB  IMG_2697: PCB led signal bridge on 6-22329

Fred, just a suggestion without me seeing the circuit diagram, you could probably replace the resistor that's in series with the LED(s) with a CL2 LED Driver IC). But the transistor will also need consideration. They also come in different mA values.

  • 5.0 to 90V operating range
  • 20mA ±10% at 5.0 - 90V
  • Available in TO-243AA (SOT-89), TO-252 (D-PAK), & TO-92 packages

Dave

PLCProf posted:

Hmmm, that is a completely different board from the one in my 6-22329. See photo of mine above.


That what made me restart this thread very interesting indeed .The pic of the PCB SHOWS A cut out in the middle ,to reverse the position of the LEDs , red or green , on top OR bottom 

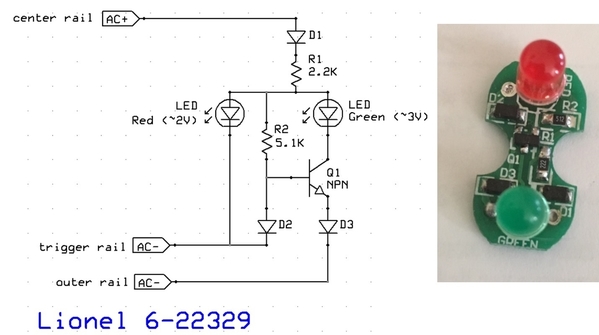
Given the scant number of components, I'm guessing it's a "starve the green" circuit.
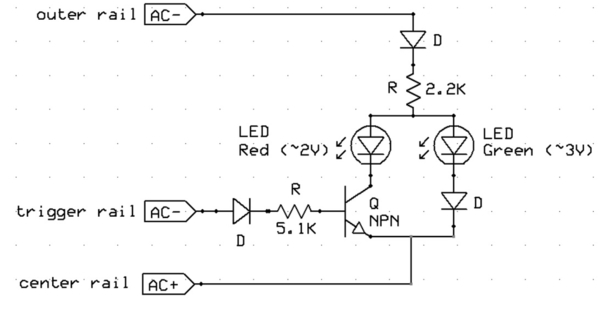
red green signal

The "trick" is a Red LED turns on at ~2V while a Green LED turns on at ~3V. 
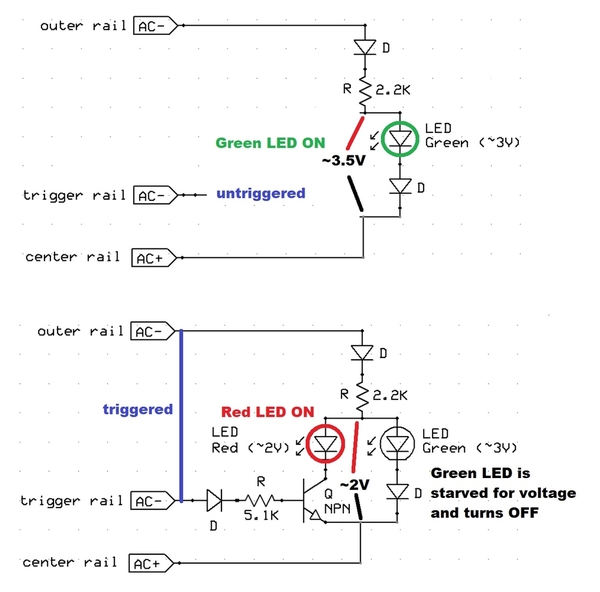
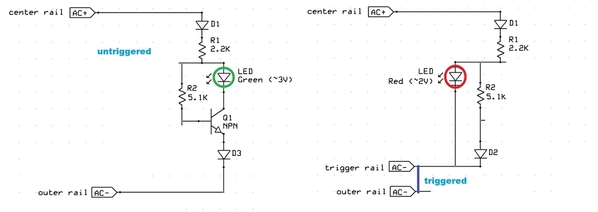
red green triggered untriggered

When untriggered, the transistor is "off" and hence the circuit is as shown on top.  The Green LED is on.  The current is half-wave rectified or pulsing 60 times per second.

When triggered, the transistor is "on" and the Red LED is on.  The current is pulsing 60 times per second.  The voltage across the Red LED only reaches 2V...so the Green LED is starved for voltage and turns OFF.  The Green LED never sees the ~3V it needs to turn on.  The added diode below the Green LED makes the Green voltage higher by the diode drop.  This separates the Red and Green voltage a bit more which makes a more distinct on-off transition.

As there are no capacitors this does not have "flicker" rejection from dirty wheel/tracks when a consist enters or leaves the insulated-rail zone.  Lack of capacitors also means the LEDs are pulsing on/off at 60 Hz which younger eyes can see.

If this is indeed what the board is, the extra few volts of a Z-4000 is not your problem.  You should be able to use a DC voltmeter to troubleshoot the circuit in a couple minutes.  For example, even if the transistor is blown (open circuit), the Green LED should be ON.  If the transistor is shorted, the Red LED should be ON (and Green OFF).  Any diode that is "on" should have a DC measured voltage of 1/4V or so; it's only on half the time so you don't read the 1/2V to 3/4V one normally thinks of as a diode voltage. 

Attachments

Images (2)
  • red green signal
  • red green triggered untriggered

Untitled

If that's how it's built, it explains why it does not work!

As drawn, you show D2 in parallel with Red LED.  In other words, both see the same voltage.  If D2 is a regular diode, it reaches about 3/4 V when "ON" and will never reach 2V which the Red LED needs to turn on.  The D2 always starves the Red LED of voltage.

Attachments

Images (1)
  • Untitled

Hi Dave , you are absolutely right ! In my first freehand drawing of that PCB Your red line is correct on my first drawing, however in my rush to make a clearer drawing I made the error coping the lines over , yes the led anode goes between the R 1& R 2 , I never said I was perfect ,lol . Thanks guys for watching my back. Upon further checking, D1 is shorted out ,burning out the green led.  I have new Parts coming ,transistors are in but not the diodes yet . I will advise when I change the bad parts. I have two of these boards to fix. I'm wondering if TVS killed the Diodes. These units are on our conventionally running lines 12-21 volts Z4000 powered . We had a few derailments on those lines , so maybe a TVS diode would help prevent a burnout in the future. 

Fred 

So for the record, here's the current version (vs. what PLCPROF showed initially) of the 6-22329:

lionel 6-22329 signal head schematic

When untriggered, transistor is on so Green LED lights with the active components as shown on the left.  When triggered, the D2 turns off the transistor and Red LED is on with the active components as shown on the right.

lionel 6-22329 signal head schematic on and off

Attachments

Images (2)
  • lionel 6-22329 signal head schematic
  • lionel 6-22329 signal head schematic on and off

Latest update. I had to change all the semiconductors on that little board, those diodes were surely small lol . I installed them on  the lay out , work fine until dirty wheel showed up, then a lot of flickering of both leds , they are very sensitive . Lets see how long they last .  At some point in the future I would like to make new PCB for the signal bridge. Thanks for everybody's help.


Fred

Add Reply

Post

OGR Publishing, Inc., 1310 Eastside Centre Ct, Suite 6, Mountain Home, AR 72653
800-980-OGRR (6477)
www.ogaugerr.com

×
×
×
×
Link copied to your clipboard.
×
×