
 A dozen Railking passenger cars need  LED lighting. Two incandescent  bulbs  per car . The need for replacing these things is getting old .  I don't  run the cars all the time but when I do there is usually a need to replace one or two or to reposition a loose one.

Any way to be a little economical with the LEDs and where to get the materials needed ?

Original Post

Replies sorted oldest to newest

HEY John,                                                                                                     Thanks for the rapid response.                                            If you have used the  " one solution " , is there a not too complicated soldering job to the boards needed.  I have experience soldering wires together or to tracks but I've never tried anything with boards .

If it is something I think I can get done what kind of LEDs would you suggest ?    I looked over the bulbs in " Here is another "  and I'm  about as confused as any novice can be.

Is ' Gunrunnerjohn associated with Hennings?


Some of the cabooses I have do have LEDs for marker lights I think.  The Railking passenger cars just have two plug in incandescents each.


John is indeed associated with Hennings, as JW&A. The soldering involves attaching the track pickup wires to the "AC in" holes on the board and  wires to the light strip on DC out. He also has a no soldering kit that includes the light strips. There are thousands of strip light rolls on the favorite site; look for 3528 warm white non waterproof 12v strip light.

There may not be led replacement bulbs for the push in style; I have replaced all mine with the strips.

There are many threads on doing passenger car lighting with the strips and various regulator solutions, both home-rolled and off-the-shelf solutions.  I came up with the LED lighting regulator board to make the job of LED lighting a passenger car easy.

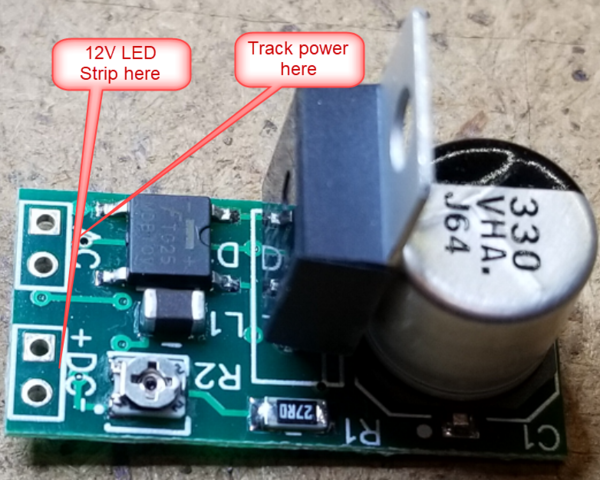
 LED Lighting Regulator

The module gives you DCS compatibility, flicker free operation, adjustable intensity, and of course, low power operation.  You can get 5 meter reels of LED's in amber, warm white, or bright white, for $3-4 from a host of places.  One reel will do eleven 18" passenger cars or ten 21" passenger cars.  Obviously, shorter cars work as well, you just get more cars from one reel of LED's.

As mentioned, I also packaged a solder-free kit, obviously it costs more for each car as I had to do the packaging.

 Passenger Car LED Lighting Kit

For anyone that can do basic soldering, the modules are a much more cost effective solution.

Attachments

Images (1)
  • mceclip0
Old Newbie posted:

John - can I use the module on 18V DC from LionChief walwarts?  

Sure, it runs on AC or DC up to around 22 volts.

Dallas Joseph posted:

OK  GRJ , 

If I would get 3 of your lighting kits I would be able to get at least 6 passenger cars lit for now.  I could get the other ones done later. 

The small size of your modules seem like this is the most efficient system to get into the small areas of these cars using track power.

How do I order these from you ?

 JWA Passenger Car LED Lighting Kit

John H posted:

The board is 1 1/16" by 1/2". by 3/4" high. You can bend a tab to get the height to about 5/8". I have hidden them in the vestibule or bathroom of cars.

Most of the time, I stick it on the roof of the car with the tab bent over.  Unless you hold the car upside down, you can't see it.  If there is a location like vestibule or bathroom with no windows, I put it there.

I stick them with the adhesive backing, then I use a few spots of CA Adhesive to make sure they don't come loose.  I haven't had a problem with any of them.

One caution, you have to make sure you're well ventilated using CA Adhesive and it's totally dry before closing up the cars so you don't fog the windows.  As long as I follow my simple rules, it's worked out well.

JEFF ,                                                                                                                 I too have used a contact like cement.    From Walthers and many others (  Hobbylinc  etc.,, )  it's called GOO  ( UPC - 16374 - 00185 ). It sometimes gets  a little stringy but it's great at setting pieces in place.                                  As far as your other post Jeff about the people being installed before closing the car up........WELL.....I've felt that the cars  with a dozen or so  passeangers looked realistic.       Mine were filled like the collegiate were heading to Spring Break.  I have to keep the revenue at a high level for THIS RR.


GRJ ,                                                                                                                   Love that  CA Adhesive.  I've used a  Super Thin type for some porous surfaces that are hard to get a good bond with . I've done refurbishing on plaster of Paris church statues when the damaged surface of the plaster is exposed and it's impossible to get paint to stick to it. After letting some CA soak in I reapply and then the pieces can be bonded or the surface is ready for repainting.  Fixed everything from flake board furniture hinge areas  to permanently bonding wooden chair legs in this manner.

I definitely hear your advice about ventilation though   GRJ.  If you ever use the Super Thin , be careful too .......that stuff flows faster than water.                    

I actually keep both the true liquid and the gel CA on hand.  I have Loctite 380 Black Max as well, it's great for filling gaps, and it dries black.  It's really strong, I use that occasionally for brass repairs where soldering would mean I'd have to do some painting.  The Black Max blends right in and really grips.

I have Walther's Goo, but I find it's a bit too difficult to control for fine work, so I don't use it nearly as often as I might otherwise.

Last edited by gunrunnerjohn

Dmestan, 

        Using the last few posts should help you with the glue.

As far as the silicone being used , I'm not so sure.     

When working with motorcycle and auto circuits I was always told to keep most silicone glues away from the wiring .  Not sure if it had anything to do with corrosion with that ammonia smelling carrier or not.

Have fun with the lighting.😉

Last edited by Rich Melvin

OH  BOY  JOHN ,                                                                                        at one time I remember asking you if you were an MIT Grad .  And now you sound like quite the adhesive specialist.  This hobby sure does encompass a very large scientific expertise base.  Pretty much like running a real railroad I guess , with less area involved . (  ?  )

Always stay well ventilated of course , we want to keep you around for a long time .  🗿    🗿  🗿 🗿🗿🗿

 I have used replacement LED bulbs and just plugged them in to my 12VAC outside landscape lighting.  After 5 years they are still burning brightly without a single failure. These direct plug in LED lights may work on the passenger cars but not sure if they could handle the voltage spikes.  I'll have to try them and if they are too bright a bit of amber bulb dye applied gives them a golden glow.

HEY  JOHN ,                                                                                                  really nice LED system to work with.                                  I have the inexpensive Railking Pennsy Madison cars if you know what they are like   , with the two incandescent bulb holders. 

I actually soldered the AC wires to the car system instead of using those handy connectors , put the the module  in the  bathroom where I had a seated lady in a chair  ( not the throne ) .  Plenty of room .

I used the two bulb holders to hold a board 1/8 " × 3/16 " which was about two inches less than the interior of the car.  I then lightly coated the bottom and top of that board with that GOO.  I removed the paper on the adhesive backing and applied the LED strip . The nice thing I was able to do was to position one of the LEDs in each of the rear red marker light body holes .  The lights were the old fashion caboose lights like I have on some of the inexpensive Lionel cabooses  which I had painted to look a little better .  The incandescent lighting did little to show that there was any light in those.  This light system made it very easy to finally get to see some light from the markers.    I had lowered the bodies on the trucks to look a little better , so now you can see the tail of the train in the dark.   Progress .

I can do 5 more cars from the 3 kits I received.  I'll have to order enough as time goes by for the other 8 cars .

What a nice efficient way to install an LED up grade. 

KUDOS  BIG  JOHN 👍       THANKS


Hey Dennis,                                                                                               i like doing the amber dye.   I have a little 0-6-0 RAILKING  switcher that I did that to on the head light and tender rear light.  With a couple of coats it gave a nice look to the interior of the cab.

I didn't use the small  regulator screw on GRJ's LED module.  I left it alone and the light is fairly bright but I did use the whole strip of LEDs which I believe can be used for a larger passenger car.  Mine are the inexpensive ,shorter RK Madison's. 

The light is a brighter white but it really works out well with all the other types and colors on the layout. It sort of says  "  HEY, I'm a passenger car full of people not a building or rail signal  "   I don't know,  it just looks OK to me.

I couldn't give any info on spikes from the rail causing problems on the passenger cars .  The locomotive pieces I have are almost all Proto3 with LED lighting and I haven't  had any issues with that after about 3 years running them.

Sounds like you are having a ball with your rail experiences. Mine is just a private , one room deal.

Enjoy.

Add Reply

Post
The DCS Forum is sponsored by

OGR Publishing, Inc., 1310 Eastside Centre Ct, Suite 6, Mountain Home, AR 72653
800-980-OGRR (6477)
www.ogaugerr.com

×
×
×
×
Link copied to your clipboard.
×
×