You have to have more in than going out with the stepdown converter. Figure 13-14v if you are stepping it down to 12v
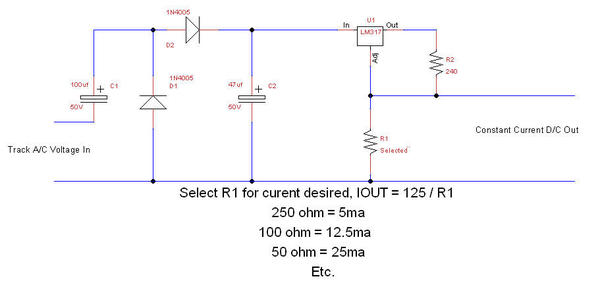
If you're running conventional with lower voltages, here's one solution to getting light at lower voltages, it's a voltage doubler. You can select the value of R1 to vary the intensity of the lighting. This circuit will give you lights down to 6-7 volts from the transformer. This provides variable voltage to the load, later in this thread I have another configuration for constant current.
Edited to correct diagram!
Attachments
OK, so it sounds like for conventional running the strip lights are not the best option in passenger cars if the lights won't come on until 13V. I'll try Dale's LED solution on fish paper.
BTW, has anyone tried the mini modules? http://www.ebay.com/itm/New-Mini-DC-DC-Converter-Adjustable-Step-Down-Module-Power-Supply-Output-1-3-17V-/130994366448?pt=LH_DefaultDomain_0&hash=item1e7fdf67f0
thx, Don
Don, did you not see my post right above yours? It's a simple solution to low track voltage. The module you linked is the one that only steps down, so you have to start with at least 12-13 volts to light the strips.
OK, so it sounds like for conventional running the strip lights are not the best option in passenger cars if the lights won't come on until 13V. I'll try Dale's LED solution on fish paper.
BTW, has anyone tried the mini modules? http://www.ebay.com/itm/New-Mini-DC-DC-Converter-Adjustable-Step-Down-Module-Power-Supply-Output-1-3-17V-/130994366448?pt=LH_DefaultDomain_0&hash=item1e7fdf67f0
thx, Don
John, I think I was typing while you were submitting ![]() .
.
I may give both options a try.
Thanks again
Don
I'm lazy, that's why I like the light strips. Simple to install with a few components, and I'm on to the next car. ![]()
This was done on my Mac with a program called Pixelmator. It is $29.00 and is very powerful. I do not own Photoshop any more, because of the expense and everything I can do on Photoshop I can do on Pixelmator. I took a Photo of the punchdown block and then used the software to draw the lines in different color.
Thanks! Unfortunately I only have a PC, no Mac. Photoshop is way too $$$ for me, not to mention learning curve! May give Paint another look, or keep looking for something else inexpensive and easy to use.
John,
Does your doubler regulate the DC voltage, or do I still need the DC-DC step down converter?
thx, Don
Nope, the doubler actually requires AC input, that's necessary for the doubling action. As the diagram states, AC track voltage in, DC constant current out.
John, my question was after the DC out - DC voltage out of the doubler is variable based on the track voltage, the right side of the circuit only regulates current, so I still need the DC-DC step down if I want constant voltage for the LEDs, correct? Or will increased DC voltage not affect the LED brightness?
thx, Don
If you have constant current out, you don't have to worry about the voltage, it takes care of itself. You can adjust the current to achieve the brightness you want. I find 20ma to an 18" strip for a passenger car to be about right, you may like them brighter or dimmer. Adjusting the value of that one resistor gets you any brightness you desire.
I have no idea why Dale is suggesting not using the voltage doubler, but it works well for me. the components for a voltage doubler only around a dollar, so I can't see the cost as being an issue here.
Flicker resistance is simply picking the capacitor values, larger values = less flicker. In my command conversions, I use a 220uf 35V capacitor, and I see no flicker of any kind in normal running.
John,
The current regulator is just simple ohms law? So if I assume 12V DC in, a 470ohm resistor would give 25mA. Does this sound right? But then as track voltage increases, so does the output of the doubler, and subsequently the output current of the current regulator?
Are 1/4 watt resistors sufficient for this?
thx, Don
Don,
The CL2N3 current regulator chip in GRJ's delivers a fixed 20 mA of current to the LED strip irrespective of the input voltage. The purpose of the resistor in this configuration is to shunt or "steal" some of that 20 mA which effectively dims the strip. If you think you will want to fiddle with LED strip brightness, see my post in this thread of Jan 14. That is, if you are going to use a 2 cent resistor anyway to adjust brightness, you can use an alternative device that is much cheaper.
Separately, with respect to DC-DC converters you might consider so-called step-down/step-up converter modules, also known as "buck-boost" converters. These generate regulated voltage with input voltages lower or higher than the output voltage. They are a bit more expensive ($3 vs. $1 on eBay) than the step-down modules and slightly larger. But as your eBay link shows for step-down modules, you might find one with a smaller footprint. I tacked together the following showing one in action and side-by-side with a step-down "only" module. You still need a bridge rectifier to connect to track AC. The module has an input capacitor but add additional capacitance as needed for flicker reduction. In this case I set the module to 11VDC to drive the LED strip. No change in brightness across the entire voltage range of my Z-4000.
Attachments
Stan,
i've been using the set up you show in the post above but without the capacitor and seem to have flicker free operation - other than flicker free what purpose does the capacitor serve? Running TMCC (18v) i have found turning the regulator down to 7 - 8 volts gives me a most realistic amount of brightness - but to each his own.
jackson
John,
The current regulator is just simple ohms law? So if I assume 12V DC in, a 470ohm resistor would give 25mA. Does this sound right? But then as track voltage increases, so does the output of the doubler, and subsequently the output current of the current regulator?
Are 1/4 watt resistors sufficient for this?
thx, Don
No, the LM317 in constant current mode has a computation to determine the current that the load will get. However, I just noticed I'm missing an important resistor in my diagram! ![]()
Here's the LM317 Calculator and you can see the missing resistor.
Jackson, I assume you mean you're using the $1 step-down (only) module? You would not need the down/up module if running TMCC since the module's input voltage is always higher than the desired output voltage.
Regarding the capacitance, the IC chip and circuit requires some minimum voltage to operate. These are DC-DC converters and in our AC track voltage applications, the input voltage drops to zero 120 times per second. Any capacitance on the input side stores energy to keep the circuit running during these dropouts. One might ask why not just capacitance on the output side. Fair question, but that output capacitor's voltage will be at the target voltage and start dropping the instant the input voltage is lost. So you'd want any flicker reduction reserve power on the input side which will be at the unregulated voltage which can be converted to the desired voltage during power loss. In your case, apparently the on-board input capacitor is large enough to store the energy required to keep the output at 9V during both the AC zero-crossings and for any dirty-track dropouts. Note that the input capacitor will be charged up to 18V (or so for TMCC) so it can drop quite a ways before the 9V output starts to decay. Sorry if this was completely incoherent!
Note, I fixed the voltage doubler diagram in the previous post.
John,
For current regulator I think you had it right the first time. This diagram/calculator seems to be for voltage regulator.
So I'm a little confused. If I can regulate voltage to 12V DC, do I need to be concerned about current? Or the LEDs will only draw what they need?
Don
Here is some more interesting info on these circuits -http://www.trainweb.org/girr/t.../white_led_tips.html
John,
For current regulator I think you had it right the first time. This diagram/calculator seems to be for voltage regulator.
So I'm a little confused. If I can regulate voltage to 12V DC, do I need to be concerned about current? Or the LEDs will only draw what they need?
Don
You're right, I got mixed up in my circuits and thought that one was wrong! Thanks! I'll fix it again, this is getting absurd! ![]()
Either voltage or current works, however I like regulating the current better, and it takes one less resistor.
"If you have constant current out, you don't have to worry about the voltage, it takes care of itself"
If you have 3 LEDs in series with a resistor you need 12 volts to drive it.
Dale H
So what? With a voltage doubler, that's a non-issue at any track voltage you're going to encounter in normal running.
Let's try that again, here's the real constant current model, the previous one is the constant voltage solution.
Attachments
FYI, here's a good data sheet on the LM317 - http://www.onsemi.com/pub_link/Collateral/LM317-D.PDF. Fig 26 has the current regulator as John has described.
For the resistor, 1/4W or 1/2W ?
thx, Don
Dale, at 5 volts AC in, you will actually have at least 12 volts, I suggest you try it. Remember, the capacitors are charging to the peak voltage, not the RMS voltage. I've run the 1033 down to cutoff with this circuit, and the strip was light properly all the way to cutoff of the voltage. With an LM317T at the currents we're talking about, less than 1/2W dissipated in the regulator and resistor.
Again Dale, you have your way, and I have mine. I like mine better, which is why I do it. You're obviously free to do them your way. I like the even distribution of light with the strips.
Not as hard as it sounds, right? ![]()
Perhaps another option or idea is to look into is LM334Z which costs about 79 cents or less.

It may be able to replace both the bridge rectifier or voltage doubler and the current limiter all in one component but its limited to 10 ma with may or may not be bright enough for you passenger car illumination.
The LM334Z is a 3-terminal adjustable current source featuring 10,000:1 range in operating current, excellent current regulation and a wide dynamic voltage range of 1V to 40V. Current is established with one external resistor and no other parts are required. Initial current accuracy is ±3%. The LM334Z is a true floating current source with no separate power supply connections. In addition, reverse applied voltages of up to 20V will draw only a few dozen microamperes of current, allowing the devices to act as both a rectifier and current source in AC applications. The LM334Z is guaranteed over a temperature range of 0°C to +70°C.
Features:
Operates from 1V to 40V
0.02%/V current regulation
Programmable from 1μA to 10mA
True 2-terminal operation
Available as fully specified temperature sensor
±3% initial accuracy
I'm currently using the choke, bridge rectifier, cap, and CL2 circuit for my passenger / caboose lighting with individual LEDs or LED strips like Dale and John pointed out.
I find 20ma for 18" cars is just right for me, some folks like them brighter. I think 10ma might be a little weak for many uses. Perfect for stuff like a caboose or baggage car I suspect.
John,
I used the LM 317 T with a bridge rectifier and an 11 Ohm adjusting resistor to drive 6 warm white LED's in an LGB passenger car. Lights come on around 6 volts and are fully lit around 8 volts. They look great!
Until they reach full brightness, the LED's flash on and off rapidly.
I tried adding 4 470 uf capacitors in parallel between the bridge rectifier and the LM 317 T but nothing changed.
Any idea why the LED's flash rapidly until full current is reached?
The only thing that comes to mind is the input/output threshold voltage of the regulator.
Try adding a small capacitor on the output side.
Here's how I do it. The only change I'd do from this is to make the capacitor a larger value for more flicker resistance. A 220uf will keep the lights nice and solid, even on dirty track. Most of the work is taking the car apart, the actual LED conversion is a piece of cake.
After the picture was taken, hot glue was used to secure the components.
I have a few questions for the experts as I'm trying to wire LED lights in my 12" lionel passenger cars. I'm using Gunrunnerjohn's method posted above. My first question is whether the choke and In4003 diode have to be wired in a certain direction or doesn't that matter? Also, I'm having issues with my 220uf 35v capacitors. As soon as I power up, the capacitor (wired as shown in the photo above) seems to overheat and smoke. This has happened with two different brands of 220uf capacitors. Is there a positive and negative side to the capacitor? Not sure what I'm doing wrong there.
Lastly, while I've left the capacitor off for now, the led lights (using led string of 300 lights) seem to work just fine but I would like them a bit brighter. Is there another diode I could use instead of the CL2N3-G that would make the LED lights a bit brighter? Thanks for your help! It's been a fun project so far.
Capacitors are most assuredly polarity-sensitive. The big stripe running down the one in the above photo denotes the negative terminal. Hook 'em up backwards and they most certainly will release their magic smoke ![]()
---PCJ
The choke does not have to be wired in a certain direction.
The diode DOES have to be wired in a certain direction. The silver band (on the bottom side of the diode in GRJ's photo) goes to the "+" side of the capacitor.
If you look closely at that wide stripe on the capacitor you will usually see "-" symbols in the stripe. And the stripe itself, in addition to being on the physical side of the "-" connection will usually have arrows on it pointing to the "-" connection. Once you see it you'll wonder how you ever missed it, but that's what the forum is for! ![]()
First, get the capacitor issue sorted out. The capacitor will up to double the brightness.
Then, if this is still not enough, yes there are other components like the CL2N3 that deliver more current to the LEDs. Presumably you have more than 1 CL2N3 in hand. If so, a simple thing is to put a 2nd CL2N3 "in parallel" with the first in the same orientation. With the circuit running you can carefully press the 2 leads of the 2nd device against the same 2 leads of the existing device. This will exactly double the current into the LEDs and exactly double the brightness. This will give a rough idea of how much more current you "need" and will help select a suitable device.
Oh wow! I'm so glad this thread got started. I really need to convert a lot of cars, and have never attempted it.
John, does your diagram for your lighting work in conventional and command? I'm stuck in conventional until the 990s ship. ![]()
I've read that there is a way to make the circuit so you can adjust the intensity of the LEDs as well. I'm just not sure how to do that... isn't there some sort of screwdriver pot you cn add or something?
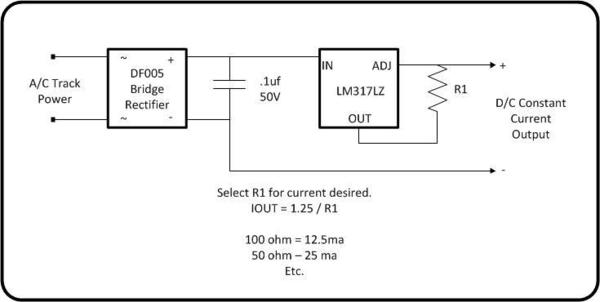
You can use a LM317 in the TO220 package in a constant current mode to give you any amount of current you desire up to around 100ma without a heatsink. It's wired as below. Note this diagram specifies the TO-92 package for the part, but the wiring and current computation is exactly the same for the larger TO220 package. Also, for additional flicker resistance, replace the .1uf capacitor with something like a 220uf electrolytic.
Attachments
I just saw your post.
The circuit previously posted works for conventional or command, however for command the voltage doubler is somewhat of a liability, especially if you want more current out of the circuit. That's really for conventional running, the one I just posted is more appropriate for command only.
Thanks everyone for your replies! I must have missed the polarity markings on my capacitors (they look different from GRJ's) so that is likely my problem. I will get them wired up correctly and see if that makes a difference with the brightness. Much appreciated!!
Well, when they're wired with the proper polarity, they should stop exploding! ![]()
Just wanted to report back that I got the capacitor wired up correctly now and everything is good to go! And as Stan2004 stated above, I did see an increase in brightness once the capacitor was correctly installed and the brightness is to my satisfaction so I am a happy camper. This has been a very helpful thread and I have learned a lot! Thanks again for everyone's time and help!!
In GRJ's circuit you replace R1 with a screwdriver trimpot. The CL2N3 delivers a constant 20 mA. Let's say you want a trim range of half that to double that...or from 10 mA to 40 mA. Using the formula provided this means R1 needs to vary between about 133 ohms (for 10 mA) and 33 ohms (for 40 mA). So you use a combination of a fixed 33 ohm resistor (a few cents) and a 100 ohm trimpot (about 50 cents).
While you might think why can't I just use a trimpot alone, I suppose you could but a trimpot's resistance goes down to 0 ohms. This would cause the LM317 to deliver (attempt to deliver) infinite current which is simply in bad taste. Yes, you may think you're smart enough to never turn the trimpot to one end but...
If you're using the trimpot once in your life to set it and forget it, OK. But the more interesting question is how/where to mount the trimpot to allow brightness adjustment for, say, day vs. night running. Some guys just choose a low and high setting using 2 fixed-value resistors and then use a slide-switch mounted under the car to select. It's cheaper (switches are maybe 15 cents) and arguably easier to reach under a car and slide a switch than to fuss with a screwdriver adjustment. Or with a 3-position slide switch and 3 resistors you can get low-med-high, etc..
And if you want to completely hijack this thread we can discuss ways to automatically brighten/dim as the car approaches/leaves a station platform ![]()
Attachments
Guys, this thread has a lot of information and I'm trying to get up to speed. I'm going to dive in and make some conversions. BUT, my first attempt will be with my large scale cars for an upcoming night run at my local club. The cars are G scale and have wiring for a 9v battery and an integrated on/off switch. I have pulled one apart to plan out the project. Can anyone suggest a wiring diagram and component list to maximize the 9v battery life? If I understand correctly, this is DC so I just need a resistor before the LED strip? Or should I use a small pot current reducer?
I plan to use these LEDs: http://www.ebay.com/itm/5M-300...;hash=item2563f29f08
I have noticed that a guy online did this conversion but IMHO the LEDs were WAY too bright and you could see THROUGH the plastic car! I sure don't want that to happen. Total roof length is probably 18 inches or so...


