Replies sorted oldest to newest
I think you did a pretty awesome job!
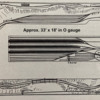
@Bill K. posted:For many years I admired a layout featured in a Kalmbach publication from the 1950s. It was a folded figure 8 design with a twice around, out and back mainline, It had a central yard, a turntable, and a wye. The only trouble was that it required 33' x 18' of space.After many moves to a number of houses over the years, or rather decades, I finally had enough space for a fairly substantial train table. Unfortunately, it wasn't nearly large enough to accommodate my dream layout.My goal was to somehow compress the Kalmbach track plan into 22' x 16 1/2'. As I was approaching age 80, I wanted to avoid having to duck under a bridge or other obstruction to reach the interior of the layout.I ended up folding one end of the track plan back, and having the central yard be on the outside of the main line rather than inside. Having two isles allows me to walk around with my Legacy remote controller to operate and view operations. It limited me to a 48" minimum curve, but I feel that it was worth it. I have 20 or so Legacy engines that like it just fine.My turntable is out on the end of the yard, which works out ok for me. I have added sidings and made other modifications over the past several years, and have pretty much maxed out my available space.Below are pictures of the original Kalmbach track plan, my track plan, and a shot of the layout.
Fantastic job adapting the layout to your space. IMO your design improves on the original design, by doubling back on itself, it makes following the trains more interesting.
Could you briefly explain your benchwork? Also what materials were used for the top surface?
Thanks!
The best thing about other track plans is they provide a template to adapt to your space. Nice job.
The benchwork is made of aluminum extrusions such as those manufactured by the 8020 Company and others. I used to own a manufacturing business that used large quantities of these extrusions, so it occurred to me to use it for my current layout.
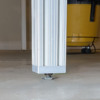
Aluminum brackets are used to connect the various pieces like a big erector set. It can easily be added to or otherwise modified with nothing more than an allen (hex) wrench. The extrusions for my table would probably cost slightly over $2K in today's dollars. A lot of money, but no more than the cost of a single Lionel Vision Big Boy or Challenger. If I eventually decide to dismantle the layout, the extrusions could probably be sold on eBay for close to what I have in them.
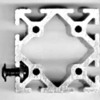
Below are some photos showing parts of the structure in greater detail.
Attachments
Well done!
Peter
Very impressive. Thanks for sharing the details of your bench work.
That looks nice. I hope you have enough room for some scenery though. You certainly have a good, long main line run.
Your use of aluminum extrusions as benchwork for support of your layout platforms is an example of a genius at work! Most hobbyists build benchwork with lumber - 2x4s and plywood. I built my layout "benchwork" with SKIL plastic sawhorses that support hollow-core doors as the layout platforms. And there are carpet layouts (especially at Christmas time) without any benchwork. Different strokes for different folks.
Mike M.
Here is a link to large photos of the above layout:
Bill,
Your layout is very clean with excellent color contrast to draw the eyes of guests toward the features in your scenery. Could you please share the "cliffs notes" on how you built your big, red brick wall? Thank you, sir!
-Bob
@BobRoyals posted:Bill,
Your layout is very clean with excellent color contrast to draw the eyes of guests toward the features in your scenery. Could you please share the "cliffs notes" on how you built your big, red brick wall? Thank you, sir!
-Bob
Red brick wall photos were downloaded from Google images and printed out on one-piece adhesive backed label paper with a cheap color ink-jet printer. Wooden forms were made for the arches, and the paper cut out and stuck to the forms as shown. Where the signs are imbedded in the walls, I pasted them over the brick photo in a photo editing program before printing them out.
From a distance of about two feet, I can't distinguish the brick from the real thing. The paper has stuck firmly in place going on five years now.
Attachments
@Bill K. posted:The benchwork is made of aluminum extrusions such as those manufactured by the 8020 Company and others.
I Really Like your Bench work. I checked out the 8020 website and they offer the extrusions in many different sizes. Wondering what size you used? Also how did you attach the 1/2" Plywood top to the bench work?
Thank you.
Impressive benchwork!
@MainLine Steam posted:I Really Like your Bench work. I checked out the 8020 website and they offer the extrusions in many different sizes. Wondering what size you used? Also how did you attach the 1/2" Plywood top to the bench work?
Thank you.
There's a company called TNUTZ that sells the same thing for close to half the price (link below). I used 2" x 2" (2020) extrusions, which can be ordered cut-to-length. If you have a horizontal bandsaw, you can cut it to exact lengths yourself and save a small amount of money. They can end tap the legs for adjustable feet, which I suggest.
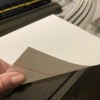
The 1/2" plywood is secured to the tops of the extrusions with 1/4-20 flat head cap screws 3/4" long and countersunk into the plywood.
Attachments
Bill, I recognize that Kalmbach track plan from years ago! You did a great job adapting the plan to fit your space and access needs! The aluminum extrusion makes for a really great looking and sturdy layout frame. Also, they would be easy to handle for 'older modeler' myself included. The scenery really looks great, and the paper brick wall and arches really look outstanding!! The link to more photographs really show some nice engines, shelves, and layout details. I can even hear Norman's mother at the Bates' Motel!
@Bill K. posted:There's a company called TNUTZ that sells the same thing for close to half the price (link below). I used 2" x 2" (2020) extrusions, which can be ordered cut-to-length. If you have a horizontal bandsaw, you can cut it to exact lengths yourself and save a small amount of money. They can end tap the legs for adjustable feet, which I suggest.
The 1/2" plywood is secured to the tops of the extrusions with 1/4-20 flat head cap screws 3/4" long and countersunk into the plywood.
Thank you for the information and the additional pictures. The extrusions are well designed, allowing you to screw in 1/4-20 fasteners from the side (neat idea).
Great looking layout! ![]()


