"HONGZ" stands for HO scale, N scale, G scale, and Z scale.

Post your non-O scale stuff here!

I'm building an N-scale layout on a hollow core door and am looking for opinions regard how to locate the wires.

The givens are:  Kato Unitrack mounted directly on the door (no cork, no foam).  Will have DC and DCC, with the ability to toggle between them.  Layout consists of approximately five blocks and about a dozen switches - double track main line with a crossover, a Timesaver, Inglenook, and staging yard.  Need to run wires for track and switches only; there will be no signals or anything else that requires power.

I can think of four ways to run the wires - 1) Drill through the door and secure them to the other side of the door (seems to defeat the purpose of using a door), 2) Drill through the top and fish through to the edge (neat, but don't know what obstructions are inside the door - corrugated cardboard, supports, etc.), 3) Run them along the roadbed to a central location, then run them to the edge, or 4) Run them on top of the board directly to the edge (cover them with scenery - harder to fix if there's a problem down the road).

I've found numerous posts and YouTube videos of door slab layouts, but didn't find one that spent any time on this aspect.  (So many of the videos are ponderous to watch - stop mumbling and get to the point - but I digress.)

Please share your experiences, lessons learned, links / videos, and suggestions regarding wiring a door slab layout.  Thanks.

Original Post

Replies sorted oldest to newest

@romiller49 posted:

Mallard, if you are putting legs on the door to keep it off the ground then I would use your #1 way. Drill a hole through the door and secure underneath. Why do you think that way defeats the purpose. I may be missing something.

Thanks for the thought - I left out some of the thought process.

I've considered adding legs, but probably won't.  Likely that the layout will be used by setting it on a table or sawhorses - having wires on the underside would expose them to being caught on or rubbed by whatever surface the layout is resting on.  Also, when not in use it will be stacked upright against a wall - don't want to catch the wires while moving it.

you could add some scrap lumber to raise the door just like - an inch tall.

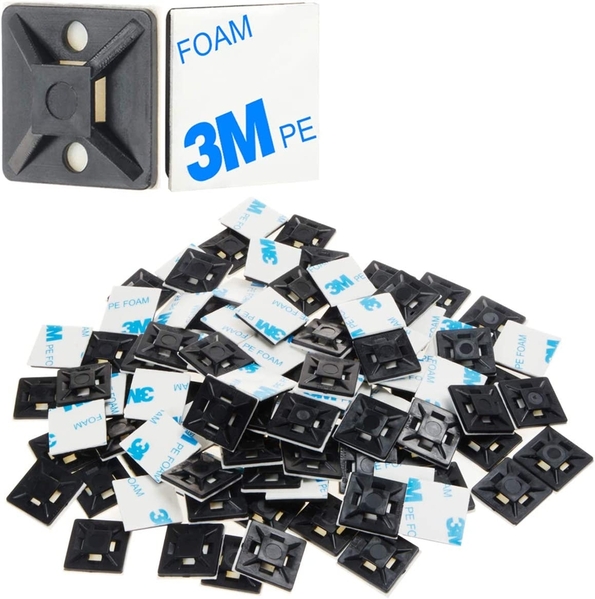
on the back of the door, run two wooden 'rails' down the 80" length of it. this way you can lay it across sawhorses or on another table and have room for the wires to live without getting crushed/pinched/pulled. maybe use some wire tie-offs with zipties to keep it tucked up close to the door


wire clips

Attachments

Images (1)
  • wire clips

I laid foam on mine and carved a channel down the middle under the rails for the wiring. You don't want foam so you could run a router down the center and leave a channel in the door itself for the wires. That would make it neater. Under the door would make wiring repairs easier. Once the track is permanently installed, there is no easy way to repair anything track related unless you have a better way to secure than the way I installed mine.

I will give you my opinion on the Kato track and my experiences with my layout, which isn't sceniced yet. IMO Kato is great for temporary layouts. I can't think of an easy way to secure it or to remove sections for repair later. I glued mine down with Bob Smith Ind gap filling CA with a kicker to move along quickly. Once I got it all in place, I realized that removing sections for repairs or replacement will be difficult. Also, can't solder Kato track because it will melt the joiners and the roadbed. I disassembled a lot of the joiners to remove the metal part from the interlocking bases and soldered feeder wires on the bottoms then reassembled them. It was a lot of work and I still have areas where my trains slow down.

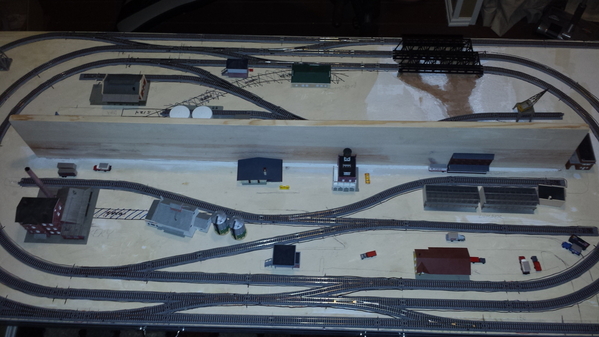
Here is a picture of mine from a few years ago.

20150114_172141

Attachments

Images (1)
  • 20150114_172141
@Mike D posted:

I laid foam on mine and carved a channel down the middle under the rails for the wiring. You don't want foam so you could run a router down the center and leave a channel in the door itself for the wires. That would make it neater. Under the door would make wiring repairs easier. Once the track is permanently installed, there is no easy way to repair anything track related unless you have a better way to secure than the way I installed mine.

I will give you my opinion on the Kato track and my experiences with my layout, which isn't sceniced yet. IMO Kato is great for temporary layouts. I can't think of an easy way to secure it or to remove sections for repair later. I glued mine down with Bob Smith Ind gap filling CA with a kicker to move along quickly. Once I got it all in place, I realized that removing sections for repairs or replacement will be difficult. Also, can't solder Kato track because it will melt the joiners and the roadbed. I disassembled a lot of the joiners to remove the metal part from the interlocking bases and soldered feeder wires on the bottoms then reassembled them. It was a lot of work and I still have areas where my trains slow down.

Here is a picture of mine from a few years ago.

20150114_172141

Thanks for the thoughts - your layout is very similar to what I'm doing.  My track will be nailed down - not easy to take up if repairs are needed, but possible - need to remove several sections to get enough slack.  Using Kato Unitrack to help with alignment and durability - I have an old portable N layout where the track was easily bent and damaged.  I've also used Loctite Power Grab adhesive along the edge of the roadbed on similar track on another layout - easy to slice with a utility knife for removal.  Hoping to avoid issues by doing a lot of testing before scenery goes down.

I'm going to consider the router idea (thanks also to @Stuart).

I've built several Lionel door layouts over the years. N scale stuff is much lighter in weight. For the heavier Lionel stuff, I add 1x4 supports length wise to edges of the door. I learned that lesson the hard way by having a hollow core door slowly start to sag over the years. Though finding a good condition used older door has the advantage that they were made more solidly years ago.

For wiring, I drill all the way through the door, then use one of those small diameter sippy straws to feed the wire through: It's much easier to find the second drilled hole with something stiff like a straw, versus just the wire alone. Once the wire is through, I pull the straw down and then away from the wire. This of course means you have to drill a hole big enough for the sippy straw to go through.

Drilling a hole through just the top layer of the door, then trying to fish the wire through would be nearly impossible, if not extremely aggravating. You'd be better off build a frame with a piece of lauan on top. For me, the convenience of the hollow core door is it's light weight, small size (for an apartment or a portable layout) and its' almost ready to use nature... save for me adding supports to the long sides of the door.

I duct tape the wires to the bottom of the door, writing on the tape with a Sharpie to identify what the wire goes to. I run all the wires to the front of the layout to where the 1x4 is. There I use plastic wire clips to bunch all the wires, as they run across this 1x4 to the corner where the transformers are.

You also might try doing a search on Youtube for train layouts on a hollow core door. There are quite a few N scale layouts built on hollow core doors with videos on Youtube (not nearly as many Lionel layouts though). You might get some pointers or inspiration.

Thanks for the thoughts.  I chose to use a door for stability and light weight, and to kick-start the process vs. building a platform.  I can imagine that a door could sag over time with heavy items on it.

BTW, I did a fair amount of searching, and yes there are a lot of links and videos about building layouts on hollow core doors.  Oddly, I didn't find any that covered how they ran their wires.

Have you considered 2" thick foam instead of a hollow core door ? It can be cut to size if need be and painted an earth brown color with latex paint and sprinkled with fine turf if desired. It's stable enough to build a layout on, but still lightweight and easier than wood to insert scenic items like poles, lights, trees, etc.

You can surround the perimeter with 1" x 4" pine stock that is about 1/2" or so higher than the layout and extends about an inch below layout level to hide the wires. The wires can be duct taped or hot glued to the underside of the foam base so they won't stick down or get caught on anything. Make supports, like slats or a perimeter ledge, for the foam base to sit on.

@Richie C. posted:

Have you considered 2" thick foam instead of a hollow core door ? It can be cut to size if need be and painted an earth brown color with latex paint and sprinkled with fine turf if desired. It's stable enough to build a layout on, but still lightweight and easier than wood to insert scenic items like poles, lights, trees, etc.

You can surround the perimeter with 1" x 4" pine stock that is about 1/2" or so higher than the layout and extends about an inch below layout level to hide the wires. The wires can be duct taped or hot glued to the underside of the foam base so they won't stick down or get caught on anything. Make supports, like slats or a perimeter ledge, for the foam base to sit on.

That's a valid approach, similar to a layout I built a few years ago, but this layout needs to be sturdy for storage, so I went with a door.  I also wanted to jump-start the process by not having to build any framework.

A hollow core door is sort of an oxymoron, it still has supports in it to keep the shape and fishing through it would be a nightmare. Running a channel in the board to run the wiring is kind of futzy, and then if you want access to it, how you you handle it?

I would drill through and run the wiring on the bottom. To keep it from snagging, the secret is to keep it tightly connected to the bottom of the board in some way. The other thing is as someone else suggested, put a furring strip or the like the length of the table, and that will be what the door rests on. Doesn't have to be deep, a furring strip would do it. Most people would staple the wiring to the underside of the board, which will work, but might be a PITA if you need to replace the wire or something.  I would probably do something like attach something springy (like a bendable piece of plastic) with a screw on one end, then the wires are held by the plastic, you pull the other end of the plastic down, wire goes in, you let it go, wire will hold to bottom of door. Will also allow easily removing it.

About 20+ years ago I built the four (G, O3R, HO, N) layouts for our LHS.  The N scale layout was built first, because (1) it was to be located at eye level mounted above the product shelves/hooks for the N scale products, and (2) it was destined to be portable enough to be shared/viewed on behalf of the store at local events/venues...like our AMTRAK station for the annual rail travel booster event.

Ergo, light weight, compact size, ease and safety of transporting was essential.

So I selected a 36" hollow core door (No bores or hinge mortise cuts) as the layout base.  The track plan was based on Kalmbach's Carolina Central plan for the same base.  In order to provide some variation to the terrain AND accommodate wiring I then layered two 1" thick sheets of open-cell (pink/blue) foam on the top side. 

However, I cut the the first, or inner, layer of foam smaller than the door dimensions by 1" both directions.   I bonded it centered on the door surface, and then the full sized foam sheet to top of that, thereby creating a 1/2" deep channel that ran the entire periphery of the layout.  The control box and power connections were located at one end of the layout within a 'hill' of extra foam (additional 1" thick pieces stacked and rough carved.)

All layout wiring then runs in the foam channel to the control box.  A fascia of 1/4" Masonite was then placed, contoured, and screwed to capture/hide the wiring.  The screws enable any future wiring changes that might be necessary.

To get the wires from their track/device to the channel I used a (drum roll, please!) long knitting needle!  It may sound awkward, but it really worked well to create a bore for the wires to reach the channel.  Since most of the connections were to the track which ran close to the layouts periphery, the bore was not very long, anyway.  With the track located I simply started the needle adjacent to the track/device terminals, aimed the needle by eye towards the nearest channel and pushed it through.  And after a couple of practice 'jabs', it was pretty easy to have the needle emerge quite centered in the channel, too!!

The bottom of the layout, still mounted above the product shelves at the store, is absolutely clear of wiring...and their temptations/risks!  It seems to be working well.  Clear plastic panels were subsequently fastened to the Masonite fascia to keep the curious digital mischievers at bay.

FWIW...

KD

Add Reply

Post

OGR Publishing, Inc., 1310 Eastside Centre Ct, Suite 6, Mountain Home, AR 72653
800-980-OGRR (6477)
www.ogaugerr.com

×
×
×
×
Link copied to your clipboard.
×
×