@BillYo414 posted:

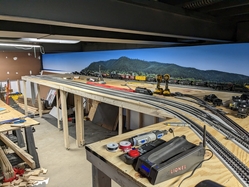
More progress on track and table. Most excitingly, I managed to level out the bowed pieces of plywood to the point where I'm satisfied! I ended up going with a 2x4 on the underside.

I bought some terminal strips to start getting setup for wiring but setting up track and putting up more table really sucked up most of my time. I was surprised. My layout uses a few sections of custom track or flex track and that was an unexpected difficulty for me. I'm used to sectional track where you put it down and go. So I've had to do a lot of measured and double checking before I screw the track down. No big deal. I would say I acquired a new skill!

On with the photos...

here is my newly un-bowed plywood:
PXL_20230302_002911749

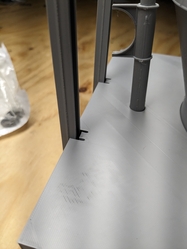
Here's the benchwork I added:
PXL_20230304_200056060

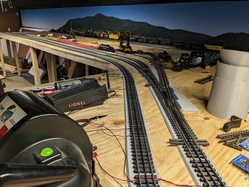
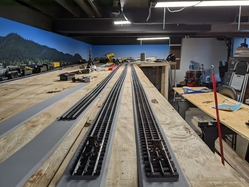
I really like the track work here and that's mostly because it took forever to get the alignment where it should be:
PXL_20230304_200059061PXL_20230304_200137696

And here's some of those fun double track mainline shots:
PXL_20230304_200113869PXL_20230304_200122359

You may notice the 2-10-10-2 isn't on the tracks. It seems to have chewed up its own gearbox. Not sure what that's about but I'm looking into it.

I cannot seem to get the casting deck for the blast furnace to print no matter what I do. It either warps or comes out looking terrible on the corners. My last two solution ideas are keeping the bed temps elevated through the print or replacing the nozzle. The casting deck is kind of important to holding the structure together in the model so splitting it into smaller pieces would be trouble. Kind of a bummer. I wanted to start putting the furnaces up. I did get the highline arches and girders prototyped. They look great but I want to get a few more done before I show off haha

Bill, the mill works will be on the way. Despite the setbacks it must feel good to get some track down. And, as Peter mentioned, the backdrop works.

Jay

Thanks @Putnam Division and @Tranquil Hollow RR. There will be similar mountains/hills at each end of the layout to obscure the curves and break up the scene some. It also is intended to capture the way that kind of terrain affects how towns and buildings are arranged in this region.

The last version of the casting deck actually came out decent. I just had it warp on me. I made some more changes to the settings and the next revision is on now.

Success! Shortlived though.

This is the view of the blast furnace from having the camera at eye level. I'm about 5' 9":
PXL_20230305_181413276

Here's a slightly different view from higher:
PXL_20230305_181419504

The bustle pipe, tuyeres, and tap hole:
PXL_20230305_181425000

And my shortlived success:
PXL_20230305_180524025

In my haste to figure out the right combination of settings to print a flat casting deck with decent appearance, I forgot to check my dimensions. Now the columns don't fit not a big deal. This is a problem that is easily solved with some adjustments. Nonetheless, it feels like I just made a huge leap of progress getting these parts to print.

I can't get over how rough the surfaces look in these photos. They're not nearly that bad in person. Luckily, this model is meant to be a skeleton and will be weathered up. Blast furnaces are a weird shape so it's much easier to print one and then make it nice than it is to scratch build one. @David Minarik told me of his scratch built blast furnace experience and it sounded like a lot of work (with jaw dropping results though ). This will take a while to weather because I have to learn the skill but printing the shape will be such a benefit in the long run.

The 2-10-10-2 is back in action. Two loose bolts. One on each of the front most drive wheels.

I added one last section of table to complete the yard area. That puts me three sheets of plywood away from completing benchwork I'll be glad to vac up the saw dust for the last time when I get to that point haha

Attachments

Images (4)
  • PXL_20230305_180524025
  • PXL_20230305_181413276
  • PXL_20230305_181419504
  • PXL_20230305_181425000
@BillYo414 posted:

Success! Shortlived though.

This is the view of the blast furnace from having the camera at eye level. I'm about 5' 9":
PXL_20230305_181413276

Here's a slightly different view from higher:
PXL_20230305_181419504

The bustle pipe, tuyeres, and tap hole:
PXL_20230305_181425000

And my shortlived success:
PXL_20230305_180524025

In my haste to figure out the right combination of settings to print a flat casting deck with decent appearance, I forgot to check my dimensions. Now the columns don't fit not a big deal. This is a problem that is easily solved with some adjustments. Nonetheless, it feels like I just made a huge leap of progress getting these parts to print.

I can't get over how rough the surfaces look in these photos. They're not nearly that bad in person. Luckily, this model is meant to be a skeleton and will be weathered up. Blast furnaces are a weird shape so it's much easier to print one and then make it nice than it is to scratch build one. @David Minarik told me of his scratch built blast furnace experience and it sounded like a lot of work (with jaw dropping results though ). This will take a while to weather because I have to learn the skill but printing the shape will be such a benefit in the long run.

The 2-10-10-2 is back in action. Two loose bolts. One on each of the front most drive wheels.

I added one last section of table to complete the yard area. That puts me three sheets of plywood away from completing benchwork I'll be glad to vac up the saw dust for the last time when I get to that point haha

Way to go Bill! That’s a productive weekend.

Bill,

I had to go back a  page or two to catch up. You are moving fast buddy! With that being said, I appreciate the thought you are putting into each step of your layout build. I'm sure most will concur, that even with the utmost planning, errors will occur. You addressed your bench work issue and will have a better layout and better running trains because of it. I'm equally impressed with your passion of the steel mill and homage to the Mahoning Valley. I certainly have a soft spot for your endeavor having lived there for 7 years. Of course by the time I got there the industry had long passed. However, that didn't stop the conversations from a few of the locals who gave witness to the days of old. Additionally, there were several "what used to be here" trips with friends when driving around. They already knew if it had anything to do with the railroad, we had to stop and my "research" would follow. If only we had cell phones then.

We are only getting bits and pieces of your thought process but I'm sure when you get closer to a "finished product" we all will be in awe of what you have done. Keep up the great work man.

Dave

Last edited by luvindemtrains
I'm equally impressed with your passion of the steel mill and homage to the Mahoning Valley.

It's an affliction I'm happy to live with haha I'm in a similar boat to you. I grew up here in the 90s when thing were being torn down but I didn't understand much of it because I was too young. Now I drag my friends around town looking at old sites and finding traces of what was there. I've even started trying to print old photos on transparencies so you can hold them up and see what it looked like. I wish I could better explain my interest in the area but I sure can show it through this project haha

I appreciate the kind words from everyone. It's very encouraging for me to hear and I hope one day you can all come see the layout in person.

Work will probably slow down a little bit until the next paycheck haha

@BillYo414 posted:

Success! Shortlived though.

This is the view of the blast furnace from having the camera at eye level. I'm about 5' 9":
PXL_20230305_181413276

Here's a slightly different view from higher:
PXL_20230305_181419504

The bustle pipe, tuyeres, and tap hole:
PXL_20230305_181425000

And my shortlived success:
PXL_20230305_180524025

In my haste to figure out the right combination of settings to print a flat casting deck with decent appearance, I forgot to check my dimensions. Now the columns don't fit not a big deal. This is a problem that is easily solved with some adjustments. Nonetheless, it feels like I just made a huge leap of progress getting these parts to print.

I can't get over how rough the surfaces look in these photos. They're not nearly that bad in person. Luckily, this model is meant to be a skeleton and will be weathered up. Blast furnaces are a weird shape so it's much easier to print one and then make it nice than it is to scratch build one. @David Minarik told me of his scratch built blast furnace experience and it sounded like a lot of work (with jaw dropping results though ). This will take a while to weather because I have to learn the skill but printing the shape will be such a benefit in the long run.

The 2-10-10-2 is back in action. Two loose bolts. One on each of the front most drive wheels.

I added one last section of table to complete the yard area. That puts me three sheets of plywood away from completing benchwork I'll be glad to vac up the saw dust for the last time when I get to that point haha

Bill,

I have to say, That looks excellent!   I think it will clean up just fine.  I can't wait to see future photos.

Bill

That's a great looking furnace! And with so much detail.

Did or would you ever consider making copies of the furnace available to us  steel mill modelers that don't have access to a 3d printer?

I'm in the process of also building a steel mill layout and have some of the mill structures completed.  All made from MDF , foam board and corrugated cardboard. For the hot blast stoves I went a different way,  2 empty oatmeal cans stacked on top of each other, wrapped with black poster board, with a Christmas ornament for the dome.  (I had a technician from Johnstown PA that called them Christmas balls). I'm thinking that the furnace top works would use parts from a Lionel coaling station, styrene sheet and pvc pipes, the bustle pipe I can use a foam floral ring from the craft stores and more piping for the tuyeres. The cast house floor will be either 3/4 inch MDF or gator board with wood H columns,  but I need to figure out how to make the sloping walls of the furnace body.

Thanks! @third rail

Sounds like you got a heck of a mill coming along! Have I missed your pictures? I would like to see your stoves. It seems like the stoves around Pittsburgh had the ball on top where as the stoves in Youngstown were tangent on the sides but still had the dome. It's odd. I guess it must be related to heat efficiency? Either way, I would love to see them if you have some time to post them! The sloping walls of the furnace are a major reason I decided to go with 3D printing. It's otherwise very difficult to get the ratios right.

I do intend to sell these as kits once I get one whole piece assembled and make a basic instruction sheet for assembly. I don't know the cost or anything yet but I think it would be a great help to O scale if these structures were available. Especially because the foot print isn't terribly large because it's an older furnace design. One thing I'm struggling with is how to deal with the possibility that someone would want to flip sides that the stove sits on. Then I read about the complaints with new products from actual manufacturers and I get nervous as can be that people would do nothing but complain about what I produce haha but anyway, yes. I would like to make these available. Hopefully by the end of this year. I need to get repeatable parts printing and then write the instruction sheet (there are probably going to be over 150 pieces) and figure out the most effective way to ship them.

Bill

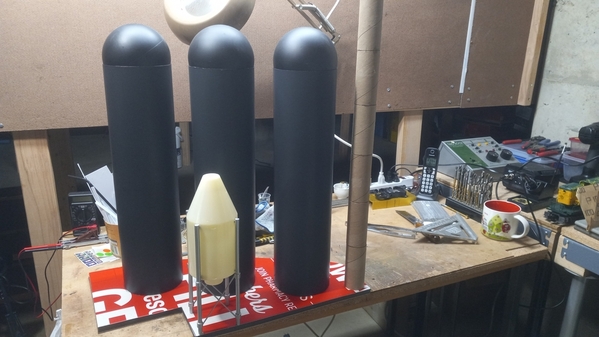
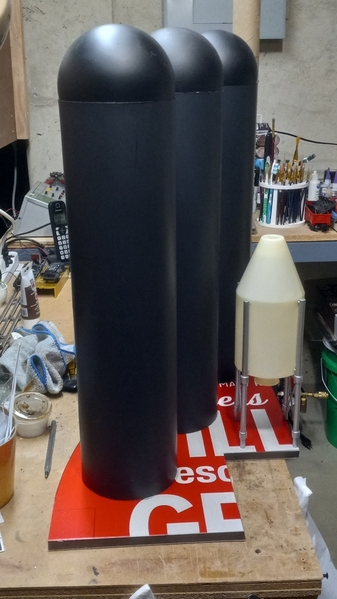
Here are my hot blast stoves,  more of a representation right now.  They need catwalks at the junction of the body and the dome and all the hot and cold blast piping.  Total height about 22 inches,  making them around 92 scale feet tall. Stack is a bunch of receipt tape rolls glued together , might change to 1&1/2 Inch pvc pipe.  The structure in front of the stove is a G scale seed silo assembled upside down.  It'll be part of the dust collector.  A larger unit will straddle a track and connect to the downcomer.

20230308_16333220230308_163356

The base is a gator board sign I acquired from my store as it was closing.  It advertised flue shots,  was 24X60 inches, very stiff and weather proof. Base will be raised up about 2 inches and a brick wall will be applied.

Attachments

Images (2)
  • 20230308_163332
  • 20230308_163356

I'm thinking of a furnace built in the 1920's but still active around 1955, the era I picked for my layout. Furnace body that I'm hoping to build will be 80-100 scale feet 18-24 inches and a top works of around 15 inches for a total height of 39 inches max. I have about 40 or so inches from the layout to the ceiling rafters in my basement.

Does your height include the top works? I've read that many 1900's era furnaces were short, like 60-80 feet high,  plus the uptakes and downcomers. Older hot blast stoves had stacks on top of each stove,  not a single stack positioned to be side like more recent furnaces.

My height does include top works. I was severely limited by my ceiling height. It still looks good enough for me though. The density of the model is what I really enjoy. Having three or four of these packed together will give me the look I want.

The first furnace shell I ever printed was entirely too tall for me layout. I intend to develop other furnace designs that are more for a later era if I find out there's demand for them. I would just have to figure out if the taller furnace would use the same cast house structure.

@third rail posted:

The cool part of an older furnace are the 4 uptake that are the blast gates.  Makes the top works look like a crown

I was a little bummed when I discovered my furnace wouldn't have the top that I commonly saw in photos from the 40s, 50s, 60s, etc. But it's all good (and a heck of a lot harder to model in CAD and print!).

The convenient part of an older furnace is that you don't need an ore yard haha

Yes you can.  Any vessel on the great lakes was a lake boat or laker. Didn't matter whether they carried freight or passengers.

My boat is a version of one that that hauled ore from Quebec to Ontario . I purchased plans for it off the internet specifically one that fit my space available. Like I said it's 100% scratch built,  I carved the bow and stern from pieces of aspen wood layered wedding cake style. It has poplar wood sides and a hardboard deck.

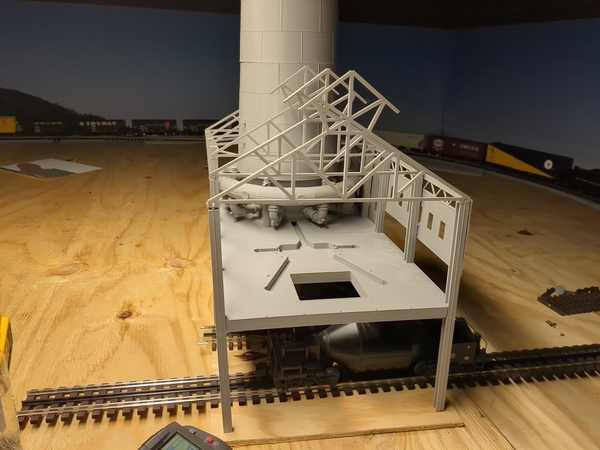
Moving right along. Casting decks, roof trusses, bustle pipe supports, and some walls complete. There is currently no glue holding this together. I wouldn't sneeze on it though haha

Here's the overall progress:
IMG_20230311_102440_1

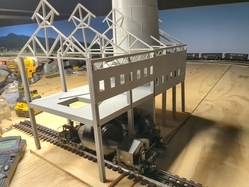
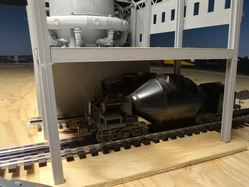
Mocked up with a hot metal car and slag car:
IMG_20230311_102453_2IMG_20230311_102503_1

This is not the final arrangement. This is just for the assembly and whatnot. The platform is about 11" x 19" so far. There will be a skip hoist off the back and stoves to the side. So 11"x19" is just a bit of the footprint. I'm building on quarter inch thick plywood so I can move the structures off the layout for maintenance/bring and brag/whatever. We actually won't be looking at this side of the furnaces in the final arrangement. We'll be looking at the high line and the skiphoist because we will have to actually dump coal from hoppers. I couldn't have that being the thing we couldn't see.

It's not all bad though. This will be a good thing in my opinion because there won't be a lack of detail visible (in the form of people or anything). I'll be able to have lights and smoke but you won't be able to see that nobody is working to tap the furnace. I probably sound a little obsessive/crazy explaining this but I think that sometimes not being able to see the detail allows your mind to fill in the detail and that is actually the better way to get the job done.

It won't stop me from trying to animate runner gates and the mud gun though

I ordered as much track as the budget would allow instead of getting the plywood I need to finish the bench work. I also got some terminal strips and enough Tortoise switch machines to get the crossover wired up.

I'm trying to upload some videos but I suspect they're too big because I keep getting a warning to slow down.

Attachments

Images (3)
  • IMG_20230311_102440_1
  • IMG_20230311_102453_2
  • IMG_20230311_102503_1
Last edited by BillYo414

@SteveH it stayed flatter than those big sheets. I don't get it! But I also won't be complaining haha

@Mark Boyce thanks!

@Dave_C Thanks!! They're parallel faces on the tail section (the single piece on the column). There is a tiny angle on the two parallel pieces coming down from the truss. So I suppose it is dovetail. It's entirely fit together with friction at the moment though.

I guess my videos are too big to upload or something. I suppose I will have to get myself a Youtube channel. I just have zero know-how for video editing. I barely know how to take decent photos haha

@BillYo414 posted:

@SteveH it stayed flatter than those big sheets. I don't get it! But I also won't be complaining haha

@Mark Boyce thanks!

@Dave_C Thanks!! They're parallel faces on the tail section (the single piece on the column). There is a tiny angle on the two parallel pieces coming down from the truss. So I suppose it is dovetail. It's entirely fit together with friction at the moment though.

I guess my videos are too big to upload or something. I suppose I will have to get myself a Youtube channel. I just have zero know-how for video editing. I barely know how to take decent photos haha

Bill, I don’t know anything about video editing.  I just take the video and upload it to YouTube as is.  If I didn’t like the video on the phone, I take another before uploading.

@BillYo414 posted:

Moving right along. Casting decks, roof trusses, bustle pipe supports, and some walls complete. There is currently no glue holding this together. I wouldn't sneeze on it though haha

Here's the overall progress:
IMG_20230311_102440_1

Mocked up with a hot metal car and slag car:
IMG_20230311_102453_2IMG_20230311_102503_1

This is not the final arrangement. This is just for the assembly and whatnot. The platform is about 11" x 19" so far. There will be a skip hoist off the back and stoves to the side. So 11"x19" is just a bit of the footprint. I'm building on quarter inch thick plywood so I can move the structures off the layout for maintenance/bring and brag/whatever. We actually won't be looking at this side of the furnaces in the final arrangement. We'll be looking at the high line and the skiphoist because we will have to actually dump coal from hoppers. I couldn't have that being the thing we couldn't see.

It's not all bad though. This will be a good thing in my opinion because there won't be a lack of detail visible (in the form of people or anything). I'll be able to have lights and smoke but you won't be able to see that nobody is working to tap the furnace. I probably sound a little obsessive/crazy explaining this but I think that sometimes not being able to see the detail allows your mind to fill in the detail and that is actually the better way to get the job done.

It won't stop me from trying to animate runner gates and the mud gun though

I ordered as much track as the budget would allow instead of getting the plywood I need to finish the bench work. I also got some terminal strips and enough Tortoise switch machines to get the crossover wired up.

I'm trying to upload some videos but I suspect they're too big because I keep getting a warning to slow down.

Another successful and productive weekend Bill.

Jay

Add Reply

Post
The Track Planning and Layout Design Forum is sponsored by

AN OGR FORUM CHARTER SPONSOR

OGR Publishing, Inc., 1310 Eastside Centre Ct, Suite 6, Mountain Home, AR 72653
800-980-OGRR (6477)
www.ogaugerr.com

×
×
×
×
Link copied to your clipboard.
×
×