Many thanks to everyone who helped me. I successfully performed my second PS3 upgrade into a scale wheels CNJ Pacific. I really appreciate the help. It wasn't as easy as I thought it would be because the plastic case of the PS3 electronics was just slightly larger than the plastic case of the PS2 electronics but after a while I figured out a way of fitting everything in the tender.

What I am attempting to do now is install the remaining PS2 electronics into a friends Railking PS1 Big Boy. 

#1) There is a large weight in the tender. There is nowhere to put the electronics with this weight there. Can I remove it? Or should I try to find some way of fitting it in there? Maybe I can build up a second floor so to speak above the weight? I don't want the locomotive to have derailing problems when finished. 

#2) Will the PS3 coupler from the upgrade kit work with the PS2 electronics?

Below are two pictures. The gutted Big Boy tender and the completed Pacific. imageimage

Attachments

Images (2)
  • image
  • image
Original Post

Replies sorted oldest to newest

Thanks guys for all the great advice. I will definitely keep the weight. I have never done a diesel upgrade so I don't have a bracket from one of those kits. Maybe mounting the electronics and the battery holder directly to weight is the best idea? It's only four screws. That would definitely simplify the install. Thanks again. 

Last edited by Hudson J1e

Just in case anyone is interested in what I did on this locomotive, here's the story. Unfortunately, some house projects came up and vacation so that's why it took me so long to get back to this.

I definitely was taking the advice of the forum and keeping the weight. After thinking about a plan of action I decided to buy a piece of steel from HD and mount it to the weight. I drilled and tapped holes in the steel so that the factory MTH screws would fit into it. Here's a pic of the weight tapped for two 2-56 screws and a picture of the steel. Where you see the four holes I messed up. The first holes were too far to the edge and the shell would not fit on. It was hitting the battery. I'm glad with PS3 installations there are no battery and no charging port. 

Attachments

Images (2)
  • image
  • image
Last edited by Hudson J1e

Now on to the boiler. The boiler was a routine upgrade except for one thing. I'm sure the techs on here may have seen this before but I never did. The first pic shows the boiler almost complete. I can't get the connector to sit flat. There are diodes under the connector that are hitting the metal piece in the center. I certainly don't want them touching anything. That's why the plastic is there. I just wanted to test the electronics to make sure everything works fine and it does. The second picture shows where I had to cut the frame so the diode leads would fit in between the frame. Third picture shows how the diode body is still hitting that piece of metal in the center of where the connector goes. 


Anysuggestions on on how I can get this connector to sit flat? imageimageimage

Attachments

Images (3)
  • image
  • image
  • image
Last edited by Hudson J1e

Thanks for the suggestions guys. I'm a little nervous removing the diodes and wiring them in. A schematic would help a lot in seeing exactly how they are wired in the circuit. I just don't want to make any costly mistakes that could blow or damage the boards. Could I just remount them on the top side of the board?

RJR, thanks for suggestion. I didn't know I could put a supercap in place of the battery.

Hudson J1e posted:

Thanks for the suggestions guys. I'm a little nervous removing the diodes and wiring them in. A schematic would help a lot in seeing exactly how they are wired in the circuit. I just don't want to make any costly mistakes that could blow or damage the boards. Could I just remount them on the top side of the board?

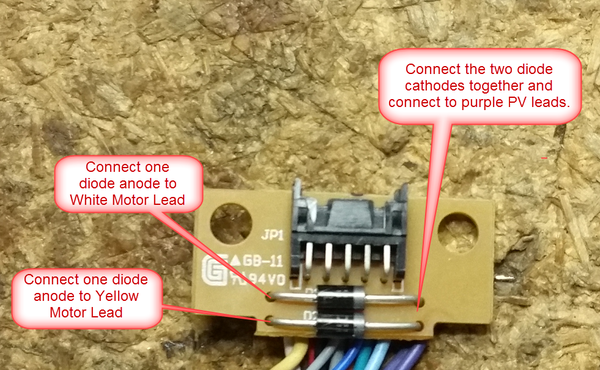
Just follow the wiring.  The diodes are wired with the anode (non-banded) side to the motor leads, one to each side of the motor.  The cathodes (banded) sides are wired together and they create the PV voltage that is on the purple wires.  You can mount them on the top side, but you need to INSURE that the connections don't short to the frame.  When you take the diodes off the board, the bottom has no copper or connections, no change of shorting to the frame.

I'm not getting the "top side" move, that makes no sense to me.  Doing that puts them right under all the wiring from the connector, that's going to be a real kludge!  I'd really move them to the leads and away from the connector board, you'll be much happier with the results!

GRJ, I had thought of all those wires on top of the diodes. I'm not crazy about that idea either. I will try to trace out the circuit. It isn't going to be easy to solder to the motor leads as the first motor already has two wires on the tab. I couldn't get the wires through the tab like the factory did so I just soldered them on top of the tab.

RJR, I already opened up the frame with a Dremel. The problem is because of the piece of metal that supports the connector is on an angle the diodes still hit it.

Thanks for your help guys. I appreciate it.

Mark, thanks. My intent was that maybe some of the information I posted would help someone else.

Many thanks to GRJ who emailed me a detailed photo of what to do. I was able to de-solder the diodes and get the locomotive running. It now runs perfectly although it still has the premier pacific sound file in it. I have tried three times unsuccessfully to change the sound file. The process keeps hanging up.

I decided to load the MTH Loader program on my laptop which runs Windows 10. It's new but a bottom of the line laptop. I only bought it to have a portable computer. At first it didn't work because I needed something called .NET Framework. I got that installed and now the Loader program now works. I just tried loading the new sound file on the other computer and I get this error message:

X CRITICAL ERROR: NO SERIAL PORTS DETECTED ON THIS COMPUTER.

I can get around a computer but I am by no means an expert. Any suggestions on this?

I assume your TIU is not Rev L.  You need a USB to serial adapter cable.  Radio SHack has carried one by Gigaware, and Dell has them (another brand) in its catalog at half the R-S price, but plus shipping.  You will also use that cable to hook an MTH wifi into the TIU.

ADDED: Hudson, just noted your post.  With Rev L, you just use a USB cable.  But do use the menu item to select the port.

Last edited by RJR
RJR posted:

I assume your TIU is not Rev L.  You need a USB to serial adapter cable.  Radio SHack has carried one by Gigaware, and Dell has them (another brand) in its catalog at half the R-S price, but plus shipping.  You will also use that cable to hook an MTH wifi into the TIU.

RJR, my TIU is the Rev L. I was researching this problem online before I posted the above comments. I believe it has something to do with Windows 10 and it isn't the MTH software but I couldn't find an exact fix.

I will post the picture for you. I don't think GRJ will mind.

I just found another thread with a similar problem. Unfortunately, the OP didn't post a solution.

https://ogrforum.ogaugerr.com/t...oesm-t-recognize-tiu

If you look at the picture GRJ posted on the other thread, his computer says "Prolific USB to Serial Comm Port (Comm 7)". My computer does not say that. In my Device Manager it only says "USB Serial Port (Comm 3)".

Hudson J1e posted:

Mark, thanks. My intent was that maybe some of the information I posted would help someone else.

Hudson,

Thank you for the detailed information and photos indeed!  When I first replied I had 2 PS1 diesels and 2 PS3 diesel upgrade kits, that I planned to install this winter.  Lo and behold last week I traded one of the diesels and kits for a very nice Weaver Gold Edition B&O Cincinnatian Pacific and 7 MTH Premier Cincinnatian cars with matching blue.  (Photos to follow in Matt's What did you buy cool topic).  Now I will get a PS3 upgrade kit, so I'll be doing one of each, diesel and steam.  Though my career has been in electronics, there is always some hangup in any new project that needs to be addressed.  I often don't see what needs done even if it is staring me in the face.  As a former supervisor (who was no ball of fire himself said) I'm not the sharpest tool in the shed.    Other's help sure comes in handy.

rtr12 posted:

Did you see this on the MTH DCS page? Windows Rev L TIU USB Drivers For DCS Loader Program

Some folks have reported having to load this driver when using Windows 10 and I think others have said they did not need to load it as it was already on their PCs. I am not a Windows 10 expert, but this might be worth a try if you are still having trouble? 

Thanks for all the help guys. RTR12, I saw your post last night and I was going to try that next but I tried it again and it worked. I made no changes to the computer whatsoever (although it did some updates on its own) and now it does see the TIU. I have no explanation why I am no longer getting the "NO SERIAL PORTS" message.

Unfortunately, now I am back to the original problem. It gets to 12% and then it hangs up. Every time. I have now tried it 4 times from the laptop. That's a total of 7 times from both computers. I am now thinking that maybe I picked the wrong file to load. I will try another file. Remember this isn't a PS3 upgrade board but a factory PS2 board from about 8-10 years ago.

There's a message that comes up on the MTH website that I never saw before. It says:

"Consumers looking to replace their production Proto-Sound 2.0 sound set with another Proto-Sound 2.0 locomotive sound set may find that the sound set doesn't load properly into the Proto-Sound 2.0 hardware. Should that happen, try searching for the model whose sound set you wish to install into your Proto-Sound 2.0 locomotive with the Proto-Sound 2.0 Upgrade Kit Sound Set."

This is what I thought I did. I picked the upgrade kit sound set.

Well, I tried another file and I got a message that I can't load a 5V in this engine. The first file I tried (the one that always hangs up at 12%) has a _3V at the end. The second file didn't have this so I thought it was okay but I got the 5V message. I then decided to try a Premier file. The file did not have _3V at the end of the file name but I didn't get the 5V message. It went to 62% before it hung up. I decided to try to the desktop again but again with the Premier file it hung up at 12%. Now I went back to the laptop and just like the original file I tried it hung up at 12%. 

This is very frustrating. I don't know what else to do here to get this file loaded. 

What is the best voltage to have going to the Fixed 1 input? 12V? 18V? 

Last edited by Hudson J1e

Phil, it's been a while sense I've done an upgrade or for that fact a file swap but when I did I also had some issues with hang ups during the transfer period. I have a TIU on my work bench for doing upgrades and repair work. With a tip from another forum member I fashioned a harness with a banana plug and a pair of alligator clips. I clip one to the center roller frame assembly and the other to the frame or wheel.  Just a thought.


Milwrd

Here is a thread about using DC power as GRJ suggests above. I saved it some time back. It has a little more information on the how to's of using DC for loading files. I had a lot of questions myself and they were answered in this thread by GRJ, Barry and other knowledgeable folks. They answered all my questions and I think it is good info if you are trying DC for the first time. 

RJR posted:

Phil, check the number of the file that says can't load a 5-volt file.  There is a bug that often a 3-volt file will give that message.  I've tried as many as a half-dozen times before it goes through.  Milwrd is giving good advice.  Try it with nothing else power-connected to the TIU.

This is how I have been doing it. I just have a small piece of track connected to the TIU and nothing else. But thank you very much for the suggestions both RJR and Milwrd.

I am sorry I couldn't post sooner. My life is very hectic right now. What I did was kept experimenting with different voltages. Finally, when I tried 7.5 volts (AC) it worked. The file loaded and everything is fine.

gunrunnerjohn posted:

Try using DC to power the TIU, makes a significant difference.

DC!!! Wow!! I would have never thought of that. I feel like Goldie Wilson when Marty McFly suggested to him that he run for Mayor! Thanks I will read the thread referenced above. Great suggestion for the next time.


Thanks again to everyone who responded and helped me out with this project. I really appreciate it.


Last edited by Hudson J1e

Add Reply

Post
The DCS Forum is sponsored by

OGR Publishing, Inc., 1310 Eastside Centre Ct, Suite 6, Mountain Home, AR 72653
800-980-OGRR (6477)
www.ogaugerr.com

×
×
×
×
Link copied to your clipboard.
×
×