Back in Oct 2017 I started a new layout design (https://ogrforum.ogaugerr.com/.../new-layout-design-2). The layout has progressed to the point where I am in the ballast and scenery phase so I figured I move posts to this forum.
I am going to try to cut and paste the last few posts on the track plans forum dealing with scenery and structures to this forum. The original posts can be viewed by going to the last page the track plans forum.
Replies sorted oldest to newest
Please join me for the grand re-opening of Bill's Oil Yard, established in Dec 1946 in the town of Raymondale. it was first served by the Delta Lines. Since then Ol' Bill has branched out with new products such as propane as Bill keeps pace with new technologies. And yes Ol' Bill is still around. When asked about his secret of longevity Bill was heard to a shot of whiskey and a good cigar after EVERY meal. Needless to say the crew gets a little antsy when Bill gets too close to the propane tank..........
say hi to Bill and his drinking buddy
Attachments
It’s good to see Bill is still working the yard. Any forthcoming plans for an 80th anniversary in four years?
It has been a while since I posted progress on the railroad. I was laying ballast but had to stop when the brown roofing granules ran out. It has been about a month and so far the roofing company has seen no granules. I did start laying gray ballast on the main lines (got a whole bucket from a friend) but as usual got bored so decided to try scenery.
I am using brown ballast in the yards and gray on the main lines. Hopefully this will work out since my knees hurt.
When I decided to take a break from ballast I started scenery on the edge of the railroad board (after installing facia). I have never done this before so all this was new to me. I have been reading books and articles plus viewing YouTube so came up with a recipe using mostly Woodland Scenics products. I had a WS sand mat to start off with in most of the places. In the one corner I built up a small hill with brown paper, plaster cloth and Sculptamold then painted it a dark tan.
The scenery recipe follows:
Fine Turf:
Little bit Soil
Lots of Green Blend
Little bit Yellow
Little bit Green Blend over Yellow
Coarse Turf:
Patch work not total coverage
Dark to Light
Under Brush:
Use Scenic glue
Put in clumps
Dark to light – dark on half of glue lines – light on other half
Highlight with fine turf – some green – some yellow
Bushes:
Put glue in other areas
Dark to light
Tone down with fine turf
Foliage Clusters:
Use Scenic glue
Peel off a clump and find a place by itself
Use just a little
Tone down with fine turf
Foliage:
Comes in a sheet
Pick off a clump and stretch it out a lot
Drop on bush
Tone down with fine turf
Lichen:
Spread out a littler bit
Place on top of bushes
Tone down with fine turf
Some photos are below. It looked ok but I kept having the feeling it was not 'real' enough.
The trees above are Aspens - Julie's Organic Aspens - Anderson Model kits - www.modelrailroadkit.com.
The short 'tree' is WS fine leaf foliage
One night watching YouTube I discovered the joys of Noch leaves. I saw a video where Kathy Millat made low bushes starting with polyfiber, then another one by someone else who made taller bushes using sisal rope. I gave both a try today. without a doubt Noch leaves are the secret sauce.
Millat - Low Bushes
Spread out Woodland Scenics Poly Fiber or Foliage on double sided tape on brown paper– push up a little
( I had some purple Sil-for I used so I painted it med green)
Spray scenic cement
Add some fine ground foam
Spray scenic cement
Add some more fine ground foam
Spray scenic cement
Add leaves
I will let this stuff dry overnight then place it on top of some WS foliage and see how it goes. The purple stuff is actually the Sil-for left overs on the bench after stretching out sections of the stuff. I simply picked the leftovers up and sprinkled them over the bushes.
Attachments
The sisal rope bushes -
Hemp or sisal rope
Spread out fibers on end of rope
Cut fibers into shape you want
Add white glue to rope ¼ inch below spread fibers
Cut
Make samples with different lengths
Paint dark tan
Sprinkle on 10-12 mm static grass while paint is wet
Paint dark tan
Sprinkle on fine ground foam while paint is wet
Spray scenic cement
Sprinkle on leaves
Spray scenic cement
Sprinkle on highlights – fine ground foam (did not do this as yet)
Cut bottom off and glue in place
Attachments
Did some more ballast then took a break with the back and played around with some scenery. Note none of this is original. I read and watched Youtube.
a more detailed photo look at making bushes with sisal rope. A detailed procedure was given in an earlier post. I bought 3/8 inch diameter rope and discovered it is made up three 1/8 inch diam strands. So one can make bushes with 3/8 , 1/4 or 1/8 inch trunk diameter. Last post I made 3/8 inch trunks. Below are 1/4 inch trunks.
The sisal strands are separated and white glue was applied to the trunk portion.
I spray painted with a dark tan and while the paint was wet I sprinkled on some 12mm static grass (color does not matter).
Once dry I sprayed painted again and added fine ground foam (green blend).
Once dry I sprayed with an adhesive and sprinkled on Noch leaves. It is the leaves that make all the difference in the world.
I also played around with some Aspen trees I inherited a while back (2008?) from a local train store that shut down. Below is how they started.
I used the 3M spray adhesives and sprinkled on 12mm static grass. This time the color counts (green).
After the tree dried I sprayed the adhesive again and sprinkled on Noch leaves.
Don't know if I mention this previously - I found Martin Welberg Scencic Studios through Youtube.
This guy makes some great product (Holland) that can be bought from Scenic Express. He specializes in tufts and bushes.
Attachments
A friend gave me some Sedum plants a while back. One is supposed to let them sit for several months before using for trees. Since I had them for 5 years I figure they were ready to go....
The plant on the left is the raw Sedum. I sprayed 'scenic cement' on the whole plant and let it sit overnight. I then sprayed the plant with a flat gray primer. Once that dried I took a different approach than with the sisal rope and Aspen trees. I soaked the plant with scenic cement then applied some coarse turf. I followed up with Noch leaves that were a shade lighter in green. The 'trunks' are kind of skinny so I may end up placing these behind other tress or cutting the trunks down and use as an oversized bush.
Attachments
Some more tree making
I cut some dead branches off a scrub brush behind my house. On the right is what I started with and on the left is a finished tree.
The "usual" formula is to glue on fine leaf foliage or super tree material which is time consuming. I decided to try something different. I sprayed the trees and sprinkled on 12mm static grass. I let the trees dry than repeated the process. Photo above is initial application of static grass.
Once dry I sprayed again and sprinkled on some Busch foliage (kind of like Woodland Scenics coarse turf but a little smaller. Once dry I repeated the process. Again photo above is initial application,.
Last thing was Noch leaves. As I stated before this stuff is night and day for trees.
Attachments
Next up was Woodland Scenics ready make tress. They come in two basic flavors - standard and premium.
On the left is the WS standard tree. It looks like the tree was flooded with glue and WS bushes were piled on. Rather then strip the tree bare I removed most of the material but left some on individual branches.
I repeated the procedure I did for the scrub brush trees but needed to apply the 12mm static grass only once. I followed up with the Busch foliage then Noch leaves.
Last up is a Woodland Scenics Premium tree. More expensive but better made.
All I did here was add Noch leaves. Did I mention I really love Noch leaves!
Attachments
Joe, this year's sedum bush is growing well and looks very happy, so there will be a new crop this fall. And I remember the sisal rope technique from years back, I will have to try it. For me, it will make good shrubs, and you cannot have too many of them.
Finally I am glad you are taking some breaks with your ballast. I continually tell people, do ballast last as in the real world it lays on the "scenery". And if you do it in that sequence you only have lot line up the edges of the ballast, not creating a new boundary between scenery and ballast
Last W/E I ran into a problem with an older Atlas O turnout. fortunately I had a Ross turnout with the same curve radius however the two are not equal so I had to rip up track and replace. It turned out ok so I am back to ballast and scenery. I bought some Woodland Scenics polyfiber and have started experimenting making bushes with it.
I am also experimenting with static grass. I bought a Noch Grassmaster 2.0 a while back and never used it. My first attempts with 6 and 12 mm static grass were dismal. I am hoping this was because I used white glue. I also believe the 9 volt batteries I use with the machine were old. I sent an email to Noch asking if I would blow up the circuit board if I switched from the battery to a 9 or 12 volt AC/DC wall adapter. They never answered but providence struck. I removed the 9 volt battery once too often and broke off the wires from battery plug so ended up connecting a 12 volt adapter to the wires. Every thing powered up just fine.
I have bought some WS Static Tac glue and will see how this goes. Hopefully with this stuff and the 12 volts juicing up the machine things will work out.
@PeterA posted:Joe, this year's sedum bush is growing well and looks very happy, so there will be a new crop this fall. And I remember the sisal rope technique from years back, I will have to try it. For me, it will make good shrubs, and you cannot have too many of them.
Finally I am glad you are taking some breaks with your ballast. I continually tell people, do ballast last as in the real world it lays on the "scenery". And if you do it in that sequence you only have lot line up the edges of the ballast, not creating a new boundary between scenery and ballast
Peter I have about 100 years supply of sisal rope. I will cut off a length or two and bring it to the next mall run along with the Plastic Weld bottle.
Joe, I think part of the issue with this area is the stones. Sitting on top of the surface they look like stones sitting on a table instead of boulders on a hill. If you "embed" them a little I thinkit will be more realistic.
Very creative. Looks like you are having Fun!
Ron
I’m new at landscaping and this thread has been very useful. I’ve been using WS products as I have had access to them, but the other suggestions here are terrific. Regarding stone. I agree embedding them some helps, but I also use the craggiest, ragged rocks I can find, not driveway gravel (too smooth). Great hints here.
I ended up taking the rocks out. they are now back in the yard where they came from. In the future I will add rocks when I am in the sculptamold phase.
Joe,
It looks like you are enjoying working on your layout. It’s nice to see you using you taking the time for yourself.
Adventures with Static grass or I should say misadventures.
I have come to conclusion I am just no good at this. So far all the things I have tried (Luke Towen - Kathy Millatt - Woodland Scenics help (and they have been a great help)) have been dismal failures. Instead of fields of 7 and 12mm grass waving in the breeze there are fields of cut hay. I followed all the rules for grounding, hopper filling, height form workpiece etc.
I started with Modpodge then moved over to Woodland Scenics Static Tac. I also tried World War Scenics Layering spray (it did work a little bit).
I converted the Noch Grassmaster 2 from battery to 12 volt wall adaptor with no luck.
I even procured Woodland Scenics grass applicator and used the 12 volt adaptor. I am now in the middle of an email exchange with a nice lady from WS.
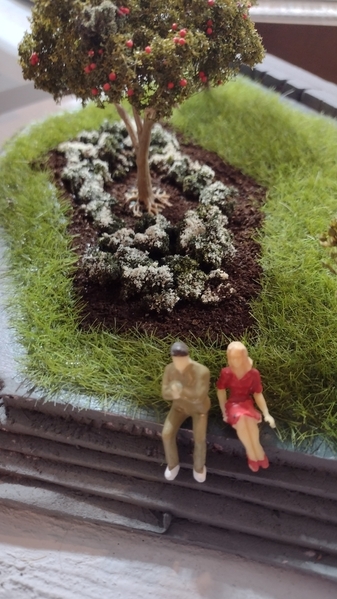
My first attempts at becoming a static grass guru is shown below. I applied Static Tac and spread it out with a paint brush.
Sherry for woodland Scenics sent some tips shown below
Applying Static Grass with Static King – Tips and Techniques
Some applications of the Static Grass will start out sparse and will need to be thickened. If you want to thicken your application, follow the below techniques (these techniques are included in the instructions on page 6, Step 9):
1. If the adhesive is still wet, you should immediately remove the excess Static Grass that is lying over. Most of this excess has not planted in the adhesive and will remove easily if you turn the diorama over or use the Model-Vac. After you have removed the loose excess, apply more Static Grass over the wet adhesive. Repeat as needed.
2. If the adhesive has dried, you can thicken the application by misting the Static Grass with Spray-Tac and applying more Static Grass over it. Repeat as necessary.
Here are some additional tips on how to get the best results when using the Static King:
• The closer you hold the Static King to the layout, the stronger the static effect will be. Hold the Static King as close to the adhesive as possible during application. The Sieve should be no more than 3” away from the adhesive during application.
• After you apply the Static Grass, you can encourage the upright look by holding the Static King (while turned ON) above the application. This will build up the static field. When you remove the Static King, lift it away from the application in a vertical motion rather than a horizontal motion. The Static Grass will follow the direction of the static field.
• Are you shaking the Static King when applying Static Grass? Gently rock the Static King from side to side (not up and down) over the adhesive while the device is ON. This will help loosen the Static Grass in the Hopper and plant it in the adhesive. Keep the Hopper as close to the application area as possible while shaking the Static King. Lift the Static King away vertically.
• Are you powering the Static King with a Power Supply or are you using a 9V Battery? If you are using a battery: Is the battery brand new, or an already used one? If the 9V battery is already used, the charge on it may be low. Try a fresh new battery.
• Adding undergrowth to the application can also thicken the appearance. When the adhesive is still wet, apply shorter lengths of Static Grass over the taller. The shorter Static Grass will fill in around the taller Static Grass for a thicker grassy look.
• If you are applying over a curved, hilly area, try angling the Static King so that it is parallel to the curve of the hill.
• For some applications, it may be appropriate to use the Small Sieve instead of the Large Sieve for 7 and 12mm Static Grass. The Small Sieve will help you control the application and slow down the application process. You will have to shake the Static King more to get a thick application, but slowing down the process may help.
My next try was on parchment paper with Al foil wrapped around it
I then moved on to trying tufts - they work just as well as area coverage
Not exactly Luke Towen
I will try smaller dots today. I also have WS Tuft Tac on order.
In the meantime to get tufts I am cutting up WS field grass and gluing it to the layout base. I tried some on the parchment paper for photo purposes. it works a whole lot better then static grass.
Attachments
Joe, I don’t have any advice to offer but thank you for documenting your efforts. You have a great deal of patience, that I don’t think I would possess.
Thanks Jay - It is kind of nerve wracking watching the grass fall nice and straight only to flop over. I will give static grass a few more tries before I call it quits. I still want to try the WS tuft tac glue
I tried a recommendation from Woodland Scenics. I started with 4 mm then 7mm then 12 mm static grass. I used WS static tac to start then the WWS layering spray for subsequent layers. I'm not sure if this is what the static grass is supposed to look like. I have an email into WS. Making tufts is still beyond me.
Attachments
I have a couple packages of the WS tree armatures. Did you paint them before applying the Noch leaves, and if so what paint did you use? I am thinking I at least need to hit them with a matt finish to take away the plastic look.
Thanks!
Joe,
Here is a link to an online clinic Martin Welberg did for the Amherst show. You may find it helpful seeing how he applies static grass.
https://www.youtube.com/watch?v=UakltWBRJ_s
He also produces an interesting line of short videos called "5 Minute Fridays" which provide great info. All are on his YouTube channel which is free to subscribe to.
-Greg
Joe, like you I had better luck with 4mm static grass, the key is low and patience. I thought about trying to add 7mm and 12mm after the initial application but have not done that. I like the result you got. I think with a good 4mm base you could also "hand Plant" the longer grasses with scenic glue once the base is dry.
@EmpireBuilderDave posted:I have a couple packages of the WS tree armatures. Did you paint them before applying the Noch leaves, and if so what paint did you use? I am thinking I at least need to hit them with a matt finish to take away the plastic look.
Thanks!
Dave:
I have not worked with bare armatures as yet. I will most likely follow the same procedure I used for branches I collected from the back yard except I will paint first. The WS armatures I worked with still had some of 'bushes' glued on. I forgot to mention in the previous post I dusted them with black followed by dark grey. I tried to keep the paint off the green bushes but it actually does not matter that much. I finally dry brushed on some light gray on the lower trunk. There are also some flat dots on the trunk (from mold process). I used an Exacto blade to carve in some scratches. A razor saw may also work.
Joe, I've never tried static grass but was wondering if there was any way your work bench could have a small electrical charge that is over powering the static causing the grass to "fall over" or maybe you're removing the machine too soon before the grass has time to stick in the glue?
Just read through your adventures Joe. I think your last attempt at static grass looks good. Unless your going for a manicured lawn or a field of wheat waving in the wind, what you produced looks like a typical field of wild grasses. Not all uniform, with thick and thin patches. Add in some longer tufts and I think you are there.
Nice work on the trees and bushes too.
Bob
@coach joe posted:Joe, I've never tried static grass but was wondering if there was any way your work bench could have a small electrical charge that is over powering the static causing the grass to "fall over" or maybe you're removing the machine too soon before the grass has time to stick in the glue?
Joe - the work bench I use is a wood roll around cart I built for painting structures. I cover the top with card board to protect the wood so I don't think there is a residual charge.
WS did tell me not to vigorously shake the applicator and to lift it straight up to help keep the grass straight.
I learned from Marin Welberg video referenced in a post above that if grass starts laying over it is not the glue (assuming you are not letting it skin over) but the ?kv? power of the applicator. I will be trying an experiment today. I already switched an old Noch 2.0 applicator from battery to a 12VDC wall wart. I made up a wire with alligator clips on each end. One gets clipped to the metal rod in the hopper and the other end is clipped to the metal strainer (kind of like a Luke Towen custom applicator). I turned the machine on last night - no sparks or fire. I did place some 12mm grass in the hopper and it seemed to come out straight as nails. I will trying it out on glue today.
Bob:
I'm a retired engineer - we can be quite anal at times. I watch Kathy Millat and Luke Towen videos and the grass comes out straight as nails and stands proud. Now it has become a challenge - kind of like if they can do it I can do it too.
Joe
@Joe Fauty posted:Bob:
I'm a retired engineer - we can be quite anal at times. I watch Kathy Millat and Luke Towen videos and the grass comes out straight as nails and stands proud. Now it has become a challenge - kind of like if they can do it I can do it too.
Joe
I hear you Joe. My dad was an EE, I'm a master electrician, now working as VP of Facilities for a local University. My OCD goes on overload from time to time too....
Keep plugging away, I'm sure you will figure it out.
Bob
I have the same problems with static grass. I have decided the WS applicator is good up to 6 mm not for anything longer. There is another applicator on the market in the $200 plus range with much higher voltage which makes the longer fibers really stand at attention. I do need to get my hands on the WS wall wart as they have a non-standard power fitting. Also thinking about modifying the WS unit to bring the copper electrode closer to the plastic screen
For me the most successful is to apply the glue, sprinkle on the grass as close as possible to the surface. Vacuum the excess right away, picks up the loose fibers and tends to pull the grass into a vertical position. Then reapply while the glue is still wet. I can usually manage 3 applications before the glue sets.
Link is to an earlier post on the subject. Static Grass and trees on TPRR
Scoutingdad:
The WS wall wart has pos and neg reversed on the barrel. I found out when I converted my Noch 2 to use the wall wart. I had to switch the red and black leads from the Noch to a barrel adaptor that the wall wart barrel fits into.
Like you I think the WS grass applicator is good for up to about 6 mm grass. See next post.
@Joe Fauty Joe thanks for the info on the wall wart. Sneaky thing to do for those of us who have extra warts laying around. I can make a cross over plug adapter to see how well that works. I was getting ready to buy one because the battery does not last long delivering a good charge. Knew there was no power getting in because the on-light would never light.
While the WS grass applicator was sort of working an old Noch 2 applicator I had would not work for anything over 2mm grass. The warranty is long gone so I decided to try modifying it. The first thing I did was to cut off the 9V battery plug and wire the machine to use the 12V WS wall wart. See other posts above. This sort of helped but I decided to go further. Fortunately the applicator's screens are metal. I attached alligator clips to both ends of an 20 gauge wire. I attached one end to the rod at the bottom and the other end to the metal screen (had to cut some mesh to do this).
I left the hopper empty, turned on the machine to make sure nothing blew up on me and it worked. To make sure I placed the machine over some 12mm grass I had previously tried to apply to a base. I could see the applicator pulling the grass up straight so I know the machine was operating properly.
I tried the machine with 7mm grass that it had previously failed to stand up. The result is shown below. I still could not make tufts with it though.
Next I tried a mix of 4 and 6mm grass - see below
Thought I was on to something but decided to try the WS applicator with the same grass. The result is shown below.
They both look pretty good to me. So far I know the WS applicator will work with 6mm grass but not so good with 10mm and fails miserably with 12mm grass. The modified Noch now works with with grass up to 7mm. I have not tried it yet with 10-12mm grass.
I do know once the grass is applied and the excess vacuumed off I can run the empty Noch over the grass and see it pulling the grass up which helps a lot.
If the Noch works with 12mm grass I will try to improve the connection to the screen. The rod at the bottom of the hopper is round so I can at least buy a barrel clip to slip over it and eliminate one alligator clip. Incidentally while playing around with the machine the positive wire broke off a post on the circuit board inside the machine's barrel handle. I believe this board is the negative ion generator. To solder the wire back on to its post I had to basically pull the entire machine apart. There is only one screw that holds the circuit board in place (this the screw for the external black ground wire that is placed in the glue). The circuit board has a large black wire that connects it to the bottom of the rod that protrudes through the hopper. The connection is a simple barrel connector that can be pulled off and inserted back on. What I am thinking is that should the circuit board ever blow up on me I can purchase a more powerful negative ion generator that will hopefully fit inside the barrel and end up with a "Luke Towen" DYI grass applicator.
Attachments
@EmpireBuilderDave posted:I have a couple packages of the WS tree armatures. Did you paint them before applying the Noch leaves, and if so what paint did you use? I am thinking I at least need to hit them with a matt finish to take away the plastic look.
Thanks!
Dave - I tried bare WS tree armatures yesterday. Unlike the armatures where I pulled the foam off but left some as an anchor for the 12mm grass I had to do something different with these armatures. I painted them first. After the paint dried I sprayed with the 3M 45 adhesive then sprinkled on some coarse turf. I sprayed again and added the 12mm grass. From that point on it was the same as for the other armatures - coarse turf / fine turf highlights followed by Noch leaves. The trees ended up looking just like the other WS armature trees.
@ScoutingDad posted:@Joe Fauty Joe thanks for the info on the wall wart. Sneaky thing to do for those of us who have extra warts laying around. I can make a cross over plug adapter to see how well that works. I was getting ready to buy one because the battery does not last long delivering a good charge. Knew there was no power getting in because the on-light would never light.
Please let me know how this works out.
@Joe Fauty Had a bunch of these connectors extra for my layout lighting. Incredibly easy fix. Just crossed the wires and the WS Applicator works. Thanks for the info.
MILAPEAK (Real 18AWG 43x2pcs Copper Strands) 20 Pairs DC Power Pigtail Cable, 12V 5A Male & Female Barrel Connectors for CCTV Security Camera and Lighting Power Adapter (2.1mm x 5.5mm, Ultra Thick)
Attachments
When we started out, as kids, with our trains did you ever think anyone would be considering the purchase of a negative ion generator. Its not our Dad’s hobby anymore; we are in the new millennium.
Hi Guys....
I've been following with great interest your discussions and frustration with static grass applicators. Although I'm no where near the point of be ready to apply static grass, I like to do research on such things (it's a gadget...I LOVE GADGETS!).
Anyway....I came across a YouTube video (actually its a 3 Part video) where a gentleman builds (built?) his own static grass applicator. The device seemed to work well enough. But what I found interesting was; one of the viewers posted a note about an inherent flaw with OTC static grass applicators (the viewer note is covered in builder's 2nd video). Below is a quote of the comment from the viewer....
"99% of the static grass applicators that are shown on you tube are designed incorrectly. I hate to say it, but I don't even need to see part 2 to tell you yours falls in that category. The grass needs to be charged from 'behind', not in front. I had long discussions about this with World War Scenics. It's a simple fix, if you provide me a way to send you some photos, I can show you the simple change. It will work 100 times better than what you have. I first made mine pretty much the same way yours is designed, it worked, but nothing like when you charge the grass from behind , not in front. Just another side note, even World War Scenics specifically said Luke Towans design is incorrect and he doesnt use his applicator any more."
What he's saying is; most static grass applicators charge the screen that the grass flows through so that the grass receives its positive charge while passing through the screen. According to the Commenter; if you can relocate/remove the wire from the screen to a metal plate (like a bronze washer or something you can solder to) that is behind the grass (like to the bottom of the container), the whole contents of the applicator bowl gets charged; not just the grass that passes through the screen.
Please note....I am NOT recommending you to tear into your OTC grass applicators that you bought with your hard-earned money . And I don't know if this change would help you all in apply static grass or if the current OTC applicators already have that design change. But for applicators whose design charges/has a connection to the screen, it may be worth your while to at least take a peek at the videos and judge for yourself if the change makes sense.
Here's the 2nd video; that reviews the applicator change..... https://www.youtube.com/watch?v=3h2NJJDe7RY
And the change description starts as time 0:57 through 2:47
I hope this helps........
Junior - good point. Right now I have a wire from the rod at the bottom of the hopper connected to the screen so I am assuming the grass is charged from behind and gets an extra boost at the screen?????
Watched the videos - the Woodland Scenics Applicator is designed with a copper conductor well behind the plastic discharge screen. IMO it does ok up to about 6mm. Seems to me the issue is with the voltage potential developed by the negative ion generator and to a certain extent the distance between the copper conductor and the positive ground. I've seen videos of the grass standing straight up as it hits the glue. In my experience with the WS applicator, the fibers first lay down and then stand up as additional fibers are deposited.
@Joe Fauty....
My knowledge of electronics is pretty basic, so if someone finds what I'm posting here is incorrect feel free to correct my posting.
Having more than one positive side connection in the container "could" improve the charge given to the bowl contents; only because more of the contents might be subject to being charged (ie. a larger surface area for imparting a charge to the contents).
But if your talking about increasing the charge itself that's imparted to the contents....that's a whole 'nother animal. To do that requires higher voltage (NOT AMPS) coming out of the ion generator....which is a topic I have no real knowledge to speak safely about.
I make this statement because ion generators produce on average 7KV to as high as 20KV. A few go as high as 30KV. That's 7,000 Volts to 30,000 VOLTS !
A zap from a 7KV ion generator might smart, but one from a 30KV generator would definitely hurt! Thank God there's hardly any (as in minimal) amps behind these generators. Otherwise they could be very dangerous.
Hope this helps......
@ScoutingDad...
Your observations seem spot on . Please see my thoughts above regarding ion generator voltage increases.
@Joe Fauty posted:Junior - good point. Right now I have a wire from the rod at the bottom of the hopper connected to the screen so I am assuming the grass is charged from behind and gets an extra boost at the screen?????
I did not use the correct word above. Saying 'boost' implied more voltage. I should have said the grass would stay charged at the same voltage going through the screen.
Since I am standardizing on a 12VDC wall wart for the Noch I made the barrel connect more permanent as can be seen below. It is now glued into the bottom of the applicator.
I tried adding a washer to the internal electrode. It is stainless - had no brass / copper washers. There was no noticeable effect at all. It's probable due to the metal content of the washer???? If I can find a brass or copper washer I will try that.
There is an applicator called the RTS 55KV Greenkeeper which puts out 55KV but it is beyond my checkbook. Check out Sarah - https://ogrforum.ogaugerr.com/...er-static-grass?nc=1. There is a 35Kv and a 25Kv model but I have already wasted money on 2 applicators and am in the process of destroying one.
I am trying one last thing. There is a negative ion generator advertised on Ebay that puts out 15kv with a 12 volt supply. It is $20. I also bought the 'control box' that goes with it. I will build it and instead of a strainer I will attach the electrode wire to the Noch electrode and see what happens.
EBAY LINK removed per OGR terms of service.
Attachments
Did a bunch of different stuff with the static grass.
I built the static grass box from the parts I bought from the Ebay supplier. I gutted the old Noch applicator, ran a wire from the control box to the electrode at the bottom of the hopper then a wire to the metal screen.
I had some success with the Noch but decided to build a special flat dispenser as shown in the videos to test the machine. Not only did it not work as shown in the video but I ended up sparking the dispenser to the metal pan. The Noch performance degraded after that. So I must have done something to the generator. I ended up buying another generator and installed it into the box today. I won't be trying the flat dispener / baking pan trick again.
This time I built a tea leave strainer dispenser and tried it along with the Noch. I could not tell the difference in performance between the two but felt the tea strainer was much easier (and much less expensive) to use. If I needed more grass I simply added it the strainer while I was dispensing which one can't do with the Noch.
I started with 2mm grass then went over it with 7mm. It looked ok however after vacuuming off the excess grass I had to go over every thing with an powered empty strainer to lift the grass more than it was.
2mm grass
7mm grass added
This is it for me and static grass. Opinion - if you want to use static grass spend the money for the 55KV applicator or buy the above 12KV generator / box and supplies for about $40 and hope the manufacturer comes out with a new super duper 30KV generator in the near future. As for me it is back to good ol' ground foam. I will probably use the tea strainer in some small areas just to break up the scene.
Attachments
That static grass seems to be very difficult to get desired results.
Joe, I really admire your perseverance during this endeavor. Also, thank you very much for sharing the details of your efforts. It is very helpful and educational. Thank you, Jay
Don't give up on static grass. It takes time to learn how to apply. I use the Woodland Scenics applicator up to 6 mm anything longer does not have the charge to stand up. This is probably my best attempt to date. I had to apply at least 3 times to get the density I was looking for. The sock at the end of the vacuum hose does work well and can be used sparingly to help the grass stand up. Most any 12vdc adapter will work as a power supply, but you have to make an adapter to cross + and - into the unit.
Very frustrating trying to get this to work early on, especially after watching others apply so successfully.
I won't. I figure a mix of 2mm and 6-7mm in the future
I just finished up building a Suncoast Yard Office. Suncoast Models is defunct but kits can still be bought through Ebay. Suncoast Models are not the the easiest kits to build but for some reason I like them.
The kit is a basic box. All window and door openings have to be cut out. Instead of the cardboard sub walls I used styrene. Instead of a "parts wall" I built a dock. I also used hydrocal block walls from New England Brownstone for the foundation instead of the wood shown on the box cover.
I still need to find people and more stuff for the dock. Next up is an open sided locomotive shed so I can complete scenery in this are of the rail road. After that I am designing and using a Cricut Maker 3 to cut walls for a feed mill down track from a grain elevator. Using the Cricut to cut basswood will hopefully be an upcoming OGR article.
Attachments
I had to stop landscaping until I built an open air locomotive maintenance shed. This shed is typical of those used out west when there was no air conditioning.
My version will hold a Union Pacific steam locomotive.
I have it placed at the end of a spur. directly in front is a coal tower. There will be a MOW maintenance shed and tall water tower up track. Now that the shed is in place (still need to paint it) I can start thinking on landscaping this portion of the layout.
Attachments
@Joe Fauty.....all I can say is.....HOLY CRAP! You've been bustin hump! The ballasting looks great and the parts of the layout that you've landscaped already look phenomenal . The layout really appears to be coming together nicely.
And yes.....work requiring you to be on your knees is a killer to say the least. I think I can tolerate maybe an hour or so before cramping starts.....not a pretty sight.
Joe, nice work. The track plan looks good and the layout is progressing nicely and quickly. It should be stunning when it's almost done. Almost done because great layouts are never quite done.
Looks good, Joe - was the open-air maintenance shed a kit or scratch-built ?
Looking good, Joe!
Peter
Joe, wow you really have gotten a lot done. Looking great.
Tom
Nice work Joe. What is the corrugated building in the corner, is that the maintenance shed? Is that scratch built?
Rich / Richie:
The corrugated shed is accustom built open air locomotive shed popular in the Southwest during the early 1900's up to about 1950. The smaller lines like Magma Copper built these to keep the sun off the locomotive and the repair crews.
Attachments
Joe,
The layout is looking good. Enjoy every minute of building it.
I haven't done much on the model RR in the last 2-3 weeks. First I got sick (Flu) then in the middle of that my left knee decided to go south. I had to wait till I was over being sick to get x-rays and see the Doc. Thank God no knee surgery as yet, just a cortisone shot. I am slowly getting back into action.
I'm writing a two part article for OGR on using the Cricut Maker 3 to various materials for signs, decals etc and cut basswood walls for buildings. I came up with a design for a feed mill based on an old model RR magazine article. All the walls including door and window openings were cut with the machine. I just finished gluing everything together. I need to glue in some roof supports and this building will be ready for painting. I have a grain elevator and a feed and grain store. I needed the middleman.
Attachments
Joe, building looking great. Looking forward to your OGR articles. I have always had trouble with bass wood structures. Any secret glue or tricks you use to keep it from warping?
Thanks.
Tom
Tom:
As you can see from the photo the most important aspect in preventing warping is internal bracing. I use either 3/8 or 1/4 inch sq. basswood strips. I have found that when using basswood that the manufacturer has patterned (scribed, clapboard, board and batten etc.) vertical bracing is good enough. If I use a blank piece of basswood for a wall I always brace it cross grain since if the wood warps it will do so with the grain.
I generally don't like using clamps when gluing walls together. I add super glue to the top, middle and bottom of the wall to be glued and fill in the rest with white wood glue. I hold the parts together until the super glue takes hold. I use a right angle at the bottom to make sure the parts are aligned correctly. The CA acts as the clamp until the wood glue dries.
As you can see I don't stain or paint before gluing a building together. This is because I always paint the entire structure inside and out with a base coat (usually dark gray) from a rattle can. I shy away from using acrylic paints as base coats since they are water based.
Some like to spray the wood with a sealer such as Dullcote before painting but I have this unnecessary since I use rattle cans.
Once the four walls are glued if I find a wall bowing in or out I will glue a brace between the two walls. You can see there are two braces glued to the two peaks of the angled roofs. The side walls did not bow but if they did I would have adding bracing between them also.
Joe,
Many thanks for your instructions on gluing basswood. I really appreciate you taking the time to explain it so clearly and completely. I have printed out your instructions and have them ready for my next basswood kit. I have to say that I have shied away from basswood kits and that wood in general. I was wondering if rattle can paints would make a difference and you answered that too.
Thank you.
Tom
I painted the building Rust-Oleum Gray primer then Dark Taupe. After this I dusted it with Satin Nutmeg. The lighting makes it difficult to discern the difference. Before I painted I used a wire brush to roughen up the wood a little. When brushing drag the brush in the parallel to the clapboard.
I will be cutting the trim and painting with Rust-Oleum Brown. The doors and windows will be the same brown color. The roof will be black conservation board with a rolled roof most likely which is the same as the yard office except I am going to try a dark tan this time.
Attachments
Looking forward to your OGR articles Joe, and then maybe a Cricut 3 on my Christmas list...
Looks really nice with those paints Joe. how long do you wait between paints?
Tom
Tom:
Between coats about an hour. After final coat at least a day for wood but a couple of days for plastic.
@EmpireBuilderDave posted:Looking forward to your OGR articles Joe, and then maybe a Cricut 3 on my Christmas list...
Dave:
If OGR accepts them there will be two articles. The first covers using the Maker 3 to make building signs, cut text, and make decals from photo paper, adhesive backed white vinyl and standard decal paper.
The second article covers designing and cutting basswood walls. I will submit this article as soon as the feed mill is complete.
Joe
Joe, I wasn't sure about the wood and just learned to let the paints dry a couple of days on plastic.
Thank you for the paint times.
Tom
While I am building the feed mill I have been busy cleaning track since the ballasting is complete. I will now have to address issues with detectors and signals that I knocked around while kneeling and crawling around on top of the layout. While paying attention to what was in front of me I forgot about my legs and feet swinging around behind me.
I have just received a new 180W Powerbrick. I bought a 360W Powermaster a while back and was waiting on the brick to connect to it. The reason for this goes back a ways. To make a long story short I had a locomotive track that I loaded up with about 8 locomotives. This was connected to 180W 10 amp Powermaster. I can't remember if the the track would turn and starting one starting locomotive of a bunch and turn off or if it would not turn on at all. Once I started removing locomotives from the track everything went back to normal.
I need to re-route wires from the locomotive track back to the 360W power district and see what happens.
I had time today to move wires. I now have the locomotive track along with all the yard tracks on the 360W Powermaster. I loaded up the locomotive track, turned the power on and had no issues. Life is beautiful once again. Now on to the detectors and signals.
Attachments
Joe, yard looking good.
tom
The feed mill is complete except for signage. I now have a grain elevator that delivers to the feed mill that delivers to a feed store in town.
The dock was scratched built with basswood and stained with MicroMark Gray Brown stain. I wanted to use New England Brownstone hydrocal block walls for the foundation but did not have enough. Instead I used Plastruct RT29 rectangular tubing with a Plastruct block laminate. I painted the foundation black then over sprayed with Satin River Rock. Instead of mortar I simply coated the surface with an India ink / water wash which darkened it up considerably.
The figures are Woodland Scenics and Bachman Scene Scapes. The roof top air vents are Bar Mills 0438 Tall Roof Vents . The dust collector on the roof and the wall duct are part of the Bar Mills 04024 Industrial Vent Systems. The small black tank near the office door is a Bar Mills 04006 Heating Oil Tank.
The large brown barrels are actually very old Lionel parts from when I was a kid. Hopefully they look like flour barrels ready for shipment to the Feed Store.
The storage silos are made with Plastruct tubing.
I'm not sure where the bench came from.
The small attic fan is a Bar Mills 04034 Window Fan Assemblies kit. These are peel and stick assemblies
Attachments
Once again Joe an impressive work of art. What is the foot print?
Nice! I had no idea so many O scale details are available. I've been making due with HO stuff available at the hobby shops. I guess I need to mail order more often.
Joe, feed mill is fantastic !!
Tom
@Tranquil Hollow RR posted:Once again Joe an impressive work of art. What is the foot print?
Approx 16 wide by 14 deep
@coach joe posted:Nice! I had no idea so many O scale details are available. I've been making due with HO stuff available at the hobby shops. I guess I need to mail order more often.
Joe - Walthers is a good place to go to order O scale details from a bunch of manufacturers. They even sell Plastruct and Evergreen plastic.
Interesting @Joe Fauty...I had written off Walthers because they seemed to focus on any scale BUT 'O'. I may have to revisit them.
In parallel with working on scenery the next building project is going to be a sand house for the spur leading to the open air locomotive shed. I plan on storing my UP Mik there.
I have a Korber sand house kit but never liked the design of the tower so will modernize it a little bit. I may run a pipe to ground on one side of the track and have the tower on the other side.
I did some more scenery over the W/E
Attachments
Joe,
I noticed in the first pic that you have a Lionel IR device in the corner. I never liked the fact that the device came mounted on a base that, IMHO, detracted from the realism of the accessory.
If you like to solder, the device can be disassembled so that the base can be mounted underneath the layout and only the IR cabinet mounted on the layout. The only hitch is that the wires between the cabinet and the base are not long enough to reach between the underneath and topside of the layout and have to be extended by a couple/few inches. Since the wires run through the layout, you have to solder in place.
The only other issue is that the cabinet will probably not be tall enough for the IR sensor to pick up the body of a moving train and you will need to build a small base for it to sit on. I made mine out of sheet styrene.
See bottom of pic.
Attachments
Richie - an excellent idea!
What about just cutting a hole big enough for the cabinet, pushing the detector from the bottom so the only the cabinet is visible? We would have to figure out a way of holding the detector in place under the layout - maybe duck tape?
Did some thinking on above - it won't work. With the thickness of plywood and homasote the top of the detector won't show above the table. As you stated the detector would need to be taken apart and rewired.
The problem of the detector not being high enough also plagues my Z-Stuff detectors. They need to be raised also.