I just received one of the left-over UP SD7s and am really glad I treated myself to this locomotive. It is just gorgeous! However, I am having trouble getting it to accept any engine address except 1. I'm using the Legacy system and when I follow the instructions in the manual the engine doesn't take the new address. When I follow the instructions in the engine's manual the only address it will take is 1. I have the switch set to program. What am I doing wrong?

I'm also getting jerky slow speed performance (control is set to R100) and saw Scott's earlier post advising to turn off the speed control. I'm not sure how to do this with the Legacy controller. The instructions in the manual seem to be pointed to the Cab1 remote. I'm hoping that the slower speeds will improve after a break-in period.

Joe

Last edited by Rich Melvin
Original Post

Replies sorted oldest to newest

Scott said he turned the sound off while testing and forgot to turn it on before sending these engines out.  Would it be useful to turn the volume setting up on the Legacy remote while  the engine is still number #1?  

This could serve two purposes:

1) Validate that sounds are turned on and working. 

2) Ensure that the sound detection is on when you try to reset the number.  Without sound you would be depending totally on the light flicker which I find to be less confirming.  You are much less likely to miss the sound confirmation.

John,

Does resetting an engine number reset sound parameter?


The engine has all appropriate sounds and works fine, other than resetting the i.d. and the starting speed. It's not that it's terribly high, just more abrupt than my Legacy or MTH engines. I have two Atlas engines with TMCC that have the same type starting speed.

When I try to set the id # with the Legacy instructions I get no horn confirmation when I press the set button. When I follow the instructions in the engine's manual (eng, 0,1,horn) the horn sounds as appropriate per the manual. The worse thing that happens is that it stays at address 1.

The Legacy remote automatically defaults it to cab1 when I try to enter the new number. As I stated before, I press eng, the desired # (80) and press set. No lights flicker and the horn doesn't sound. When following the engine manual instructions, you press eng, 0, 1, and press the horn. Lights flash and horn sounds.

I may just delete it from the Legacy system and run it with the DCS system.

Well Joe,  this is exactly the problem I'm having with a new Allegheny.  I can't get it to program a new number.  

Now try this:  Leave your engine with the switch in the PGM position, and see if the engine will still run.   If it does,  the PGM switch isn't doing anything and there is something wrong with the switch or the wiring.  In this case, you'll need to work out a solution with Scott.  I'm working with Lionel service on how to proceed.

If the engine doesn't respond as engine #1in PGM mode, that theory is shot.

Yes, I left the switch in the program position and it ran just as if it were in the run position. I sent an email to Scott to see if he has any ideas. I'm pretty sure I can live with it having address 1. I routinely rotate engines on and off the layout (or at least I will when I get to full operation) and the likely possibility of having two engines set at address 1 is slim to none. Thanks to everyone for all the suggestions.

Joe

joedaddy posted:

Yes, I left the switch in the program position and it ran just as if it were in the run position. I sent an email to Scott to see if he has any ideas. I'm pretty sure I can live with it having address 1. I routinely rotate engines on and off the layout (or at least I will when I get to full operation) and the likely possibility of having two engines set at address 1 is slim to none. Thanks to everyone for all the suggestions.

Joe

And when the switch is in the RUN position does it run also?

I suggest:

1. Turn the sound up so you can hear all the engine sounds including Horn and Bell. (AUX1, 1,1,1,1)

2. With the switch in PROG position press the bell button. If the whistle blows, you are in program mode.   If the bell turns on, then the program switch has a loose wire and is no closing the circuit to put the radio board in Program mode. it would require opening the model to attach one of the wires that has come loose from either the switch or the plug going into the Motherboard. Happens in vibration in shipping sometimes. 

3. If you can't figure it out, email me again.

Scott Mann

On DC out of the box the two I have would every so slightly differentiate in speed from one another; after about an hour of break in they run almost perfectly together almost as if I have them "consisted" together on DCC. I will get them running on DC in the next exhibit of the LT&N. 


I am thrilled with these models and plan to upgrade some details such as air hoses and such, and weather them . 


Thank you for making these Scott. 

Attachments

Videos (1)
trim.64937B6C-3F62-4290-96C9-4E8D60182C7D

Okay guys, I followed Scott's directions and found that the program switch is not working. Took the shell off and couldn't see any loose or dangling wires. Put the shell back on and did a test. Now the program switch is working and I was able to get the new address in. Evidently something is loose somewhere but I sure couldn't find it. 

Thanks for the help and Merry Christmas!

When I found the loose wire it wasn't obvious either, I discovered it when I was in plugging the connectors. It turned out that was loose just enough not to provide connection when jiggled.  I found that they had crimped the metal sleeve on the wire but did not strip of enough of the insulation to provide enough contact or a firm hold. Therefore when I pulled the connectors apart the wire came right out. For the record this happened to one of the FTs   What a PITA to fix too. 

You got that right Suzukovich. I've spent the majority of my hobby life in HO scale and am pretty confident in my abilities to re-wire, re-motor, dcc, sound decoders, or do any kind of modifications necessary. I take the shell off an O scale engine and I'm lost. The hardest thing was trying to pack all those wires back in without causing further problems! It all ended good though. Got the new address in, shell put back on with no new problems, and Kadees installed. I've got a feeling this UP engine is going to be a frequent visitor on my Southern Railway layout.

suzukovich posted:

When I found the loose wire it wasn't obvious either, I discovered it when I was in plugging the connectors. It turned out that was loose just enough not to provide connection when jiggled.  I found that they had crimped the metal sleeve on the wire but did not strip of enough of the insulation to provide enough contact or a firm hold. Therefore when I pulled the connectors apart the wire came right out. For the record this happened to one of the FTs   What a PITA to fix too. 

just a bit of info and nothing here to blast.

I found that a light did not work in a old TMCC equipped version of an Allegheny. When I was upgrading the engine, I traced the problem to a bad connection at the factory. It was exactly as described by the post above. Seems they had crimped the tiny connector on the insulation and it didn't make full contact with the wire at the plug. I never posted it because the engine is so old. I only hope that might help anyone trying to trace a wiring issue?

You can't see stuff like that without checking with a meter.

In away I got lucky. The wire came out while I was reconnecting the plugs. Funny is that the PS2/3 engines have the same issues. Wiring zip tied so tight that they pull on connectors and wiring. I have had several engines that had signal, speed control or a motor not turning that was due to loose connectors and or wiring just too tight. All things I have learned from being on OGR, GGG, and Gunrunner to look for. The 3rd rail Ft with the issue was a good learning experience for me as it was EER and I was at first hesitant on trouble shooting it.  I have an odyssey engine with the same symptoms and now I know what I am looking for and where, when I get time I will work on that one.

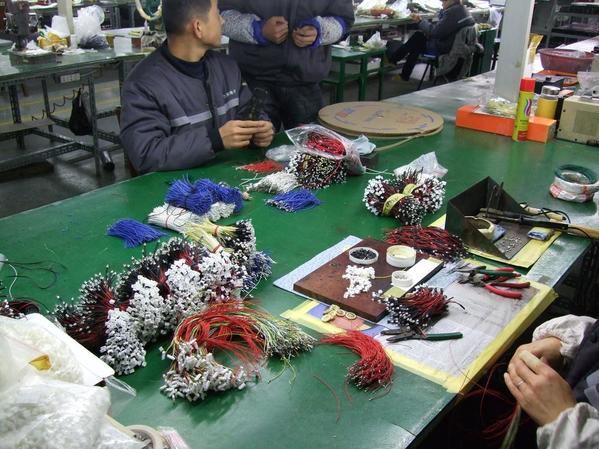
wire-harness-makingAt the factory there are a few people that prepare all the wire harnesses. These are custom made for each project. Crimping, soldering, inserting in plugs. Chassis are then tested, then after the shells are installed they  tested again. Then I come over for a unit by unit inspection which includes testing again. But one test we don't perform is to check if the PROG/RUN switch is operating. I only check a few models for this, and that's just to make sure they switch is in the right orientation. It's rare that they don't work. I focus more on the obvious features, lights, pickups, antenna. Those are most critical to good operation. The more features, the more wires, the greater the opportunity for something to come loose. Shipping doesn't help either.  it's a catch 22.

But, the facotry does a pretty darn good job overall. The SDs were the most trouble free production in a long time. Nothing is 100%, but we were pretty close.  And I am really glad we are not making things where someone's life depends on it, like in Aerospace. 

To make the wiring more neat we have created a front light cluster circuit board, where all the Number Board, Marker Light, Head and Mars Lights are preinstalled in a circuit board which is then screwed into the shell, with a multi pin plug and tether that goes back to the main board. This should make changing LEDs a snap in our E89 and ALCO PAs. We try to make incremental improvements to make sure we are not introducing more unintended errors into production. The factory and management are all for it.

Thanks for all your feedback and support. And HAPPY HOLIDAYS from all of us at Sunset Models.


Attachments

Images (1)
  • wire-harness-making
Last edited by sdmann

You might want to add testing them in lash up mode to finding engines that are running faster than others so adjustments can be made. Nudging didn't work but setting quickstep speed( I believe its the stall speed in TMCC/Legacy) in DCS remote seams to have done the trick.

Replacement engine running lead (C&S 822) in lash up. took 30 sec to program lash up verses almost 2hrs with original C&S 822.  Here they are on a run through the morning mist. By the way that's one of your CB&Q Waycar on the end.


Last edited by suzukovich

Add Reply

Post

OGR Publishing, Inc., 1310 Eastside Centre Ct, Suite 6, Mountain Home, AR 72653
800-980-OGRR (6477)
www.ogaugerr.com

×
×
×
×
Link copied to your clipboard.
×
×