I recently finished doing an upgrade on a premier Blue Comet. All is working well except for having to reverse the wires on the motor in order for directions to work properly. I had a heck of a time getting the shell back on the engine, without pinching any wires, so I opened the tender and reversed the yellow and white wires by removing them from the 12 pin harness, reversing them, and snapping them back in. I was about to try it again, til I remembered there were 2 diodes under the 10 pin engine plug and wondered if what I did was OK. Is this a safe way to make the job easier, and will it work properly? Next time I'll test with the shell off.
Replies sorted oldest to newest
The two diodes are symmetrical, swapping the wires didn't change anything about the PV generation.
If you want it to always be wired right the first time, remember yellow is positive for forward. So, just connect a DC supply to the bare motor before wiring and determine which way is forward and mark the positive lead. Do that for both motors in two-motored units.
FWIW, I always test with the shells off first, that way I can see where the smoke comes from! ![]()
![]()
LOL on the smoke. Thanks for the quick reply, John. Lesson learned the hard way.
The yellow and white wires on the 12 pin are speaker wires on pins 6 and 7. I am curious why you did that. I have 168 upgrades under my belt and several were Comets. Wire management on some engines can be a challange.
Why would one tinker with the plug rather than just reversing the connections to the motor?
Good point Marty, I assumed he picked the motor wires on the 5-pin connector. ![]()
RJR posted:Why would one tinker with the plug rather than just reversing the connections to the motor?
He explained that, he didn't want to take the shell of the locomotive again.
I think I know what he may have done as motor wires are also yellow and white. The way it was presented would make you think he did this wire swap at the 12 pin connector. He made no reference to the 5 pin motor connector. I believe he saw white and yellow wires and thought they were motor wires. Again no reference to the 5 pin motor connector. I hope the gent reads this as if he did what I think he did, he is still going to run in reverse at start up.
I am with you on just changing the wires at the motor.
For the last bunch of upgrades I've done, I haven't had to change the wires, I figured out that I could connect them right the first time, makes one less thing to tinker with later.
On the upgrades I've done, before closing the units up by attaching shells, I do a test run on tracks, making sure hanging leads can't foul anything. I hate to remove shells, but it sure beats the possible results of connecting wires wrong.
Not only testing with batteries, but I mark the motors on diesels for wire orientation. For those that do not know, under the flywheel are plastic dots. One terminal has a Red/White near it the other is White/White. Use these to orient motors especially when replacing a defective one. G
For upgrades you just have to be careful as most dual-motored locomotives run one motor one way, the other the opposite way. For replacements, the dots are certainly a useful indicator. ![]()
Yes, but have you noticed how some engines have same wire color on same side and on others they alternate? All based on the dots and how the motor is placed in the motor mount. Especially for Tach motors (forward or aft facing). G
Yep, that's why I use the battery test to make sure I know which way the wheels are actually going to rotate for the upgrade. Then I can be sure I'm wiring the + to the + and the - to the - properly. The consist thing is there is no consistency to the way these products are designed. ![]()
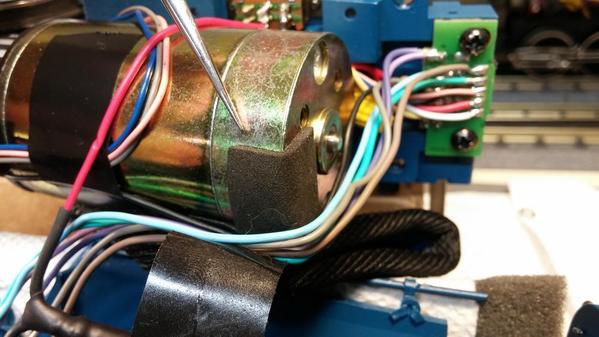
Your right Marty, I swapped the wrong yellow and white wires. I tried following the wires in the tender while they were still zipped tied together which led me to the wrong plug. I noticed later that the speaker wires are a slightly heavier gauge then the motor wires. Wish I would have caught that first. This is only my 4th upgrade, so I have allot of catching up to do. After 168 upgrades, Marty, that's something to be very proud of. I'll bet your the fastest in the U.S. My hats off to you. Thank you for being there for us new-bees. As for swapping the leads on the motor, which I ended up doing anyway and hated having to remove that shell again, I had to solder them on because I didn't have terminal connectors small enough to use. If I did, they would have to be bent as to not contact the chassis (if anyone has a good supplier and part number for ones that could be bent to a 90 degree without breaking off, that would be great). This motor is made by Pittman and is one tight fit. Hence, looking for an easier wire swap. I also had to tape the wires, layed out flat, over the top of the motor, because the shell wouldn't sit down all the way on the chassis when using the included wire wrap in the kit. Next time I'll be sure to pretest the motor like John suggested.
Do yourself a big favor! Purchase some 1/8" and 3/16" shrink tubing and some small zip ties.
Prior to soldering the motor wires to the motor leads, slide a small piece of shrink tubing on each wire. After soldering the wire ends to the motor leads, shrink the tubing. This prevents motor shorts and you do not destroy the boards. Small zip ties can gather the wires for better wire management. One hint - do NOT pull the zip ties tight. Snug them up gently.
Just some useful info.
bruce
Dave, slide-on connectors on the motors are rare, they're normally soldered on. I've found them in a couple of locomotives with Pittman motors, but other than that, they're all soldered. I prefer them to be soldered anyway, one less contact point to go bad. If the wires are that tight a fit, you also want to make sure they're not being pinched when the shell is screwed on, that could be bad. ![]()
Yes John, one thing I had learned early on, is that if the shell is floating above the chassis, leaving even the smallest gap, a wire is going to get crushed when the screws are tightened down. Thanks Bruce, other then the connectors, I do have all those supplies and that is how MTH originally had this motor hooked up. I believe John's correct in saying pretest the motor then solder. On the wire routing issue, I tried to put a zip tie around the motor to hold the wires down flat, but the clearance is so tight, the shell wouldn't slip down over the motor. Electrical tape (3M) was what I had to use. I know the tape will age quickly and start to come off, leaving a sticky mess, especially if the motor gets hot, but what else is a guy to use?
If it's that tight over the motor, I try to route them beside the motor, usually low near the chassis. I just fixed one that had wires going over the motor, they wore through at the edge of the motor, dead board was the result.
Just use the 5 pin connector to swap those motor leads. G
John, I've used that route on another upgrade and wish I could have on this one, but the drive wheels come so close to the fly wheel, my only choice was over the top. (see picture). I did however, after reading your post on the repair with the wires rubbing through, glued a piece of rubber over the motors top edge. Thanks for the warning.
GGG, John posted that the diodes under the engine's tether recepticle wouldn't change the PV generation by swapping the wires on the 5 pin plug.

Attachments
The rubber certainly should help, what you don't want it the wires pressed down on a fairly sharp edge, not good.
I was referring to running them where these wires are going on one side or the other. Sometimes there is also more clearance from the shell on on sthe sides about 45 degrees down. I try to keep any pressure off the wiring for obvious reasons.

Attachments
You can loosen the motor mount bracket and run wires under the motor and up the side. You can remove one of the purple wires and reconnect at the other end since that is only used for HL anyway. I know the diodes do not matter, just wasn't sure you knew to swap at the 5 pin.
Yellow motor starts positive and switches to white in reverse via relay. Diodes are the constant source for PV (purple wire). G
Got it G, Thank You


