http://www.williamstrains.com/...Instruct-Lockout.htm
Instructions for Installing a Switch to Williams Relay Boards
Before starting: Please be aware that performing this change voids the warranty on the reverse board of this locomotive.
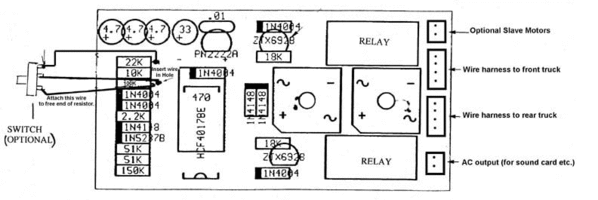
1) Solder a wire from the junction of the 22K/10K resistors (see diagram) to one outside terminal
2) Unsolder and lift inner end of the 100K resistor (see diagram)
3) Solder a wire from the now free end of the 100K resistor to the other outside terminal of the switch
4) Solder a wire from the now vacant hole in the board (hole vacated by inner end of 100K resistor) to the center terminal of the switch.
CAUTION: DO NOT allow switch solder connections to contact metal floor of locomotive.
So, here's how that went:
The reverser in place. Note sound board mounted on top. This needs to be moved out of the way and the cables disconnected from the reverser.
The reverser board. The nut in the center must be removed; use a small crosshead (Phillips) screwdriver on the screw under the frame between the motor trucks.
My homemade wiring harness. The switch is from Radio Shack; the plug was salvaged from another project.
The board by its lonesome. The clear shield has been removed after the nut and plastic washer.
The 100k resistor, unsoldered.
Since there were clearance issues, I decided to jumper the center wire to the back of the board.
The other two wires in place. I slipped a bit of shrink tubing over the 100k resistor just in case.
Reassemble and test. Success! The E-unit can now be locked into one direction.
The next item was dealing with the GG-1's steps. One problem with the GG-1 and giraffes is that the steps tend to hook onto the actuator ramp, causing a derailment. In order to address this, the steps need to be narrowed.
***WARNING: THE FOLLOWING IMAGE IS GRAPHIC. PARENTAL DISCRETION ADVISED.***
(Left: Stock. Right: Not Stock)
Once a bit of flat black paint is applied, the grinding isn't quite so obvious:
One nice thing about the postwar Lionel shell I used is that there is a slot for the old E-unit lever. This made a dandy spot for the new switch.
And here we are! Detail parts from the Train Tender, homebrewed stickers applied and the Gi-raffe Express GG-1 is ready for service!
Mitch


