@RSJB18 posted:

The signal project is coming along nicely Art. Since the Atlas boards use RJ-45 plugs, installing them on the signals ahead of time, saves lots of splicing contortions under the layout later. Reduces the inevitable crossed wires too.

Bob

Thanks, Bob.  We are trying to do as much on the workbench as we can.  It's a lot easier than working under the layout.

Art

We were able to get a lot done yesterday.  All the signals are now installed on the lower level of the layout!  I have a lot of touch up work that needs to be done, but all the signals are installed in the their final locations.

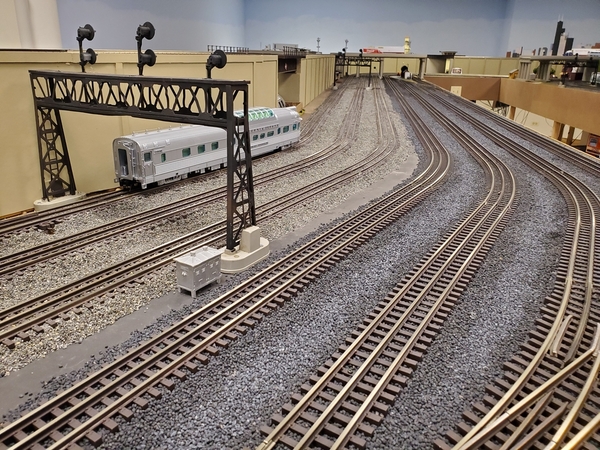
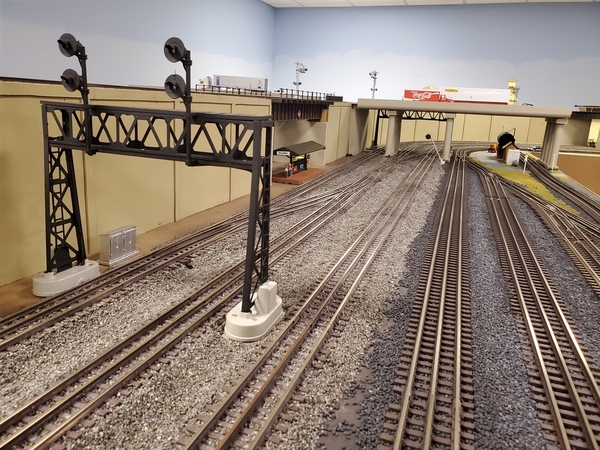
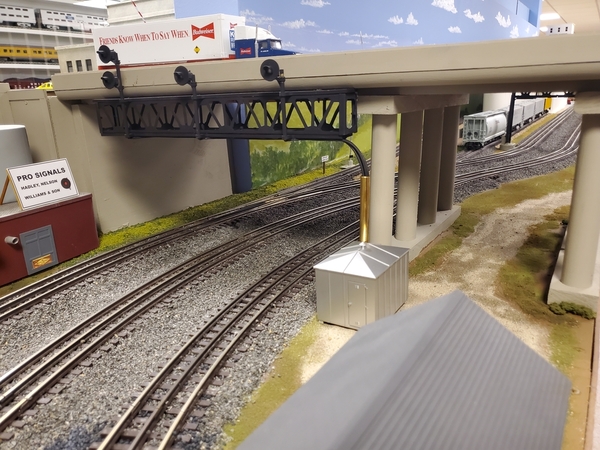
The first three pictures show the area where the "race track" (3 track mainline) runs along side my Eola yard.  This is a complex area with four crossovers to protect.  The mast or staff signal laying at a diagonal just before the highway bridge is not permanently anchored yet.  If you notice that there is a 2-track signal bridge and then the staff signal further down, it's because we did that to make the the right-hand mainline track a longer block to hold longer trains.

Final signals installed East Eola 2Final signals installed East Eola 3Final signals installed East Eola 5

The next two pictures shows the area of East Eola at the beginning of the yard on the East end.

Final signals installed East Eola

Final signals installed East Eola 4

The next picture shows the bridge at West Eola just past the highway bridge.

Final signals installed West Eola

The last two pictures shows the 3-track bridge that we mounted to the side of the Mannheim Road highway bridge.  The conduit that routes the wires below the layout has yet to be painted.

Final signals installed West Eola 2

West Eola bridge mounted on highway bridge

Art

Attachments

Images (8)
  • Final signals installed East Eola 2
  • Final signals installed East Eola 3
  • Final signals installed East Eola 5
  • Final signals installed East Eola
  • Final signals installed East Eola 4
  • Final signals installed West Eola
  • Final signals installed West Eola 2
  • West Eola bridge mounted on highway bridge
Last edited by Chugman

Art,

This project has been very enjoyable to watch. I'm very impressed with the team you had to help you work through this. Would it be safe to say you're on the home stretch? It's hard to believe I started my signaling project 2 years ago but my "team" is not available as often so it's not completed yet. I guess we'll get there.

Dave

@Rich883 posted:

Art, great work! Thanks for sharing.

Rich, I appreciate that.  I was waiting this morning for my wife to get out of the hospital and I took that time to read through your thread.  I remember I was following it before I took my hiatus and was and am very impressed with your layout and your scenery.  That harbor scene is awesome!  Your recent posts on your used car lot are great.  I have been planning on doing something similar as a part of my H & N Chevy auto dealership as an OK Used car lot with the Miller Sign.  Great work and I will following your future posts.

Art

Wonderful thread!!  To be a little tongue in cheek:  A piece of "Art" work!!

Thanks, Alan!  The project is going well and it's been a lot of fun to share with so many great and supportive OGR forum members.  They have great ideas and are willing to share them openly with the rest of us.  It's a fun community to be a part of, thanks for making that possible.

Art

Art,

This project has been very enjoyable to watch. I'm very impressed with the team you had to help you work through this. Would it be safe to say you're on the home stretch? It's hard to believe I started my signaling project 2 years ago but my "team" is not available as often so it's not completed yet. I guess we'll get there.

Dave

Dave, I couldn't do this without the team supporting me.  Many of them are still working and have busy lives, but they have been finding the time to keep things moving ahead.

I've seen signals on your layout and they look great and so does your layout.  What do you have left to do on your signals?

Art

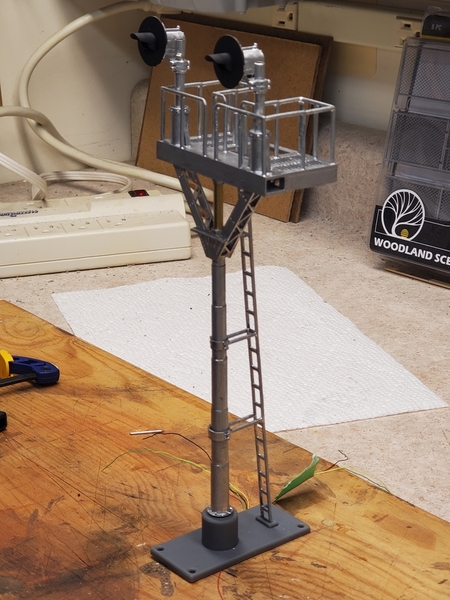
During our work session last Saturday, Alan (AlanRail) brought over the components that he had printed of his bracket tower signal.  We had been drooling over the pictures that he has posted online, but in person it is drop dead gorgeous in our opinion.  It is printed in five pieces and they all fit together like a glove. 

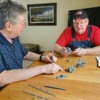
Here is a picture of us sitting at the table by the layout examining the pieces for the first time.  You can see that the base is one piece, the mast is another, the platform another, the support arms, and the ladder.

Bracket tower components discussion with Alan and Jim

After discussing whether they are the right height above the track and the design of the platform where the wires are routed down to and below the layout, we then talked about painting and the assembly order.   Jim took all the pieces home to assemble one prototype for us to approve.

Jim came over tonight with a nearly complete model for me to look at and so we could take a few pictures to share.  The first pictures show it temporarily assembled at the work bench.

Bracket signal front at benchBracket signal front closeup at bench

Those were pictures of the front side.  The next two pictures are from the back side.  The detailing is very well done in my opinion.

Bracket signal back at benchBracket signal back closeup at bench

The next picture shows the heads lit up by holding the wires to a battery cell just for looks.

Bracket signal lit up at bench

Next we took it out to the layout and staged it at a location that we plan to use one at.  We placed an Atlas California Zephyr observation car under it for a check on clearances and what the overall look of it was in a layout setting.  The next two pictures show that and we think it looked pretty good.

Bracket signal staged at REA building

Bracket signal staged at La Grange

After these tests, Jim took it back home to glue all the parts together, finish painting it, put longer wires on it so it will reach under the layout to the signal boards, and bring it back for final examination.

I think Alan did a super job designing and printing all the components.  I have no doubt Jim will put it all together and make it look great and as though it is an easy task.  And another challenge appears to be solved.

Art

Attachments

Images (8)
  • Bracket tower components discussion with Alan and Jim
  • Bracket signal front at bench
  • Bracket signal front closeup at bench
  • Bracket signal back at bench
  • Bracket signal back closeup at bench
  • Bracket signal lit up at bench
  • Bracket signal staged at REA building
  • Bracket signal staged at La Grange

Thanks Mark and Peter.  This was one style of signal that once I became aware of their existence, we had to have one on my layout somewhere.   As things evolved, we eventually found three places that they would make sense.   I'm not sure why real railroads used these, but on my layout it is due to a lack of real estate to place regular signals on.

Art

Last edited by Chugman

When Jim and I placed a bracket signal on the layout to see if the height looked right, we were concerned that it might be too tall.  We finally decided it was OK, but I was still thinking about it.  I did a few searches on Google to see what I could find. 

What I got out of it I thought was interesting.  It sounds like the main reason bracket signals are so high was to to enable engineers to see them over tall train cars like double-stack cars.  Further I found that bracket signals were less expensive to build and maintain than signal bridges.  When there were still steam engines, railroads had to locate signals on the right side of the track so engineers could see them.  Now with modern diesels, that is not so important, but most signals are still on the right side.  When the Pennsylvania Railroad began eliminating 4-track mainlines, they no longer had to use so many signals bridges and bracket signals replaced some of them.

If I have gotten any of this mixed up, please let me know.  I do know that I love the look and uniqueness of bracket signals and am excited to have some going on my layout.

Art

The last thing that we did last Saturday was to complete some of the wiring so we could test it.  The location we chose was my East Proviso freight yard entrance.  We attached the wires from the Tortoise switch machines to the Atlas Interlocking boards.   The we connected the occupancy detector wires to the Atlas signal boards.  And finally we made up cables to connect the signal boards from the previous block to the boards in the test block.

We had to make up 6 long cables to connect the boards with RJ45 plugs on both ends.   Then we put labels on the cables indicating where they were to be plugged in.  (Plug and Play)

Making block connector cables

Labeling block connector cables

After we ran those cables and plugged them in we were ready to test the signals.  This was a big moment for me!  To be able to see action in the signals when a train passes and when a turnout is thrown.  I wasn't disappointed, they worked great.  I just shot a short video to demonstrate the signals working.

A disclaimer:   I haven't made a video since my PC hard drive recently crashed and I had to download software that I haven't used before.  You can tell that I didn't spend a lot of time on it, but it was more important to me to show you how the signals look and work that achieving perfection in the video.  The lowest signal on the 3-head center signal pole on the signal bridge shows green to enter my Proviso yard, but we intend to change that to flashing yellow.  That is what we plan to use on all my yard entrances to show it's clear to enter at restricted yard speed and be prepared to stop for any yard traffic.   

Hope you enjoy the video.

Art

Attachments

Images (2)
  • Making block connector cables
  • Labeling block connector cables
Last edited by Chugman
@Chugman posted:

The last thing that we did last Saturday was to complete some of the wiring so we could test it.  The location we chose was my East Proviso freight yard entrance.  We attached the wires from the Tortoise switch machines to the Atlas Interlocking boards.   The we connected the occupancy detector wires to the Atlas signal boards.  And finally we made up cables to connect the signal boards from the previous block to the boards in the test block.

We had to make up 6 long cables to connect the boards with RJ45 plugs on both ends.   Then we put labels on the cables indicating where they were to be plugged in.  (Plug and Play)

After we ran those cables and plugged them in we were ready to test the signals.  This was a big moment for me!  To be able to see action in the signals when a train passes and when a turnout is thrown.  I wasn't disappointed, they worked great.  I just shot a short video to demonstrate the signals working.

A disclaimer:   I haven't made a video since my PC hard drive recently crashed and I had to download software that I haven't used before.  You can tell that I didn't spend a lot of time on it, but it was more important to me to show you how the signals look and work that achieving perfection in the video.  The lowest signal on the 3-head center signal pole on the signal bridge shows green to enter my Proviso yard, but we intend to change that to flashing yellow.  That is what we plan to use on all my yard entrances to show it's clear to enter at restricted yard speed and be prepared to stop for any yard traffic.   

Hope you enjoy the video.

Art

Enjoyed the video !  Your trains run so smoothly !

Rich

Thanks Mark, Rich, and Mike.  I felt the best way to show the working signals was with a short video.  I can't wait to get more blocks up so we can test the approach signals in proper operation.  With only two blocks linked together, it only shows red or green, not yellow.

Art


We worked all day on the layout and I feel we got a lot done.   The biggest accomplishments today were that we "tested the concept" and it was sound.  By that, I mean we finished the wiring on a section of the layout and everything worked the way that it was supposed to.

We attached the track detector wires to the Atlas signal boards.  Next we attached wires from the Tortoise switch machines to the Atlas Interlocking boards.  Then we made up and ran connecting cables to daisy chain the signal boards together.  Lastly we added the logic cables between the boards on each signal board cluster.  All of this was completed on about 100 feet of mainline #1 and interconnected about 7 blocks.  The occupancy feature worked beautifully!  We are using a two block approach so if the aspect is green, you are clear for two blocks.  If the aspect is yellow or approach, you are clear for one block.  And if the aspect is red, the block ahead is occupied and you must stop.

The mainline turnouts are all protected by signals to tell you which way the turnout is thrown ahead of you and if it's clear to proceed.  The dispatcher and tower operators will use these to direct the engineers to the routes that they have set up for them.

We had one little problem that we couldn't get the aspects at the yard entrances to show flashing yellow.  Jim was able to trouble shoot it and found the problem and was able to correct it.  On my railroad, we are using using flashing yellow as a "restricted approach" that means clearance to enter the yard at a restricted speed of 10 miles per hour and be prepared to stop.

It's hard to post pictures of the signals operating, so I will make another video soon to show it in action.

Thanks for you interest and support.

Art

Last edited by Chugman

Art,


Your layout and signalling is an inspiration! I really like the shade of green you have on the signals. In real life the green is almost a cyan green ( I think that is the proper name) and yours are pretty close if not dead one. The stock Lionel signals are too green. Would you mind sharing what led's you are using? I am about to embark on signalling my layout and these would save time as I wouldn't have to buy a bunch of different greens and test them out.

Thank you Art!!

@RSJB18 posted:

Very satisfying when everything works as planned Art.

I'm curious about the Atlas system. Is it all plug and play or do you have to program a master controller to tell the other boards what to do?

Bob

I agree Bob.  You don't mind doing all the work if it pays off.

The Atlas system is self contained, you do not need any additional controllers.  It is as plug and play as you can get.  For basic signaling where you would just indicate occupancy for one direction of travel, all you need are Atlas signal boards.  You separate the layout into blocks, cut gaps in an outside rail (3-rail), attach indicator wires from the track to the signal boards, power the boards, and run cables connecting the boards together and watch the magic.

If you are running bi-directional, you have to add a complete system going the other way and link them together.  It's not  more difficult, but it does add to the time required and the expense as you are doubling everything.

To get to the next level, which is indicating which way all your mainline turnouts are thrown requires the addition of the Atlas Interlocking boards to the mix.  In addition to everything already described, you connect wires from your switch machines to the Atlas interlocking boards and then connect the interlocking boards to the signal boards in what I call a signal board cluster.

None of these steps are complicated, but to be successful you must be able to think through everything in advance, layout a diagram with everything clearly marked, label everything, and methodically follow your plan.  It's a little like the old cliché "how do you eat an elephant, one bite at a time."

Another great feature about this is that you don't have to do it all at once.  You can break it into pieces many different ways.  Do one direction first, add the other later.  Add the turnout control later, it just layers on top of what you have already done.  Or another approach could be to totally do one section of the layout at a time.  And you need to decide what do you really want to accomplish?  If you are going to be normally running trains alone you may not need or want the turnout controls?  If you aren't planning to actual run trains by the signals, only use the signals in highly visible areas where they will be seen most often and easily.

Sorry for the long answer, I'll try to answer any questions or get the answer from one of our team members that knows.

Art 

@Guitarmike posted:

Art,


Your layout and signalling is an inspiration! I really like the shade of green you have on the signals. In real life the green is almost a cyan green ( I think that is the proper name) and yours are pretty close if not dead one. The stock Lionel signals are too green. Would you mind sharing what led's you are using? I am about to embark on signalling my layout and these would save time as I wouldn't have to buy a bunch of different greens and test them out.

Thank you Art!!

Mike, thanks for the comments.

Alan and Jim ordered several different LED's when we were looking for them.  We wanted the colors to match the Atlas and Custom Signals as closely as possible.  The yellow was the hardest to match as I never realized there were so many variations of a basic color.  Since we were using searchlights, we had to find tri-color LED's that produced an acceptable color for all three.  After trying several, Alan tried the ones offered by WeHonest a Chinese retailer on the popular Internet website.  They were spot on and reasonably priced.  And I think they took less than two weeks to get here.  He claims to be able to also honor some special requests such as length of wires and whether they are anode common or cathode common.

We had tried LED's that we would have had to solder the wires on ourselves, but quickly decided that wasn't worth the effort.  Those wires are very small and you have to be a glutton for punishment to tackle it yourself to save a few cents. 

Good luck on your project.

Art

Wow, I’m getting behind, do to outdoor work, doctors appointments, but this weekend I’ll watch your video, catch up on your latest progress and try to comprehend your amazing workmanship. This is a fantastic project, worthy of to be a featured article in OGR the magazine. Thank you for the great write ups, the in-depth reasoning on this articulated subject, trackside signals. Happy Railroading Everyone

@RSJB18 Bob, thank you for asking Art about the Atlas system.

@Chugman Art, thank you for describing the Atlas system.  I had no idea they had this available until you started this thread about your signaling project.  I am following another thread where the OP is posting about a totally different system.  Of course like anything, there are many ways to go about it.  As I told him, during all you years working as an electronics technician and engineer, I wanted to keep things very simple at home.  Now that I've been retired for almost 4 years, I find myself drawn to these discussions.     Thank you for keeping us up to date.

Wow!  Just Wow!  This is so impressive!  I am looking forward to more video updates!

Thanks, Scott.  Since I recently lost my hard drive and my old movie maker software, I'm forced to learn a new system.  In fact, I am going to start experimenting with it right now so I can hopefully do an improved job on the next video.  I've already had a relative say the best way to make it better is to make it shorter. 

Art

Add Reply

Post

OGR Publishing, Inc., 1310 Eastside Centre Ct, Suite 6, Mountain Home, AR 72653
800-980-OGRR (6477)
www.ogaugerr.com

×
×
×
×
Link copied to your clipboard.
×
×