Hi, All. As I introduced myself in the electrical forum, I’m a life time 3 Railer, long time forum lurker, and recently joined the board.

I’ve had Lionel layouts since I was 7 and actually have my first 027 train set yet.  My last layout was a 25’x15’ basement layout back in 2006 – a double mainline with a branch line and a small yard on each end to do some switching when I wasn’t loop running.  The layout was focused on the branch line, “Valley Junction,” which is a fictional town somewhere in central-ish PA.  The mainline that passes thru is of course the PRR. Thus “VJ&P”, which also happens to be my initials.  The PRR double mainline were the outer most loops.  I could switch cars from the mainline to the VJ branch line and deliver them to the local industries.  There were 2 smaller loops in Valley Junction so I could let 4 engines in total run amuck on their own.  The entire layout was conventional engines with old school blocks.

I had laid the track and got thru most of the power wiring and started with some signals and accessories but as life would have it, I had to stop and tear everything down.  I moved from PA to NC at that time. I kept everything in storage for years but never had the time or space to get back into it.  I sold most of it except for a few pieces.

Fast forward to a couple of months ago, and 2 things happened:  My wife surprised me on our anniversary with a Pennsy Flyer LionChief set and we made the decision to build a new home.  I don’t think she realized what she unleashed when she got me the Pennsy Flyer  :-D   I realized how much I missed it.  And since we made the decision to build, we’re adding a bonus room above the garage specifically for a new iteration of the VJ&P.  Stairs will come up in the middle of the room so the layout can run around the perimeter, most likely with one or 2 peninsulas. We’ll build in lighting, ventilation, and a few other things to tailor it specifically for a model RR.

But I’m getting ahead of myself. I won’t start designing the new layout until we lock in the plans with the architect so I know the room size and shape.  It will definitely be a new version of the VJ&P with focus on Valley Junction and Pennsy passing through.

In the present, I’m working on finalizing a small layout.  The goal is specifically to start learning about Lionel Legacy and all the cool new technology for the hobby that has come around in the past 10 – 15 years.  I’m not concerned about prototypical operations or scenery.  I’m starting out with a couple of “boring” loops and sidings so I can figure out how all the new tech works with the intent of applying everything I learn to the future 35’x25’ layout in the next year or 2.

That said, I’ve attached what I’ve been working on.  I’m new to SCARM, and Fastrack, so please excuse the rookie mistakes and gaps in the design.  Since the new layout will be a few years away, I wanted the 072 outer loop so I can purchase a big engine or two and begin to build my collection again.  I originally had 048 curves for the inner loop and outer loop passing siding, but @SteveH is a bit of an instigator and made me rethink what I was doing.  In the same space, I can use 060 curves which will allow me to run engines with a min 054 requirement.  I added a reverse loop and a few sidings.  I have a couple conventional control engines but decided to added an elevated loop to run them.  The double loop layout will be all Legacy control.

Again, this layout is a learning exercise for setting up and getting familiar with all the new tech.  The track plan itself isn’t the priority but I wanted to be able to run a couple engines and have some on table storage.  I’ve started a discussion about the wiring and power set up in the electrical forum but wanted to introduce myself and share what I’m working on as far as the track plan goes.

Any feedback on the layout or tips for using SCARM are welcome.

One initial question about Lionel Fastrack...  I understand it doesn’t have as much “give” as the old tubular track which you could fudge and shift stretches of it to put everything together.   How unyielding is Fastrack? In my plans, I have lots of the tiny connector sections and also areas where I couldn’t quite get SCARM to connect pieces.  In the real world, will I be able to pull the gaps close or do I really need to have the exact combination of pieces?

Thanks in advance for the input and discussion. And thanks to all of you who have been posting in my other thread.  Looking forward to getting to know everyone.

- Vin

Attachments

Last edited by VJandP
Original Post

Replies sorted oldest to newest

There is unfortunately no answer to "how unyielding is Fastrack".  Even with computer software, different settings in the program will produce different "fit".

A few other points:

The bigger the loop you are trying to connect, the more you will be able to fudge.

Fastrack cannot be pushed together any tighter than its actual length

There is very often a way to make things fit better by using many sections with different lengths of straight between different radii of curves, etc.  This gets inconvenient and expensive!

Vin, thanks for sharing more about your goals.   I essentially agree with LongHair's comments about fudging FasTrack, it depends.  For this size layout, to connect tracks in the real world, it's possible to make the joints fairly tight compared to what SCARM might indicate as one or two instances of +or - 1/8" discrepancies lengthwise.

When making tracks align in SCARM laterally and angularly, I prefer to find combinations that result in near perfect alignment.  Especially when working with different curve diameters in the same plan, trying different combinations of lengths and curve angles eventually results in alignment.

This all translates to SCARM settings as: Settings - Edit - Tolerances: Distance 0.15", Angle ~2.5 degrees

Something I use that speeds up this process is the attached spreadsheet.  Here's a sampling of what it looks like:

Screenshot 2021-11-01 224121

As far as your revised plan, I've worked on it a bit to improve the alignment, the biggest changes were substituting O72 RH Switches in place of O60's at the crossover and adding missing 1-3/8" isolation pieces at some of the switches.  The rest is just alignment and clearance related.  Note that in the image below, I've turned on the Show Roadbed feature in SCARM settings.  This makes it more obvious when adjacent tracks are too close or overlapping.  That was the case with the right hand spur in the yard on the right, so I substituted a O60 curve for the O72 just before the bumper.

Double Loop w Reverse and Sidings V1alt

When working with SCARM, I found it's online help combined with experimentation to be the best ways to learn.

Attachments

Last edited by SteveH

@SteveH. Another huge thank you for your time and effort.  Now I know the tolerances can be adjusted and that there’s a “show roadbed” option.  Definitely good things to know.  The tweaked plan looks great.  I’m anxious to download it to my laptop and take a closer look.

@Long Hair Thank you for the Fastrack tips    That makes sense that the bigger the layout the more flooding there is. Similar to using tubular track    I can see how this will get inconvenient and expensive quickly! I’m sure there wouldn’t be anything more frustrating than being so close to finishing a section of track and being short a handful of odd pieces.  A sharp hack was my best friend when I laid the tubular track for my other layouts. LOL

Love this forum!

Vin, I too have gotten frustrated running out of track pieces when finalizing a layout.  Since then, I've patiently looked for good deals and ordered more than I think I'll need.  I'll use the extras eventually.

If you're interested, here's a link to my next major layout plan.  Working on it helped me to become very familiar with SCARM and get some great advice here on OGR.

@VJandP posted:

@SteveH. Another huge thank you for your time and effort.  Now I know the tolerances can be adjusted and that there’s a “show roadbed” option.  Definitely good things to know.  The tweaked plan looks great.  I’m anxious to download it to my laptop and take a closer look.

@Long Hair Thank you for the Fastrack tips    That makes sense that the bigger the layout the more flooding there is. Similar to using tubular track    I can see how this will get inconvenient and expensive quickly! I’m sure there wouldn’t be anything more frustrating than being so close to finishing a section of track and being short a handful of odd pieces.  A sharp hack was my best friend when I laid the tubular track for my other layouts. LOL

Love this forum!

If you're w/in driving distance of an LHS, buy some product and make friends with the owner. If you're a good customer, they may let you buy more track and extra fitment pieces than you will need and then let you return what you don't use for a refund or store credit.   

@SteveH posted:

Vin, I too have gotten frustrated running out of track pieces when finalizing a layout.  Since then, I've patiently looked for good deals and ordered more than I think I'll need.  I'll use the extras eventually.

If you're interested, here's a link to my next major layout plan.  Working on it helped me to become very familiar with SCARM and get some great advice here on OGR.

Your plans look great.  I'll definitely be looking for inspiration on the next layout.

I've already scored some decent deals on eBay.  Most recently an estate sale of 120+ pieces of fast track, looked to be mostly 10" straight, a bunch of 30" straight, and a bunch of various misc sized straight pieces.  With shipping, it works out to about $3 on average for a section with the smaller sections being offset by the 30" pieces and a turn out or 2.

I suddenly need more storage . . . 

@VJandP posted:

Your plans look great.  I'll definitely be looking for inspiration on the next layout.

I've already scored some decent deals on eBay.  Most recently an estate sale of 120+ pieces of fast track, looked to be mostly 10" straight, a bunch of 30" straight, and a bunch of various misc sized straight pieces.  With shipping, it works out to about $3 on average for a section with the smaller sections being offset by the 30" pieces and a turn out or 2.

I suddenly need more storage . . . 

Thanks Vin.  It's was also an exercise in figuring out ways of using every type of FasTrack pieces available all together in the same layout. 

Sharing an update.   The space in the garage I have is limited and there are some restrictions like the **** pull down ladder above.  The first layout I posted was intended to be a table on casters so it could be pushed out of the way.  Then I thought about doing an L shape around the area where the ladder would drop.

What I've attached here is a potential alternative.  Problem is that it gives me barely 24" to maneuver in front of the workbench.  And the other thing I don't like, with it being so close to the ladder (it would unfold less than 12' ahead of the siding area) a rogue tote could fall off the ladder, which has happened before.

Overall I like the plan but this permanent table layout won't quite fit the bill.

What I did take away from it though is that I'm loosing the outer 072 loop of the first plan to save some space.  Thinking about what I want to do - learning about Lionel Legacy and wiring - I can save the "big engines" for the future layout in the new house.  I don't need to do too much too quickly.   I'll try to keep the outer loop 060 and will drop down to 048 for the inner loop and maybe 036 to incorporate a small yard.

A 12'x8' table on casters so it can be shifted out of the way sounds daunting but right now it's my best option for a decent size and to accommodate the space needed for other activities in the garage.  Still thinking on it.  We'll see what the next track plan looks like and what I want to prioritize and what I want to give up in this "temporary" layout.

Attachments

I have less space than you, but I gave up on 072 curves when planning as well.  My mainline is 054 and sidings are 042.  I like the second plan better than the one you first posted.  Yes, we all have to work with obstacles.  We have the pool down ladder to the attic in our hallway.  It is a pain to use, and certainly messes with you for layout planning.

O-60 switches have an unusual geometry.  Going from the end with the switch stand, out through the curved side, is the equivalent of one O60 curve plus two 1-3/8" straight sections.  This can be seen in the attached image where a O60 curve plus the two 1-3/8" straights are overlaid on top of an O60 switch with its included stock half roadbed pieces attached.

O60 Curve and 1-375 stacked on O60 SW w-markup

To use a O60 switch within a basic loop, two 1-3/8" pieces need to be added into the loop symmetrically in 3 locations (shown in orange) for the loop to line up.

60 48 Loops L Shaped V1altb BACKUP

The green pieces were changed to make it all fit.  The blue pieces were added to allow independent power control (toggle switches or other) of the individual spurs.

The revised SCARM file is attached.

Attachments

Last edited by SteveH

@SteveH Thank you for tweaking the track plan.   I keep forgetting about the insulating pieces.  In my brain I keep thinking old school and that I’m going to replace the center rail pin with an insulating nylon pin.  :-/

Thank you everyone for your ongoing input!

I’m working on 2 more track plans that I’ll share hopefully this week.   I’m experimenting with plans that have smaller radius curves so I can do more with the inner loop and adding yards and sidings.  Also, I'm playing around with a layout that I remember from a Train Store I frequented as a boy.

So many options

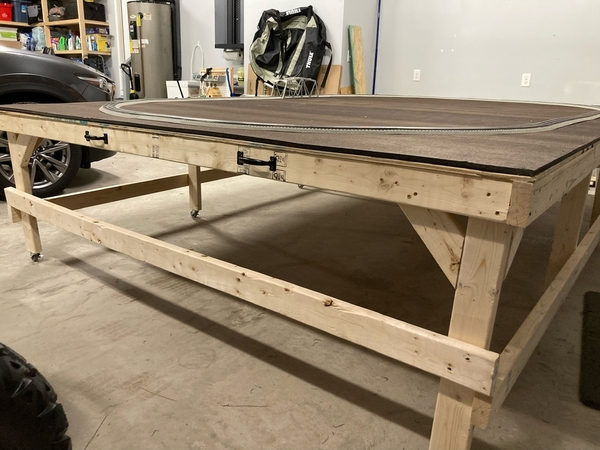
FINALLY !     Between work and holiday activities, haven’t had much time to make any progress. I spent some time in the garage this past weekend building the table -  12’x8’, on casters so it can easily be scooted around.   Immediately became a storage shelf but half of the boxes are things that I purchased for the layout. The rest of it is going to find a home elsewhere in the garage.

I bought some gate handles that I’ll put on the sides to make it easier to grasp when moving.  Plenty of 45° braces at the top of the legs but I’m going to add an extra piece around the bottom above the casters for additional support. Once I drop the sound deadening board on… I’ll be ready for track!

Speaking of track, I still haven’t finalized a plan for the table. But, temporarily I will be putting a couple of loops on just so I can set up a few things and start getting the hang of all this new equipment.

53EE0A14-7FB0-4533-A3B1-4901E7EBF68A

The below 2 pictures are some of my eBay acquisitions and an early Christmas gift to myself… the ZW-L     I’ve had pretty good luck finding a few items that I really wanted on eBay, I’ll share pictures and updates as I set things up.

The two acquisitions I‘m most excited about are 2 Conrail Lionmaster SD80MAC Diesels, #4100 and #4129.   One was still new in the box and the second was lightly used and well taken care of.   Ultimately I want to model 50s and 60s steam and diesel, but I had to have these Conrail locomotives. I grew up watching these blue behemoths pass through Erie, Pennsylvania streets.   Just taking them out of the box put a huge smile on my face. I can’t wait to fire them up, sound the horn, and watch the ditch lights flashing.

2621DDFE-FAB8-4F17-8769-4963EF04D6B8A207C535-8A1C-4712-AC3B-42E30305F36D

This last pic is what started it all. My wife got this Pennsylvania Flyer set for me for our anniversary a couple of months ago. This totally rekindled my flame for the hobby. At one point I told her… I don’t think you realize what you’ve unleashed. I think she does now, sort of… LOL. Wait until we get into the new house and I get my hands on that bonus room.

2CEA2445-5CB7-46F5-A63B-9293EA40AD2B

Attachments

Images (4)
  • 2CEA2445-5CB7-46F5-A63B-9293EA40AD2B
  • 53EE0A14-7FB0-4533-A3B1-4901E7EBF68A
  • 2621DDFE-FAB8-4F17-8769-4963EF04D6B8
  • A207C535-8A1C-4712-AC3B-42E30305F36D
Last edited by VJandP

Updated pic of the table. I added some extra bracing on the legs. Also added some gate handles on each side to make it easy to grab and manipulate. For as big as the table is, it rolls pretty easily on the casters… so much so, I have to make sure I keep the wheels locked or it’ll coast by itself due to the slope of the garage floor.  

You can see I also added the sound deadening board and last but not least, the inaugural loop of track!    I used the wall wart to power up and run the Pennsylvania Flyer around it, and it did fine. I thought it would lose steam, no pun intended, when it got to the far end of the loop but it did fine without having an additional power run connected.  

With some of the discussion I’ve seen about Fastrack, I was expecting lots of echo and vibration and for the sound of the train on the track to be very loud.  I didn’t think it was bad at all.  Granted I’m in a large garage and only had a few cars hooked up…. We’ll see what it sounds like when I get a few more trains going.

One thing I’ve learned already, 072 curves take up space fast! Ultimately, if I was going to be limited to a smaller layout, I would definitely stick with 060 or 048 and lesser diameters.  But for now, this layout is all about catching up and learning. Looking forward to setting up a few more loops and firing up the ZW-L.


0CFF4640-74F2-4313-B352-4FBEA301A475C8DA2B09-D766-4C18-8784-8A8EA11B0E29

Attachments

Images (2)
  • 0CFF4640-74F2-4313-B352-4FBEA301A475
  • C8DA2B09-D766-4C18-8784-8A8EA11B0E29

Add Reply

Post
The Track Planning and Layout Design Forum is sponsored by

AN OGR FORUM CHARTER SPONSOR

OGR Publishing, Inc., 1310 Eastside Centre Ct, Suite 6, Mountain Home, AR 72653
800-980-OGRR (6477)
www.ogaugerr.com

×
×
×
×
Link copied to your clipboard.
×
×