


 I inked the track plan for my existing layout for a magazine article and personal use. Getting the rails drawn correctly is kind of a pain. No wonder they do this digitally now.
I didn't do anything on my layout Saturday. I was busy putting together a recap of what I did on my layout for the last year.
51 photos, and a short video. You can read about it HERE.![]()
John Rowlen posted:Finally started placing buildings and accessories on the "Valley of Bridges" layout. I will mark the table for each building footprint, then drill holes for powering lights. I need to trim the upper ridgeline plywood back some more to allow for the hillside slope down to the "Village of Deichman". I also placed buildings in the industrial area, but this is subject to change as I build the elevated bridgework extension on the upper ridgeline reverse loop by the docks. After placing buildings, I will run wire to the Atlas O Signals on the upper ridgeline before I do the rock quarry wall, sealing some of the access to the wiring. I made more progress in the last two days, then in the last three months.
Attaboy!

Got the perfect graphic for that spur going into the cinderblock wall:

Mitch
Attachments
Images (1)

Been painting in the New Year!

The flatcar is for Santa! The Hudson will be going into a two-tone scheme similar to Lionel's "Blue Streak" or "Blue Comet" for Gi-raffe Express service. Incidentally, Rustoleum's "Brilliant Blue" is a pretty good match for the 3376/3386 giraffe cars...
Mitch
Attachments
Images (1)
p51 posted:
I am inking a track plan for my layout. Getting the rails drawn correctly is kind of a pain. No wonder they do this digitally now.
Your inking your track plan? I wouldn't think you are going to start over? I think it looks good, you can tell you took some time to do it.
theteejmiester posted:Thank you Mark.
What does the RS3 project entail? Well here is a run down lol.
First it is a older weaver model so,cracked gears replaced was the first thing.
Now what's left to finish.
All brass grab irons. Door handles. Stanchions,handrails and lift rings
Semi scratch built fuel tank.
P & D hobbies brass fan grill and fan.
Brass breather.
PSC exhaust stack
Brass sand fill hatches.
Detailed cab interior.
Brass horn and bracket.
New pilot details. Coupler lift bars. Mu hoses. Overland models plows.
Replace the brake cylinders on the trucks. Brake chain hanger and such for the trucks as well.
TMCC conversion and sound coming later.
P and D window kit. Wiper blades.
New dual sealed beam headlight castings.
Ditch lights. And of course paint and weathering. Still adding to the parts Pile so it may be a while longer till it's done. And who knows what else I will change.

Thank you. That is quite a project indeed! It will look and run great when finished!
HAPPY NEW YEAR ALL. Last night while the wife was switching between the Cavs and Ohio State I was laying out switches I had to see what I could come up with for a industrial area. Not 100% with the area but at least a start. I placed a couple of the buildings around to get an idea. If I stay with the track plan I may end up with different industries in some of the spots. Today will be working on this and seeing what switches and crossover I have to order. Some pics.......Paul


Attachments
Images (3)
Uploaded a video of my AF 326 Hudson engine after rebuilding the smoke unit. Now I need an exhaust fan!
. . . . . Click here

Attachments
Images (1)

thanks for sharing! runs like a swiss watch.
mike g. postedYour inking your track plan? I wouldn't think you are going to start over?
This is something I've been meaning to do for a long time.
I'm NOT starting over, this is the layout I have.
Eventually I'm going to scan it and play with it on Photoshop, adding colors and details.
p51 posted:
I like the intriguing design with the switching challenges.
pennsynut posted:I like the intriguing design with the switching challenges.
Sorry, I should have been more specific. This IS my layout, not a planned one. I edited my post to reflect that.
p51 posted:pennsynut posted:I like the intriguing design with the switching challenges.
Sorry, I should have been more specific. This IS my layout, not a planned one. I edited my post to reflect that.
Lee likes to put his carts before AND after his iron horses ![]()
Did you break out a "real" ink pen too?
No 3d SCARM version? ![]()
Adriatic posted:Sorry, I should have been more specific. This IS my layout, not a planned one. I edited my post to reflect that.
Did you break out a "real" ink pen too?
No 3d SCARM version?
Yep, all in ink.
The only computer use will be when I do coloring and lettering to this.
Last changes to the track plan are done to include doors, which I'd previously forgot...
I also oriented it correctly.
Attachments
Images (1)
Not a lot,,,,
I did order up post war axles and wheels to fix the slop jobs Lionel put in those celebration series blue stripe passenger cars and I also bought a ALCO frame and front truck so I can re-build the one I cannibalized to make the powered A- unit for the four-motor set. So, I am tapped out but will be able to keep working the hobby. 
Masked windows on a Walthers golden valley built up that I will paint. 88 pains, I mean panes. I also made walls for a 2.5 inch brick extension for a new Rico station to replace the freight part of the kit. The Rico station is going to be a restaurant. Here is the golden valley station.

Attachments
Images (1)
pennsynut posted:Masked windows on a Walthers golden valley built up that I will paint. 88 pains, I mean panes. I also made walls for a 2.5 inch brick extension for a new Rico station to replace the freight part of the kit. The Rico station is going to be a restaurant. Here is the golden valley station.
Looks good, but wow I bet that took some time to mask all the small windows!
Looks nice. I like the use of blue tape on the windows. Might try something similar on several of my buildings. I want to see your station when finished. I have a thing about RR stations. Have too many on my layout but would have more if there was room.
Started on the first building for my module. It's constructed out of foam core using my own grid style frame work to avoid any warping. All corners are finished using acrylic texture paste to avoid having any visible joints. Like I said I just started building it this afternoon so all the facade is just pinned in place for test fitting. But it's coming along well.
I forgot how fun it is to scratch build structures. Been over ten years since my last one!
Attachments
Images (1)
And it roughly in place on the module

Attachments
Images (1)
Mike G. It did take a couple of days working at the kitchen island with football games to ease the pain. Tonight I painted the inside and out with rattle can expresso brown. Fortunately, I remembered to mask the inside of the windows before I painted. Yikes, all that time cutting and fitting with a toothpick.
Jim Pastorious. I have a great affection for them as well. As I drive by homes in my area it is amazing how similar the basic architecture and detailing is to the small stations. I have an Atlas station in the town area of my layout and this one will be at the other end. I have decided to use a fine point red marker to color the mullions in the windows with the brown frame and detail. But I am still looking for acrylic depot buff in local stores to brush paint the rest of the building. There isin't much area left to paint after the windows, so rather than mask off the windows I will just use a fine brush. Your thoughts?
TJ. Nice clean work.
I have a video on stations and recently bought a book on them. Plus have checked out a bunch that are left in western Pa., especially the P&LE ones. Beautiful, functional buildings. The smaller, wooden ones are interesting, too. Not many of them left though.
The last thing I did last year was watch my C&O Berk crawl to a stop and too much smoke come out of the stack.
It had a fresh top off of fluid so I parked it and today I "took the day off" and did nothing, allowing some evaporation of the fluid. But its after midnight so I'm about to see what this things problem is ![]()
After 6 fast rounds of assembly and disassembly I was done with the Berk.,
I found the high heat cloth insulation had inched its way out of the smoke chambers lid and the wire was shorting on the lid. The excess smoke was from smoke fluid that had saturated the cloth insulation. I fed it back inside, and to stop the cloth from creeping I also fed an extra 3/8"-1/2" into the chamber. I bent the excess wire inside in a V; away from the tab and element, then back to the hole. Once out of the hole it bends in the opposite dirrection, sort of hooking on the lid. The length and "hook" should keep it from creeping out that far again. Time 45 min. +playtime ![]()
Adriatic posted:After 6 fast rounds of assembly and disassembly I was done with the Berk.,
I found the high heat cloth insulation had inched its way out of the smoke chambers lid and the wire was shorting on the lid. The excess smoke was from smoke fluid that had saturated the cloth insulation. I fed it back inside, and to stop the cloth from creeping I also fed an extra 3/8"-1/2" into the chamber. I bent the excess wire inside in a V; away from the tab and element, then back to the hole. Once out of the hole it bends in the opposite dirrection, sort of hooking on the lid. The length and "hook" should keep it from creeping out that far again. Time 45 min. +playtime
Attaboy! ![]()
theteejmiester posted:And it roughly in place on the module
Looking good TJ, What are you using for the roll up doors?
Mike,thank you. And as to your question... I am just scribbing the panels on foam core. I did two different panel spacings based on what I found online. Actually doesnt look bad surprisingly. Think with a little more work it will be convincing.
theteejmiester posted:Mike,thank you. And as to your question... I am just scribbing the panels on foam core. I did two different panel spacings based on what I found online. Actually doesnt look bad surprisingly. Think with a little more work it will be convincing.
Tj, thanks for the info, I think they look just fine, I might have to try that down the road.
Mark Boyce posted:I helped my daughter and son-in-law move almost everything left in her art studio on the rear of our house to their house last evening. I decided to take some photos of the room after I placed some trains on some shelves she left behind. Yes, the pink paint will be covered with blue. I plan to start a topic soon for layout planning for this 11' 6" x 11' 4" room. As the photos show, there is a door to the basement in one corner and a big sliding glass door on an adjacent wall. The brick wall was the exterior of the house before my in-laws put on the addition, and the washer and dryer are on the other side of the brick wall. The Ceiling Central RR is in the wood paneled room right outside the small door.
Mark, When you start the new thread on your layout, please post the link here or message it to me. I'm eager to follow your process!
So the 1:48 crew finished the cliff, no work place injuries reported...... the riggers are on the way to set it in place ![]()


Attachments
Images (5)


RSJB18, nice job with your cliff. I like the way it turned out. For me today it is back to the drawing board. The ideas I had for industries is not panning out in that area. My idea I am going to work with now is a small yard and maybe a small engine servicing area. I'll see how this will fit in after lunch.............Paul


Anthony K posted:I've had a bit of extra time over the holidays to work on my layout. I've been laying track, wiring, and testing DC
Looks like a place for unlimited fun. Enjoy.
frankM


Fixed one of my prized buildings that had a fluorescent light fall on it ![]()
Before:

After:

Attachments
Images (2)


The riggers finished up early and the MOW crew cleared the line for a test run. ![]()
![]() I was going to place a roadway bridge that I built in front onto the platform above the tunnel. Now that the cliff is done I don't want to block the view of it. Back to the drawing board again I guess.........
I was going to place a roadway bridge that I built in front onto the platform above the tunnel. Now that the cliff is done I don't want to block the view of it. Back to the drawing board again I guess.........![]()


Attachments
Images (3)


RSJB , lets see the arch in place. It may block the rock some, but the intricacy of the corner may win out. There's something to be said for contrasts in a small area. I thought the height build up was interesting too.
Sam..any lean will look prototypical, lol. But I'm sure your heart skipped a beat before it came crashing down. Its looking good from here.
Anthony....Wow! That's it, just wow. ![]()
John D. posted:Mark Boyce posted: I plan to start a topic soon for layout planning for this 11' 6" x 11' 4" room.
Mark, When you start the new thread on your layout, please post the link here or message it to me. I'm eager to follow your process!
Absolutely John!! I am so glad you are interested. I will put something out there on the FaceBook group for the North Penn O Gaugers too, since all of you have shared so much with me.
RSJB18 posted:The riggers finished up early and the MOW crew cleared the line for a test run.

It looks excellent!! Always glad to know no injuries were incurred!!
Moonson posted:Anthony K posted:I've had a bit of extra time over the holidays to work on my layout. I've been laying track, wiring, and testing DC
Looks like a place for unlimited fun. Enjoy.
frankM
Your layout is really taking shape Anthony!! Frank always says it so well!
What plans do you have for scenery around that big column in the middle of the big turn loop?
I finished the Ford Plant steps. The first three aisles of the layout have a raised floor that is a foot above the concrete, but aisle 4 doesn't. So I added two 8' x15" fold down platforms that are 15" high for operators to stand on.
Here are the completed steps.

The 1x4 at the bottom of the legs ties all three together and helps keep them from folding when in use.

Here's one of the steps in the up position.

The view from the step toward the plant.

Looking the other direction toward the St Paul Avenue overflow yard.

Attachments
Images (5)
A few beers and that step could be treacherous !!
I think its perfect for short folks like me!! Great work Elliot.
jim pastorius posted:A few beers and that step could be treacherous !!
Rule G Jim.![]()
Translation: railroad speak for no drinking on the job.
I was up there for a while, all 350 pounds of me. ![]() A less round person would do even better.
A less round person would do even better.
Some nice work guys. Your bench work is clean and tight. Today I worked on the arch area and placed the station with 2 cotes of expresso. I painted it last night so it should be cured tomorrow for some dull cote. Close up is a poor photo of an acrylic color I'm considering. In my light it is a yellow gold. The florescent light is really bright there. Tedious assembly work of a Lionel power house. Two of the walls were warped but I added some inside bracing to eliminate almost all of the warp on the problem wall.


BTW, I tried an ultra fine red marker on the window sashes of an Atlas tower. The trim is brown and it's difficult to pickup the red sashes. 
Attachments
Images (4)
Well tonight was a demolition and construction. Started off thinking I could take apart my IHC engine shed. Boy I was wrong. After all these years the glue I used bonded it together too well. Ended up losing most of the building. Managed to saved a few walls and some of the roof. Moving on from that I finally decided on a spot for the Sauerkraut Factory. I marked it out and glued down the cork roadbed. I went with track to both sides. One track will be for box cars or refrigerator cars the other track which will be just a short track will hold a K Line Vinegar car. Couple of pics...........Paul


Attachments
Images (4)
pennsynut posted:Some nice work guys. Your bench work is clean and tight. Today I worked on the arch area and placed the station with 2 cotes of expresso. I painted it last night so it should be cured tomorrow for some dull cote. Close up is a poor photo of an acrylic color I'm considering. In my light it is a yellow gold. The florescent light is really bright there. Tedious assembly work of a Lionel power house. Two of the walls were warped but I added some inside bracing to eliminate almost all of the warp on the problem wall.
BTW, I tried an ultra fine red marker on the window sashes of an Atlas tower. The trim is brown and it's difficult to pickup the red sashes.
I think the gold color looks wonderful, and maybe if you put a second coat of red on it stand out more. I sure hope you have the stairs for the second floor or its going to be one hell of a drop! LOL
paul 2 posted:Well tonight was a demolition and construction. Started off thinking I could take apart my IHC engine shed. Boy I was wrong. After all these years the glue I used bonded it together too well. Ended up losing most of the building. Managed to saved a few walls and some of the roof. Moving on from that I finally decided on a spot for the Sauerkraut Factory. I marked it out and glued down the cork roadbed. I went with track to both sides. One track will be for box cars or refrigerator cars the other track which will be just a short track will hold a K Line Vinegar car. Couple of pics...........Paul
Hey Paul, sorry about the shed, but you can always scratch build something if you cant put it back together. I like the new track work for the new building, I think it will look really nice once its done!
I've found heat to be an effective means of separating parts that are glued together. I use an RC airplane blower but a hair dryer may also work. The parts that I separated were wood so there is no affect from the heat, however, with plastic, one may need to be cautious on the amount of heat used.
KRM posted:Nothing on the layout but something on a layout project.
Got the last powered A-unit finished today from an idea of 8N's.
Great idea and makes for a great set.
Works Great but sure lets the ZW know it is feeding something with it and six lit passenger cars behind it..
I had a 218 shell on a frame with a 2 position e-unit motor in it that I pulled the motor, pick up truck and e-unit out of and installed the new motor, A unit dummy front truck and wired pigtails to the motor so it all runs off the E-unit in the lead engine. So there is 8 axles with magnets pulling. So a post war 218 leads the way for the twin motor 8021 B unit and 8020 powered A unit. Works GREAT!!!


that's a nice set I have the same but just the front one is powered I converted it over to TMCC then ran it awhile it now makes some noise out of the gears I think so I don't run it anymore until I find the issue


Attachments
Images (2)
ChessieMD posted:Spiked the track on my Rio Grande switching layout. Still have some plaster work, install the backdrop and then start scenic work. Overall a very productive 2016.
That's a pretty herky track screw for sure!
Adriatic posted:RSJB , lets see the arch in place. It may block the rock some, but the intricacy of the corner may win out. There's something to be said for contrasts in a small area. I thought the height build up was interesting too.
Sam..any lean will look prototypical, lol. But I'm sure your heart skipped a beat before it came crashing down. Its looking good from here.
Anthony....Wow! That's it, just wow.
Adriatic- I will set it in place later and post some pix this evening. I am open to suggestions so any assistance is appreciated.
Thanks
Here's the 2065 resplendent in its two-tone paint scheme!

Still have to paint the coal, install new headlight and marker lenses, and have custom decals made... ;-)
Mitch
Attachments
Images (1)
I have been working on a parking garage that will serve my Union Station and Greyhound Bus Depot. It started as a Korber power plant office building and I adapted it as a 3" deep backdrop building. Here are two pictures, one on the bench and another test fit in the space on the backdrop.
I am adding 4 more stories in a modern concrete style and have to make additional signage.
Art

Attachments
Images (2)
Chugman, Very Cool. ![]()
Chugman, looks great, you going to put ramps in?
mike g. posted:Chugman, looks great, you going to put ramps in?
Not between floors, but I will store cars on the floors in a random pattern that will be visible through the openings. It's only three inches deep so it is hard to do much on the inside.
Art
Chugman posted:mike g. posted:Chugman, looks great, you going to put ramps in?
Not between floors, but I will store cars on the floors in a random pattern that will be visible through the openings. It's only three inches deep so it is hard to do much on the inside.
Art
Still a great idea and a great build!
Today was a good day. No demolition. With the glue dry I applied paint to the cork. After letting that dry I put down the ballast. Having to let the glue dry I'll let it go the rest of today. I've also got to get some more Masonite so I can do behind the table. Got a Tuesday night train get together so really no time later. Few pics...................Paul


Attachments
Images (3)
looking good, Its getting there Paul!!!
M. Mitchell Marmel posted:Here's the 2065 resplendent in its two-tone paint scheme!
Still have to paint the coal, install new headlight and marker lenses, and have custom decals made... ;-)
Mitch
Yellow roof, brown hatch?
Yellow pilot??
Window frames????
Wheels??????
At least a yellow stripe or we might suspect a yellow streak!
(Ouch. But, it was there. I couldn't resist ![]() )
)
My like button is freaking out again. Looking good everyone.
I WILL hafta track down a small toy gi-raffe to act as engineer... ;-)
Mitch
A local antique store has two metal ones made by Brittain. Not cheap.
Chugman posted:I have been working on a parking garage that will serve my Union Station and Greyhound Bus Depot. It started as a Korber power plant office building and I adapted it as a 3" deep backdrop building. Here are two pictures, one on the bench and another test fit in the space on the backdrop.
I am adding 4 more stories in a modern concrete style and have to make additional signage.
Art
Art,
That looks terrific, nice work.
Mark Boyce posted:Moonson posted:Anthony K posted:I've had a bit of extra time over the holidays to work on my layout. I've been laying track, wiring, and testing DC
Looks like a place for unlimited fun. Enjoy.
frankM
Your layout is really taking shape Anthony!! Frank always says it so well!
What plans do you have for scenery around that big column in the middle of the big turn loop?
Thanks Frank, Adriatic, and Mark!
Mark- I'm thinking about bending a sheet of 1/4" Masonite (with a removable piece for the unfinished light switch) around the column to simulate the tracks going upgrade through a cut, much like the far side of the room. There will be some sort of scenic block in the center of that loop so that you can't see the train for more than half the loop from any angle. I ran my B&P GP"18" and caboose with a test train up through this new section. I'll have to dig out some of my other B&P engines for upcoming pics! I was in Butler Friday and saw four of the SD45-body units around the shop the 452, 457, 458, and 3064. It gave me inspiration to keep working.


Just got in from the clubhouse where we are making steady progress. Some time was spent building a step-up platform at the control panel to give a better overall view on the layout. Otherwise, work continues on the urban area where Harold is installing SuperStreets and the station platform is underway.
We have so much 'stuff' set in place that we haven't been able to do much actual test-running of trains. We are working on the 3rd level track and waiting for a case of roadbed to arrive before laying the track.


Attachments
Images (5)
Kerrigan posted:ChessieMD posted:Spiked the track on my Rio Grande switching layout. Still have some plaster work, install the backdrop and then start scenic work. Overall a very productive 2016.
That's a pretty herky track screw for sure!
Yea...indeed. I wanted something that would "grab" the cork and foam as it went into the scenery bed. So far so good. Track is rock solid.
Last night I cleaned of my #1 outer loop and decided to test run my larger Lionel PW steam engines because some seemed erratic. Discovered instead that, I think, i have some bad track with screwed up wiring. Seems loops #3 & #4 off my Z transfomer are goofed up so today a full analysis will be conducted.
Took a happy snap of my RailKing PTC PCC for the Facebook group:

Naturally, Norma Bates Kitteh decided to get in on the act:

"Believe it or not, I'm just waiting for a streetcar!" ![]()
Mitch
Attachments
Images (2)
Chugman posted:I have been working on a parking garage that will serve my Union Station and Greyhound Bus Depot. It started as a Korber power plant office building and I adapted it ...Art
Art, You sure did "adapt" that kit! Masterful! Clever, creative, and imaginative.
It reminds me of a parking garage that existed across the street from a Brooks Brothers store that was in Pittsburgh, years ago - very similar.
Cool!
FrankM
RSJB18 posted:Adriatic posted:RSJB , lets see the arch in place. It may block the rock some, but the intricacy of the corner may win out. There's something to be said for contrasts in a small area. I thought the height build up was interesting too.
Sam..any lean will look prototypical, lol. But I'm sure your heart skipped a beat before it came crashing down. Its looking good from here.
Anthony....Wow! That's it, just wow.
Adriatic- I will set it in place later and post some pix this evening. I am open to suggestions so any assistance is appreciated.
Thanks
OK Guys- here is the cliff with the bridge in front of it. My original plan was to have the bridge serve a small parking area for a station that I am going to build in back on the upper level between the main line and siding. My thought now is to make the platform area above the tunnel entrance a small park with picnic tables and swings, etc. I am open to suggestions.
Thanks


Attachments
Images (5)


RSJB18 posted:OK Guys- here is the cliff with the bridge in front of it.
Wow, that is really starting to look sharp. I really like your stone work!
RSJB18, the cliff looks great and as others have said the stone work is very good. I see what you want to do but to me the corner is crowded. From the pics it just seems like too much for the area.....Paul
I would have to agree with Paul. Excellent stone bridge covering part of the excellent rock cut is too much. I guess I'm saying 'less is more'
RSJB18. Neat bridge.
This morning I made a mockup of a freight house to see if I like the look of the ends, based on the photo of a Lackawanna freight house. There will be four garage size doors on the sides. The roof is left over from one of two Lionel loco sheds I kitbashed.


Attachments
Images (2)
Thanks for the feedback guys. I feel that it is too crowded with the bridge so I will leave it off for now.
A little secret- the "stone work" is printed images on card stock. ![]()
Anthony K posted:Mark Boyce posted:Moonson posted:Anthony K posted:I've had a bit of extra time over the holidays to work on my layout. I've been laying track, wiring, and testing DC
Looks like a place for unlimited fun. Enjoy.
frankM
Your layout is really taking shape Anthony!! Frank always says it so well!
What plans do you have for scenery around that big column in the middle of the big turn loop?
Thanks Frank, Adriatic, and Mark!
Mark- I'm thinking about bending a sheet of 1/4" Masonite (with a removable piece for the unfinished light switch) around the column to simulate the tracks going upgrade through a cut, much like the far side of the room. There will be some sort of scenic block in the center of that loop so that you can't see the train for more than half the loop from any angle. I ran my B&P GP"18" and caboose with a test train up through this new section. I'll have to dig out some of my other B&P engines for upcoming pics! I was in Butler Friday and saw four of the SD45-body units around the shop the 452, 457, 458, and 3064. It gave me inspiration to keep working.
That sounds like a good plan. I will look forward to seeing it take shape! The GP18 would be nice. Yes, you may see anything at the Butler service facility. That is good inspiration indeed!
RSJB18 posted:Thanks for the feedback guys. I feel that it is too crowded with the bridge so I will leave it off for now.
A little secret- the "stone work" is printed images on card stock.
You can get fabulous results with printed images!!
Good fun/work session this morning. Last night was a great train get together at Uncle Ray's. Along with getting my fixed engine I was able to get some more Gar Graves track pins, I always seem to run out of them, two Gar Graves track bumpers and a bottle of earth color. I got the sidings in for the Sauerkraut Factory. Put some cars around it. Brian, a first time especially for you. All four cars have never seen the rail LOL. After lunch I'll plaster the area around it and maybe make a small earth mound in front of the building. Pics of work.............Paul


Attachments
Images (6)
Looks Great Paul, Perfect location for just the right amount of cars!
paul 2 posted:Good fun/work session this morning. Last night was a great train get together at Uncle Ray's. Along with getting my fixed engine I was able to get some more Gar Graves track pins, I always seem to run out of them, two Gar Graves track bumpers and a bottle of earth color. I got the sidings in for the Sauerkraut Factory. Put some cars around it. Brian, a first time especially for you. All four cars have never seen the rail LOL. After lunch I'll plaster the area around it and maybe make a small earth mound in front of the building. Pics of work.............Paul
Looking good Paul. I love the Heinz cars! Nice touch.
The banjo signal got here today so I finished up the project.
140 Banjo Signal
145 Gateman
252 Crossing gate
Here is the finished "Action Corner" of the layout I did for grand-son Jordan. It is all run by a push button to give the three year old "the job" of being the Gateman. I think he will like it and know he don't care about the scale..LOL
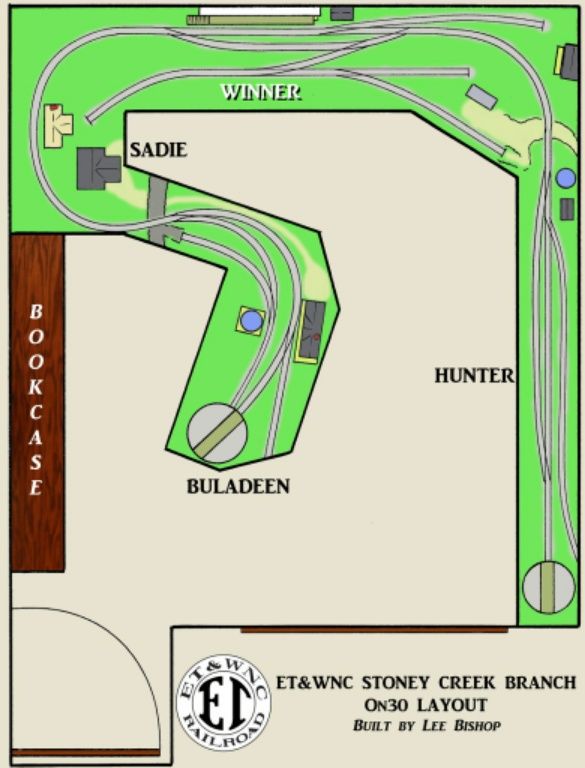
I drew out a track plan in ink, then scanned and colored it last night. I think it turned out okay. The reason this looks a tad blurry is that the original file is the size of a letter-sized sheet of paper and was made for a publication:
KRM posted:The banjo signal got here today so I finished up the project.
140 Banjo Signal
145 Gateman
252 Crossing gate
Here is the finished "Action Corner" of the layout I did for grand-son Jordan. It is all run by a push button to give the three year old "the job" of being the Gateman. I think he will like it and know he don't care about the scale..LOL
I think the action corner is a good deal for Jordan! Now you will need to come up the next action area for him! I have been collecting some accessories when I get a good deal for future grandchildren.
Thanks, Mark. It all started with a K-Line operating diesel fueling station I have that runs off a push button. It did not take long to figure out little ones have more fun if they are in control.. ![]()
KRM posted:Thanks, Mark. It all started with a K-Line operating diesel fueling station I have that runs off a push button. It did not take long to figure out little ones have more fun if they are in control..
LOL. That is right!
Straightened out my wiring and started to plan to install some new curve track on my Standard gauge loop. Bought some 042 curves today which will replace two 036 curves that have a short straight piece in the middle. These curves I bought were reasonably priced and heavy duty. I was surprised. Fixed a loose lock on too.
Yesterday, I had planned to get some work done on the layout, but mother nature intervened and dropped the outside temp well below freezing. That prompted my wife to say, "Let's defrost the freezer!", something she had been threatening for weeks. There went my day.
On the bright side, the mail lady brought me a couple boxes of goodies. I did get downstairs in the evening for a couple hours, and unpacked the new items and a couple more I got a few weeks ago.
I give you "The Rainbow"!
The concept for the train came from this print by railroad artist Larry Fisher. It is an early Amtrak Empire Builder made of a colorful hodgepodge of of equipment.

This is what I've come up with so far.

An Atlas Amtrak dorm - buffet -lounge dome.

Another Atlas, 16 section sleeper.

K-line GN Big Sky blue dome.

A K-line Milwaukee Road diner.

And a K-line GN BSB full dome. This one required a little of my attention when I got it out of the box. One of the inboard wheel sets was rolling around loose. On closer inspection, the side frame was slightly bent. A few gentle squeezes with my big Channel-Locs took care of that. Then the wire going to the roller had broken. Fixed that too, and all was right with the world!

Fedex just brought me car number six a few minutes ago. That's the third and final K-line GN BSB car, a Pullman.
I'm still waiting on two more cars from GGD. A CB&Q duplex sleeper and a GN green and orange coach. That will bring the total to eight. I'll still need two more cars, but they will need custom paint. The train still needs a baggage car, and probably another coach. One will get BN Cascade Green, the other NP two tone green. The whole thing will be pulled by the new Atlas F-7's in Amtrak paint, just like the one in the print, powered A and B. I'm thinking of adding a K-line dummy B to that as well.![]()
EDIT: Not even 10 minutes after posting this UPS showed up bearing gifts from GGD. More pics later.![]()
Attachments
Images (7)
ChessieMD posted:Kerrigan posted:ChessieMD posted:Spiked the track on my Rio Grande switching layout. Still have some plaster work, install the backdrop and then start scenic work. Overall a very productive 2016.
That's a pretty herky track screw for sure!
Yea...indeed. I wanted something that would "grab" the cork and foam as it went into the scenery bed. So far so good. Track is rock solid.
I use screws just long enough to go through the tie and get a good grab on the Homosote roadbed without going in far enough to touch the plywood subroadbed. Makes it a lot quieter without touching the "soundboard" plywood base.
Unpacked the latest order from ROSS Switches.
Gotta say these switches look even better than the older ones I've in place!
With tracks in place I took some pink board and made up a small hill in the front of the building. I decided on this layout that I am going to keep scenery on the small side. No mountains or cliffs just small knolls scattered around the layout. I decided this one was going to be more city, industrial areas, grain silos and a couple of freight yards with a small engine servicing facility. So with the first one in and plaster wrap applied that's it till after dinner. I am hoping the wrap will be set up enough because I would like to put down some plaster on the bare wood and if possible the knoll too.......Paul


Attachments
Images (2)
p51 posted:I drew out a track plan in ink, then scanned and colored it last night. I think it turned out okay. The reason this looks a tad blurry is that the original file is the size of a letter-sized sheet of paper and was made for a publication:
Nice job Lee, You could have your self a second job with these skills!
This afternoon I finished except for weathering, a Lionel power house. I masked tried my golden valley depot and tested rustoleum warm camel on my test box. I liked the color and need variety on my building colors. The color is slightly more brown than the photo. My next color challenge is the Rico station, w/o the freight part. The green molding pieces intrigue me but trim color, don't know other than white. Tomorrow I might begin a brick paper on masonite freight building while I think about Rico colors. I really enjoy this thread. It helps stimulate me to move forward and of course I get some great ideas. Cheers.


Attachments
Images (2)
pennsynut posted:This afternoon I finished except for weathering, a Lionel power house. I masked tried my golden valley depot and tested rustoleum warm camel on my test box. I liked the color and need variety on my building colors. The color is slightly more brown than the photo. My next color challenge is the Rico station, w/o the freight part. The green molding pieces intrigue me but trim color, don't know other than white. Tomorrow I might begin a brick paper on masonite freight building while I think about Rico colors. I really enjoy this thread. It helps stimulate me to move forward and of course I get some great ideas. Cheers.
Keep them coming, you do wonderful work and I love to see what you put up next!!!
mike g. posted:p51 posted:
Nice job Lee, You could have your self a second job with these skills!
Thanks, Mike. Actually, I was a professional illustrator for several years out of high school. I even have a commercial art degree, from when everything was still hand-rendered (MacIntosh computers had just come out then and while we were using them for easy lettering, nobody knew how best to use them yet at that time).
The first lesson they should teach you in art school, though, is that nobody wants to pay you for your work. People recognize the finished product as having a value, but not the effort to create it. Same as musicians and singers, people don't see the time and effort having value.
I still draw from time to time and am currently putting together a book of my work from 1985 to today, but I have other projects to work on first.
Very cool Lee, Its amazing what you learn about people and how they have gotten there skills. As for me its wood working, from building houses right out of the Corps to building little bird houses for the grandbabies. I guess that's why I enjoy building things from scratch for my future railroad.
But again Great work Lee!!!![]()
Lee,
You are right! One of our daughters is an artist, the other is a musician. One son-in-law is a graphic designer, the other is a videographer. All that talent, but since they are aged 23 to 26, hopefully some of them will learn how to get paid a reasonable amount for their work someday. ??
Thanks Mike. I removed the masking tape except for the panes because in a couple of days I will dull cote the depot and attach the small roof over the ticket office and the main roof. The color of the brick apron was too close to the building color so I painted it red rust primer followed with flat black over spray. The photo shows it with an old left over roof. The photo color doesn't do justice to the real color imo.
Got to get going on the freight house while think about paint color for the Rico restaurant.
Attachments
Images (1)
Big_Boy_4005 posted:Yesterday, I had planned to get some work done on the layout, but mother nature intervened and dropped the outside temp well below freezing. That prompted my wife to say, "Let's defrost the freezer!", something she had been threatening for weeks. There went my day.
On the bright side, the mail lady brought me a couple boxes of goodies. I did get downstairs in the evening for a couple hours, and unpacked the new items and a couple more I got a few weeks ago.
I give you "The Rainbow"!
The concept for the train came from this print by railroad artist Larry Fisher. It is an early Amtrak Empire Builder made of a colorful hodgepodge of of equipment.
This is what I've come up with so far.
An Atlas Amtrak dorm - buffet -lounge dome.
Another Atlas, 16 section sleeper.
K-line GN Big Sky blue dome.
A K-line Milwaukee Road diner.
And a K-line GN BSB full dome. This one required a little of my attention when I got it out of the box. One of the inboard wheel sets was rolling around loose. On closer inspection, the side frame was slightly bent. A few gentle squeezes with my big Channel-Locs took care of that. Then the wire going to the roller had broken. Fixed that too, and all was right with the world!
Fedex just brought me car number six a few minutes ago. That's the third and final K-line GN BSB car, a Pullman.
I'm still waiting on two more cars from GGD. A CB&Q duplex sleeper and a GN green and orange coach. That will bring the total to eight. I'll still need two more cars, but they will need custom paint. The train still needs a baggage car, and probably another coach. One will get BN Cascade Green, the other NP two tone green. The whole thing will be pulled by the new Atlas F-7's in Amtrak paint, just like the one in the print, powered A and B. I'm thinking of adding a K-line dummy B to that as well.
EDIT: Not even 10 minutes after posting this UPS showed up bearing gifts from GGD. More pics later.
Looking good, Eliott. I'm waiting on sets of the same locomotives to which I will add a couple of rainbow "Bs" and a mix of cars to create similar consists. I picked up a video a while back showing just such a "Builder" in action. As I'm sure you do as well, I remember seeing and even riding on trains out of Minneapolis configured this way back in the day.
Add Reply
Sign In To Reply
